Instruction Manual
Page 5
... i PRECAUTIONS ii SUPPLIED ACCESSORIES iii TABLE OF CONTENTS iv QUICK REFERENCE GUIDE I-XIV ■ Installation I ■ Your first contact X ■ Repeater operation XII ■ Programming memory channels XIII 1 PANEL DESCRIPTION 1-14 ■ Front panel- controller 1 ■ Function display 3 ■ Function guide indications 7 ■ Main unit 9 ■ Microphone (HM-133 11...
... i PRECAUTIONS ii SUPPLIED ACCESSORIES iii TABLE OF CONTENTS iv QUICK REFERENCE GUIDE I-XIV ■ Installation I ■ Your first contact X ■ Repeater operation XII ■ Programming memory channels XIII 1 PANEL DESCRIPTION 1-14 ■ Front panel- controller 1 ■ Function display 3 ■ Function guide indications 7 ■ Main unit 9 ■ Microphone (HM-133 11...
Instruction Manual
Page 6
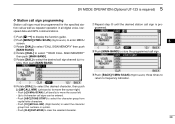
TABLE OF CONTENTS 5 DV MODE OPERATION (Optional UT-123 is required) ..... 36-60 ■ Digital mode operation 36 ■ Call sign programming 36 ■ Digital voice mode operation 39 ■ About D-STAR system 41 ■ Digital repeater operation 42 ■ Received call sign 47 &#...channel setting 79 9 PRIORITY WATCH 80-81 ■ Priority watch types 80 ■ Priority watch operation 81 10 DTMF MEMORY ENCODER 82-85 ■ Programming a DTMF tone sequence 82 ■ Transmitting a DTMF tone sequence 83 ■ DTMF speed 85 11 TONE SQUELCH AND POCKET BEEP 86-91 ■ ...
TABLE OF CONTENTS 5 DV MODE OPERATION (Optional UT-123 is required) ..... 36-60 ■ Digital mode operation 36 ■ Call sign programming 36 ■ Digital voice mode operation 39 ■ About D-STAR system 41 ■ Digital repeater operation 42 ■ Received call sign 47 &#...channel setting 79 9 PRIORITY WATCH 80-81 ■ Priority watch types 80 ■ Priority watch operation 81 10 DTMF MEMORY ENCODER 82-85 ■ Programming a DTMF tone sequence 82 ■ Transmitting a DTMF tone sequence 83 ■ DTMF speed 85 11 TONE SQUELCH AND POCKET BEEP 86-91 ■ ...

Instruction Manual
Page 7
12 PAGER/CODE SQUELCH 92-95 ■ Pager function 92 ■ Code programming 92 ■ Pager operation 94 ■ Code squelch 95 13 EXTERNAL DTMF REMOTE 96-97 14 MENU SCREEN OPERATION 98-114 ■ General 98 ■ ...
12 PAGER/CODE SQUELCH 92-95 ■ Pager function 92 ■ Code programming 92 ■ Pager operation 94 ■ Code squelch 95 13 EXTERNAL DTMF REMOTE 96-97 14 MENU SCREEN OPERATION 98-114 ■ General 98 ■ ...
Instruction Manual
Page 20
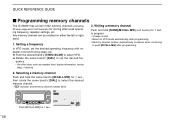
... Push and hold the same band's [M/CALL•MW] for 1 sec. to program. • 3 beeps sound • Return to VFO mode automatically after programming. 2. QUICK REFERENCE GUIDE ■ Programming memory channels The IC-2820H has a total of 522 memory channels (including 20 scan edge and 2 call channels...CALL•MW) (Left band's) for 1 sec., then rotate the same band's [DIAL] to push [M/CALL•MW] after programming. • Memory channel number automatically increases when continuing to select the desired memory channel. • "X" indicator and memory channel number ...
... Push and hold the same band's [M/CALL•MW] for 1 sec. to program. • 3 beeps sound • Return to VFO mode automatically after programming. 2. QUICK REFERENCE GUIDE ■ Programming memory channels The IC-2820H has a total of 522 memory channels (including 20 scan edge and 2 call channels...CALL•MW) (Left band's) for 1 sec., then rotate the same band's [DIAL] to push [M/CALL•MW] after programming. • Memory channel number automatically increases when continuing to select the desired memory channel. • "X" indicator and memory channel number ...

Instruction Manual
Page 21
... offset direction, tone settings, etc. ➥ Push [VFO/LOCK] to select VFO mode, then set the de- ing step, if necessary. ing to program. to push [CLR A(MW)] after programming. ating frequency via the keypad. rPush [FUNC] then push and hold [CLR A(MW)] for 1 sec. Using the HM-133 q Push [MR/CALL...
... offset direction, tone settings, etc. ➥ Push [VFO/LOCK] to select VFO mode, then set the de- ing step, if necessary. ing to program. to push [CLR A(MW)] after programming. ating frequency via the keypad. rPush [FUNC] then push and hold [CLR A(MW)] for 1 sec. Using the HM-133 q Push [MR/CALL...
Instruction Manual
Page 23
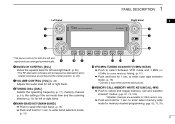
... SCAN 8 *The same controls for both the left and right bands are available for USA version only. 16 ➥ Push and hold for memory channel programming. (pgs. 62, 73, 76) 18 19 2
... SCAN 8 *The same controls for both the left and right bands are available for USA version only. 16 ➥ Push and hold for memory channel programming. (pgs. 62, 73, 76) 18 19 2

Instruction Manual
Page 24
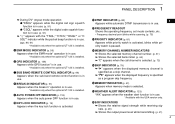
.... q OPERATING MODE INDICATOR (p. 21) Shows the selected operating mode. • FM, FM-N, AM, AM-N and DV* are arranged. e NAME INDICATOR During memory mode operation, the programmed memory or memory bank name is in use . (p. 87) 3 r TONE INDICATOR ➥ During FM mode operation: ● "TONE" appears while the repeater tone is in...
.... q OPERATING MODE INDICATOR (p. 21) Shows the selected operating mode. • FM, FM-N, AM, AM-N and DV* are arranged. e NAME INDICATOR During memory mode operation, the programmed memory or memory bank name is in use . (p. 87) 3 r TONE INDICATOR ➥ During FM mode operation: ● "TONE" appears while the repeater tone is in...
Instruction Manual
Page 25
... the displayed memory channel is specified as a skip channel. 11 ➥ "P≈" appears when the displayed frequency is specified 12 as a program skip frequency. 13 !6 MEMORY INDICATOR (p. 61) Appears when memory mode is selected. 14 !7 WEATHER ALERT INDICATOR (p. 123) 15 "WX" appears when the weather alert function...
... the displayed memory channel is specified as a skip channel. 11 ➥ "P≈" appears when the displayed frequency is specified 12 as a program skip frequency. 13 !6 MEMORY INDICATOR (p. 61) Appears when memory mode is selected. 14 !7 WEATHER ALERT INDICATOR (p. 123) 15 "WX" appears when the weather alert function...

Instruction Manual
Page 28
... the single band operation mode. • Push [DUAL](M/CALL•MW)(for the selected memory channel. • "≈" appears when memory skip, "P≈" appears when program skip selection. y SINGLE WATCH KEY [SNGL](M/CALL•MW) (p. 25) Push to select the dualwatch mode. able. *Not selectable in main band. *Available only when...
... the single band operation mode. • Push [DUAL](M/CALL•MW)(for the selected memory channel. • "≈" appears when memory skip, "P≈" appears when program skip selection. y SINGLE WATCH KEY [SNGL](M/CALL•MW) (p. 25) Push to select the dualwatch mode. able. *Not selectable in main band. *Available only when...

Instruction Manual
Page 32
...) ➥ Push and hold for the main band only. All keys on version. u 2nd FUNCTION KEY [FUNC] i DTMF SELECT KEY [DTMF-S] (p. 84) o FUNCTION KEYS [F-1]/[F-2] (p. 115) Program and recall your desired transceiver configuration. !0 BAND KEY [BAND] (p. 15) Push to select main band between transmitting and receiving while the one -touch...
...) ➥ Push and hold for the main band only. All keys on version. u 2nd FUNCTION KEY [FUNC] i DTMF SELECT KEY [DTMF-S] (p. 84) o FUNCTION KEYS [F-1]/[F-2] (p. 115) Program and recall your desired transceiver configuration. !0 BAND KEY [BAND] (p. 15) Push to select main band between transmitting and receiving while the one -touch...

Instruction Manual
Page 48
...; ] [DIAL] Frequency marker [SCP] [CLR] [CENT] 27 About the sweep steps: The specified tuning step in each frequency band (in VFO mode) or programmed tuning step (in memory mode) is used during sweep. 3 BASIC OPERATION ■ Audio mute function This function temporarily mutes the audio without disturbing the volume...
...; ] [DIAL] Frequency marker [SCP] [CLR] [CENT] 27 About the sweep steps: The specified tuning step in each frequency band (in VFO mode) or programmed tuning step (in memory mode) is used during sweep. 3 BASIC OPERATION ■ Audio mute function This function temporarily mutes the audio without disturbing the volume...
Instruction Manual
Page 57
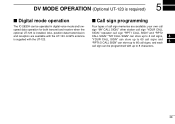
... 60 call signs, and each 5 call sign can be programmed with the UT-123. ■ Call sign programming 1 Four types of call sign memories are available with the UT-123. DV MODE OPERATION (Optional UT-123 is required) 5 ■ Digital mode operation The IC-2820H can be operated in digital voice mode and lowspeed...
... 60 call signs, and each 5 call sign can be programmed with the UT-123. ■ Call sign programming 1 Four types of call sign memories are available with the UT-123. DV MODE OPERATION (Optional UT-123 is required) 5 ■ Digital mode operation The IC-2820H can be operated in digital voice mode and lowspeed...
Instruction Manual
Page 58
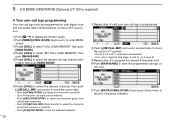
...tRotate [DIAL] to step !0. 5 DV MODE OPERATION (Optional UT-123 is programmed. u Repeat step y until your own call sign is required) D Your own call sign programming Your own call sign must be programmed for both digital voice and low-speed data communications (including GPS transmission). yRotate [...MEMORY" then push [MAIN•BAND]. rRotate [DIAL] to display the function guide. o Repeat step y to program the desired 4-character note. !0Push [MAIN•BAND] to store the programmed call sign channel (M01 to move the cursor right. • Push [ iPush [>](M/CALL•MW) (Left...
...tRotate [DIAL] to step !0. 5 DV MODE OPERATION (Optional UT-123 is programmed. u Repeat step y until your own call sign is required) D Your own call sign programming Your own call sign must be programmed for both digital voice and low-speed data communications (including GPS transmission). yRotate [...MEMORY" then push [MAIN•BAND]. rRotate [DIAL] to display the function guide. o Repeat step y to program the desired 4-character note. !0Push [MAIN•BAND] to store the programmed call sign channel (M01 to move the cursor right. • Push [ iPush [>](M/CALL•MW) (Left...
Instruction Manual
Page 59
5 DV MODE OPERATION (Optional UT-123 is required) D Station call sign programming Station call signs must be programmed for the specified station call sign channel (U01 to display the function guide. rRotate [DIAL] to select "CALL SIGN MEMORY" then push [MAIN&#...
5 DV MODE OPERATION (Optional UT-123 is required) D Station call sign programming Station call signs must be programmed for the specified station call sign channel (U01 to display the function guide. rRotate [DIAL] to select "CALL SIGN MEMORY" then push [MAIN&#...

Instruction Manual
Page 60
One of "White Noise." See page 47 for your own call sign programming details. z Push [F• ] twice to transmit and speak into the received call record automatically. Changing the squelch setting will be received. • Received call signs ...
One of "White Noise." See page 47 for your own call sign programming details. z Push [F• ] twice to transmit and speak into the received call record automatically. Changing the squelch setting will be received. • Received call signs ...

Instruction Manual
Page 61
...SCAN) (Right band's) to set with the EDIT RECORD 7 (p. 104). 8 zWhile displaying "CALL SIGN" screen, rotate [DIAL] to over-write a programmed call sign in regular memory and call 5 channels. (Temporary operation without over-writing is possible.) 6 However, the edited call sign can store into a ...blank channel automatically when "AUTO" is set the station's call sign programming details. D When sending a CQ Continued instruction from step v on page 39. nPush [BACK](V/MHz•SCAN) (Right band's) to return to...
...SCAN) (Right band's) to set with the EDIT RECORD 7 (p. 104). 8 zWhile displaying "CALL SIGN" screen, rotate [DIAL] to over-write a programmed call sign in regular memory and call 5 channels. (Temporary operation without over-writing is possible.) 6 However, the edited call sign can store into a ...blank channel automatically when "AUTO" is set the station's call sign programming details. D When sending a CQ Continued instruction from step v on page 39. nPush [BACK](V/MHz•SCAN) (Right band's) to return to...

Instruction Manual
Page 63
D Repeater call sign programming q Push [F• ] to select "CALL SIGN MEMORY" then push [MAIN•BAND]. eRotate [DIAL] to display the function guide. rRotate [DIAL] to enter MENU screen. w ...•SCAN) (Right band's) to select "RPT CALL SIGN MEMORY" then push [MAIN•BAND]. tRotate [DIAL] to select the desired call signs must be programmed for repeater operation in both digital voice and low-speed data communications. 5 DV MODE OPERATION (Optional UT-123 is required) ■ Digital repeater operation Repeater...
D Repeater call sign programming q Push [F• ] to select "CALL SIGN MEMORY" then push [MAIN•BAND]. eRotate [DIAL] to display the function guide. rRotate [DIAL] to enter MENU screen. w ...•SCAN) (Right band's) to select "RPT CALL SIGN MEMORY" then push [MAIN•BAND]. tRotate [DIAL] to select the desired call signs must be programmed for repeater operation in both digital voice and low-speed data communications. 5 DV MODE OPERATION (Optional UT-123 is required) ■ Digital repeater operation Repeater...

Instruction Manual
Page 64
... [DIAL] to display the "CALL SIGN" screen. e Set the desired station call sign. (p. 40) • See p. 38 for your own call sign programming. nRotate [DIAL] to select the desired repeater's (in advance. (p. 21) w Set your own call sign. (p. 39) • See p. 37 for station... call sign as follows; bRotate [DIAL] to receive. r Set the repeater's call sign programming. release to select "RPT2" then push [MAIN•BAND]. • RPT2 CALL SIGN screen is displayed. z Push [F• ] twice to select the nearest ...
... [DIAL] to display the "CALL SIGN" screen. e Set the desired station call sign. (p. 40) • See p. 38 for your own call sign programming. nRotate [DIAL] to select the desired repeater's (in advance. (p. 21) w Set your own call sign. (p. 39) • See p. 37 for station... call sign as follows; bRotate [DIAL] to receive. r Set the repeater's call sign programming. release to select "RPT2" then push [MAIN•BAND]. • RPT2 CALL SIGN screen is displayed. z Push [F• ] twice to select the nearest ...

Instruction Manual
Page 66
...setting. mPush [BACK](V/MHz•SCAN) (Right band's) to transmit; vRotate [DIAL] to receive. 45 release to select the nearest repeater's call sign programming. z Push [F• ] twice to select "RPT2" then push [MAIN•BAND]. • RPT2 CALL SIGN screen is displayed. bRotate [DIAL]... • See p. 37 for station call sign then push [BACK](V/MHz) (Right band's). • If the nearest repeater is a gateway repeater, program the re- 5 DV MODE OPERATION (Optional UT-123 is required) D Repeater operation into "YOUR." The symbol "/" which stands for "CQCQCQ" is ...
...setting. mPush [BACK](V/MHz•SCAN) (Right band's) to transmit; vRotate [DIAL] to receive. 45 release to select the nearest repeater's call sign programming. z Push [F• ] twice to select "RPT2" then push [MAIN•BAND]. • RPT2 CALL SIGN screen is displayed. bRotate [DIAL]... • See p. 37 for station call sign then push [BACK](V/MHz) (Right band's). • If the nearest repeater is a gateway repeater, program the re- 5 DV MODE OPERATION (Optional UT-123 is required) D Repeater operation into "YOUR." The symbol "/" which stands for "CQCQCQ" is ...

Instruction Manual
Page 70
...; • Push [ NOTE: Make sure that the "EDIT RECORD" item in DV set mode is selected. t Push [MAIN•BAND]. • The selected call sign programming mode is set to "AUTO" in advance. (p. 104) q Push [F• ] twice to select "YOUR" or "RPT1/2" then push [MAIN•BAND]. yEdit or modify the...
...; • Push [ NOTE: Make sure that the "EDIT RECORD" item in DV set mode is selected. t Push [MAIN•BAND]. • The selected call sign programming mode is set to "AUTO" in advance. (p. 104) q Push [F• ] twice to select "YOUR" or "RPT1/2" then push [MAIN•BAND]. yEdit or modify the...


