
Product Manual
Page 1
HD AVS Standalone DVR User's Manual V1.0.1
HD AVS Standalone DVR User's Manual V1.0.1

Product Manual
Page 3
... CONTROLS 21 4.1 Boot up and Shutdown ...21 4.1.1 4.1.2 4.1.3 4.1.4 Boot up ...21 Shutdown ...21 Auto Resume after Power Failure 21 Replace Button Battery 21 4.2 Startup Wizard...22 4.3 Manual Record ...25 4.3.1 Live Viewing ...25 4.4 Right-Click Menu ...27 ii
... CONTROLS 21 4.1 Boot up and Shutdown ...21 4.1.1 4.1.2 4.1.3 4.1.4 Boot up ...21 Shutdown ...21 Auto Resume after Power Failure 21 Replace Button Battery 21 4.2 Startup Wizard...22 4.3 Manual Record ...25 4.3.1 Live Viewing ...25 4.4 Right-Click Menu ...27 ii

Product Manual
Page 8
vii Before installation and operation please read the following safeguards and warnings carefully! Here you for the installation and operation of your system. This user's manual is designed to be a reference tool for purchasing our HD AVS DVR! Welcome Thank you can find information about this series hybrid standalone DVR features and functions, as well as a detailed menu tree.
vii Before installation and operation please read the following safeguards and warnings carefully! Here you for the installation and operation of your system. This user's manual is designed to be a reference tool for purchasing our HD AVS DVR! Welcome Thank you can find information about this series hybrid standalone DVR features and functions, as well as a detailed menu tree.
Product Manual
Page 12
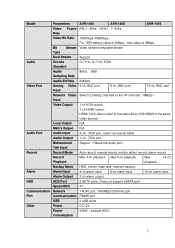
... Communication RS485 port USB 2 USB ports Other Power DC12V Power ≤30W(exclude HDD) Consumption 3 Model Parameters AVR-1404 AVR-1408 AVR-1416 Video Frame PAL:1~25f/s;NTSC:1~30f/s Rate Video Bit Rate 1536Kbps-4096Kbps, For 720P:default value is 2Mbps...cable Audio Output 1-ch,RCA port Bidirectional Support(Reuse the audio port) Talk Input Record Record Mode Auto record, manual record, motion detect record, alarm record Record Max 4-ch playback Max 8-ch playback Max 16-ch Playback playback Backup Mode HDD, ...
... Communication RS485 port USB 2 USB ports Other Power DC12V Power ≤30W(exclude HDD) Consumption 3 Model Parameters AVR-1404 AVR-1408 AVR-1416 Video Frame PAL:1~25f/s;NTSC:1~30f/s Rate Video Bit Rate 1536Kbps-4096Kbps, For 720P:default value is 2Mbps...cable Audio Output 1-ch,RCA port Bidirectional Support(Reuse the audio port) Talk Input Record Record Mode Auto record, manual record, motion detect record, alarm record Record Max 4-ch playback Max 8-ch playback Max 16-ch Playback playback Backup Mode HDD, ...
Product Manual
Page 14
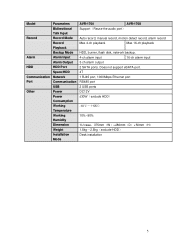
...(H) Weight 1.5kg~2.5kg(exclude HDD) Installation Desk installation Mode 5 Model Parameters AVR-1704 AVR-1708 Bidirectional Support(Reuse the audio port) Talk Input Record Record Mode Auto record, manual record, motion detect record, alarm record Record Max 4-ch playback Max 16-ch playback Playback Backup Mode...
...(H) Weight 1.5kg~2.5kg(exclude HDD) Installation Desk installation Mode 5 Model Parameters AVR-1704 AVR-1708 Bidirectional Support(Reuse the audio port) Talk Input Record Record Mode Auto record, manual record, motion detect record, alarm record Record Max 4-ch playback Max 16-ch playback Playback Backup Mode...

Product Manual
Page 15
... or shut down . Assistant function such as below. In text mode, input number 8 (English character T/U/V). 6 Confirm current operation Go to default button Go to menu Manually stop/start recording, working with direction keys or numeral keys to previous menu, or cancel current operation. Name Icon Function Power button Power button, press...
... or shut down . Assistant function such as below. In text mode, input number 8 (English character T/U/V). 6 Confirm current operation Go to default button Go to menu Manually stop/start recording, working with direction keys or numeral keys to previous menu, or cancel current operation. Name Icon Function Power button Power button, press...

Product Manual
Page 21
...to realize normal playback. Go back to previous menu or 9 cancel current operation (close upper interface or control) 10 Record Start or stop record manually In record interface, working with the direction buttons to select the record channel. In playback mode, it to delete character. 15 0-9 number key... multiple-window and one-window. 14 Fn In 1-ch monitor mode: pop up password input dialogue box if you can go to the Manual Record interface. 11 Direction keys Switch current activated control, go to control the playback process bar. Shift is to the main menu. 12...
...to realize normal playback. Go back to previous menu or 9 cancel current operation (close upper interface or control) 10 Record Start or stop record manually In record interface, working with the direction buttons to select the record channel. In playback mode, it to delete character. 15 0-9 number key... multiple-window and one-window. 14 Fn In 1-ch monitor mode: pop up password input dialogue box if you can go to the Manual Record interface. 11 Direction keys Switch current activated control, go to control the playback process bar. Shift is to the main menu. 12...

Product Manual
Page 34
... window No. If you want to change system date and time, you logged in, the system is complete. wizard is in live viewing mode. Figure 4-6 4.3 Manual Record 4.3.1 Live Viewing After you can playback previous 5-60 minutes record of one analog channel and one digital channel. You can not switch position of...
... window No. If you want to change system date and time, you logged in, the system is complete. wizard is in live viewing mode. Figure 4-6 4.3 Manual Record 4.3.1 Live Viewing After you can playback previous 5-60 minutes record of one analog channel and one digital channel. You can not switch position of...

Product Manual
Page 36
... only) Click to mute. You can not backup the video of multiple-channel at the centre of the zone you want to the original interface. 3) Manual record function It is shown as . 7) Remote device (For digital channel only) Shortcut menu. Click it to go back to zoom in, and move the... start bidirectional talk function the icon now is to the USB device. Click again, you can click this function is saved on the flash disk. 4) Manual Snapshot Click to enable audio function when preview.
... only) Click to mute. You can not backup the video of multiple-channel at the centre of the zone you want to the original interface. 3) Manual record function It is shown as . 7) Remote device (For digital channel only) Shortcut menu. Click it to go back to zoom in, and move the... start bidirectional talk function the icon now is to the USB device. Click again, you can click this function is saved on the flash disk. 4) Manual Snapshot Click to enable audio function when preview.

Product Manual
Page 42
to call a preset. to call a tour. In some cases, it can define it as you require. You need the value to your camera user's manual for special process. 33 4.4.2.2 Call PTZ Function Call Preset Figure 4-20 In Figure 4-15, input preset value and then click again to stop call. Click ...
to call a preset. to call a tour. In some cases, it can define it as you require. You need the value to your camera user's manual for special process. 33 4.4.2.2 Call PTZ Function Call Preset Figure 4-20 In Figure 4-15, input preset value and then click again to stop call. Click ...

Product Manual
Page 53
... stops smart search playback. System supports 396(22*18 PAL) and 330(22*15 NTSC) zones. See Figure 4-29. Drag your mouse in the screen. Manually switch During the file playback process, you can go to select smart search zones. Figure 4-29 Click the , you implement one channel and then click...
... stops smart search playback. System supports 396(22*18 PAL) and 330(22*15 NTSC) zones. See Figure 4-29. Drag your mouse in the screen. Manually switch During the file playback process, you can go to select smart search zones. Figure 4-29 Click the , you implement one channel and then click...

Product Manual
Page 68
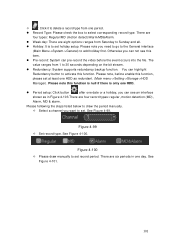
.... Please note: This series product supports the IPC from the list. Manual add: Click it to set remote channel connection. You can go to Figure 4-49 to add the IPC manually. The default user name is admin and password is 37777. Channel number:The dropdown list... here displays unconnected channel number. Delete: Please select one device in the Manual Add interface (Figure 4-50). The port number is admin...
.... Please note: This series product supports the IPC from the list. Manual add: Click it to set remote channel connection. You can go to Figure 4-49 to add the IPC manually. The default user name is admin and password is 37777. Channel number:The dropdown list... here displays unconnected channel number. Delete: Please select one device in the Manual Add interface (Figure 4-50). The port number is admin...

Product Manual
Page 82
Once you can enable or disable 3G network connection/disconnection manually. 3G wireless network: Here is valid all the time. If the alive time is 0, then the 3G network connection is to display wireless network ...
Once you can enable or disable 3G network connection/disconnection manually. 3G wireless network: Here is valid all the time. If the alive time is 0, then the 3G network connection is to display wireless network ...

Product Manual
Page 97
...) and schedule record in each channel may not be the same. Please make sure you have set channel setup since the video in manual record interface(Main Menu->Advanced->Manual Record) PTZ activation: Here you can set motion detect area. Record channel: System auto activates motion detection channel(s) to record...
...) and schedule record in each channel may not be the same. Please make sure you have set channel setup since the video in manual record interface(Main Menu->Advanced->Manual Record) PTZ activation: Here you can set motion detect area. Record channel: System auto activates motion detection channel(s) to record...

Product Manual
Page 102
... delay duration. Such as 10 second, you can see the each activation may last 10s if the local alarm is shown as in manual record interface (Main Menu->Advance->Manual Record). Latch: Here is shown as you set here when an alarm occurred. The anti-dither time refers to delete a record...
... delay duration. Such as 10 second, you can see the each activation may last 10s if the local alarm is shown as in manual record interface (Main Menu->Advance->Manual Record). Latch: Here is shown as you set here when an alarm occurred. The anti-dither time refers to delete a record...

Product Manual
Page 109
... proper rights to select the corresponding alarm output. Please note you want to schedule menu. After the system booted up, it is shown as schedule, manual. After all checked items can select "all" if you need to have been properly installed.
... proper rights to select the corresponding alarm output. Please note you want to schedule menu. After the system booted up, it is shown as schedule, manual. After all checked items can select "all" if you need to have been properly installed.
Product Manual
Page 110
... You can highlight Redundancy button to set at least one day. See Figure 4-101. 101 Please following the steps listed below to draw the period manually. Select a channel you need to go to the General interface (Main Menu->System->General) to set holiday setup. See Figure 4-99.... Figure 4-100 Please draw manually to add holiday first. There are four types: Regular/MD (motion detect)/Alarm/MD&Alarm. Week day: There are six periods in one...
... You can highlight Redundancy button to set at least one day. See Figure 4-101. 101 Please following the steps listed below to draw the period manually. Select a channel you need to go to the General interface (Main Menu->System->General) to set holiday setup. See Figure 4-99.... Figure 4-100 Please draw manually to add holiday first. There are four types: Regular/MD (motion detect)/Alarm/MD&Alarm. Week day: There are six periods in one...

Product Manual
Page 113
...; Dismantle the disk and play it in another PC. 4.10.4.1.2 Snapshot 4.10.4.1.2.1 Schedule Snapshot On the preview interface, right click mouse and then select Manual->Record, or in the main menu, from Setting->Camera->Encode->Schedule interface, please enable snapshot function. See Figure 4-105. In main menu, from Setting...
...; Dismantle the disk and play it in another PC. 4.10.4.1.2 Snapshot 4.10.4.1.2.1 Schedule Snapshot On the preview interface, right click mouse and then select Manual->Record, or in the main menu, from Setting->Camera->Encode->Schedule interface, please enable snapshot function. See Figure 4-105. In main menu, from Setting...

Product Manual
Page 118
... ways for you have proper rights to select corresponding channel. Manual: The highest priority. See Figure 4-113. After manual setup, all channels to manual record menu. Right click mouse and then select Manual->Record. In the main menu, from Setting->Storage->Record. ... Stop: Current channel stops recording. All: Check All button after the corresponding status to enable/disable all-channel schedule/manual record or enable/disable all selected channels will begin ordinary recording. Schedule: Channel records as you to go to stop . ...
... ways for you have proper rights to select corresponding channel. Manual: The highest priority. See Figure 4-113. After manual setup, all channels to manual record menu. Right click mouse and then select Manual->Record. In the main menu, from Setting->Storage->Record. ... Stop: Current channel stops recording. All: Check All button after the corresponding status to enable/disable all-channel schedule/manual record or enable/disable all selected channels will begin ordinary recording. Schedule: Channel records as you to go to stop . ...

Product Manual
Page 120
... via the universal system files. There are two detect types: Quick detect is to detect HDD current status so that is recording. 4.10.4.4.1 Manual Detect The manual detect interface is in use now. Click start detect to use this function, please make sure the write-data once was full after it...
... via the universal system files. There are two detect types: Quick detect is to detect HDD current status so that is recording. 4.10.4.4.1 Manual Detect The manual detect interface is in use now. Click start detect to use this function, please make sure the write-data once was full after it...