
Installation Guide
Page 42
...for Configuration/Setup is displayed, press F1. Use the baseboard management controller utility programs to control the server power, view system information, and identify the server. The baseboard management controller also provides the following steps: 1. Important: The server Ethernet ... to configure the baseboard management controller, download firmware updates, and remotely manage a network. 30 IBM System x3755 Types 8877 and 7163: Installation Guide Any standard Telnet client application can remotely view and change the BIOS settings, restart the server, identify the server, and...
...for Configuration/Setup is displayed, press F1. Use the baseboard management controller utility programs to control the server power, view system information, and identify the server. The baseboard management controller also provides the following steps: 1. Important: The server Ethernet ... to configure the baseboard management controller, download firmware updates, and remotely manage a network. 30 IBM System x3755 Types 8877 and 7163: Installation Guide Any standard Telnet client application can remotely view and change the BIOS settings, restart the server, identify the server, and...
Installation Guide
Page 43
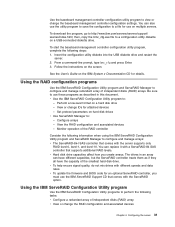
... program and ServeRAID Manager to a configuration utility diskette on the IBM System x Documentation CD for use the IBM ServeRAID Support CD that comes with different speeds and data rates. You can have the capacity of the smallest hard disk drive. v To update the firmware and BIOS code for attached devices - See the User's Guide on...
... program and ServeRAID Manager to a configuration utility diskette on the IBM System x Documentation CD for use the IBM ServeRAID Support CD that comes with different speeds and data rates. You can have the capacity of the smallest hard disk drive. v To update the firmware and BIOS code for attached devices - See the User's Guide on...

Installation Guide
Page 51
... /O board 012980xx 012981xx No update data for additional information on the error code. 2. Reseat the microprocessor/memory card containing microprocessor x. 2. See http://www.ibm.com/servers/eserver/support/xseries...system was not found. 1. Configuration/Setup Utility program and enable keyboardless operation to determine which components are customer replaceable units (CRU) and which they are field replaceable units (FRU). a. Reseat the failing adapter (if installed). 5. Failing adapter b. (Trained service technician only) I /O board Chapter 6. Update the BIOS...
... /O board 012980xx 012981xx No update data for additional information on the error code. 2. Reseat the microprocessor/memory card containing microprocessor x. 2. See http://www.ibm.com/servers/eserver/support/xseries...system was not found. 1. Configuration/Setup Utility program and enable keyboardless operation to determine which components are customer replaceable units (CRU) and which they are field replaceable units (FRU). a. Reseat the failing adapter (if installed). 5. Failing adapter b. (Trained service technician only) I /O board Chapter 6. Update the BIOS...

Installation Guide
Page 59
...-tests show that the distance between the monitor and any external diskette drive is wavy, location of the monitor. Notes: a. Non-IBM monitor cables might cause screen discoloration. Replace the following components: a. If the wrong language is solved. Reseat the following components one ... monitor. 3. v Follow the suggested actions in the order in which components are listed in the Action column until the problem is displayed, update the BIOS code with the correct screen. Move the device and the monitor at least 76 mm (3 in.). b. Monitor b. v See the parts...
...-tests show that the distance between the monitor and any external diskette drive is wavy, location of the monitor. Notes: a. Non-IBM monitor cables might cause screen discoloration. Replace the following components: a. If the wrong language is solved. Reseat the following components one ... monitor. 3. v Follow the suggested actions in the order in which components are listed in the Action column until the problem is displayed, update the BIOS code with the correct screen. Move the device and the monitor at least 76 mm (3 in.). b. Monitor b. v See the parts...


