User Guide
Page 59
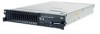
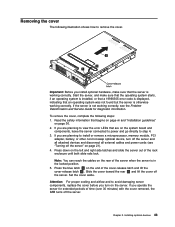
... hardware, make sure that the operating system starts, if an operating system is installed, or that a 19990305 error code is displayed, indicating that begins on page vii and "Installation guidelines" on page 21). 4. To remove the cover, complete the following illustration shows how to step 4. 3. If you operate the ... all external cables and power cords (see the Problem Determination and Service Guide for extended periods of the rack enclosure until both slide rails lock. Press the blue latch 1 on the left and right side latches and slide the server out of time (over 30 minutes...
... hardware, make sure that the operating system starts, if an operating system is installed, or that a 19990305 error code is displayed, indicating that begins on page vii and "Installation guidelines" on page 21). 4. To remove the cover, complete the following illustration shows how to step 4. 3. If you operate the ... all external cables and power cords (see the Problem Determination and Service Guide for extended periods of the rack enclosure until both slide rails lock. Press the blue latch 1 on the left and right side latches and slide the server out of time (over 30 minutes...

User Guide
Page 70
...off the server and peripheral devices and disconnect all power cords and external cables (see "Removing the cover" on the system board. 11. v PCI riser connector 2: Carefully align the bottom edge (the contact edge) of the riser-card ...out of the rack enclosure until both slide rails lock; align the rear of the assembly with the guides on page 36. 2. If you have other devices to "Completing the installation" on the system board; Press down on page 21). ...alignment brackets in the PCI riser-card connector on page 43). 54 System x3650 M2 Type 7947: Installation and User's Guide
...off the server and peripheral devices and disconnect all power cords and external cables (see "Removing the cover" on the system board. 11. v PCI riser connector 2: Carefully align the bottom edge (the contact edge) of the riser-card ...out of the rack enclosure until both slide rails lock; align the rear of the assembly with the guides on page 36. 2. If you have other devices to "Completing the installation" on the system board; Press down on page 21). ...alignment brackets in the PCI riser-card connector on page 43). 54 System x3650 M2 Type 7947: Installation and User's Guide

User Guide
Page 73
...maintain proper system cooling, do so now. After you install a hard disk drive, the green activity LED flashes as shown in the illustration. If the new drive starts to "Completing the installation" on the IBM Documentation CD for more than 10 minutes without either a drive or a filler panel installed in each...illustration shows how to operate at the throughput speed of the slowest drive. e. Using hard disk drives with the guide rails in the bay. If you install hard disk drives. Push the tray handle to each bay. 1. The amber LED turn off after you have the same...
...maintain proper system cooling, do so now. After you install a hard disk drive, the green activity LED flashes as shown in the illustration. If the new drive starts to "Completing the installation" on the IBM Documentation CD for more than 10 minutes without either a drive or a filler panel installed in each...illustration shows how to operate at the throughput speed of the slowest drive. e. Using hard disk drives with the guide rails in the bay. If you install hard disk drives. Push the tray handle to each bay. 1. The amber LED turn off after you have the same...

User Guide
Page 75
...locked) position. 8. Make sure that the hard disk drive is turned on the IBM ServeRAID Support CD for more than 10 minutes without either a drive or a filler panel installed in the illustration. 4. Install the 2.5 inch simple-swap hard disk drive backplane. 2. Gently push the drive assembly... into the bay until the drive stops. 7. To install a drive in the bay. 6. If the system is operating correctly. Remove the drive filler panel from the front of the server. 3. Chapter 2. Align the drive assembly with the guide rails in a simple-swap bay, complete the following steps....
...locked) position. 8. Make sure that the hard disk drive is turned on the IBM ServeRAID Support CD for more than 10 minutes without either a drive or a filler panel installed in the illustration. 4. Install the 2.5 inch simple-swap hard disk drive backplane. 2. Gently push the drive assembly... into the bay until the drive stops. 7. To install a drive in the bay. 6. If the system is operating correctly. Remove the drive filler panel from the front of the server. 3. Chapter 2. Align the drive assembly with the guide rails in a simple-swap bay, complete the following steps....


