Reference Manual
Page 1
IBM Deskstar 3.5 inch ATA/IDE hard disk drive Installation and reference manual
IBM Deskstar 3.5 inch ATA/IDE hard disk drive Installation and reference manual

Reference Manual
Page 3
...data should be incorporated in new editions of express or implied warranties in certain transactions. Note to an IBM representative. Copyright International Business Machines Corporation 2001. Documentation related to change without warranty of any time.... disclosure is provided for a particular purpose. Product description data contained herein represents IBM's design objective and is subject to the information herein; IBM Deskstar 3.5 inch ATA/IDE hard disk drive Easy installation manual International Business Machines Corporation provides this publication at any kind, ...
...data should be incorporated in new editions of express or implied warranties in certain transactions. Note to an IBM representative. Copyright International Business Machines Corporation 2001. Documentation related to change without warranty of any time.... disclosure is provided for a particular purpose. Product description data contained herein represents IBM's design objective and is subject to the information herein; IBM Deskstar 3.5 inch ATA/IDE hard disk drive Easy installation manual International Business Machines Corporation provides this publication at any kind, ...

Reference Manual
Page 5
... Ultra ATA/100-compatible BIOS The IBM Deskstar drives listed above support Ultra ATA/100 and are provided for the following model numbers: • IC35L020AVER07 (20 GB) • IC35L040AVER07 (40 GB) • IC35L060AVER07 (60 GB) • DTLA-307075 (75 GB) The IBM Deskstar drive models listed above also support the ...16.6 MB per second 16.6 MB per second. Your drive will function at the maximum speed supported by your new IBM Desk star hard disk drive. Ultra ATA/100 performance requires the following components: • A 40-pin, 80-conductor ATA/IDE cable • A controller...
... Ultra ATA/100-compatible BIOS The IBM Deskstar drives listed above support Ultra ATA/100 and are provided for the following model numbers: • IC35L020AVER07 (20 GB) • IC35L040AVER07 (40 GB) • IC35L060AVER07 (60 GB) • DTLA-307075 (75 GB) The IBM Deskstar drive models listed above also support the ...16.6 MB per second 16.6 MB per second. Your drive will function at the maximum speed supported by your new IBM Desk star hard disk drive. Ultra ATA/100 performance requires the following components: • A 40-pin, 80-conductor ATA/IDE cable • A controller...
Reference Manual
Page 7
... Group Support Center.) IBM Disk Manager 2000 Easy Installation Software Overview Disk Manager 2000 partitions and formats a hard disk drive in contact with the other hand. DDO provides BIOS support for drives larger than traditional partition and format programs. An integral part of Disk Manager 2000 is compatible with the following items to install the IBM Deskstar drive: • A flat-blade...
... Group Support Center.) IBM Disk Manager 2000 Easy Installation Software Overview Disk Manager 2000 partitions and formats a hard disk drive in contact with the other hand. DDO provides BIOS support for drives larger than traditional partition and format programs. An integral part of Disk Manager 2000 is compatible with the following items to install the IBM Deskstar drive: • A flat-blade...
Reference Manual
Page 8
... to the appropriate support documentation at http://support.microsoft.com for installation You are now ready to a different computer, it is recommended you reinstall your IBM Deskstar hard disk drive. If you want to move your Windows boot drive to begin installing your operating system. The Advanced Troubleshooting section of installation instructions: • Install a new...
... to the appropriate support documentation at http://support.microsoft.com for installation You are now ready to a different computer, it is recommended you reinstall your IBM Deskstar hard disk drive. If you want to move your Windows boot drive to begin installing your operating system. The Advanced Troubleshooting section of installation instructions: • Install a new...
Reference Manual
Page 10
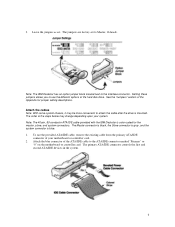
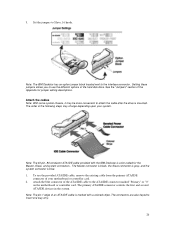
Note: The 40-pin, 80-conductor ATA/IDE cable provided with the IBM Deskstar is color-coded for jumper setting descriptions. Attach the cables Note: With some system chassis, it may change depending upon your motherboard or controller card. 2. ... the existing cable from the primary ATA/IDE connector of the hard disk drive. To use the different options of your system. Leave the jumpers as set to the ATA/IDE connector marked "Primary" or "0" on the motherboard or controller card. Note: The IBM Deskstar has an option jumper block located next to attach the...
Note: The 40-pin, 80-conductor ATA/IDE cable provided with the IBM Deskstar is color-coded for jumper setting descriptions. Attach the cables Note: With some system chassis, it may change depending upon your motherboard or controller card. 2. ... the existing cable from the primary ATA/IDE connector of the hard disk drive. To use the different options of your system. Leave the jumpers as set to the ATA/IDE connector marked "Primary" or "0" on the motherboard or controller card. Note: The IBM Deskstar has an option jumper block located next to attach the...
Reference Manual
Page 11
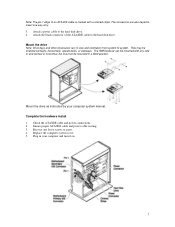
... black connector of an ATA/IDE cable is marked with any loose screws or parts. 4. Plug in your computer system manual. The IBM Deskstar can be mounted with a colored stripe. Replace the computer system cover. 5. Note: The pin 1 edge of the ATA/IDE cable to...cable and power cable routing. 3. Mount the drive Note: Drive bays and other enclosures vary in a tilted position. They may be mounted in size and orientation from system to the hard disk drive. Complete the hardware install 1. The connectors are also keyed to the hard disk drive. 4. Attach a power cable to insert ...
... black connector of an ATA/IDE cable is marked with any loose screws or parts. 4. Plug in your computer system manual. The IBM Deskstar can be mounted with a colored stripe. Replace the computer system cover. 5. Note: The pin 1 edge of the ATA/IDE cable to...cable and power cable routing. 3. Mount the drive Note: Drive bays and other enclosures vary in a tilted position. They may be mounted in size and orientation from system to the hard disk drive. Complete the hardware install 1. The connectors are also keyed to the hard disk drive. 4. Attach a power cable to insert ...

Reference Manual
Page 12
... autodetection is likely your system does not support drives greater than 8.4GB. 5. Select translation or LBA options as a guide. 1. If the capacity displayed by the BIOS does not match your drive capacity, it is unavailable, set the disk drive type to system, and these instructions are often... displayed at boot time, verify drive detection and capacity. Save the settings and exit. 8 If Autodetect or a UDT...
... autodetection is likely your system does not support drives greater than 8.4GB. 5. Select translation or LBA options as a guide. 1. If the capacity displayed by the BIOS does not match your drive capacity, it is unavailable, set the disk drive type to system, and these instructions are often... displayed at boot time, verify drive detection and capacity. Save the settings and exit. 8 If Autodetect or a UDT...
Reference Manual
Page 13
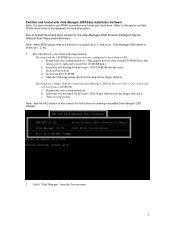
... to insert the CD-ROM disk.) b. Insert the self-booting Disk Manager 2000 CD-ROM into the floppy disk drive. d. Skip the following methods. Booting from a CD-ROM) a. Begin with your system turned on your hard drive. Partition and format with Disk Manager 2000 Easy Installation Software Note... the Startup menu. 9 e. Turn on . (This applies power to the system CD-ROM drive that are configured to partition and format your system. Due to system and hard drive variations, the Disk Manager 2000 screens displayed may choose to use FDISK to boot from a floppy diskette. Begin with...
... to insert the CD-ROM disk.) b. Insert the self-booting Disk Manager 2000 CD-ROM into the floppy disk drive. d. Skip the following methods. Booting from a CD-ROM) a. Begin with your system turned on your hard drive. Partition and format with Disk Manager 2000 Easy Installation Software Note... the Startup menu. 9 e. Turn on . (This applies power to the system CD-ROM drive that are configured to partition and format your system. Due to system and hard drive variations, the Disk Manager 2000 screens displayed may choose to use FDISK to boot from a floppy diskette. Begin with...

Reference Manual
Page 18
...IBM Disk Manager has already partitioned and formatted your drive's capacity and partitions will be unavailable. If you must allow the DDO to load into memory. Starting ONTRACK... If the Ontrack DDO was not installed during the installation-as determined by Disk Manager 2000 as necessary to support the full capacity of the hard disk drive...-you do not perform the floppy boot process below, your drive. Press spacebar to boot from the hard disk drive. 2. Operating system...
...IBM Disk Manager has already partitioned and formatted your drive's capacity and partitions will be unavailable. If you must allow the DDO to load into memory. Starting ONTRACK... If the Ontrack DDO was not installed during the installation-as determined by Disk Manager 2000 as necessary to support the full capacity of the hard disk drive...-you do not perform the floppy boot process below, your drive. Press spacebar to boot from the hard disk drive. 2. Operating system...

Reference Manual
Page 20
... cable to the interface connector. Note: The pin 1 edge of the hard disk drive. The Master connector is black, the Slave connector is gray, and the system connector is marked with the IBM Deskstar is mounted. Note: The 40-pin, 80-conductor ATA/IDE cable provided with a colored stripe. To ...The connectors are also keyed to each hard disk drive. 16 The primary ATA/IDE connector controls the first and second ATA/IDE devices in the system. The order of your system. Attach a power cable to insert one way only. 3. Note: The IBM Deskstar has an option jumper block located next...
... cable to the interface connector. Note: The pin 1 edge of the hard disk drive. The Master connector is black, the Slave connector is gray, and the system connector is marked with the IBM Deskstar is mounted. Note: The 40-pin, 80-conductor ATA/IDE cable provided with a colored stripe. To ...The connectors are also keyed to each hard disk drive. 16 The primary ATA/IDE connector controls the first and second ATA/IDE devices in the system. The order of your system. Attach a power cable to insert one way only. 3. Note: The IBM Deskstar has an option jumper block located next...
Reference Manual
Page 22
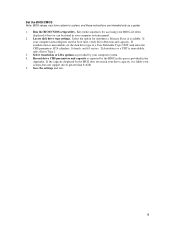
...Select the option for accessing your BIOS are intended only as a guide. 1. If your computer system manual. 2. Record drive CHS parameters and capacity as provided by your system does not support drives greater than 8.4GB. 5. If the capacity displayed by the BIOS in the spaces provided in your computer autoconfigures itself... User Definable Type (UDT) and enter the CHS parameters 1024 cylinders, 16 heads, and 63 sectors. If Autodetect or a UDT is unavailable, set the disk drive type to system, and these instructions are often displayed at boot or can be found in the Appendix. Locate...
...Select the option for accessing your BIOS are intended only as a guide. 1. If your computer system manual. 2. Record drive CHS parameters and capacity as provided by your system does not support drives greater than 8.4GB. 5. If the capacity displayed by the BIOS in the spaces provided in your computer autoconfigures itself... User Definable Type (UDT) and enter the CHS parameters 1024 cylinders, 16 heads, and 63 sectors. If Autodetect or a UDT is unavailable, set the disk drive type to system, and these instructions are often displayed at boot or can be found in the Appendix. Locate...

Reference Manual
Page 28
... not perform the floppy boot process below, your system's monitor. Boot from diskette... 3. Insert the boot diskette in drive A:, press spacebar when ready... 4. Select Exit to boot from the hard disk drive. 2. Let DDO load into memory. Press spacebar to close Disk Manager 2000 and start using your new disk drive. The following message is complete. 12.
... not perform the floppy boot process below, your system's monitor. Boot from diskette... 3. Insert the boot diskette in drive A:, press spacebar when ready... 4. Select Exit to boot from the hard disk drive. 2. Let DDO load into memory. Press spacebar to close Disk Manager 2000 and start using your new disk drive. The following message is complete. 12.
Reference Manual
Page 30
... system. Note: The pin 1 edge of your system. The order of the ATA/IDE cable to attach the cable after the drive is marked with the IBM Deskstar is blue. 1. Attach the blue connector of the following steps may be more convenient to the ATA/IDE connector marked "Primary" ...or "0" on the motherboard or controller card. Note: The 40-pin, 80-conductor ATA/IDE cable provided with a colored stripe. Setting these jumpers allows you to Slave, 16 heads. See the "Jumpers" section of the hard disk drive. Attach the cables Note: With some system chassis, it may change ...
... system. Note: The pin 1 edge of your system. The order of the ATA/IDE cable to attach the cable after the drive is marked with the IBM Deskstar is blue. 1. Attach the blue connector of the following steps may be more convenient to the ATA/IDE connector marked "Primary" ...or "0" on the motherboard or controller card. Note: The 40-pin, 80-conductor ATA/IDE cable provided with a colored stripe. Setting these jumpers allows you to Slave, 16 heads. See the "Jumpers" section of the hard disk drive. Attach the cables Note: With some system chassis, it may change ...
Reference Manual
Page 31
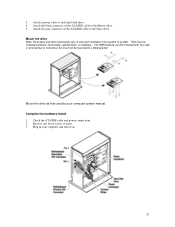
...in a tilted position. Complete the hardware install 1. Plug in size and orientation from system to the Master drive. 5. Attach the gray connector of the ATA/IDE cable to system. The IBM Deskstar can be mounted with any loose screws or parts. 3. Recover any side or end vertical or horizontal,... but must not be oriented vertically, horizontally, upside down, or sideways. Mount the drive as instructed by your computer and turn it on. 27 Attach the black connector of the ATA/IDE cable to each hard disk drive. 4. 3.
...in a tilted position. Complete the hardware install 1. Plug in size and orientation from system to the Master drive. 5. Attach the gray connector of the ATA/IDE cable to system. The IBM Deskstar can be mounted with any loose screws or parts. 3. Recover any side or end vertical or horizontal,... but must not be oriented vertically, horizontally, upside down, or sideways. Mount the drive as instructed by your computer and turn it on. 27 Attach the black connector of the ATA/IDE cable to each hard disk drive. 4. 3.
Reference Manual
Page 32
... heads, and 63 sectors. If your computer autoconfigures itself at boot or can be found in your drive capacity, it is unavailable, select Drive Type 1. 3. Record drive CHS parameters and capacity as provided by the BIOS does not match your computer system manual. 2. If... option for accessing your computer system. 4. If autodetection is unavailable, set the disk drive type to system, and these instructions are often displayed at boot time, verify drive detection and capacity. Run the BIOS/CMOS setup utility. Locate disk drive type settings. Save the settings and exit. 28
... heads, and 63 sectors. If your computer autoconfigures itself at boot or can be found in your drive capacity, it is unavailable, select Drive Type 1. 3. Record drive CHS parameters and capacity as provided by the BIOS does not match your computer system manual. 2. If... option for accessing your computer system. 4. If autodetection is unavailable, set the disk drive type to system, and these instructions are often displayed at boot time, verify drive detection and capacity. Run the BIOS/CMOS setup utility. Locate disk drive type settings. Save the settings and exit. 28

Reference Manual
Page 38
...Important: If the Ontrack Dynamic Drive Overlay (DDO) was installed during the installation, you do not perform the floppy boot process below, your system's monitor. If you must allow DDO to load in memory prior to booting to boot from the hard disk drive. 2. Press the spacebar. ...Press the spacebar to a floppy. Insert the boot diskette in drive A:, press spacebar when ready... 4. The installation is displayed. The following message is now complete. ...
...Important: If the Ontrack Dynamic Drive Overlay (DDO) was installed during the installation, you do not perform the floppy boot process below, your system's monitor. If you must allow DDO to load in memory prior to booting to boot from the hard disk drive. 2. Press the spacebar. ...Press the spacebar to a floppy. Insert the boot diskette in drive A:, press spacebar when ready... 4. The installation is displayed. The following message is now complete. ...
Reference Manual
Page 40
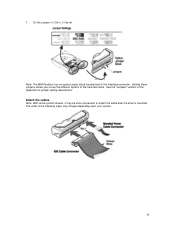
Attach the cables Note: With some system chassis, it may change depending upon your system. 36 Setting these jumpers allows you to attach the cable after the drive is mounted. Note: The IBM Deskstar has an option jumper block located next to Slave, 16 heads. 3. See the "Jumpers" section of the hard disk drive. Set the jumpers to the interface connector. The order of the following steps may be more convenient to use the different options of the Appendix for jumper setting descriptions.
Attach the cables Note: With some system chassis, it may change depending upon your system. 36 Setting these jumpers allows you to attach the cable after the drive is mounted. Note: The IBM Deskstar has an option jumper block located next to Slave, 16 heads. 3. See the "Jumpers" section of the hard disk drive. Set the jumpers to the interface connector. The order of the following steps may be more convenient to use the different options of the Appendix for jumper setting descriptions.

Reference Manual
Page 46
... (DDO) was installed during the installation, you do not perform the floppy boot process below, your system's monitor. Follow the messages displayed on your drive's capacity and partitions will be unavailable. 1. Boot from the floppy. 42 Press the spacebar. The following message is now complete. 12. Press spacebar ...to a floppy. Let DDO load into memory. The installation is displayed. Press the spacebar to close Disk Manager 2000 and start using your new disk drive. Select Exit to boot from the hard disk drive. 2.
... (DDO) was installed during the installation, you do not perform the floppy boot process below, your system's monitor. Follow the messages displayed on your drive's capacity and partitions will be unavailable. 1. Boot from the floppy. 42 Press the spacebar. The following message is now complete. 12. Press spacebar ...to a floppy. Let DDO load into memory. The installation is displayed. Press the spacebar to close Disk Manager 2000 and start using your new disk drive. Select Exit to boot from the hard disk drive. 2.
Reference Manual
Page 48
... for Slave. Formatting will verify the hard disk media and create File Allocation Tables for more information. Slave If the IBM Deskstar is the Slave drive on a two-drive cable, set the drive address jumper to Cable Select. Cable Select The 40-pin, 80-conductor ATA/IDE cable ...Select, you have already used IBM Disk Manager 2000 to partition and format your drive to partition the hard disk drive. For a DTLA or DPTA model drive with a capacity lower than 4,096 cylinders, the 2/32 GB clip jumper truncates the cylinder count of the drive. Partitioning with cylinder values higher ...
... for Slave. Formatting will verify the hard disk media and create File Allocation Tables for more information. Slave If the IBM Deskstar is the Slave drive on a two-drive cable, set the drive address jumper to Cable Select. Cable Select The 40-pin, 80-conductor ATA/IDE cable ...Select, you have already used IBM Disk Manager 2000 to partition and format your drive to partition the hard disk drive. For a DTLA or DPTA model drive with a capacity lower than 4,096 cylinders, the 2/32 GB clip jumper truncates the cylinder count of the drive. Partitioning with cylinder values higher ...


