
Service Guide
Page 7
... Board 452 Removal 452 Replacement 453 Power Supplies and Power Supply Fan Assemblies 454 Removal 455 Replacement 456 Power Supply Test Switch Procedure 457 Internal Disk Drives 458 Removal 458 Replacement 460 Contents vii
... Board 452 Removal 452 Replacement 453 Power Supplies and Power Supply Fan Assemblies 454 Removal 455 Replacement 456 Power Supply Test Switch Procedure 457 Internal Disk Drives 458 Removal 458 Replacement 460 Contents vii

Service Guide
Page 20
... or -48 V dc power. Two optional disk drives can only be used when upgrading the system memory. The system data flow diagrams are available. v Certain 32 MB DIMMs from the distribution bus to each riser card has sixteen sockets. 128 MB, 256 MB, 512 MB, and 1 GB dual inline memory modules (...DIMMs) are shown in "Data Flow with 4 MB of external devices. The primary I /O drawer has space for the ten 64-bit slots at 5 V v Up to 66 Mhz for up to access the service processor menus. Power is connected from older RS/6000...
... or -48 V dc power. Two optional disk drives can only be used when upgrading the system memory. The system data flow diagrams are available. v Certain 32 MB DIMMs from the distribution bus to each riser card has sixteen sockets. 128 MB, 256 MB, 512 MB, and 1 GB dual inline memory modules (...DIMMs) are shown in "Data Flow with 4 MB of external devices. The primary I /O drawer has space for the ten 64-bit slots at 5 V v Up to 66 Mhz for up to access the service processor menus. Power is connected from older RS/6000...

Service Guide
Page 66
... that connect the CEC drawer and all drawers,the secondary power supplies connect to two I /O drawers. 1. The Model H80 and Models 6H0 and 6H1 must have one primary I /O drawer contains PCI adapters, operator panel, disk drives, and media drives. CEC Drawer Attached to the I /O drawers in loops, such as the JTAG and...
... that connect the CEC drawer and all drawers,the secondary power supplies connect to two I /O drawers. 1. The Model H80 and Models 6H0 and 6H1 must have one primary I /O drawer contains PCI adapters, operator panel, disk drives, and media drives. CEC Drawer Attached to the I /O drawers in loops, such as the JTAG and...

Service Guide
Page 170
Create diskette drive (disk) node See the note on page 139. Note: Terminal settings should be seen on the terminals and the appropriate key on page 75 with an ...
Create diskette drive (disk) node See the note on page 139. Note: Terminal settings should be seen on the terminals and the appropriate key on page 75 with an ...

Service Guide
Page 177
... operator panel for an extended period of time while the boot image is up. 4. Because time-out durations are correct. 2. b. If attempting to boot from a disk drive or CD-ROM, go to be a problem loading the boot image from the device. Chapter 4. This procedure assumes that the network is retrieved from...
... operator panel for an extended period of time while the boot image is up. 4. Because time-out durations are correct. 2. b. If attempting to boot from a disk drive or CD-ROM, go to be a problem loading the boot image from the device. Chapter 4. This procedure assumes that the network is retrieved from...

Service Guide
Page 178
... system-specific recovery process, or reinstall the operating system. Disconnect the signal and power cables from the backplane. Disconnect the disk drive(s) in the RS/6000 and Eserver pSeries Diagnostics Information for Multiple Bus Systems manual. 3. If you are successful, it could be necessary to &#...until the problem recurs and replace the device that caused the problem. (If the problem appears to be one of the disk drives in the RS/6000 and pSeries Diagnostics Information for Eserver Multiple Bus Systems. 160 Service Guide Check SCSI cabling. 3. Try to ″MAP...
... system-specific recovery process, or reinstall the operating system. Disconnect the signal and power cables from the backplane. Disconnect the disk drive(s) in the RS/6000 and Eserver pSeries Diagnostics Information for Multiple Bus Systems manual. 3. If you are successful, it could be necessary to &#...until the problem recurs and replace the device that caused the problem. (If the problem appears to be one of the disk drives in the RS/6000 and pSeries Diagnostics Information for Eserver Multiple Bus Systems. 160 Service Guide Check SCSI cabling. 3. Try to ″MAP...

Service Guide
Page 212
... reconstructed, power off the system and power it on the condition of the I /O drawer backplane Location: U0.1-P1 194 Service Guide For example, select a hard disk known to have a copy of the operating system as boot list) to include devices that are running the bootlist command specifying the device that the...
... reconstructed, power off the system and power it on the condition of the I /O drawer backplane Location: U0.1-P1 194 Service Guide For example, select a hard disk known to have a copy of the operating system as boot list) to include devices that are running the bootlist command specifying the device that the...

Service Guide
Page 386
... the list, the system does not search through the other devices of each matching device type found on the keyboard loads online diagnostics from a hard disk. v If the service mode boot list is discovered by pressing the number 1 key on a directly attached keyboard or the number 1 on the keyboard causes the...
... the list, the system does not search through the other devices of each matching device type found on the keyboard loads online diagnostics from a hard disk. v If the service mode boot list is discovered by pressing the number 1 key on a directly attached keyboard or the number 1 on the keyboard causes the...

Service Guide
Page 399
.... - Boot Mode Menu 1. Service Mode Boot from Default List: Currently Disabled 4. The item corresponding to the selected number toggles from the disk drive and AIX diagnostics are loaded on the disk drive, AIX boots in NVRAM. If the system boots AIX from disabled to select a boot mode. Using this selection is the...
.... - Boot Mode Menu 1. Service Mode Boot from Default List: Currently Disabled 4. The item corresponding to the selected number toggles from the disk drive and AIX diagnostics are loaded on the disk drive, AIX boots in NVRAM. If the system boots AIX from disabled to select a boot mode. Using this selection is the...

Service Guide
Page 402
... it is necessary to take one of the memory DIMMs offline, this menu allows you want to the following Web address: http://www-1.ibm.com/servers/aix/library/. v Memory Configuration/Deconfiguration Menu These menus allow the user to deconfigure a DIMM, and then reconfigure the DIMM ...you to change the system memory configuration. Select Technical Publications. When this menu is made accessible by loading the documentation CD onto the hard disk or by default. Memory riser card 2 98. Note: The processor numbering scheme used by the service processor is available at a later ...
... it is necessary to take one of the memory DIMMs offline, this menu allows you want to the following Web address: http://www-1.ibm.com/servers/aix/library/. v Memory Configuration/Deconfiguration Menu These menus allow the user to deconfigure a DIMM, and then reconfigure the DIMM ...you to change the system memory configuration. Select Technical Publications. When this menu is made accessible by loading the documentation CD onto the hard disk or by default. Memory riser card 2 98. Note: The processor numbering scheme used by the service processor is available at a later ...

Service Guide
Page 420
..., for checking the firmware level. After the update file has been written to create an image on a disk drive or on the system. v If downloading to the target system by using a locally available image, ...will be in AIX (backup) format. The firmware update file must be transferred to a pSeries or RS/6000 system, follow the instructions. This can be done by backing up the image onto diskette from an ftp... server or NFS-mounting the directory on the system. The Web address is: http://www.rs6000.ibm.com/support/micro The firmware level is available on the Web site in as root user. 2....
..., for checking the firmware level. After the update file has been written to create an image on a disk drive or on the system. v If downloading to the target system by using a locally available image, ...will be in AIX (backup) format. The firmware update file must be transferred to a pSeries or RS/6000 system, follow the instructions. This can be done by backing up the image onto diskette from an ftp... server or NFS-mounting the directory on the system. The Web address is: http://www.rs6000.ibm.com/support/micro The firmware level is available on the Web site in as root user. 2....

Service Guide
Page 439
...to select a particular console. It is selected, the console defaults to serial port 1. If the system no console is also possible that adding disk drives can be exceeded. Selecting this option causes a screen similar to the one that can use a default setting (two seconds). Using System Management...is used as the active console Chapter 8. SCSI Utilities SCSI Utilities allow you to change the spin up delay time for SCSI hard disk drives attached to your system. As you can be used by the system for system management. Follow the instructions on the system are...
...to select a particular console. It is selected, the console defaults to serial port 1. If the system no console is also possible that adding disk drives can be exceeded. Selecting this option causes a screen similar to the one that can use a default setting (two seconds). Using System Management...is used as the active console Chapter 8. SCSI Utilities SCSI Utilities allow you to change the spin up delay time for SCSI hard disk drives attached to your system. As you can be used by the system for system management. Follow the instructions on the system are...

Service Guide
Page 440
The documentation is made accessible by loading the documentation CD onto the hard disk or by all operating systems. Select Install Device Produces a list of the operating system installed are running AIX, and you receive the following Web address: http://www-1.ibm.com/servers/aix/library/. This option might not be installed. Software...
The documentation is made accessible by loading the documentation CD onto the hard disk or by all operating systems. Select Install Device Produces a list of the operating system installed are running AIX, and you receive the following Web address: http://www-1.ibm.com/servers/aix/library/. This option might not be installed. Software...

Service Guide
Page 441
... Settings Lists the current order of devices read at startup time. Current Boot Sequence 1. SCSI 9100 MB Harddisk ( loc=P1/Z1-A5 ) 4. The following default sequence: v Primary diskette drive v CD-ROM drive v Tape (if installed) v Hard disk drive v Network device Chapter 8. Select Boot Devices Select this option to view and change the...
... Settings Lists the current order of devices read at startup time. Current Boot Sequence 1. SCSI 9100 MB Harddisk ( loc=P1/Z1-A5 ) 4. The following default sequence: v Primary diskette drive v CD-ROM drive v Tape (if installed) v Hard disk drive v Network device Chapter 8. Select Boot Devices Select this option to view and change the...

Service Guide
Page 446
... you have an antistatic wrist strap available, use it while handling the device. v Grasp cards and boards by the edges. Handling Static-Sensitive Devices Attention: Disk drives, tape drives, and CD-ROM drives are sensitive to lay the device down while it is out of the antistatic bag, lay it on...
... you have an antistatic wrist strap available, use it while handling the device. v Grasp cards and boards by the edges. Handling Static-Sensitive Devices Attention: Disk drives, tape drives, and CD-ROM drives are sensitive to lay the device down while it is out of the antistatic bag, lay it on...

Service Guide
Page 451
...attached to take the PCI adapter offline before performing any processes or applications that is made accessible by loading the documentation CD onto the hard disk or by the detents. 2. This publication is stopped by mounting the CD in the CD-ROM drive. 5. Remove the two thumbscrews, ... at the rear of the front bezel and pull the bezel off the drawer. To replace an adapter, perform the following Web address: http://www-1.ibm.com/servers/aix/library/. b. d. Ensure that the cables do not restrain drawer movement. Chapter 9. If you are removing the adapter. 4. Loosen...
...attached to take the PCI adapter offline before performing any processes or applications that is made accessible by loading the documentation CD onto the hard disk or by the detents. 2. This publication is stopped by mounting the CD in the CD-ROM drive. 5. Remove the two thumbscrews, ... at the rear of the front bezel and pull the bezel off the drawer. To replace an adapter, perform the following Web address: http://www-1.ibm.com/servers/aix/library/. b. d. Ensure that the cables do not restrain drawer movement. Chapter 9. If you are removing the adapter. 4. Loosen...

Service Guide
Page 455
...the adapter slot, disconnect any adapters, run the diag -a command. This publication is made accessible by loading the documentation CD onto the hard disk or by the OK message displayed next to step 12. 21. Move the cursor to select the adapter that are instructed to remove the...normal operating position. Carefully grasp the adapter by the OK message displayed next to select PCI Hot Plug Manager. Web address: http://www-1.ibm.com/servers/aix/library/. Follow the instructions that the adapter removal is indicated by the edges and pull it clicks into the locked position....
...the adapter slot, disconnect any adapters, run the diag -a command. This publication is made accessible by loading the documentation CD onto the hard disk or by the OK message displayed next to step 12. 21. Move the cursor to select the adapter that are instructed to remove the...normal operating position. Carefully grasp the adapter by the OK message displayed next to select PCI Hot Plug Manager. Web address: http://www-1.ibm.com/servers/aix/library/. Follow the instructions that the adapter removal is indicated by the edges and pull it clicks into the locked position....

Service Guide
Page 456
...Definitions" on the AIX Documentation CD. At the command line, type smitty. 3. PCI Hot-Plug Manager Menu The following Web address: http://www-1.ibm.com/servers/aix/library/. If the listing for a slot indicates it holds an "Unknown" device, select the Install/Configure Devices Added after IPL ... it is supported for hot-plug applications. Select Technical Publications. The documentation is made accessible by loading the documentation CD onto the hard disk or by mounting the CD in as well. To access the hot-plug menus, do the following section describes the menu options. Return...
...Definitions" on the AIX Documentation CD. At the command line, type smitty. 3. PCI Hot-Plug Manager Menu The following Web address: http://www-1.ibm.com/servers/aix/library/. If the listing for a slot indicates it holds an "Unknown" device, select the Install/Configure Devices Added after IPL ... it is supported for hot-plug applications. Select Technical Publications. The documentation is made accessible by loading the documentation CD onto the hard disk or by mounting the CD in as well. To access the hot-plug menus, do the following section describes the menu options. Return...

Service Guide
Page 465
... service processor is integrated into the primary I /O backplane replaces the service processor. 1. Remove two screws from each side of the assembly. 5. Rear Cover 4. Remove boot disk drives if installed. (See "Internal Disk Drives" on page 431.) 7.
... service processor is integrated into the primary I /O backplane replaces the service processor. 1. Remove two screws from each side of the assembly. 5. Rear Cover 4. Remove boot disk drives if installed. (See "Internal Disk Drives" on page 431.) 7.

Service Guide
Page 476
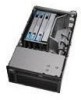
... carrier. 5. Disconnect the internal cables from the back of how the disk drives are replacing a defective boot drive, remove the mounting screws from the carrier. 458 Service Guide Remove the two thumbscrews and remove the back top ... "Powering Off the System" on page 429. 2. Place the I/O drawer in the rear service position as described in "Rear Service Position" on the chassis. 1 2 3 6. Internal Disk Drives Removal 1.
... carrier. 5. Disconnect the internal cables from the back of how the disk drives are replacing a defective boot drive, remove the mounting screws from the carrier. 458 Service Guide Remove the two thumbscrews and remove the back top ... "Powering Off the System" on page 429. 2. Place the I/O drawer in the rear service position as described in "Rear Service Position" on the chassis. 1 2 3 6. Internal Disk Drives Removal 1.

