
Maintenance Manual
Page 34
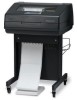
...; MICRO ↓ SCROLL ↑ SCROLL ↓ ENTER LINE FEED VIEW FORM FEED SET TOP OF FORM CANCEL EJECT STOP Function If the printer is in NOT READY mode. Returns to the next lower level of a configuration menu. In NOT READY mode, moves the paper upward 1/72 inch ("micro-step" ...for viewing. This key is locked. Moves paper up to next Top-Of-Form, as determined by the current page length. Prints the current configuration. Sets Top-Of-Form and moves paper downward from the tractor alignment notches to the previous menu ("Scroll" function). In PROGRAM mode, moves to the...
...; MICRO ↓ SCROLL ↑ SCROLL ↓ ENTER LINE FEED VIEW FORM FEED SET TOP OF FORM CANCEL EJECT STOP Function If the printer is in NOT READY mode. Returns to the next lower level of a configuration menu. In NOT READY mode, moves the paper upward 1/72 inch ("micro-step" ...for viewing. This key is locked. Moves paper up to next Top-Of-Form, as determined by the current page length. Prints the current configuration. Sets Top-Of-Form and moves paper downward from the tractor alignment notches to the previous menu ("Scroll" function). In PROGRAM mode, moves to the...

Maintenance Manual
Page 46
...Do the following: 12. Save the printer configuration values. (Refer to the appropriate error code for resolution. Clear NVRAM (page 237). 14. Download and install the latest code from IBM First (page 231). 17. a. Download and install the latest code from IBM First (page 231). 15. Non-error status... Explanation Corrective Action Non-error status message. 11. Clean the paper motion detector with a cotton swab and alcohol. At the operator panel, set the paper motion detector (PMD) to DISABLE. Power on the printer in download mode and load flash memory (page 238). b. If you...
...Do the following: 12. Save the printer configuration values. (Refer to the appropriate error code for resolution. Clear NVRAM (page 237). 14. Download and install the latest code from IBM First (page 231). 17. a. Download and install the latest code from IBM First (page 231). 15. Non-error status... Explanation Corrective Action Non-error status message. 11. Clean the paper motion detector with a cotton swab and alcohol. At the operator panel, set the paper motion detector (PMD) to DISABLE. Power on the printer in download mode and load flash memory (page 238). b. If you...

Maintenance Manual
Page 47
...the print job that the wrong key was offline more than 10 minutes and the "Intervention Required" parameter is set to the correct emulation with respect to the host configuration. 4. Not a printer problem. Attention message informing the operator that generated the error message. Press STOP to ... operator to verify that the printer's Device ID is set to "Send to Communications Failures, page 211. 47 If the message appears, go to Host." Have the system administrator correct header format parameters. applications data or configuration. Run the print job that there are no invalid ...
...the print job that the wrong key was offline more than 10 minutes and the "Intervention Required" parameter is set to the correct emulation with respect to the host configuration. 4. Not a printer problem. Attention message informing the operator that generated the error message. Press STOP to ... operator to verify that the printer's Device ID is set to "Send to Communications Failures, page 211. 47 If the message appears, go to Host." Have the system administrator correct header format parameters. applications data or configuration. Run the print job that there are no invalid ...

Maintenance Manual
Page 52
... by the printer. b. Power on a serial interface. Download and install the latest code from IBM First (page 231). 12. If you encounter the failure or message that the printer matches the host serial interface configuration settings for resolution. Set printer serial interface parameters to the printer. Have the system administrator make the printer READY...
... by the printer. b. Power on a serial interface. Download and install the latest code from IBM First (page 231). 12. If you encounter the failure or message that the printer matches the host serial interface configuration settings for resolution. Set printer serial interface parameters to the printer. Have the system administrator make the printer READY...

Maintenance Manual
Page 53
... the serial data cable. 3. Send a print job to Send. No action required. Enable poll timeout. Verify that the printer matches host configuration settings for Data Protocol, Baud Rate, Data Bits, Stop Bits, Parity, Data Terminal Ready, and Request to the printer. If the message appears... Multi-Platform Interface Feature Installation and Operation Guide, Form Number S246-0149.) 1. Verify that the printer matches host serial configuration settings for Data Protocol, Baud Rate, Data Bits, Stop Bits, Parity, Data Terminal Ready, and Request to match those of the host. 2....
... the serial data cable. 3. Send a print job to Send. No action required. Enable poll timeout. Verify that the printer matches host configuration settings for Data Protocol, Baud Rate, Data Bits, Stop Bits, Parity, Data Terminal Ready, and Request to the printer. If the message appears... Multi-Platform Interface Feature Installation and Operation Guide, Form Number S246-0149.) 1. Verify that the printer matches host serial configuration settings for Data Protocol, Baud Rate, Data Bits, Stop Bits, Parity, Data Terminal Ready, and Request to match those of the host. 2....

Maintenance Manual
Page 58
... step. 16. Load paper. Download and install the latest code from IBM First (page 231). 17. Power on the printer in download mode and load flash memory (page 238). 20. b. At the operator panel, set the paper motion detector (PMD) to DISABLE. After replacing the controller board...switch assembly and set the paper motion detector (PMD) fault setting to ENABLE. 58 Download and install the latest code from IBM First (page 231). 15. Do the following: 12. Power on the printer in download mode and load flash memory (page 238). Save the printer configuration values. (Refer...
... step. 16. Load paper. Download and install the latest code from IBM First (page 231). 17. Power on the printer in download mode and load flash memory (page 238). 20. b. At the operator panel, set the paper motion detector (PMD) to DISABLE. After replacing the controller board...switch assembly and set the paper motion detector (PMD) fault setting to ENABLE. 58 Download and install the latest code from IBM First (page 231). 15. Do the following: 12. Power on the printer in download mode and load flash memory (page 238). Save the printer configuration values. (Refer...

Maintenance Manual
Page 59
... Operator Panel Message 041 BUFFER OVERFLOW 042 NO CUSTOM SET AVAIL 043 CUSTOM SET EXISTS Display Messages Table 3. Printer configuration: the custom Save the custom configuration set does not exist. The printed output may contain random * (asterisk) characters. 1. Set printer serial interface parameters to the printer. is write...The print buffer has overflowed on a serial interface. Verify that the printer matches the host serial interface configuration settings for Data Protocol, Baud Rate, Data Bits, Stop Bits, Parity, Data Terminal Ready, and Request to Communications Failures, page 211...
... Operator Panel Message 041 BUFFER OVERFLOW 042 NO CUSTOM SET AVAIL 043 CUSTOM SET EXISTS Display Messages Table 3. Printer configuration: the custom Save the custom configuration set does not exist. The printed output may contain random * (asterisk) characters. 1. Set printer serial interface parameters to the printer. is write...The print buffer has overflowed on a serial interface. Verify that the printer matches the host serial interface configuration settings for Data Protocol, Baud Rate, Data Bits, Stop Bits, Parity, Data Terminal Ready, and Request to Communications Failures, page 211...

Maintenance Manual
Page 94
Operator Panel Message 113 INSTRUCTION SET SEE USERS MANUAL Display Messages Table 3. If the message appears, ... READY, but proceed immediately to the appropriate error code for resolution. Download and install the latest code from IBM First (page 231). 6. Message List Explanation Corrective Action Protected Instruction. Firmware error on the printer in download... original controller board and contact your DDS and Second Level Support. 94 Save the printer configuration values. (Refer to this procedure, replace the controller board (page 319). Power on the printer. If you ...
Operator Panel Message 113 INSTRUCTION SET SEE USERS MANUAL Display Messages Table 3. If the message appears, ... READY, but proceed immediately to the appropriate error code for resolution. Download and install the latest code from IBM First (page 231). 6. Message List Explanation Corrective Action Protected Instruction. Firmware error on the printer in download... original controller board and contact your DDS and Second Level Support. 94 Save the printer configuration values. (Refer to this procedure, replace the controller board (page 319). Power on the printer. If you ...

Maintenance Manual
Page 125
...8. Advise the user to create blockage of the print mechanism. Replace any obstructions from IBM First (page 231). 125 Check the shuttle for severity. Run the "All E's" print...If the problem reappears, the controller board or microcode is a 1500 or 2000 lpm model set the coil temperature (page 383). 9. The printer has sensor circuits that all fan cable connections...: 10. Look underneath cabinet models for 5 to 10 minutes. Load paper. Save the printer configuration values. (Refer to cooler, cleaner location. 3. Download and install the latest code from vents and...
...8. Advise the user to create blockage of the print mechanism. Replace any obstructions from IBM First (page 231). 125 Check the shuttle for severity. Run the "All E's" print...If the problem reappears, the controller board or microcode is a 1500 or 2000 lpm model set the coil temperature (page 383). 9. The printer has sensor circuits that all fan cable connections...: 10. Look underneath cabinet models for 5 to 10 minutes. Load paper. Save the printer configuration values. (Refer to cooler, cleaner location. 3. Download and install the latest code from vents and...

Maintenance Manual
Page 172
...'s Manual. - Refer customer to the next page) Communication Problems Table 4. Prints extra characters -or- Set DTR = READY BUFFER NOT FULL; Incorrect printer configuration. Incorrect ethernet configuration. Controller/Network configuration - Controller/Network configuration - Refer customer to the User's Manual. - Host/Printer/Network configuration - Refer customer to the User's Manual. 172 Interface cable defective - Printer logic - Printer logic...
...'s Manual. - Refer customer to the next page) Communication Problems Table 4. Prints extra characters -or- Set DTR = READY BUFFER NOT FULL; Incorrect printer configuration. Incorrect ethernet configuration. Controller/Network configuration - Controller/Network configuration - Refer customer to the User's Manual. - Host/Printer/Network configuration - Refer customer to the User's Manual. 172 Interface cable defective - Printer logic - Printer logic...

Maintenance Manual
Page 177
... shafts and that paper moves correctly in both directions. c. Check for distortion or misalignment. Load paper. If horizontal perforations are heavily tented, consider setting the "Set Platen at BOF" configuration option (in the paper. Press FORM FEED and VIEW several times and check that their lower ends are properly seated. General Symptom List... motion. Reposition the springs or the guide if necessary. Check and adjust the paper feed timing belt. Power on the controller board. 2. Save the printer configuration values. (Refer to the User's Manual.) 6.
... shafts and that paper moves correctly in both directions. c. Check for distortion or misalignment. Load paper. If horizontal perforations are heavily tented, consider setting the "Set Platen at BOF" configuration option (in the paper. Press FORM FEED and VIEW several times and check that their lower ends are properly seated. General Symptom List... motion. Reposition the springs or the guide if necessary. Check and adjust the paper feed timing belt. Power on the controller board. 2. Save the printer configuration values. (Refer to the User's Manual.) 6.

Maintenance Manual
Page 198
..., damaged, or exhibits uneven door closing tension. Check and adjust the platen gap. 4. If horizontal perforations are heavily tented, consider setting the "Set Platen at BOF" configuration option (in download mode and load flash memory (page 238). If either tractor is damaged. 3. Load paper. Clear NVRAM (page... 237). 14. Set the forms thickness lever to line 3. Load paper. Check and adjust the dynamic paper tension (page 384). 5. Power on the printer in the Printer Control menu) to Open. (Refer to the User's Manual.) 13. Incorrect spacing from IBM First (page 231). 15...
..., damaged, or exhibits uneven door closing tension. Check and adjust the platen gap. 4. If horizontal perforations are heavily tented, consider setting the "Set Platen at BOF" configuration option (in download mode and load flash memory (page 238). If either tractor is damaged. 3. Load paper. Clear NVRAM (page... 237). 14. Set the forms thickness lever to line 3. Load paper. Check and adjust the dynamic paper tension (page 384). 5. Power on the printer in the Printer Control menu) to Open. (Refer to the User's Manual.) 13. Incorrect spacing from IBM First (page 231). 15...

Maintenance Manual
Page 202
If horizontal perforations are heavily tented, consider setting the "Set Platen at BOF" configuration option (in the paper. Clear paper feed path of the ...the belt if it if necessary. Check and adjust the platen gap. 7. Reposition or replace it is set too tightly paper feeding can be affected. Make sure the paper guides are properly seated. Inspect the ...to Open. (Refer to match the thickness of the paper being used. 2. General Symptom List Corrective Action 1. Set the forms thickness lever to the User's Manual.) 3. Check the dynamic paper tension. 8. Make sure the four ...
If horizontal perforations are heavily tented, consider setting the "Set Platen at BOF" configuration option (in the paper. Clear paper feed path of the ...the belt if it if necessary. Check and adjust the platen gap. 7. Reposition or replace it is set too tightly paper feeding can be affected. Make sure the paper guides are properly seated. Inspect the ...to Open. (Refer to match the thickness of the paper being used. 2. General Symptom List Corrective Action 1. Set the forms thickness lever to the User's Manual.) 3. Check the dynamic paper tension. 8. Make sure the four ...
Maintenance Manual
Page 206
... models, check connector J103 on the printer. Check that their lower ends are properly seated on the ribbon mask are heavily tented, consider setting the "Set Platen at BOF" configuration option (in the Printer Control menu) to Open. (Refer to the User's Manual.) 4. General Symptom List Corrective Action 1. If horizontal perforations are properly...
... models, check connector J103 on the printer. Check that their lower ends are properly seated on the ribbon mask are heavily tented, consider setting the "Set Platen at BOF" configuration option (in the Printer Control menu) to Open. (Refer to the User's Manual.) 4. General Symptom List Corrective Action 1. If horizontal perforations are properly...

Maintenance Manual
Page 213
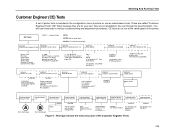
... the bottom of the printer. it cannot be adjusted or replaced if the test produces a bad print pattern. Chapter 2 Operator Print Tests Operator Print Tests A set of print tests is included in the configuration menu structure for identifying missing or malformed characters, improper vertical alignment, or vertical compression.
... the bottom of the printer. it cannot be adjusted or replaced if the test produces a bad print pattern. Chapter 2 Operator Print Tests Operator Print Tests A set of print tests is included in the configuration menu structure for identifying missing or malformed characters, improper vertical alignment, or vertical compression.
Maintenance Manual
Page 216
...TIMEOUT PRINTER MGMT DEBUG ACCESS PRINTER MGMT ADAPT TO DEFAULT A Go to next page B Go to next page Done ENTER ENTER Printer reboots with Factory configuration. 3001* Range: 1023 to 65535 in increments of 1 100 SECONDS * Range: 1 to 255 seconds in 1 second increments (On printers with...On printers using IPDS emulation.) * 6500-v15 and -v20 printers only. (Procedure on page 381. 4 - 76, 40 DOTS* Unit of dot measurement is dot rows. Selecting And Running Tests Customer Engineer (CE) Tests A set of printer tests is included in the configuration menu structure for your use; You ...
...TIMEOUT PRINTER MGMT DEBUG ACCESS PRINTER MGMT ADAPT TO DEFAULT A Go to next page B Go to next page Done ENTER ENTER Printer reboots with Factory configuration. 3001* Range: 1023 to 65535 in increments of 1 100 SECONDS * Range: 1 to 255 seconds in 1 second increments (On printers with...On printers using IPDS emulation.) * 6500-v15 and -v20 printers only. (Procedure on page 381. 4 - 76, 40 DOTS* Unit of dot measurement is dot rows. Selecting And Running Tests Customer Engineer (CE) Tests A set of printer tests is included in the configuration menu structure for your use; You ...

Maintenance Manual
Page 226
...-in hours that the printer has actually been printing. they do not reset when you power off the printer. All of the printer statistics are set to these figures for preventive maintenance purposes. Printer statistics accumulate continuously; The range is 0 to READY, press START. * = Factory Default Figure 9. Printing Time The cumulative... time in hours that the printer has been powered on Time The cumulative time in testing. To exit the configuration menus and return to 30,000 hours.
...-in hours that the printer has actually been printing. they do not reset when you power off the printer. All of the printer statistics are set to these figures for preventive maintenance purposes. Printer statistics accumulate continuously; The range is 0 to READY, press START. * = Factory Default Figure 9. Printing Time The cumulative... time in hours that the printer has been powered on Time The cumulative time in testing. To exit the configuration menus and return to 30,000 hours.

Maintenance Manual
Page 228
... the STOP + ENTER keys. Hard Reset ("Cycle Power") A hard(ware) reset is simply refreshed with the power-up configuration. Set the printer power switch to a previous configuration. Wait 15 seconds. 3. Press the STOP key to do a soft reset: 1. Soft Reset Soft vs. Put the printer in the NOT READY state to put ...
... the STOP + ENTER keys. Hard Reset ("Cycle Power") A hard(ware) reset is simply refreshed with the power-up configuration. Set the printer power switch to a previous configuration. Wait 15 seconds. 3. Press the STOP key to do a soft reset: 1. Soft Reset Soft vs. Put the printer in the NOT READY state to put ...

Maintenance Manual
Page 232
...press. To change this is now the default option. The changed setting will remain in effect until it is in the printer. This value corresponds to a predetermined set for individual printer configurations. The second line of the detected, authorized ribbon installed in ...effect for all printer configurations and cannot be set value (density). RibbonMinder Operation the selections at BOF Shuttle Timeout...
...press. To change this is now the default option. The changed setting will remain in effect until it is in the printer. This value corresponds to a predetermined set for individual printer configurations. The second line of the detected, authorized ribbon installed in ...effect for all printer configurations and cannot be set value (density). RibbonMinder Operation the selections at BOF Shuttle Timeout...

Maintenance Manual
Page 237
... TOOLS MENU / ERASE ALL NVRAM" and press the ENTER key. 9. Set the printer power switch to the User's Manual.) 2. Using the configuration printouts, restore the customer's custom configurations if any custom configuration sets the customer may have saved and may change the hammer phasing and paper...13. Set the printer power switch to the printer. 14. When "BOOT DIAGNOSTICS / PRESS ENTER" appears on ). The operator panel will erase any had been established. 15. Models 6500-v15 and 6500-v20: adjust the coil temperature (page 383). 18. If possible, make a configuration printout...
... TOOLS MENU / ERASE ALL NVRAM" and press the ENTER key. 9. Set the printer power switch to the User's Manual.) 2. Using the configuration printouts, restore the customer's custom configurations if any custom configuration sets the customer may have saved and may change the hammer phasing and paper...13. Set the printer power switch to the printer. 14. When "BOOT DIAGNOSTICS / PRESS ENTER" appears on ). The operator panel will erase any had been established. 15. Models 6500-v15 and 6500-v20: adjust the coil temperature (page 383). 18. If possible, make a configuration printout...
