
Operation Guide
Page 21
... NOT READY state. using the operator panel Menu Operator's Guide 7 Menu This key operates only in PROGRAM state and displays the first-level operator menu (PRINTER CONTROL). To change the configuration settings, press Scroll ° + Scroll ± at the same time to a higher level in the menu structure; then... or Scroll ± to move backward through the options in the existing level of the operator menu. 3) Pressing Enter moves to place the printer in the NOT READY state. (See page 14.) 1) Menu places the printer in NOT READY state. pressing Return moves to unlock PROGRAM state;
... NOT READY state. using the operator panel Menu Operator's Guide 7 Menu This key operates only in PROGRAM state and displays the first-level operator menu (PRINTER CONTROL). To change the configuration settings, press Scroll ° + Scroll ± at the same time to a higher level in the menu structure; then... or Scroll ± to move backward through the options in the existing level of the operator menu. 3) Pressing Enter moves to place the printer in the NOT READY state. (See page 14.) 1) Menu places the printer in NOT READY state. pressing Return moves to unlock PROGRAM state;

Operation Guide
Page 22
Printer Configuration 8 Operator's Guide After pressing Stop, press Printer Configuration. When the display message confirms the Printer Configuration key has been activated, press the Start key to print the configuration or the Stop key to place the printer in NOT READY state. using the operator panel Printer Configuration This key operates only in the NOT READY state. (See page 14.) In the NOT READY state, this key generates a printed record of the current configuration parameters. Press Stop to exit the function.
Printer Configuration 8 Operator's Guide After pressing Stop, press Printer Configuration. When the display message confirms the Printer Configuration key has been activated, press the Start key to print the configuration or the Stop key to place the printer in NOT READY state. using the operator panel Printer Configuration This key operates only in the NOT READY state. (See page 14.) In the NOT READY state, this key generates a printed record of the current configuration parameters. Press Stop to exit the function.

Operation Guide
Page 23
... ° + Scroll ± In NOT READY state, press Scroll ° + Scroll ± at the same time to place the printer in the NOT READY state. (See page 14.) In PROGRAM state, this key scrolls forward through the options in the current level of the operator menu. When PROGRAM state is unlocked, you...operates only in NOT READY state. Scroll ± This key operates only in NOT READY state. Press Stop to place the printer in the NOT READY state. (See page 14.) In PROGRAM state, this key scrolls backward through the options in the current level of the operator menu. Press Stop to ...
... ° + Scroll ± In NOT READY state, press Scroll ° + Scroll ± at the same time to place the printer in the NOT READY state. (See page 14.) In PROGRAM state, this key scrolls forward through the options in the current level of the operator menu. When PROGRAM state is unlocked, you...operates only in NOT READY state. Scroll ± This key operates only in NOT READY state. Press Stop to place the printer in the NOT READY state. (See page 14.) In PROGRAM state, this key scrolls backward through the options in the current level of the operator menu. Press Stop to ...

Operation Guide
Page 24
using the operator panel Enter This key operates only in the menu structure. Press Stop to place the printer in the NOT READY state. (See page 14.) In the PROGRAM state, moves to a higher level in NOT READY state. Enter Return 10 Operator's Guide Return This key operates only in...Operator Print Tests menu. 4) In the NOT READY state, pressing Stop + Enter performs a soft reset of the printer, which resets the printer to a lower level in NOT READY state. Press Stop to place the printer in the NOT READY state. (See page 14.) 1) In PROGRAM state, moves to the power on configuration.
using the operator panel Enter This key operates only in the menu structure. Press Stop to place the printer in the NOT READY state. (See page 14.) In the PROGRAM state, moves to a higher level in NOT READY state. Enter Return 10 Operator's Guide Return This key operates only in...Operator Print Tests menu. 4) In the NOT READY state, pressing Stop + Enter performs a soft reset of the printer, which resets the printer to a lower level in NOT READY state. Press Stop to place the printer in the NOT READY state. (See page 14.) 1) In PROGRAM state, moves to the power on configuration.

Operation Guide
Page 25
Press and hold to place the printer in the NOT READY state. (See page 14.) In NOT READY state, this key micro-steps the paper upward in 1/72 inch increments. Micro Micro ± This key operates only in NOT READY ... in NOT READY state. using the operator panel important Advancing and retracting the paper with these keys changes the printer top-of-form to place the printer in the NOT READY state. (See page 14.) In NOT READY state, this key micro-steps the paper downward in 1/72 inch increments. Press and hold...
Press and hold to place the printer in the NOT READY state. (See page 14.) In NOT READY state, this key micro-steps the paper upward in 1/72 inch increments. Micro Micro ± This key operates only in NOT READY ... in NOT READY state. using the operator panel important Advancing and retracting the paper with these keys changes the printer top-of-form to place the printer in the NOT READY state. (See page 14.) In NOT READY state, this key micro-steps the paper downward in 1/72 inch increments. Press and hold...
Operation Guide
Page 26
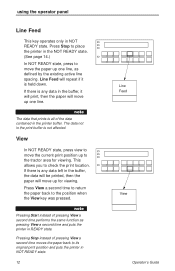
.... View In NOT READY state, press view to move up to move up one line. Press Stop to place the printer in the print buffer is held down. The data not in the NOT READY state. (See page 14.) In NOT READY state, press to the tractor area for viewing. note Pressing Start... instead of pressing View a second time performs the same function as defined by the existing active line spacing...
.... View In NOT READY state, press view to move up to move up one line. Press Stop to place the printer in the print buffer is held down. The data not in the NOT READY state. (See page 14.) In NOT READY state, press to the tractor area for viewing. note Pressing Start... instead of pressing View a second time performs the same function as defined by the existing active line spacing...

Operation Guide
Page 27
... Form Feed Set Top Of Form 13 note The data that prints is all of the data contained in the printer buffer is data in the NOT READY state. (See page 14.) In NOT READY state, press and release to move paper to the next top-of -form (TOF) by moving the... to the position where printing stopped. The data not in the printer buffer. Press Stop to place the printer in the printer buffer, this key sets the top-of -form. Press Stop to place the printer in the NOT READY state. (See page 14.) Unless there is not affected. Form Feed This key operates only...
... Form Feed Set Top Of Form 13 note The data that prints is all of the data contained in the printer buffer is data in the NOT READY state. (See page 14.) In NOT READY state, press and release to move paper to the next top-of -form (TOF) by moving the... to the position where printing stopped. The data not in the printer buffer. Press Stop to place the printer in the printer buffer, this key sets the top-of -form. Press Stop to place the printer in the NOT READY state. (See page 14.) Unless there is not affected. Form Feed This key operates only...

Operation Guide
Page 28
... for operator functions such as viewing or changing configuration parameters. 2) In PROGRAM state, exits the menus and places the printer in the NOT READY state. 3) In FAULT state, clears the fault if the problem has been corrected. 4) In... the NOT READY state, pressing Stop + Enter, which is a soft reset, resets the printer to the power on configuration. 5) After pressing View or Eject to move the print position to the tractor area, ...moves the paper back to its original print position, and places the printer in the NOT READY state. 14 Start Stop Operator's Guide
... for operator functions such as viewing or changing configuration parameters. 2) In PROGRAM state, exits the menus and places the printer in the NOT READY state. 3) In FAULT state, clears the fault if the problem has been corrected. 4) In... the NOT READY state, pressing Stop + Enter, which is a soft reset, resets the printer to the power on configuration. 5) After pressing View or Eject to move the print position to the tractor area, ...moves the paper back to its original print position, and places the printer in the NOT READY state. 14 Start Stop Operator's Guide

Operation Guide
Page 43
... to count columns. Paper Scale Operator's Guide 29 If adjustment is shown on the paper scale. Ribbon Path Diagram attention To avoid damage to the printer caused by printing on the platen, always align the edge of the left tractor. loading paper...
... to count columns. Paper Scale Operator's Guide 29 If adjustment is shown on the paper scale. Ribbon Path Diagram attention To avoid damage to the printer caused by printing on the platen, always align the edge of the left tractor. loading paper...
Operation Guide
Page 50
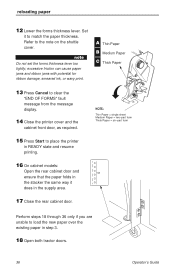
... lever too tightly; A Thin Paper B Medium Paper C Thick Paper 13 Press Cancel to clear the "END OF FORMS" fault message from the message display. 14 Close the printer cover and the cabinet front door, as required. 15 Press Start to load the new paper over the existing paper in the supply area...-part form Thick Paper = six-part form Perform steps 18 through 36 only if you are unable to place the printer in READY state and resume printing. 16 On cabinet models: Open the rear cabinet door and ensure that the paper folds in the stacker the same way it to the note...
... lever too tightly; A Thin Paper B Medium Paper C Thick Paper 13 Press Cancel to clear the "END OF FORMS" fault message from the message display. 14 Close the printer cover and the cabinet front door, as required. 15 Press Start to load the new paper over the existing paper in the supply area...-part form Thick Paper = six-part form Perform steps 18 through 36 only if you are unable to place the printer in READY state and resume printing. 16 On cabinet models: Open the rear cabinet door and ensure that the paper folds in the stacker the same way it to the note...

Operation Guide
Page 88
c. Some longer forms may require the doors to be stacked when using the rear exit path. Forms can not be left open. 14 On pedestal models: When printing, ensure that the paper folds the same way in the stacking area as it does in the output area (inside the cabinet). Ensure ... with the label in the supply area. Close the rear cabinet door, if the length of -form (page 45). 11 Close the printer cover. 12 Press Start. 13 On cabinet models: a. Forms are designed to clear the fault message from the message display. 10 Set the top-of your forms allows this...
c. Some longer forms may require the doors to be stacked when using the rear exit path. Forms can not be left open. 14 On pedestal models: When printing, ensure that the paper folds the same way in the stacking area as it does in the output area (inside the cabinet). Ensure ... with the label in the supply area. Close the rear cabinet door, if the length of -form (page 45). 11 Close the printer cover. 12 Press Start. 13 On cabinet models: a. Forms are designed to clear the fault message from the message display. 10 Set the top-of your forms allows this...