
User Guide
Page 6
... 1-74 Adjusting the Tear-off Position 1-76 Adjusting the Load Position 1-78 Adjusting the Print Alignment 1-78 Unloading Forms 1-81 Removing the Dual Purpose Forms Device (F2 1-83 Installing and Using the Document Insertion Device (F3) . . . 1-85 Installing the Document Insertion Device (F3 1-...to Know Your Printer 2-1 Parts of the Printer 2-2 Model Identification 2-2 Power Switch 2-3 Power-On Test 2-3 Acoustic Cover 2-5 Access Cover 2-5 Front Paper Door 2-5 Forms Guide/Forms Sensor 2-6 Automatic Forms Thickness Adjustment (AFTA 2-8 Platen Rod 2-8 iv User's Guide Model 302
... 1-74 Adjusting the Tear-off Position 1-76 Adjusting the Load Position 1-78 Adjusting the Print Alignment 1-78 Unloading Forms 1-81 Removing the Dual Purpose Forms Device (F2 1-83 Installing and Using the Document Insertion Device (F3) . . . 1-85 Installing the Document Insertion Device (F3 1-...to Know Your Printer 2-1 Parts of the Printer 2-2 Model Identification 2-2 Power Switch 2-3 Power-On Test 2-3 Acoustic Cover 2-5 Access Cover 2-5 Front Paper Door 2-5 Forms Guide/Forms Sensor 2-6 Automatic Forms Thickness Adjustment (AFTA 2-8 Platen Rod 2-8 iv User's Guide Model 302

User Guide
Page 45
Loading Forms in the F1 Forms Device To load forms in locating the tensioning plates. See the figure on page 1-18 for help in the F1 forms device, follow these steps: 1. B lu e F o rm s G u id e / F o rm s S e n so r Chapter 1. Setting Up the 4232 Printer Model 302 1-23 Feed the form into the bottom front of the printer. Be sure that the form goes under the blue forms guide/forms sensor and between the tensioning plates.
Loading Forms in the F1 Forms Device To load forms in locating the tensioning plates. See the figure on page 1-18 for help in the F1 forms device, follow these steps: 1. B lu e F o rm s G u id e / F o rm s S e n so r Chapter 1. Setting Up the 4232 Printer Model 302 1-23 Feed the form into the bottom front of the printer. Be sure that the form goes under the blue forms guide/forms sensor and between the tensioning plates.

User Guide
Page 80
Close the left tractor pins. Blue Tractor Door 1-58 User's Guide Model 302 Feed the form into the printer until the paper is on at least two tractor pins on each side. 4. Put the left paper holes over the left blue tractor door. Be sure that the form goes under the blue forms guide/forms sensor. Blue Forms Guide/ Forms Sensor 5.
Close the left tractor pins. Blue Tractor Door 1-58 User's Guide Model 302 Feed the form into the printer until the paper is on at least two tractor pins on each side. 4. Put the left paper holes over the left blue tractor door. Be sure that the form goes under the blue forms guide/forms sensor. Blue Forms Guide/ Forms Sensor 5.

User Guide
Page 99
Tear off the paper toward the front of the form feeds past the forms sensor, the printer displays 1 END OF FORMS LOAD FORMS and pressing Load/Eject ejects the paper. Setting Up the 4232 Printer Model 302 1-77 Note: If the last page of the printer. 2. Press Load/Eject to position the next form back to print the next print job. Chapter 1. The Ready indicator comes on, and you are ready to the top of form position. To remove the form, follow these steps: 1.
Tear off the paper toward the front of the form feeds past the forms sensor, the printer displays 1 END OF FORMS LOAD FORMS and pressing Load/Eject ejects the paper. Setting Up the 4232 Printer Model 302 1-77 Note: If the last page of the printer. 2. Press Load/Eject to position the next form back to print the next print job. Chapter 1. The Ready indicator comes on, and you are ready to the top of form position. To remove the form, follow these steps: 1.

User Guide
Page 112
Get cut forms that the tab is under the chute. Place the lower forms guide in front of the lower forms guides (if not already installed). Ta b Chute b. Then slide the lower forms guide to load forms in .). 1-90 User's Guide Model 302 Preparing to Load Forms To prepare to the left until it locks on. 2. a. Align the lower forms guide beside the blue forms guide/forms sensor. Install one of the forms chute so that are at least 203.2 by 279.4 mm (8 by 11 in the F3 forms device, follow these steps: 1.
Get cut forms that the tab is under the chute. Place the lower forms guide in front of the lower forms guides (if not already installed). Ta b Chute b. Then slide the lower forms guide to load forms in .). 1-90 User's Guide Model 302 Preparing to Load Forms To prepare to the left until it locks on. 2. a. Align the lower forms guide beside the blue forms guide/forms sensor. Install one of the forms chute so that are at least 203.2 by 279.4 mm (8 by 11 in the F3 forms device, follow these steps: 1.

User Guide
Page 135
... removing the F3 forms device to install a different forms device, you are removing the F3 forms device to the right off the blue forms guide/forms sensor. Setting Up the 4232 Printer Model 302 1-113 Store the lower forms guide with your F3 forms device. 7. With a firm grasp, slide the lower forms guide to install a different forms device, remove the...
... removing the F3 forms device to install a different forms device, you are removing the F3 forms device to the right off the blue forms guide/forms sensor. Setting Up the 4232 Printer Model 302 1-113 Store the lower forms guide with your F3 forms device. 7. With a firm grasp, slide the lower forms guide to install a different forms device, remove the...

User Guide
Page 144
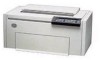
You will need this information as you use this and other 4232 Printer Model 302 manuals. 2-2 User's Guide Model 302 Parts of the Printer The printer has the following parts: Print Head Ribbon Power Switch Access Cover Operator Panel Blue Forms Guide/Forms Sensor (under paper door) Model and Serial Number Paper Door Model Identification Figure 2-1 is an enlargement of a plate on the bottom-front area of your printer. TYPE 4232-XXX Model Number S/N XX-XXXXX Serial Number Figure 2-1. 4232 Printer Model 302 Model Identification Plate Record the model and serial numbers of the printer.
You will need this information as you use this and other 4232 Printer Model 302 manuals. 2-2 User's Guide Model 302 Parts of the Printer The printer has the following parts: Print Head Ribbon Power Switch Access Cover Operator Panel Blue Forms Guide/Forms Sensor (under paper door) Model and Serial Number Paper Door Model Identification Figure 2-1 is an enlargement of a plate on the bottom-front area of your printer. TYPE 4232-XXX Model Number S/N XX-XXXXX Serial Number Figure 2-1. 4232 Printer Model 302 Model Identification Plate Record the model and serial numbers of the printer.

User Guide
Page 148
... the type of the form. Blue Forms Guide/ Forms Sensor With a Continuous Forms Device (F1) or a Dual Purpose Forms Device (F2) installed, the sensor works as: A forms guide for aligning the left edge of forms device installed in several ways. The way it . Forms Guide/Forms Sensor The blue forms guide/forms sensor works in the printer. A forms sensor for detecting the presence of a form and activating the...
... the type of the form. Blue Forms Guide/ Forms Sensor With a Continuous Forms Device (F1) or a Dual Purpose Forms Device (F2) installed, the sensor works as: A forms guide for aligning the left edge of forms device installed in several ways. The way it . Forms Guide/Forms Sensor The blue forms guide/forms sensor works in the printer. A forms sensor for detecting the presence of a form and activating the...

User Guide
Page 149
The Document Insertion Device (F3) has an additional guide called a lower forms guide that fits over the sensor. Chapter 2. Getting to Know Your Printer 2-7 The sensor works as : A guide for detecting the presence of a form and activating the Load/Eject key. Low er F o rm s G u id e The lower forms guide works as : A sensor for aligning the cut sheet form.
The Document Insertion Device (F3) has an additional guide called a lower forms guide that fits over the sensor. Chapter 2. Getting to Know Your Printer 2-7 The sensor works as : A guide for detecting the presence of a form and activating the Load/Eject key. Low er F o rm s G u id e The lower forms guide works as : A sensor for aligning the cut sheet form.

User Guide
Page 203
... the print job (see "Introducing the 4232 Printer Model 302" in IBM 4232 Printer Model 302 Product and Programming Description for more information on the maximum page length setting). Be sure that the forms are loaded correctly and that nothing blocks the blue forms guide/forms sensor. 5. Press Load/Eject. 3. Appendix B. Reset the top of...
... the print job (see "Introducing the 4232 Printer Model 302" in IBM 4232 Printer Model 302 Product and Programming Description for more information on the maximum page length setting). Be sure that the forms are loaded correctly and that nothing blocks the blue forms guide/forms sensor. 5. Press Load/Eject. 3. Appendix B. Reset the top of...

User Guide
Page 204
... (F3), and Auto Sheet Feeder (F4): B-4 User's Guide Model 302 Clear the jam. 4. Verify the printed output; Be sure that nothing blocks the blue forms guide/forms sensor. 5. Reset the top of form position and enable printing. if pages are damaged or data is not an error condition. Press Load/Eject to position the...
... (F3), and Auto Sheet Feeder (F4): B-4 User's Guide Model 302 Clear the jam. 4. Verify the printed output; Be sure that nothing blocks the blue forms guide/forms sensor. 5. Reset the top of form position and enable printing. if pages are damaged or data is not an error condition. Press Load/Eject to position the...

User Guide
Page 208
.... 2. Press Start. 4. This message could also display if the paper present sensor becomes dirty. B-8 User's Guide Model 302 Note: If you do not have an F3 or F4 forms device, see "Setting Up Your 4232 Printer with ASF" in IBM 4232 Printer Model 302 Auto Sheet Feeder General Information). Install either the... F3 or F4 forms device and set that device through the Configuration Menu (see Chapter 1, "...
.... 2. Press Start. 4. This message could also display if the paper present sensor becomes dirty. B-8 User's Guide Model 302 Note: If you do not have an F3 or F4 forms device, see "Setting Up Your 4232 Printer with ASF" in IBM 4232 Printer Model 302 Auto Sheet Feeder General Information). Install either the... F3 or F4 forms device and set that device through the Configuration Menu (see Chapter 1, "...

User Guide
Page 258
...to other peripheral devices to hold input or output data temporarily. bezel. See forms guide/forms sensor. C Centronics* parallel interface. continuous forms. A series of operation. cut forms. A single form, not connected to the printer, from the computer through a printing device. ...). data stream. A request from a terminal for controlling the transmission of printed text. Continuous Forms Device (F1). blue forms guide/forms sensor. blue forms tension knob. A forms feed device that allows printing of a particular program. A portion of storage used for the ...
...to other peripheral devices to hold input or output data temporarily. bezel. See forms guide/forms sensor. C Centronics* parallel interface. continuous forms. A series of operation. cut forms. A single form, not connected to the printer, from the computer through a printing device. ...). data stream. A request from a terminal for controlling the transmission of printed text. Continuous Forms Device (F1). blue forms guide/forms sensor. blue forms tension knob. A forms feed device that allows printing of a particular program. A portion of storage used for the ...
User Guide
Page 259
.... Blue knob used to align the left edge of an IBM product that can be printed. See Document Insertion Device. forms guide/forms sensor. The number of lines of four mechanical paper handling devices that a blank form is not ejected when separating forms. Dual Purpose Forms Device (F2). Glossary X-3 A forms feeding option which, when selected, automatically stops continuous...
.... Blue knob used to align the left edge of an IBM product that can be printed. See Document Insertion Device. forms guide/forms sensor. The number of lines of four mechanical paper handling devices that a blank form is not ejected when separating forms. Dual Purpose Forms Device (F2). Glossary X-3 A forms feeding option which, when selected, automatically stops continuous...

User Guide
Page 265
... print verification test 1-95 inspection B-24 prepare for installation 1-12 forms guide, location and function 2-6 forms handling devices 2-16 forms information C-1 forms loading Continuous Forms Device 1-23 Document Insertion Device 1-91 Dual Purpose Forms Device 1-57 forms sensor 2-6 forms tension knob 1-40 forms tension lever 1-40 forms tensioner 1-40 forms transport device 2-19 front paper door 1-88, 2-5 G glossary X-1 H humidity damage 2-15 I indicators...
... print verification test 1-95 inspection B-24 prepare for installation 1-12 forms guide, location and function 2-6 forms handling devices 2-16 forms information C-1 forms loading Continuous Forms Device 1-23 Document Insertion Device 1-91 Dual Purpose Forms Device 1-57 forms sensor 2-6 forms tension knob 1-40 forms tension lever 1-40 forms tensioner 1-40 forms transport device 2-19 front paper door 1-88, 2-5 G glossary X-1 H humidity damage 2-15 I indicators...
