
User Guide
Page 5
Setting Up the 4232 Printer Model 302 1-1 Beginning Printer Installation 1-2 Installing the Ribbon Cartridge and Guide 1-6 Preparing for Forms ...Continuous Forms Device (F1 1-18 Preparing to Load Forms 1-21 Loading Forms in the F2 Forms Device 1-57 Using the Printer Verification Test for the F1 Forms Device 1-30 Adjusting the Print Quality 1-35 Adjusting the Tractor Tension 1-37 Adjusting the...Load Forms 1-56 Loading Forms in the F1 Forms Device 1-23 Using the Printer Verification Test for the F2 Forms Device 1-62 Adjusting the Print Quality 1-67 Adjusting the Tractor Tension 1-68...
Setting Up the 4232 Printer Model 302 1-1 Beginning Printer Installation 1-2 Installing the Ribbon Cartridge and Guide 1-6 Preparing for Forms ...Continuous Forms Device (F1 1-18 Preparing to Load Forms 1-21 Loading Forms in the F2 Forms Device 1-57 Using the Printer Verification Test for the F1 Forms Device 1-30 Adjusting the Print Quality 1-35 Adjusting the Tractor Tension 1-37 Adjusting the...Load Forms 1-56 Loading Forms in the F1 Forms Device 1-23 Using the Printer Verification Test for the F2 Forms Device 1-62 Adjusting the Print Quality 1-67 Adjusting the Tractor Tension 1-68...

User Guide
Page 6
...85 Changing the Paper Door 1-88 Preparing to Load Forms 1-90 Loading Forms in the F3 Forms Device 1-91 Using the Printer Verification Test for the F3 Forms Device 1-93 Adjusting the Print Quality 1-98 Adjusting the Forms Thickness Setting 1-99 Adjusting the ...the Acoustic Cover 1-114 Removing the Acoustic Cover 1-114 Reinstalling the Acoustic Cover 1-114 Attaching the 4232 Printer Model 302 to Your Computer . . . 1-116 Connecting to Know Your Printer 2-1 Parts of the Printer 2-2 Model Identification 2-2 Power Switch 2-3 Power-On Test 2-3 Acoustic Cover 2-5 Access Cover 2-5 Front ...
...85 Changing the Paper Door 1-88 Preparing to Load Forms 1-90 Loading Forms in the F3 Forms Device 1-91 Using the Printer Verification Test for the F3 Forms Device 1-93 Adjusting the Print Quality 1-98 Adjusting the Forms Thickness Setting 1-99 Adjusting the ...the Acoustic Cover 1-114 Removing the Acoustic Cover 1-114 Reinstalling the Acoustic Cover 1-114 Attaching the 4232 Printer Model 302 to Your Computer . . . 1-116 Connecting to Know Your Printer 2-1 Parts of the Printer 2-2 Model Identification 2-2 Power Switch 2-3 Power-On Test 2-3 Acoustic Cover 2-5 Access Cover 2-5 Front ...

User Guide
Page 7
...the Ribbon Cartridge 3-2 Installing the Ribbon Cartridge 3-4 Chapter 4. Using the Operator Print Tests 4-1 General Test Instructions 4-1 Printer Demonstration 4-3 Top of Form Alignment 4-4 Left Margin Alignment 4-6 Printer Configuration 4-9 Printer Verification 4-12 Bidirectional Adjustment 4-15 Contents v Operator Panel 2-9 Alarm 2-10 Display 2-10 Power Indicator 2-11 Ready ...2-19 Ribbons 2-20 Print Head 2-20 Problem Determination 2-20 Relocation Instructions 2-20 Caring for Your Printer 2-21 Starting a Print Job 2-22 Stopping or Canceling a Print Job 2-23 Chapter 3.
...the Ribbon Cartridge 3-2 Installing the Ribbon Cartridge 3-4 Chapter 4. Using the Operator Print Tests 4-1 General Test Instructions 4-1 Printer Demonstration 4-3 Top of Form Alignment 4-4 Left Margin Alignment 4-6 Printer Configuration 4-9 Printer Verification 4-12 Bidirectional Adjustment 4-15 Contents v Operator Panel 2-9 Alarm 2-10 Display 2-10 Power Indicator 2-11 Ready ...2-19 Ribbons 2-20 Print Head 2-20 Problem Determination 2-20 Relocation Instructions 2-20 Caring for Your Printer 2-21 Starting a Print Job 2-22 Stopping or Canceling a Print Job 2-23 Chapter 3.

User Guide
Page 17
... appendixes in the Appendix gives the experienced IBM 4232 Printer Model 302 operator a guideline for teaching others how to put together step-by those who install or operate the printer, or supervise printer operations. Chapter 2, "Getting to Know Your Printer," gives locations, descriptions of parts, a... replacement of applications. You can use the printer. Preface This guide describes the basic operating procedures for the IBM* 4232 Printer Model 302 and should be read and used by -step instructions tailored to your printer. This guide includes the procedures necessary for you...
... appendixes in the Appendix gives the experienced IBM 4232 Printer Model 302 operator a guideline for teaching others how to put together step-by those who install or operate the printer, or supervise printer operations. Chapter 2, "Getting to Know Your Printer," gives locations, descriptions of parts, a... replacement of applications. You can use the printer. Preface This guide describes the basic operating procedures for the IBM* 4232 Printer Model 302 and should be read and used by -step instructions tailored to your printer. This guide includes the procedures necessary for you...

User Guide
Page 18
... parts of the printer that are actually blue in the printer. The blue color in the IBM 4232 Printer Model 302 Operator Panel Instructions include: The operator panel Configuration options. You will use the IBM 4232 Printer Model 302 User's Guide with the IBM 4232 Printer Model 302 Operator ...Panel Instructions. This guide uses color to help you plan to diagnose and solve printer problems. Appendix C, "Forms Information," describes the types...
... parts of the printer that are actually blue in the printer. The blue color in the IBM 4232 Printer Model 302 Operator Panel Instructions include: The operator panel Configuration options. You will use the IBM 4232 Printer Model 302 User's Guide with the IBM 4232 Printer Model 302 Operator ...Panel Instructions. This guide uses color to help you plan to diagnose and solve printer problems. Appendix C, "Forms Information," describes the types...
User Guide
Page 19
... describes how to help you plan for and prepare the site for installation. IBM 4232 Printer Model 302 Product and Programming Description, GA24-4385. IBM 4230 and 4232 Printers Safety Information, SA40-0575. IBM 4232 Printer Model 302 Quick Reference Guide, SA24-4388. IBM 4232 Printer Model 302 Auto Sheet Feeder General Information, SA24-4391. Publications The following publications...
... describes how to help you plan for and prepare the site for installation. IBM 4232 Printer Model 302 Product and Programming Description, GA24-4385. IBM 4230 and 4232 Printers Safety Information, SA40-0575. IBM 4232 Printer Model 302 Quick Reference Guide, SA24-4388. IBM 4232 Printer Model 302 Auto Sheet Feeder General Information, SA24-4391. Publications The following publications...

User Guide
Page 20
... illustrations of the 4230 and 4232 Printers. IBM 4230 and 4232 Printers Maintenance Information Manual, SA40-0572. xviii User's Guide Model 302 This manual provides detailed maintenance procedures for servicing the IBM 4230 and 4232 Printers. IBM 4230 and 4232 Printers Illustrated Parts Catalog, SA40-0573. IBM 4230 and 4232 Printers Safety Information, SA40-0575. For service information, see: IBM 4230 and 4232 Printers Maintenance Analysis Procedures...
... illustrations of the 4230 and 4232 Printers. IBM 4230 and 4232 Printers Maintenance Information Manual, SA40-0572. xviii User's Guide Model 302 This manual provides detailed maintenance procedures for servicing the IBM 4230 and 4232 Printers. IBM 4230 and 4232 Printers Illustrated Parts Catalog, SA40-0573. IBM 4230 and 4232 Printers Safety Information, SA40-0575. For service information, see: IBM 4230 and 4232 Printers Maintenance Analysis Procedures...

User Guide
Page 21
... only). 16.7 (Fast Draft and DP Quality only). 15 12 10 Preface xix You can use : continuous forms for more information. Your printer combines excellent print quality along with the ability to print in several print styles and graphics. Each device does a different type of print job,... settings: DP (Data Processing) Quality Fast Draft Quality DP Text Quality Near Letter Quality. The computer does the processing; Introduction Your IBM 4232 Printer Model 302 is important that you communicate with the people who operate and program the computer so that you know when any changes are...
... only). 16.7 (Fast Draft and DP Quality only). 15 12 10 Preface xix You can use : continuous forms for more information. Your printer combines excellent print quality along with the ability to print in several print styles and graphics. Each device does a different type of print job,... settings: DP (Data Processing) Quality Fast Draft Quality DP Text Quality Near Letter Quality. The computer does the processing; Introduction Your IBM 4232 Printer Model 302 is important that you communicate with the people who operate and program the computer so that you know when any changes are...

User Guide
Page 22
For more information, see "Using Print Format and Quality Parameters" in IBM 4232 Printer Model 302 Operator Panel Instructions or "Introducing the 4232 Printer Model 302" in IBM 4232 Printer Model 302 Product and Programming Description. You can set line spacing to be printed per inch (LPI) from the operator panel. xx User's Guide Model 302 LPI represents the number of lines to the following lines per vertical inch. 6 8.
For more information, see "Using Print Format and Quality Parameters" in IBM 4232 Printer Model 302 Operator Panel Instructions or "Introducing the 4232 Printer Model 302" in IBM 4232 Printer Model 302 Product and Programming Description. You can set line spacing to be printed per inch (LPI) from the operator panel. xx User's Guide Model 302 LPI represents the number of lines to the following lines per vertical inch. 6 8.

User Guide
Page 23
... panel. This guide also contains error codes and a symptoms list. IBM 4232 Printer Model 302 Quick Reference Guide Use the guide as to setup and test the printer (as well as a reference when operating the printer. If you are installing an Auto Sheet Feeder (ASF), see "...should be posted near the printer. If you get started: IBM 4232 Printer Model 302 User's Guide Use this manual to learn how to install the IBM* 4232 Printer Model 302. Setting Up the 4232 Printer Model 302 The following steps, call your computer. Chapter 1. IBM 4232 Printer Model 302 Operator Panel ...
... panel. This guide also contains error codes and a symptoms list. IBM 4232 Printer Model 302 Quick Reference Guide Use the guide as to setup and test the printer (as well as a reference when operating the printer. If you are installing an Auto Sheet Feeder (ASF), see "...should be posted near the printer. If you get started: IBM 4232 Printer Model 302 User's Guide Use this manual to learn how to install the IBM* 4232 Printer Model 302. Setting Up the 4232 Printer Model 302 The following steps, call your computer. Chapter 1. IBM 4232 Printer Model 302 Operator Panel ...

User Guide
Page 24
... approximately 20.4 kg (45 lb). Beginning Printer Installation To install the printer, follow these steps: 1. The Document Insertion Device (F3) is shipped with a long and short lower forms guide and a paper door. Do not lift it by ... F3 forms device, be sure that you find the guides and paper door and set them aside. Be sure that you have the following items: Printer Acoustic Cover Lower Forms Guides (F3 Device Only) Paper Door (F3 Device Only) Ribbon Cartridge User's Guide Maintenance Manuals Operator Panel Instructions Quick Reference Guide...
... approximately 20.4 kg (45 lb). Beginning Printer Installation To install the printer, follow these steps: 1. The Document Insertion Device (F3) is shipped with a long and short lower forms guide and a paper door. Do not lift it by ... F3 forms device, be sure that you find the guides and paper door and set them aside. Be sure that you have the following items: Printer Acoustic Cover Lower Forms Guides (F3 Device Only) Paper Door (F3 Device Only) Ribbon Cartridge User's Guide Maintenance Manuals Operator Panel Instructions Quick Reference Guide...

User Guide
Page 25
..., if present, from the access cover window and discard it will not go any higher. Pull the door up until it . 4. Setting Up the 4232 Printer Model 302 1-3 Push the door back slightly to both the front and the rear of your choice). Place the...
..., if present, from the access cover window and discard it will not go any higher. Pull the door up until it . 4. Setting Up the 4232 Printer Model 302 1-3 Push the door back slightly to both the front and the rear of your choice). Place the...

User Guide
Page 26
6. Carefully cut the orange tie and remove it from the printer. Find the orange tie on the right side of the printer to the left of the print head. Orange Tie 1-4 User's Guide Model 302
6. Carefully cut the orange tie and remove it from the printer. Find the orange tie on the right side of the printer to the left of the print head. Orange Tie 1-4 User's Guide Model 302

User Guide
Page 27
Chapter 1. S h ip p in g B ra ce Note: Save the shipping brace in the center of the printer. Setting Up the 4232 Printer Model 302 1-5 7. Unscrew the knob and remove the knob and shipping brace from the printer. Consult the following figure and then find the large orange knob and orange shipping brace in case you relocate the printer.
Chapter 1. S h ip p in g B ra ce Note: Save the shipping brace in the center of the printer. Setting Up the 4232 Printer Model 302 1-5 7. Unscrew the knob and remove the knob and shipping brace from the printer. Consult the following figure and then find the large orange knob and orange shipping brace in case you relocate the printer.
User Guide
Page 28
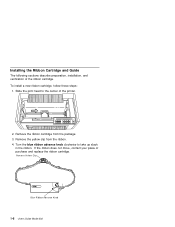
... and replace the ribbon cartridge. To install a new ribbon cartridge, follow these steps: 1. Turn the blue ribbon advance knob clockwise to the center of the printer. 2. If the ribbon does not move, contact your place of the ribbon cartridge.
... and replace the ribbon cartridge. To install a new ribbon cartridge, follow these steps: 1. Turn the blue ribbon advance knob clockwise to the center of the printer. 2. If the ribbon does not move, contact your place of the ribbon cartridge.

User Guide
Page 29
Press the cartridge down firmly to align the slots. Setting Up the 4232 Printer Model 302 1-7 Be sure that the plastic tab on the bottom of the ribbon cartridge aligns with the metal post. Chapter 1. 5. Lower the ribbon cartridge onto the metal post. Align the blue slotted opening on the bottom of the ribbon cartridge with the hole in g M e ta l P o s t 6. You may need to turn the blue ribbon advance knob to snap it into place. Ta b B lu e S lo tte d O p e n in the printer casting.
Press the cartridge down firmly to align the slots. Setting Up the 4232 Printer Model 302 1-7 Be sure that the plastic tab on the bottom of the ribbon cartridge aligns with the metal post. Chapter 1. 5. Lower the ribbon cartridge onto the metal post. Align the blue slotted opening on the bottom of the ribbon cartridge with the hole in g M e ta l P o s t 6. You may need to turn the blue ribbon advance knob to snap it into place. Ta b B lu e S lo tte d O p e n in the printer casting.

User Guide
Page 31
b. The ribbon is securely snapped onto the printer. B lu e R ib b o n A d v a n c e K n o b Chapter 1. 8. If the ribbon does not move, replace the ribbon cartridge. The left side of the ribbon cartridge is not catching on the print head. There are no twists or folds in the ribbon. The right side fits over the ribbon drive post but does not latch down. c. The ribbon moves when you have installed the ribbon cartridge correctly, check that: a. d. To be sure you turn the blue ribbon advance knob clockwise. Setting Up the 4232 Printer Model 302 1-9
b. The ribbon is securely snapped onto the printer. B lu e R ib b o n A d v a n c e K n o b Chapter 1. 8. If the ribbon does not move, replace the ribbon cartridge. The left side of the ribbon cartridge is not catching on the print head. There are no twists or folds in the ribbon. The right side fits over the ribbon drive post but does not latch down. c. The ribbon moves when you have installed the ribbon cartridge correctly, check that: a. d. To be sure you turn the blue ribbon advance knob clockwise. Setting Up the 4232 Printer Model 302 1-9

User Guide
Page 32
This machine has a grounding-type (3-wire) power cord because grounding is Off (O). If this machine provides extra protection against the risk of the printer. Connect the power cord to a properly grounded outlet. Power Switch Plug the power cord into the electrical outlet. 1-10 User's Guide Model 302 Preparing for ...
This machine has a grounding-type (3-wire) power cord because grounding is Off (O). If this machine provides extra protection against the risk of the printer. Connect the power cord to a properly grounded outlet. Power Switch Plug the power cord into the electrical outlet. 1-10 User's Guide Model 302 Preparing for ...

User Guide
Page 33
... of keys and indicators on the operator panel. Press the template into place on the operator panel display, see "Using Printer Setup Parameters" in the following figure. 2. xxxxx xxxxx xxxxxxxxx xxxxx xxxx xxxx xxxxx xxxxxxxx xxxx xxxx xxxxx xxxxxx xxxx xxxxx... xxxxx xxxx xxxxxx xxxxx xx x xxxx xxxx xx x xxxxx xxxxx To change the language shown on the operator panel, as shown in IBM 4232 Printer Model 302 Operator Panel Instructions. 3. Use the following : a. P ow er R eady P ro c e s s in g O n lin e M enu A tte n tio n U n it C h e c k Q u ic k...
... of keys and indicators on the operator panel. Press the template into place on the operator panel display, see "Using Printer Setup Parameters" in the following figure. 2. xxxxx xxxxx xxxxxxxxx xxxxx xxxx xxxx xxxxx xxxxxxxx xxxx xxxx xxxxx xxxxxx xxxx xxxxx... xxxxx xxxx xxxxxx xxxxx xx x xxxx xxxx xx x xxxxx xxxxx To change the language shown on the operator panel, as shown in IBM 4232 Printer Model 302 Operator Panel Instructions. 3. Use the following : a. P ow er R eady P ro c e s s in g O n lin e M enu A tte n tio n U n it C h e c k Q u ic k...

User Guide
Page 34
.... This status code appears because forms have not been loaded. 1-12 User's Guide Model 302 The print head and ribbon move. The printer does the following: a. The printer displays Calibrating Printer Please Wait and then DIAGNOSTICS COMPLETE followed by 1 END OF FORMS LOAD FORMS The Attention indicator also blinks and the alarm beeps...
.... This status code appears because forms have not been loaded. 1-12 User's Guide Model 302 The print head and ribbon move. The printer does the following: a. The printer displays Calibrating Printer Please Wait and then DIAGNOSTICS COMPLETE followed by 1 END OF FORMS LOAD FORMS The Attention indicator also blinks and the alarm beeps...


