
User Guide
Page 7
... Device (F2 2-17 Document Insertion Device (F3 2-18 Auto Sheet Feeder Device (F4 2-19 Ribbons 2-20 Print Head 2-20 Problem Determination 2-20 Relocation Instructions 2-20 Caring for Your Printer 2-21 Starting a Print Job 2-22 Stopping or Canceling a Print Job 2-23 Chapter 3. Replacing Your Ribbon 3-1 Removing the Ribbon Cartridge 3-2 Installing the Ribbon Cartridge 3-4 Chapter 4. Using...
... Device (F2 2-17 Document Insertion Device (F3 2-18 Auto Sheet Feeder Device (F4 2-19 Ribbons 2-20 Print Head 2-20 Problem Determination 2-20 Relocation Instructions 2-20 Caring for Your Printer 2-21 Starting a Print Job 2-22 Stopping or Canceling a Print Job 2-23 Chapter 3. Replacing Your Ribbon 3-1 Removing the Ribbon Cartridge 3-2 Installing the Ribbon Cartridge 3-4 Chapter 4. Using...

User Guide
Page 26
Find the orange tie on the right side of the printer to the left of the print head. Carefully cut the orange tie and remove it from the printer. Orange Tie 1-4 User's Guide Model 302 6.
Find the orange tie on the right side of the printer to the left of the print head. Carefully cut the orange tie and remove it from the printer. Orange Tie 1-4 User's Guide Model 302 6.
User Guide
Page 28
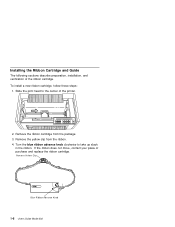
Remove the ribbon cartridge from the ribbon. 4. Slide the print head to take up slack in the ribbon. To install a new ribbon cartridge, follow these steps: 1. Turn the blue ribbon advance knob clockwise to the center ...
Remove the ribbon cartridge from the ribbon. 4. Slide the print head to take up slack in the ribbon. To install a new ribbon cartridge, follow these steps: 1. Turn the blue ribbon advance knob clockwise to the center ...

User Guide
Page 30
Ribbon Guide Ribbon Guide Posts 1-8 User's Guide Model 302 7. Align the holes in the ribbon guide with the top of the posts are even with the ribbon guide posts on the print head carrier. Press the guide all the way down on the posts until the tops of the ribbon guide.
Ribbon Guide Ribbon Guide Posts 1-8 User's Guide Model 302 7. Align the holes in the ribbon guide with the top of the posts are even with the ribbon guide posts on the print head carrier. Press the guide all the way down on the posts until the tops of the ribbon guide.

User Guide
Page 31
The right side fits over the ribbon drive post but does not latch down. There are no twists or folds in the ribbon. c. d. B lu e R ib b o n A d v a n c e K n o b Chapter 1. To be sure you turn the blue ribbon advance knob clockwise. b. The left side of the ribbon cartridge is not catching on the print head. Setting Up the 4232 Printer Model 302 1-9 The ribbon is securely snapped onto the printer. 8. The ribbon moves when you have installed the ribbon cartridge correctly, check that: a. If the ribbon does not move, replace the ribbon cartridge.
The right side fits over the ribbon drive post but does not latch down. There are no twists or folds in the ribbon. c. d. B lu e R ib b o n A d v a n c e K n o b Chapter 1. To be sure you turn the blue ribbon advance knob clockwise. b. The left side of the ribbon cartridge is not catching on the print head. Setting Up the 4232 Printer Model 302 1-9 The ribbon is securely snapped onto the printer. 8. The ribbon moves when you have installed the ribbon cartridge correctly, check that: a. If the ribbon does not move, replace the ribbon cartridge.

User Guide
Page 34
... blinks and the alarm beeps. This status code appears because forms have not been loaded. 1-12 User's Guide Model 302 Turn the power On (|). The print head and ribbon move. 4. c. The printer does the following: a. Then the printer displays The printer then displays DIAGNOSTICS IN PROGRESS b.
... blinks and the alarm beeps. This status code appears because forms have not been loaded. 1-12 User's Guide Model 302 Turn the power On (|). The print head and ribbon move. 4. c. The printer does the following: a. Then the printer displays The printer then displays DIAGNOSTICS IN PROGRESS b.

User Guide
Page 38
The printer displays Save Current Values Custom Set A e. Turn the power Off (O). 16. The printer displays Save Current Values Custom Set A Saved 15. You are now ready to "Selecting the Forms Device Installation Procedure" on page 1-17. 1-16 User's Guide Model 302 Press Enter. Go to install the forms device. Slide the print head to save the configuration changes. Press Enter to the center of the printer. 17. d.
The printer displays Save Current Values Custom Set A e. Turn the power Off (O). 16. The printer displays Save Current Values Custom Set A Saved 15. You are now ready to "Selecting the Forms Device Installation Procedure" on page 1-17. 1-16 User's Guide Model 302 Press Enter. Go to install the forms device. Slide the print head to save the configuration changes. Press Enter to the center of the printer. 17. d.

User Guide
Page 43
... tension knob to the position lets you see the below the number 1. Preparing to Load Forms To prepare to load forms in g L e v e r Chapter 1. Slide the print head to the extreme right. B lu e L o c k in the F1 forms device, follow these steps: 1. Slide the tractor to the far left side of the printer until...
... tension knob to the position lets you see the below the number 1. Preparing to Load Forms To prepare to load forms in g L e v e r Chapter 1. Slide the print head to the extreme right. B lu e L o c k in the F1 forms device, follow these steps: 1. Slide the tractor to the far left side of the printer until...

User Guide
Page 57
...Tractor Tension" on the forms to tear, wrinkle, or buckle and can affect the darkness or lightness of output. Good print quality includes: Clear, legible print Satisfactory darkness or lightness of the output. Forms Thickness Setting This setting can affect the appearance of output. See "Automatic Forms...: The Automatic Forms Thickness Adjustment (AFTA) mechanism automatically measures the forms thickness and adjusts the gap from the print head to you can make that the print quality is up to the platen rod based on the right tractor can be adjusted. The printer will normally sense...
...Tractor Tension" on the forms to tear, wrinkle, or buckle and can affect the darkness or lightness of output. Good print quality includes: Clear, legible print Satisfactory darkness or lightness of the output. Forms Thickness Setting This setting can affect the appearance of output. See "Automatic Forms...: The Automatic Forms Thickness Adjustment (AFTA) mechanism automatically measures the forms thickness and adjusts the gap from the print head to you can make that the print quality is up to the platen rod based on the right tractor can be adjusted. The printer will normally sense...

User Guide
Page 60
...for you by the Automatic Forms Thickness Adjustment (AFTA), but you can make the print darker, press Darker. The printer displays LIGHT | -------| DARK The print head moves closer to meet your requirements. Note: The print may not get darker if the ribbon is worn or if there is ready. ...1. Press Start, if needed, to the distance if the print output is dark (or light) enough to the paper, and the print becomes darker. The printer displays LIGHT | DARK The print head moves farther away from the paper, and the print becomes lighter. 1-38 User's Guide Model 302 To make ...
...for you by the Automatic Forms Thickness Adjustment (AFTA), but you can make the print darker, press Darker. The printer displays LIGHT | -------| DARK The print head moves closer to meet your requirements. Note: The print may not get darker if the ribbon is worn or if there is ready. ...1. Press Start, if needed, to the distance if the print output is dark (or light) enough to the paper, and the print becomes darker. The printer displays LIGHT | DARK The print head moves farther away from the paper, and the print becomes lighter. 1-38 User's Guide Model 302 To make ...

User Guide
Page 61
... Panel" in IBM 4232 Printer Model 302 Operator Panel Instructions for more information on this setting. Setting Up the 4232 Printer Model 302 1-39 As long as you press Darker or Lighter, the printer displays an increasing amount of darkness or lightness until one of the limits of the print head relative to...
... Panel" in IBM 4232 Printer Model 302 Operator Panel Instructions for more information on this setting. Setting Up the 4232 Printer Model 302 1-39 As long as you press Darker or Lighter, the printer displays an increasing amount of darkness or lightness until one of the limits of the print head relative to...

User Guide
Page 78
Slide the print head to load forms in .) wide. 1-56 User's Guide Model 302 Get continuous forms paper that is at least 203.2 mm (8 in the F2 forms device, follow these steps: 1. Open both of the printer. 2. Preparing to Load Forms To prepare to the far left side of the blue tractor doors. Blue Tractor Doors 3.
Slide the print head to load forms in .) wide. 1-56 User's Guide Model 302 Get continuous forms paper that is at least 203.2 mm (8 in the F2 forms device, follow these steps: 1. Open both of the printer. 2. Preparing to Load Forms To prepare to the far left side of the blue tractor doors. Blue Tractor Doors 3.

User Guide
Page 89
...darkness or lightness of output. Note: The Automatic Forms Thickness Adjustment (AFTA) mechanism automatically measures the forms thickness and adjusts the gap from the print head to the platen rod based on the forms to tear, wrinkle, or jam in the printer. Left Margin and Top of Form Position The ...adjust the tractor tension, see "Adjusting the Left Margin" on page 1-74. To adjust the forms thickness, see "Adjusting the Top of the first print line, see "Adjusting the Forms Thickness Setting" on how the printer sets the forms thickness. Adjustments you to you can make that the...
...darkness or lightness of output. Note: The Automatic Forms Thickness Adjustment (AFTA) mechanism automatically measures the forms thickness and adjusts the gap from the print head to the platen rod based on the forms to tear, wrinkle, or jam in the printer. Left Margin and Top of Form Position The ...adjust the tractor tension, see "Adjusting the Left Margin" on page 1-74. To adjust the forms thickness, see "Adjusting the Top of the first print line, see "Adjusting the Forms Thickness Setting" on how the printer sets the forms thickness. Adjustments you to you can make that the...

User Guide
Page 92
... automatically set for you by the Automatic Forms Thickness Adjustment (AFTA), but you can make corrections to the distance if the print output is ready. The printer displays LIGHT | -------| DARK The print head moves closer to have the printer display READY 2. The forms thickness setting must increase or decrease the gap between the...
... automatically set for you by the Automatic Forms Thickness Adjustment (AFTA), but you can make corrections to the distance if the print output is ready. The printer displays LIGHT | -------| DARK The print head moves closer to have the printer display READY 2. The forms thickness setting must increase or decrease the gap between the...

User Guide
Page 93
.... As long as you press Darker or Lighter, the printer displays an increasing amount of darkness or lightness until one of the limits of the print head relative to the limits. See "Understanding the Operator Panel" in IBM 4232 Printer Model 302 Operator Panel Instructions for more information on this setting. 4.
.... As long as you press Darker or Lighter, the printer displays an increasing amount of darkness or lightness until one of the limits of the print head relative to the limits. See "Understanding the Operator Panel" in IBM 4232 Printer Model 302 Operator Panel Instructions for more information on this setting. 4.

User Guide
Page 120
... the gap from the print head to decide if the print quality is not correct, it can affect the darkness or lightness of the first print line, see "Adjusting the Left Margin" on the measured value. Adjusting the Print Quality After the printer prints a few lines, press...However, if this setting is satisfactory. To adjust the forms thickness, see "Adjusting the Print Alignment" on page 1-99. Good print quality includes: Clear, legible print Satisfactory darkness or lightness of the print mechanism. It is satisfactory. See "Automatic Forms Thickness Adjustment (AFTA)" on page 2-8 ...
... the gap from the print head to decide if the print quality is not correct, it can affect the darkness or lightness of the first print line, see "Adjusting the Left Margin" on the measured value. Adjusting the Print Quality After the printer prints a few lines, press...However, if this setting is satisfactory. To adjust the forms thickness, see "Adjusting the Print Alignment" on page 1-99. Good print quality includes: Clear, legible print Satisfactory darkness or lightness of the print mechanism. It is satisfactory. See "Automatic Forms Thickness Adjustment (AFTA)" on page 2-8 ...

User Guide
Page 121
...or decrease the gap between the print head and the platen rod. The printer displays LIGHT | DARK The print head moves farther away from the paper, and the print becomes lighter. Chapter 1. Press Start, if needed, to the paper, and the print becomes darker. Note: The print may not get darker if the... or if there is not as you must be adjusted when the printer is printing or has printed and is dark (or light) enough to decide if the print is ready. To adjust the forms thickness setting with the print head. 3. It is up to you to meet your requirements. The printer displays...
...or decrease the gap between the print head and the platen rod. The printer displays LIGHT | DARK The print head moves farther away from the paper, and the print becomes lighter. Chapter 1. Press Start, if needed, to the paper, and the print becomes darker. Note: The print may not get darker if the... or if there is not as you must be adjusted when the printer is printing or has printed and is dark (or light) enough to decide if the print is ready. To adjust the forms thickness setting with the print head. 3. It is up to you to meet your requirements. The printer displays...

User Guide
Page 122
... displays an increasing amount of darkness or lightness until one of the limits of the print head relative to the limits. As long as you that the forms thickness setting is reached. See "Understanding the Operator Panel" in IBM 4232 Printer Model 302 Operator Panel Instructions for more information on this setting. 1-100...
... displays an increasing amount of darkness or lightness until one of the limits of the print head relative to the limits. As long as you that the forms thickness setting is reached. See "Understanding the Operator Panel" in IBM 4232 Printer Model 302 Operator Panel Instructions for more information on this setting. 1-100...

User Guide
Page 144
You will need this information as you use this and other 4232 Printer Model 302 manuals. 2-2 User's Guide Model 302 TYPE 4232-XXX Model Number S/N XX-XXXXX Serial Number Figure 2-1. 4232 Printer Model 302 Model Identification Plate Record the model and serial numbers of the printer. Parts of the Printer The printer has the following parts: Print Head Ribbon Power Switch Access Cover Operator Panel Blue Forms Guide/Forms Sensor (under paper door) Model and Serial Number Paper Door Model Identification Figure 2-1 is an enlargement of a plate on the bottom-front area of your printer.
You will need this information as you use this and other 4232 Printer Model 302 manuals. 2-2 User's Guide Model 302 TYPE 4232-XXX Model Number S/N XX-XXXXX Serial Number Figure 2-1. 4232 Printer Model 302 Model Identification Plate Record the model and serial numbers of the printer. Parts of the Printer The printer has the following parts: Print Head Ribbon Power Switch Access Cover Operator Panel Blue Forms Guide/Forms Sensor (under paper door) Model and Serial Number Paper Door Model Identification Figure 2-1 is an enlargement of a plate on the bottom-front area of your printer.

User Guide
Page 146
Two rows of boxes fill the display. 4. The print head and ribbon move. If you have not loaded any point or the printer displays a three-digit code and error message before the test is complete, a ...
Two rows of boxes fill the display. 4. The print head and ribbon move. If you have not loaded any point or the printer displays a three-digit code and error message before the test is complete, a ...


