
Installation Guide
Page 1
1U 17-inch Flat Panel Console Kit Installation and Maintenance Guide
1U 17-inch Flat Panel Console Kit Installation and Maintenance Guide

Installation Guide
Page 3
1U 17-inch Flat Panel Console Kit Installation and Maintenance Guide
1U 17-inch Flat Panel Console Kit Installation and Maintenance Guide
Installation Guide
Page 5
... the keyboard in the console unit 6 Installing the console unit in this document 4 Chapter 2. General Terms 53 Part 2 - Notices 71 Trademarks 71 Important notes 72 Product recycling and disposal 73 Battery return program 74 Flat-panel monitor 75 Monitor 75 Electronic emission notices 76 Federal Communications Commission (FCC) statement 76 © Copyright IBM Corp. 2009 iii Contents...
... the keyboard in the console unit 6 Installing the console unit in this document 4 Chapter 2. General Terms 53 Part 2 - Notices 71 Trademarks 71 Important notes 72 Product recycling and disposal 73 Battery return program 74 Flat-panel monitor 75 Monitor 75 Electronic emission notices 76 Federal Communications Commission (FCC) statement 76 © Copyright IBM Corp. 2009 iii Contents...

Installation Guide
Page 8
.... Be sure to cross reference an English-language caution or danger statement with the server or optional device before you install the device. vi 1U 17-inch Flat Panel Console Kit: Installation and Maintenance Guide This number is used to read all caution and danger statements in this document is labeled "Statement 1," translations for...
.... Be sure to cross reference an English-language caution or danger statement with the server or optional device before you install the device. vi 1U 17-inch Flat Panel Console Kit: Installation and Maintenance Guide This number is used to read all caution and danger statements in this document is labeled "Statement 1," translations for...
Installation Guide
Page 10
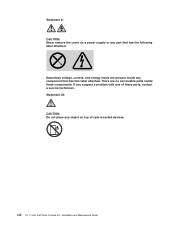
If you suspect a problem with one of rack-mounted devices. Statement 26: CAUTION: Do not place any component that has the following label attached. Statement 8: CAUTION: Never remove the cover on top of these components. Hazardous voltage, current, and energy levels are no serviceable parts inside any object on a power supply or any part that has this label attached. viii 1U 17-inch Flat Panel Console Kit: Installation and Maintenance Guide There are present inside these parts, contact a service technician.
If you suspect a problem with one of rack-mounted devices. Statement 26: CAUTION: Do not place any component that has the following label attached. Statement 8: CAUTION: Never remove the cover on top of these components. Hazardous voltage, current, and energy levels are no serviceable parts inside any object on a power supply or any part that has this label attached. viii 1U 17-inch Flat Panel Console Kit: Installation and Maintenance Guide There are present inside these parts, contact a service technician.
Installation Guide
Page 11
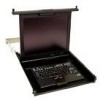
... vertical increments of space in a rack cabinet. A 1U-high device is called a "U." You can install an optional console switch in one server to the flat-panel display is a flat-panel display and keyboard tray in the rack cabinet to attach more than one unit. Introduction The IBM® 1U 17-inch Flat Panel Console Kit is not intended for use with...
... vertical increments of space in a rack cabinet. A 1U-high device is called a "U." You can install an optional console switch in one server to the flat-panel display is a flat-panel display and keyboard tray in the rack cabinet to attach more than one unit. Introduction The IBM® 1U 17-inch Flat Panel Console Kit is not intended for use with...

Installation Guide
Page 12
...and keyboard-and-mouse cables to the console unit v IBM Documentation CD You might need the following tools to install the console unit: v One number 1 Phillips screwdriver v One number 2 Phillips screwdriver v One cage-nut-insertion tool or flat-blade screwdriver (for installing cage nuts ... cable-management-arm retaining nut) v One 1/4-inch wrench (for removing the inner slide rails from the console unit) See the documentation that comes with your rack cabinet or console switch for further information about those products. 2 1U 17-inch Flat Panel Console Kit: Installation and Maintenance Guide
...and keyboard-and-mouse cables to the console unit v IBM Documentation CD You might need the following tools to install the console unit: v One number 1 Phillips screwdriver v One number 2 Phillips screwdriver v One cage-nut-insertion tool or flat-blade screwdriver (for installing cage nuts ... cable-management-arm retaining nut) v One 1/4-inch wrench (for removing the inner slide rails from the console unit) See the documentation that comes with your rack cabinet or console switch for further information about those products. 2 1U 17-inch Flat Panel Console Kit: Installation and Maintenance Guide

Installation Guide
Page 14
... notices indicate potential damage to you. Each statement is placed just before the description of a potentially lethal or extremely hazardous procedure step or situation. 4 1U 17-inch Flat Panel Console Kit: Installation and Maintenance Guide A caution statement is placed just before the instruction or situation in which damage might help you . The following notices...
... notices indicate potential damage to you. Each statement is placed just before the description of a potentially lethal or extremely hazardous procedure step or situation. 4 1U 17-inch Flat Panel Console Kit: Installation and Maintenance Guide A caution statement is placed just before the instruction or situation in which damage might help you . The following notices...
Installation Guide
Page 16
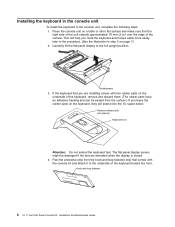
... you leave the rubber pads on the keyboard, they will help you are installing comes with the console kit and attach it to the full upright position. Thumbscrews 3. Hook-and-loop fastener 6 1U 17-inch Flat Panel Console Kit: Installation and Maintenance Guide Peel the protective strip from the hook-and-loop fastener strip that...
... you leave the rubber pads on the keyboard, they will help you are installing comes with the console kit and attach it to the full upright position. Thumbscrews 3. Hook-and-loop fastener 6 1U 17-inch Flat Panel Console Kit: Installation and Maintenance Guide Peel the protective strip from the hook-and-loop fastener strip that...
Installation Guide
Page 17
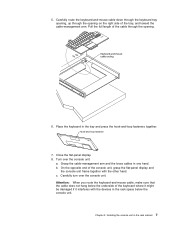
... in the rack cabinet 7 Attention: When you route the keyboard-and-mouse cable, make sure that the cable does not hang below the console unit. Chapter 2. Pull the full length of the console unit, grasp the flat-panel display and the console unit frame together with the devices in one hand. Carefully turn over the...
... in the rack cabinet 7 Attention: When you route the keyboard-and-mouse cable, make sure that the cable does not hang below the console unit. Chapter 2. Pull the full length of the console unit, grasp the flat-panel display and the console unit frame together with the devices in one hand. Carefully turn over the...

Installation Guide
Page 18
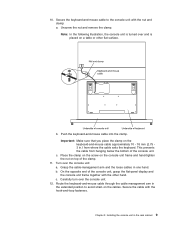
... push it . 9. Do not route the cable through the slit in the plastic bushing and push the bushing into the cable-routing cutout in the console unit frame. 8 1U 17-inch Flat Panel Console Kit: Installation and Maintenance Guide b. c. Route the cable through the slot on the left side of the...
... push it . 9. Do not route the cable through the slit in the plastic bushing and push the bushing into the cable-routing cutout in the console unit frame. 8 1U 17-inch Flat Panel Console Kit: Installation and Maintenance Guide b. c. Route the cable through the slot on the left side of the...
Installation Guide
Page 19
...75 3 in the extended position to the console unit with the hook-and-loop fasteners. b. On the opposite end of the console unit, grasp the flat-panel display and the console unit frame together with the other flat surface. Carefully turn over the console unit: a. Chapter 2. Unscrew the nut ...and remove the clamp. Turn over the console unit. 12. c. c. Secure the cable...
...75 3 in the extended position to the console unit with the hook-and-loop fasteners. b. On the opposite end of the console unit, grasp the flat-panel display and the console unit frame together with the other flat surface. Carefully turn over the console unit: a. Chapter 2. Unscrew the nut ...and remove the clamp. Turn over the console unit. 12. c. c. Secure the cable...
Installation Guide
Page 20
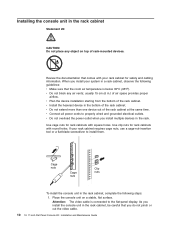
...outlet when you do not pinch or cut the video cable. 10 1U 17-inch Flat Panel Console Kit: Installation and Maintenance Guide If your rack cabinet requires cage nuts, use a cage-nut-insertion tool or a flat-blade screwdriver to properly wired and grounded electrical outlets. v Install ...starting from the bottom of the rack cabinet. v Do not block any object on a stable, flat surface. Cage nuts Clip Cage nuts nuts To install the console unit in .) of rack-mounted devices. Review the documentation that the room air temperature is connected to the flat-panel display.
...outlet when you do not pinch or cut the video cable. 10 1U 17-inch Flat Panel Console Kit: Installation and Maintenance Guide If your rack cabinet requires cage nuts, use a cage-nut-insertion tool or a flat-blade screwdriver to properly wired and grounded electrical outlets. v Install ...starting from the bottom of the rack cabinet. v Do not block any object on a stable, flat surface. Cage nuts Clip Cage nuts nuts To install the console unit in .) of rack-mounted devices. Review the documentation that the room air temperature is connected to the flat-panel display.

Installation Guide
Page 22
These holes are for the thumbscrews on page 11. 12 1U 17-inch Flat Panel Console Kit: Installation and Maintenance Guide Tighten the two rail-adjustment screws on each of the outer rails if you loosened them in the slide-rail ...bracket. Note: Do not install screws in the middle holes in step 3 on the front of the console unit. 5. Loosely attach the back of the...
These holes are for the thumbscrews on page 11. 12 1U 17-inch Flat Panel Console Kit: Installation and Maintenance Guide Tighten the two rail-adjustment screws on each of the outer rails if you loosened them in the slide-rail ...bracket. Note: Do not install screws in the middle holes in step 3 on the front of the console unit. 5. Loosely attach the back of the...

Installation Guide
Page 24
... 10. Attach the cable-management arm to the outer slide-rail bracket, using this a few times until the console unit moves smoothly in the rails. Do this screw. 14 1U 17-inch Flat Panel Console Kit: Installation and Maintenance Guide Remove the rail-adjustment screw that is closest to seat the... console unit in the rails. Press the release latches, and then push the console unit completely into the rack, and then tighten...
... 10. Attach the cable-management arm to the outer slide-rail bracket, using this a few times until the console unit moves smoothly in the rails. Do this screw. 14 1U 17-inch Flat Panel Console Kit: Installation and Maintenance Guide Remove the rail-adjustment screw that is closest to seat the... console unit in the rails. Press the release latches, and then push the console unit completely into the rack, and then tighten...
Installation Guide
Page 26
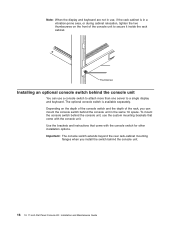
To mount the console switch behind the console unit You can mount the console switch behind the console unit. 16 1U 17-inch Flat Panel Console Kit: Installation and Maintenance Guide Important: The console switch extends beyond the rear rack-cabinet mounting flanges when you can use a console switch to attach more than one server to secure it inside the rack...
To mount the console switch behind the console unit You can mount the console switch behind the console unit. 16 1U 17-inch Flat Panel Console Kit: Installation and Maintenance Guide Important: The console switch extends beyond the rear rack-cabinet mounting flanges when you can use a console switch to attach more than one server to secure it inside the rack...
Installation Guide
Page 28
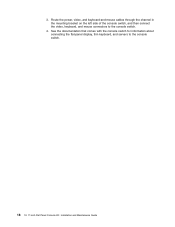
See the documentation that comes with the console switch for information about connecting the flat-panel display, thin keyboard, and servers to the console switch. 4. 3. Route the power, video, and keyboard-and-mouse cables through the channel in the mounting bracket on the left side of the console switch, and then connect the video, keyboard, and mouse connectors to the console switch. 18 1U 17-inch Flat Panel Console Kit: Installation and Maintenance Guide
See the documentation that comes with the console switch for information about connecting the flat-panel display, thin keyboard, and servers to the console switch. 4. 3. Route the power, video, and keyboard-and-mouse cables through the channel in the mounting bracket on the left side of the console switch, and then connect the video, keyboard, and mouse connectors to the console switch. 18 1U 17-inch Flat Panel Console Kit: Installation and Maintenance Guide
Installation Guide
Page 30
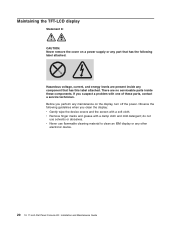
... Remove finger marks and grease with one of these components. Observe the following label attached. do not use flammable cleaning material to clean an IBM display or any component that has the following guidelines when you perform any maintenance on a power supply or any part that has this label ...on the display, turn off the power. Hazardous voltage, current, and energy levels are no serviceable parts inside any other electronic device. 20 1U 17-inch Flat Panel Console Kit: Installation and Maintenance Guide There are present inside these parts, contact a service technician.
... Remove finger marks and grease with one of these components. Observe the following label attached. do not use flammable cleaning material to clean an IBM display or any component that has the following guidelines when you perform any maintenance on a power supply or any part that has this label ...on the display, turn off the power. Hazardous voltage, current, and energy levels are no serviceable parts inside any other electronic device. 20 1U 17-inch Flat Panel Console Kit: Installation and Maintenance Guide There are present inside these parts, contact a service technician.

Installation Guide
Page 32
22 1U 17-inch Flat Panel Console Kit: Installation and Maintenance Guide
22 1U 17-inch Flat Panel Console Kit: Installation and Maintenance Guide
Installation Guide
Page 33
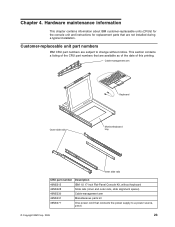
...of this printing. Chapter 4. Hardware maintenance information This chapter contains information about IBM customer-replaceable units (CRUs) for the console unit and instructions for replacement parts that are available as of the date ...-eHPleotLme +eP;AglBtD}.anc"k]s?p'ac/|eCtr\l Enter Shift G N F B D V S C A X Tab Caps Lock Shift Z Ctrl Alt Fn Keyboard Outer slide rails Monitor/keyboard tray Inner slide rails CRU part number 46M5215 46M5328 46M5330 46M5331 39M5377 Description IBM 1U 17-inch Flat-Panel Console Kit, without notice.
...of this printing. Chapter 4. Hardware maintenance information This chapter contains information about IBM customer-replaceable units (CRUs) for the console unit and instructions for replacement parts that are available as of the date ...-eHPleotLme +eP;AglBtD}.anc"k]s?p'ac/|eCtr\l Enter Shift G N F B D V S C A X Tab Caps Lock Shift Z Ctrl Alt Fn Keyboard Outer slide rails Monitor/keyboard tray Inner slide rails CRU part number 46M5215 46M5328 46M5330 46M5331 39M5377 Description IBM 1U 17-inch Flat-Panel Console Kit, without notice.