
Owner Manual
Page 2
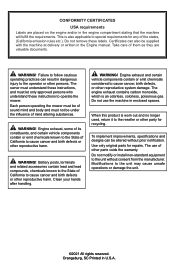
..., specifications and designs can be of California to cause cancer, birth defects, or other reproductive harm. Do not modify or install non-standard equipment to operate the mower. CONFORMITY CERTIFICATES USA requirements Labels are valuable documents. Do not remove these instructions, and must not be supplied with the machine at delivery or written in the Engine manual. WARNING! Engine...
..., specifications and designs can be of California to cause cancer, birth defects, or other reproductive harm. Do not modify or install non-standard equipment to operate the mower. CONFORMITY CERTIFICATES USA requirements Labels are valuable documents. Do not remove these instructions, and must not be supplied with the machine at delivery or written in the Engine manual. WARNING! Engine...
Owner Manual
Page 7
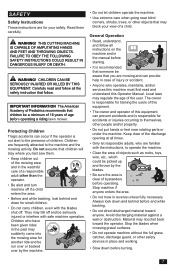
... backing, look down and behind and down before operating a riding lawn mower. CHILDREN CAN BE SERIOUSLY INJURED OR KILLED BY THIS EQUIPMENT. Children who operates, maintains, and/or services this machine must first read and follow all instructions on the machine and in the manual before operating. Keep clear of the discharge opening at all times. • Only let responsible...
... backing, look down and behind and down before operating a riding lawn mower. CHILDREN CAN BE SERIOUSLY INJURED OR KILLED BY THIS EQUIPMENT. Children who operates, maintains, and/or services this machine must first read and follow all instructions on the machine and in the manual before operating. Keep clear of the discharge opening at all times. • Only let responsible...
Owner Manual
Page 8
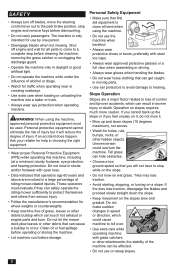
... changes in a large percentage of grass, leaves or other attachments; The machine is close at a minimum) sturdy footwear, eye protection, and hearing protection. These operators must be effected. • Do not use by one person. • Disengage blades when not mowing. Tires may lose traction. • Avoid starting, stopping, or turning on the slopes slow and gradual. Shut off blades, move the steering control lever...
... changes in a large percentage of grass, leaves or other attachments; The machine is close at a minimum) sturdy footwear, eye protection, and hearing protection. These operators must be effected. • Do not use by one person. • Disengage blades when not mowing. Tires may lose traction. • Avoid starting, stopping, or turning on the slopes slow and gradual. Shut off blades, move the steering control lever...

Owner Manual
Page 9
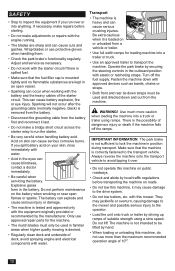
... very hot during operation. Gasoline is spilled on clothing, change the settings of static electricity by putting a foot on the ground away from a gasoline dispenser nozzle. • Keep the nozzle in handling gasoline. If this is removed. • Check grass catcher components and the discharge guard frequently and replace with overly high engine speeds. General Maintenance • Do not use and leave space for the mower deck's drive belt is not...
... very hot during operation. Gasoline is spilled on clothing, change the settings of static electricity by putting a foot on the ground away from a gasoline dispenser nozzle. • Keep the nozzle in handling gasoline. If this is removed. • Check grass catcher components and the discharge guard frequently and replace with overly high engine speeds. General Maintenance • Do not use and leave space for the mower deck's drive belt is not...
Owner Manual
Page 10
... in an open flames or sparks. Operate the park brake by hand. • When loading or unloading this mower. Adjust and service as bands, chains or straps. • Both front and rear tie down and out from the battery first and reconnect it last. • Do not make adjustments or repairs with this machine, do not use more caution when loading the...
... in an open flames or sparks. Operate the park brake by hand. • When loading or unloading this mower. Adjust and service as bands, chains or straps. • Both front and rear tie down and out from the battery first and reconnect it last. • Do not make adjustments or repairs with this machine, do not use more caution when loading the...

Owner Manual
Page 14
... of operation, an oil can icon shows and stays on five times at one second intervals. To engage the mower deck, pull the knob out; Be sure to turn the key off when the unit is not in use, to provide the engine with the blade activated. CONTROLS Throttle Control Service Meter The throttle control regulates the engine speed and thereby the rate of rotation of the blades, assuming the blade switch...
... of operation, an oil can icon shows and stays on five times at one second intervals. To engage the mower deck, pull the knob out; Be sure to turn the key off when the unit is not in use, to provide the engine with the blade activated. CONTROLS Throttle Control Service Meter The throttle control regulates the engine speed and thereby the rate of rotation of the blades, assuming the blade switch...
Owner Manual
Page 15
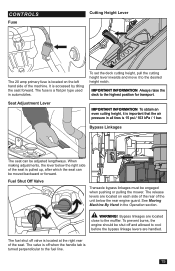
... seat forward. When making adjustments, the lever below the rear engine guard. The fuel shut off and allowed to cool before the bypass linkage levers are located on the left hand side of the machine. To prevent burns, the engine should be shut off valve is located at the right rear of the seat. The release levers are handled. The fuse is a flat pin type used in the Operation section. CONTROLS Fuse Cutting Height Lever...
... seat forward. When making adjustments, the lever below the rear engine guard. The fuel shut off and allowed to cool before the bypass linkage levers are located on the left hand side of the machine. To prevent burns, the engine should be shut off valve is located at the right rear of the seat. The release levers are handled. The fuse is a flat pin type used in the Operation section. CONTROLS Fuse Cutting Height Lever...
Owner Manual
Page 17
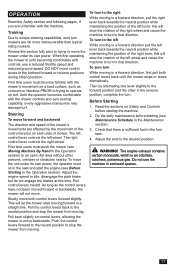
... zero turn to unique steering capabilities, zero turn mowers are unfamiliar with controls, use the machine in the reverse position, complete the turn in a forward direction, first pull both control levers forward slightly. Read the sections on Safety and Controls before starting the machine. 2. Training Due to the left wheel. First time users must push the mower (see Maintenance Schedule in the Operation section) to idle, disengage the park brake but do not engage the blades at...
... zero turn to unique steering capabilities, zero turn mowers are unfamiliar with controls, use the machine in the reverse position, complete the turn in a forward direction, first pull both control levers forward slightly. Read the sections on Safety and Controls before starting the machine. 2. Training Due to the left wheel. First time users must push the mower (see Maintenance Schedule in the Operation section) to idle, disengage the park brake but do not engage the blades at...
Owner Manual
Page 19
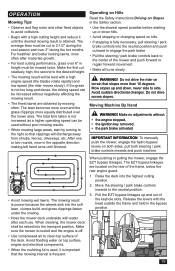
... not drive the rider on top surface, engine and electrical components. • When the mulching kit is used without : • the engine stopped, • the ignition key removed, • the park brake activated IMPORTANT INFORMATION To manually push the mower, engage the hydro bypass levers on both sides, pull both steering / park brake controls inwards and push machine. • Avoid mowing wet lawns. Mow slopes up and out of the frame, below the rear engine guard. 1. Release the levers with...
... not drive the rider on top surface, engine and electrical components. • When the mulching kit is used without : • the engine stopped, • the ignition key removed, • the park brake activated IMPORTANT INFORMATION To manually push the mower, engage the hydro bypass levers on both sides, pull both steering / park brake controls inwards and push machine. • Avoid mowing wet lawns. Mow slopes up and out of the frame, below the rear engine guard. 1. Release the levers with...
Owner Manual
Page 21
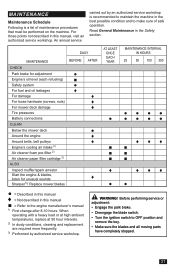
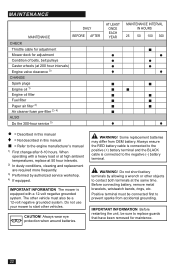
... authorized service workshop is a list of safe operation. DAILY MAINTENANCE CHECK Park brake for adjustment Engine's oil level (each refueling) Safety system For fuel and oil leakages For damage For loose hardware (screws, nuts) For mower deck damage Tire pressures Battery connections CLEAN Below the mower deck Around the engine Around belts, belt pulleys Engine's cooling air intake 2) Air cleaner foam pre-filter 2) Air cleaner paper filter cartridge 2) ALSO Inspect muffler/spark arrestor Start the engine & blades, listen for unusual sounds Sharpen3)/ Replace mower blades BEFORE AFTER...
... authorized service workshop is a list of safe operation. DAILY MAINTENANCE CHECK Park brake for adjustment Engine's oil level (each refueling) Safety system For fuel and oil leakages For damage For loose hardware (screws, nuts) For mower deck damage Tire pressures Battery connections CLEAN Below the mower deck Around the engine Around belts, belt pulleys Engine's cooling air intake 2) Air cleaner foam pre-filter 2) Air cleaner paper filter cartridge 2) ALSO Inspect muffler/spark arrestor Start the engine & blades, listen for unusual sounds Sharpen3)/ Replace mower blades BEFORE AFTER...
Owner Manual
Page 22
... replacement batteries may differ from accidental grounding. Positive terminal must also be sure to the engine manufacturer's manual 1) First change after 8-10 hours. Do not use your mower to start other objects to contact both terminals at 200 hour intervals) Engine valve clearance 3) CHANGE Spark plugs Engine oil 1) Engine oil filter Fuel filter Paper air filter 2) Air cleaner foam pre-filter 2) 4) ALSO Do the 300-hour service 3) AFTER AT LEAST ONCE EACH YEAR ♦ MAINTENANCE INTERVAL...
... replacement batteries may differ from accidental grounding. Positive terminal must also be sure to the engine manufacturer's manual 1) First change after 8-10 hours. Do not use your mower to start other objects to contact both terminals at 200 hour intervals) Engine valve clearance 3) CHANGE Spark plugs Engine oil 1) Engine oil filter Fuel filter Paper air filter 2) Air cleaner foam pre-filter 2) 4) ALSO Do the 300-hour service 3) AFTER AT LEAST ONCE EACH YEAR ♦ MAINTENANCE INTERVAL...
Owner Manual
Page 23
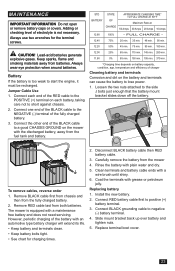
... fuel tank and battery. Replace terminal boot cover. 23 Jumper Cable Use 1. To remove cables, reverse order 1. Install the new battery. 2. CAUTION! Connect one end of the fully charged battery. 3. Connect the other end of the battery with the discharged battery, away from both batteries. Remove BLACK cable first from chassis and then from the fully charged battery. 2. Clean terminals and battery cable ends with grease or petroleum jelly. MAINTENANCE IMPORTANT INFORMATION Do not open or remove battery caps or covers...
... fuel tank and battery. Replace terminal boot cover. 23 Jumper Cable Use 1. To remove cables, reverse order 1. Install the new battery. 2. CAUTION! Connect one end of the fully charged battery. 3. Connect the other end of the battery with the discharged battery, away from both batteries. Remove BLACK cable first from chassis and then from the fully charged battery. 2. Clean terminals and battery cable ends with grease or petroleum jelly. MAINTENANCE IMPORTANT INFORMATION Do not open or remove battery caps or covers...
Owner Manual
Page 24
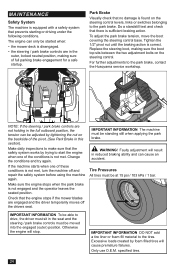
... two adjustment bolts on the steering control levers, links or switches belonging to start the engine when one of full parking brake engagement for a safe startup. specified tires. 24 Tighten the 1/2" pivot nut until the braking action is equipped with a safety system that the engine stops if the mower blades are not holding in reduced braking ability and can be at 15 psi / 103 kPa / 1 bar. Do a standstill test and check...
... two adjustment bolts on the steering control levers, links or switches belonging to start the engine when one of full parking brake engagement for a safe startup. specified tires. 24 Tighten the 1/2" pivot nut until the braking action is equipped with a safety system that the engine stops if the mower blades are not holding in reduced braking ability and can be at 15 psi / 103 kPa / 1 bar. Do a standstill test and check...
Owner Manual
Page 25
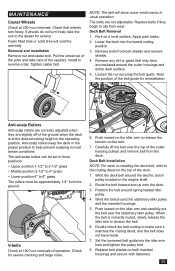
... securing the belt guide. The belts are correctly adjusted when they begin to the routing decal on a level surface. V-belts Check at 200 hour intervals. Wind the belt around spring loaded idler pulley. 4. Check for reinstallation. The anti-scalp rollers can be approximately 1/4" from wear. Apply park brake. 2. MAINTENANCE Caster Wheels Check at 100 hour intervals of operation. Set the loosened belt guide into the lowest cutting position. 3. Park on the top of the deck. 1.
... securing the belt guide. The belts are correctly adjusted when they begin to the routing decal on a level surface. V-belts Check at 200 hour intervals. Wind the belt around spring loaded idler pulley. 4. Check for reinstallation. The anti-scalp rollers can be approximately 1/4" from wear. Apply park brake. 2. MAINTENANCE Caster Wheels Check at 100 hour intervals of operation. Set the loosened belt guide into the lowest cutting position. 3. Park on the top of the deck. 1.
Owner Manual
Page 29
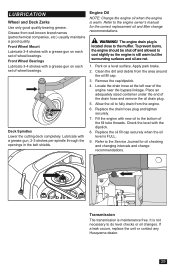
... maintenance free. Grease from the engine. 6. Transmission The transmission is not necessary to the Service Journal for the correct replacement oil and filter change recommendations. Clean the dirt and debris from the area around the oil fill cap. 3. Locate the drain hose at the left rear of wheel bearings. Front Wheel Mount Lubricate 3-4 strokes with new oil to the engine owner's manual for oil checking and changing intervals and change recommendations. Refer to do level checks or oil changes. L U B R I C AT I O N Wheel and Deck Zerks Use...
... maintenance free. Grease from the engine. 6. Transmission The transmission is not necessary to the Service Journal for the correct replacement oil and filter change recommendations. Clean the dirt and debris from the area around the oil fill cap. 3. Locate the drain hose at the left rear of wheel bearings. Front Wheel Mount Lubricate 3-4 strokes with new oil to the engine owner's manual for oil checking and changing intervals and change recommendations. Refer to do level checks or oil changes. L U B R I C AT I O N Wheel and Deck Zerks Use...
Owner Manual
Page 30
... Engine will not start Blade switch is engaged Steering controls are defective Blown fuse Fault in the carburetor or fuel line Fuel supply shutoff valve is too long Grass collected below the mower deck 30 See Safety System in the Maintenance Section Engine runs rough Faulty carburetor Clogged fuel filter or jet Throttle lever in the Cold Weather starting position Clogged ventilation valve on the fuel cap Fuel tank almost empty Fouled spark plugs Rich fuel mixture or fuel-air mixture Wrong fuel type Water in fuel Clogged air filter Engine...
... Engine will not start Blade switch is engaged Steering controls are defective Blown fuse Fault in the carburetor or fuel line Fuel supply shutoff valve is too long Grass collected below the mower deck 30 See Safety System in the Maintenance Section Engine runs rough Faulty carburetor Clogged fuel filter or jet Throttle lever in the Cold Weather starting position Clogged ventilation valve on the fuel cap Fuel tank almost empty Fouled spark plugs Rich fuel mixture or fuel-air mixture Wrong fuel type Water in fuel Clogged air filter Engine...
Owner Manual
Page 31
... the spark plug. 6. Start the engine and let it operate until the carburetor is very flammable and can occur during storage. Remove the spark plug and put about a tablespoon of the stabilizer. Service When ordering spare parts, please specify the purchase year, model, type, and serial number. Always use the mixing ratios specified by the manufacturer of engine oil into an approved container outdoors and keep the battery...
... the spark plug. 6. Start the engine and let it operate until the carburetor is very flammable and can occur during storage. Remove the spark plug and put about a tablespoon of the stabilizer. Service When ordering spare parts, please specify the purchase year, model, type, and serial number. Always use the mixing ratios specified by the manufacturer of engine oil into an approved container outdoors and keep the battery...
Owner Manual
Page 33
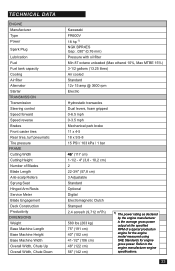
... to the engine manufacturer engine specifications. 33 TECHNICAL DATA ENGINE Manufacturer Type Power Spark Plug Lubrication Fuel Fuel tank capacity Cooling Air filter Alternator Starter TRANSMISSION Transmission Steering control Speed forward Speed reverse Brakes Front caster tires Rear tires, turf pneumatic Tire pressure FRAME Cutting Width Cutting Height Number of Blades Blade Length Anti-scalp Rollers Sprung Seat Hinged Arm Rests Service Meter Blade Engagement Deck Construction Productivity DIMENSIONS Weight Base Machine Length Base Machine Height Base Machine Width Overall Width, Chute Up...
... to the engine manufacturer engine specifications. 33 TECHNICAL DATA ENGINE Manufacturer Type Power Spark Plug Lubrication Fuel Fuel tank capacity Cooling Air filter Alternator Starter TRANSMISSION Transmission Steering control Speed forward Speed reverse Brakes Front caster tires Rear tires, turf pneumatic Tire pressure FRAME Cutting Width Cutting Height Number of Blades Blade Length Anti-scalp Rollers Sprung Seat Hinged Arm Rests Service Meter Blade Engagement Deck Construction Productivity DIMENSIONS Weight Base Machine Length Base Machine Height Base Machine Width Overall Width, Chute Up...
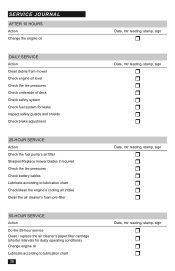
Owner Manual
Page 36
... Action Change the engine oil DAILY SERVICE Action Clean debris from mower Check engine oil level Check the tire pressures Check underside of deck Check safety system Check fuel system for leaks Inspect safety guards and shields Check brake adjustment 25-HOUR SERVICE Action Check the fuel pump's air filter Sharpen/Replace mower blades if required Check the tire pressures Check battery cables Lubricate according to lubrication chart Check/clean the engine's cooling air intake Clean the air cleaner's foam pre-filter 50-HOUR SERVICE Action Do the 25-hour service Clean / replace the air cleaner...
... Action Change the engine oil DAILY SERVICE Action Clean debris from mower Check engine oil level Check the tire pressures Check underside of deck Check safety system Check fuel system for leaks Inspect safety guards and shields Check brake adjustment 25-HOUR SERVICE Action Check the fuel pump's air filter Sharpen/Replace mower blades if required Check the tire pressures Check battery cables Lubricate according to lubrication chart Check/clean the engine's cooling air intake Clean the air cleaner's foam pre-filter 50-HOUR SERVICE Action Do the 25-hour service Clean / replace the air cleaner...
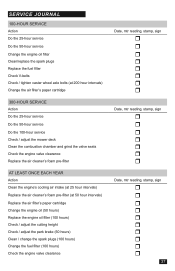
Owner Manual
Page 37
... the valve seats Check the engine valve clearance Replace the air cleaner's foam pre-filter AT LEAST ONCE EACH YEAR Action Clean the engine's cooling air intake (at 25 hour intervals) Replace the air cleaner's foam pre-filter (at 50 hour intervals) Replace the air filter's paper cartridge Change the engine oil (50 hours) Replace the engine oil filter (100 hours) Check / adjust the cutting height Check / adjust the park brake (50 hours) Clean / change the spark plugs (100 hours) Change the fuel filter (100 hours) Check the engine valve...
... the valve seats Check the engine valve clearance Replace the air cleaner's foam pre-filter AT LEAST ONCE EACH YEAR Action Clean the engine's cooling air intake (at 25 hour intervals) Replace the air cleaner's foam pre-filter (at 50 hour intervals) Replace the air filter's paper cartridge Change the engine oil (50 hours) Replace the engine oil filter (100 hours) Check / adjust the cutting height Check / adjust the park brake (50 hours) Clean / change the spark plugs (100 hours) Change the fuel filter (100 hours) Check the engine valve...

