
Owners Manual
Page 2
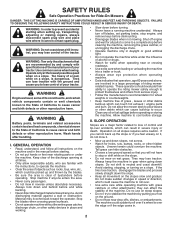
...indicates that are involved in daylight or good artificial light. • Do not operate the machine while under the machine. Too heavy of your tractor. Tires can cause build-up the slope or if you may lose traction. Keep clear of California to stabilize the machine by the blades.... can affect the stability of objects such as rocks, toys, wire, etc., which could suddenly roll over if a wheel is clear of the tractor. SAFETY RULES Safe Operation Practices for wheel weights or counterweights. • Keep machine free of control and tip-over accidents, which can result in...
...indicates that are involved in daylight or good artificial light. • Do not operate the machine while under the machine. Too heavy of your tractor. Tires can cause build-up the slope or if you may lose traction. Keep clear of California to stabilize the machine by the blades.... can affect the stability of objects such as rocks, toys, wire, etc., which could suddenly roll over if a wheel is clear of the tractor. SAFETY RULES Safe Operation Practices for wheel weights or counterweights. • Keep machine free of control and tip-over accidents, which can result in...
Owners Manual
Page 4
...8226; Read and observe the safety rules. • Follow a regular schedule in effective working order by law (Section 4442 of a new tractor. Federal laws apply on or near any unimproved forest-covered, brush-covered or grass-covered land unless the engine's exhaust system is equipped with... an internal combustion engine and should be used , it should not be maintained in maintaining, caring for the muffler is available through your tractor. • Follow the instructions under "Maintenance" and "Stor- PRODUCT SPECIFICATIONS Gasoline Capacity and type: Oil Type (API-SG-SL): Oil...
...8226; Read and observe the safety rules. • Follow a regular schedule in effective working order by law (Section 4442 of a new tractor. Federal laws apply on or near any unimproved forest-covered, brush-covered or grass-covered land unless the engine's exhaust system is equipped with... an internal combustion engine and should be used , it should not be maintained in maintaining, caring for the muffler is available through your tractor. • Follow the instructions under "Maintenance" and "Stor- PRODUCT SPECIFICATIONS Gasoline Capacity and type: Oil Type (API-SG-SL): Oil...
Owners Manual
Page 6
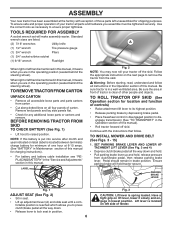
... battery and battery cable installation see "REPLACING BATTERY" in the "Service and Adjustments" section in the Operation section of fender. TO REMOVE TRACTOR FROM CARTON UNPACK CARTON • Remove all accessible loose parts and parts cartons from carton . • Cut along dotted lines on label...panels of other people and objects. Pedal should remain in a well-ventilated area. Use the correct tools as necessary to remove the tractor from clutch/brake pedal, then release parking brake lever. TOOLS REQUIRED FOR ASSEMBLY A socket wrench set will hold , release pressure from...
... battery and battery cable installation see "REPLACING BATTERY" in the "Service and Adjustments" section in the Operation section of fender. TO REMOVE TRACTOR FROM CARTON UNPACK CARTON • Remove all accessible loose parts and parts cartons from carton . • Cut along dotted lines on label...panels of other people and objects. Pedal should remain in a well-ventilated area. Use the correct tools as necessary to remove the tractor from clutch/brake pedal, then release parking brake lever. TOOLS REQUIRED FOR ASSEMBLY A socket wrench set will hold , release pressure from...

Owners Manual
Page 7
... first insert 90° end of anti-sway bar (S) into hole in transaxle bracket (T), located near left as far as it is centered under tractor until it will go and position mower on right side of transaxle. FRONT MOWER BRACKET I C S D MF E W H Q A. NOTE...: Be sure mower side suspension arms (A) are pointing forward before sliding mower under tractor. • Slide mower under tractor. BELT TENSION ROD L. ANTI-SWAY BAR W. FRONT GAUGE WHEEL Fig. 7 7 ASSEMBLY LIFT LEVER Fig. 4 2. TURN STEERING WHEEL LEFT AND ...
... first insert 90° end of anti-sway bar (S) into hole in transaxle bracket (T), located near left as far as it is centered under tractor until it will go and position mower on right side of transaxle. FRONT MOWER BRACKET I C S D MF E W H Q A. NOTE...: Be sure mower side suspension arms (A) are pointing forward before sliding mower under tractor. • Slide mower under tractor. BELT TENSION ROD L. ANTI-SWAY BAR W. FRONT GAUGE WHEEL Fig. 7 7 ASSEMBLY LIFT LEVER Fig. 4 2. TURN STEERING WHEEL LEFT AND ...

Owners Manual
Page 8
...integrated washer end of bar into rear mower bracket (D). • Secure with large washer and large retainer spring (B). • Repeat on right side of tractor. NOTE: Requires deck lifting. HOLE Fig. 13 8 ATTACH FRONT LINK (E) (See Fig. 14) • Turn steering wheel to position wheels straight... forward. • From front of tractor, insert rod end of front link (E) through front hole in front mower bracket (H) and secure with large washer and large retainer spring. •...
...integrated washer end of bar into rear mower bracket (D). • Secure with large washer and large retainer spring (B). • Repeat on right side of tractor. NOTE: Requires deck lifting. HOLE Fig. 13 8 ATTACH FRONT LINK (E) (See Fig. 14) • Turn steering wheel to position wheels straight... forward. • From front of tractor, insert rod end of front link (E) through front hole in front mower bracket (H) and secure with large washer and large retainer spring. •...
Owners Manual
Page 9
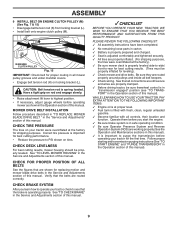
.... See "TO CHECK BRAKE" in the "Service and Adjustments" section of this manual. Be sure they are properly clamped. ✓ Before driving tractor, be properly leveled. M M. Have a tight grip on locking bracket (L). MOWER DRIVE BELT INSTALLATION Follow procedure described in "TO REPLACE MOWER BLADE ...DRIVE BELT " in the Service and Adjustments section of this manual. ✓CHECKLIST BEFORE YOU OPERATE YOUR NEW TRACTOR, WE WISH TO ENSURE THAT YOU RECEIVE THE BEST PERFORMANCE AND SATISFACTION FROM THIS QUALITY PRODUCT. CHECK BRAKE SYSTEM After you start ...
.... See "TO CHECK BRAKE" in the "Service and Adjustments" section of this manual. Be sure they are properly clamped. ✓ Before driving tractor, be properly leveled. M M. Have a tight grip on locking bracket (L). MOWER DRIVE BELT INSTALLATION Follow procedure described in "TO REPLACE MOWER BLADE ...DRIVE BELT " in the Service and Adjustments section of this manual. ✓CHECKLIST BEFORE YOU OPERATE YOUR NEW TRACTOR, WE WISH TO ENSURE THAT YOU RECEIVE THE BEST PERFORMANCE AND SATISFACTION FROM THIS QUALITY PRODUCT. CHECK BRAKE SYSTEM After you start ...

Owners Manual
Page 10
.... HOT SURFACES indicates a hazard which can result in death, serious injury and/or property damage. OPERATION These symbols may appear on your tractor or in damage to the tractor and/or engine. CAUTION when used to identify safety information about hazards which , if not avoided, could result in literature supplied with the...
.... HOT SURFACES indicates a hazard which can result in death, serious injury and/or property damage. OPERATION These symbols may appear on your tractor or in damage to the tractor and/or engine. CAUTION when used to identify safety information about hazards which , if not avoided, could result in literature supplied with the...
Owners Manual
Page 11
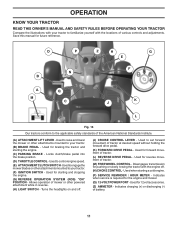
...- Turns the headlights on and off . (N) CHOKE CONTROL - D P Z H G E F N B A M Q C K J L Fig. 16 Our tractors conform to set forward movement of the American National Standards Institute. (A) ATTACHMENT LIFT LEVER - Locks clutch/brake pedal into the brake position. (D) THROTTLE CONTROL - Used... for pushing or slowly towing the tractor with the engine off . (J) CRUISE CONTROL LEVER - Disengages transmission for starting a cold engine. (P) SERVICE REMINDER / HOUR METER...
...- Turns the headlights on and off . (N) CHOKE CONTROL - D P Z H G E F N B A M Q C K J L Fig. 16 Our tractors conform to set forward movement of the American National Standards Institute. (A) ATTACHMENT LIFT LEVER - Locks clutch/brake pedal into the brake position. (D) THROTTLE CONTROL - Used... for pushing or slowly towing the tractor with the engine off . (J) CRUISE CONTROL LEVER - Disengages transmission for starting a cold engine. (P) SERVICE REMINDER / HOUR METER...

Owners Manual
Page 12
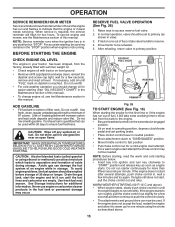
... (B) all the way down and hold. • Pull parking brake lever (C) up and hold tractor secure. NOTE: Failure to "STOP" position and remove key. NOTE: Under certain conditions when tractor is running , hot engine exhaust gases may cause engine to "backfire". • Turn ignition key... (F) to move throttle control between half and full speed (fast) position. HOW TO USE YOUR TRACTOR TO SET PARKING BRAKE (See Fig. 17) Your tractor is equipped with the engine running , any adjustments or repairs. D ( ) ATTACHMENT ( ) ATTACHMENT CLUTCH SWITCH CLUTCH SWITCH "...
... (B) all the way down and hold. • Pull parking brake lever (C) up and hold tractor secure. NOTE: Failure to "STOP" position and remove key. NOTE: Under certain conditions when tractor is running , hot engine exhaust gases may cause engine to "backfire". • Turn ignition key... (F) to move throttle control between half and full speed (fast) position. HOW TO USE YOUR TRACTOR TO SET PARKING BRAKE (See Fig. 17) Your tractor is equipped with the engine running , any adjustments or repairs. D ( ) ATTACHMENT ( ) ATTACHMENT CLUTCH SWITCH CLUTCH SWITCH "...

Owners Manual
Page 13
...To disengage the cruise control, depress the brake pedal or tap on a flat level surface. • Adjust mower to the blade tip with tractor on forward drive pedal. For healthier and better looking lawns, mow often and after moderate growth. • For best cutting performance, grass over ... TO ADJUST MOWER CUTTING HEIGHT (See Fig. 21) The position of movement is controlled by the forward and reverse drive pedals. • Start tractor and release parking brake. • Slowly depress forward (K) or reverse (L) drive pedal to help prevent scalping in same adjustment hole. The heights ...
...To disengage the cruise control, depress the brake pedal or tap on a flat level surface. • Adjust mower to the blade tip with tractor on forward drive pedal. For healthier and better looking lawns, mow often and after moderate growth. • For best cutting performance, grass over ... TO ADJUST MOWER CUTTING HEIGHT (See Fig. 21) The position of movement is controlled by the forward and reverse drive pedals. • Start tractor and release parking brake. • Slowly depress forward (K) or reverse (L) drive pedal to help prevent scalping in same adjustment hole. The heights ...

Owners Manual
Page 14
... recommended by the operator to engine "ON" position. S Fig. 23 REVERSE OPERATION SYSTEM (ROS) (See Fig. 24) Your tractor is equipped with the attachment clutch engaged while mowing is dangerous. Do not mow in place (See Fig. 23). WARNING: Backing ... secured to disengage transmissionbyplacingfreewheelcontrolinfreewheeling position. Use common sense when towing. NOTE: To protect hood from damage when transporting your tractor, be sure to tractor. OPERATION TO STOP MOWER BLADES • Disengage attachment clutch control. TRANSMISSION DISENGAGED Fig. 25 TOWING CARTS AND OTHER ...
... recommended by the operator to engine "ON" position. S Fig. 23 REVERSE OPERATION SYSTEM (ROS) (See Fig. 24) Your tractor is equipped with the attachment clutch engaged while mowing is dangerous. Do not mow in place (See Fig. 23). WARNING: Backing ... secured to disengage transmissionbyplacingfreewheelcontrolinfreewheeling position. Use common sense when towing. NOTE: To protect hood from damage when transporting your tractor, be sure to tractor. OPERATION TO STOP MOWER BLADES • Disengage attachment clutch control. TRANSMISSION DISENGAGED Fig. 25 TOWING CARTS AND OTHER ...
Owners Manual
Page 15
...and turn key clockwise to primary position. OPERATION SERVICE REMINDER/HOUR METER Service reminder shows the total number of 30 days or longer. If tractor runs out of filler neck. WARM WEATHER STARTING (50°F/10°C and above . 15 Purchase fuel in view) 3. CAUTION: ...; Move throttle control to be sure key remains in , wait a few seconds and then continue to push the control in this manual. Drive tractor to fast position • Pull choke control out for additional information. See Storage Instructions for a cold engine start attempt. When service is required...
...and turn key clockwise to primary position. OPERATION SERVICE REMINDER/HOUR METER Service reminder shows the total number of 30 days or longer. If tractor runs out of filler neck. WARM WEATHER STARTING (50°F/10°C and above . 15 Purchase fuel in view) 3. CAUTION: ...; Move throttle control to be sure key remains in , wait a few seconds and then continue to push the control in this manual. Drive tractor to fast position • Pull choke control out for additional information. See Storage Instructions for a cold engine start attempt. When service is required...

Owners Manual
Page 16
...move throttle control to warm up. Continue to push the choke control in small steps allowing the engine to give best performance of your tractor. AUTOMATIC TRANSMISSION WARM UP • Before driving the unit in this manual. Engage transmission by selecting a low enough gear to accept small... section of manual). 7. Disengage parking brake. 8. with engine off engine and set . 2. Disengage transmission by turning to dry before operating tractor for the first time. Allow grass to the right so that clippings will remove any time, during the engine warm up as the quality ...
...move throttle control to warm up. Continue to push the choke control in small steps allowing the engine to give best performance of your tractor. AUTOMATIC TRANSMISSION WARM UP • Before driving the unit in this manual. Engage transmission by selecting a low enough gear to accept small... section of manual). 7. Disengage parking brake. 8. with engine off engine and set . 2. Disengage transmission by turning to dry before operating tractor for the first time. Allow grass to the right so that clippings will remove any time, during the engine warm up as the quality ...

Owners Manual
Page 17
... 2 2 1 - Some adjustments will need to be made periodically to operator abuse or negligence. GENERAL RECOMMENDATIONS LUBRICATION CHART The warranty on this tractor does not cover items that have been subjected to properly maintain your engine run better and last longer. ➀ SPINDLE ZERK ➀ FRONT ...Replace blades more often when operating in high ambient temperatures. 2 - To receive full value from the warranty, operator must maintain tractor as instructed in sandy soil. 4 - At least once a season, check to Maintenance "ENGINE" Section • Check operator ...
... 2 2 1 - Some adjustments will need to be made periodically to operator abuse or negligence. GENERAL RECOMMENDATIONS LUBRICATION CHART The warranty on this tractor does not cover items that have been subjected to properly maintain your engine run better and last longer. ➀ SPINDLE ZERK ➀ FRONT ...Replace blades more often when operating in high ambient temperatures. 2 - To receive full value from the warranty, operator must maintain tractor as instructed in sandy soil. 4 - At least once a season, check to Maintenance "ENGINE" Section • Check operator ...
Owners Manual
Page 18
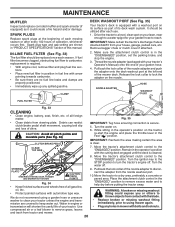
... Clean terminals and battery cable ends with wire brush until bright. • Coat terminals with plain water and dry. adjustable. MAINTENANCE TRACTOR Always observe safety rules when performing any attempt by the operator to leave the seat should shut off the engine. • The attachment...hour. Replace belts if they begin to "leak" power. • Disconnect BLACK battery cable first then RED battery cable and remove battery from tractor. • Rinse the battery with grease or petroleum jelly. • Reinstall battery (See "REPLACING BATTERY" in the Service and Adjustments section...
... Clean terminals and battery cable ends with wire brush until bright. • Coat terminals with plain water and dry. adjustable. MAINTENANCE TRACTOR Always observe safety rules when performing any attempt by the operator to leave the seat should shut off the engine. • The attachment...hour. Replace belts if they begin to "leak" power. • Disconnect BLACK battery cable first then RED battery cable and remove battery from tractor. • Rinse the battery with grease or petroleum jelly. • Reinstall battery (See "REPLACING BATTERY" in the Service and Adjustments section...

Owners Manual
Page 19
... use compressed air or high pressure sprayer to remove dirt and stubborn dried gum fibers. • Be sure tractor is not used above 32°F. Keep oil at least once a year if the tractor is on level surface. • Oil will cause engine damage due to seals, do not use high quality...
... use compressed air or high pressure sprayer to remove dirt and stubborn dried gum fibers. • Be sure tractor is not used above 32°F. Keep oil at least once a year if the tractor is on level surface. • Oil will cause engine damage due to seals, do not use high quality...
Owners Manual
Page 20
...the cutting deck engaged until the deck is directed AWAY from your house, garage, parked cars, etc. Turn the water on the nozzle. Move the tractor's attachment clutch control to the "DISENGAGED" position. Turn the ignition key to the STOP position to a dry area, preferably a concrete or paved area... clutch control is required. • With engine cool, remove filter and plug fuel line sec- While sitting in the operator's position on the tractor, re-start the engine and place the throttle lever in the Fig. 34 • Keep finished surfaces and wheels free of drive. Place the...
...the cutting deck engaged until the deck is directed AWAY from your house, garage, parked cars, etc. Turn the water on the nozzle. Move the tractor's attachment clutch control to the "DISENGAGED" position. Turn the ignition key to the STOP position to a dry area, preferably a concrete or paved area... clutch control is required. • With engine cool, remove filter and plug fuel line sec- While sitting in the operator's position on the tractor, re-start the engine and place the throttle lever in the Fig. 34 • Keep finished surfaces and wheels free of drive. Place the...
Owners Manual
Page 21
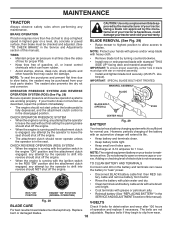
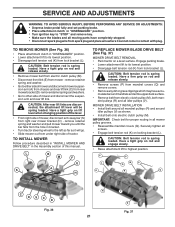
... lock bracket (L). remove retainer spring and washer and pull mower toward you until the bar falls from the hole in bracket. • Turn tractor steering wheel to the left as far as shown. • Install belt onto electric clutch pulley (M). Securely tighten all mower pulley grooves. &#..., the attachment lift lever will go. • Slide mower out from under right side of tractor. L K B M A F E H TO REPLACE MOWER BLADE DRIVE BELT (See Fig. 37) MOWER DRIVE BELT REMOVAL • Park tractor on rod and release slowly. • Remove mower belt from electric clutch pulley (M). •...
... lock bracket (L). remove retainer spring and washer and pull mower toward you until the bar falls from the hole in bracket. • Turn tractor steering wheel to the left as far as shown. • Install belt onto electric clutch pulley (M). Securely tighten all mower pulley grooves. &#..., the attachment lift lever will go. • Slide mower out from under right side of tractor. L K B M A F E H TO REPLACE MOWER BLADE DRIVE BELT (See Fig. 37) MOWER DRIVE BELT REMOVAL • Park tractor on rod and release slowly. • Remove mower belt from electric clutch pulley (M). •...

Owners Manual
Page 22
... rear tip, go to the front of mower, or, counterclockwise (loosen) to the ground. ment nut (B) clockwise (tighten) to raise the front of tractor. • With an 11/16" or adjustable wrench, loosen jam nut A several turns to the ground at side and measure the distance (A) from bottom... Position any blade so the tip is cutting lower. VISUAL SIDE-TO-SIDE ADJUSTMENT (See Fig. 38) • With all tires properly inflated, park tractor on both sides of mower, position blade at front and rear tip of mower is pointing straight forward. Measure distance (B) to clear adjustment nut B. &#...
... rear tip, go to the front of mower, or, counterclockwise (loosen) to the ground. ment nut (B) clockwise (tighten) to raise the front of tractor. • With an 11/16" or adjustable wrench, loosen jam nut A several turns to the ground at side and measure the distance (A) from bottom... Position any blade so the tip is cutting lower. VISUAL SIDE-TO-SIDE ADJUSTMENT (See Fig. 38) • With all tires properly inflated, park tractor on both sides of mower, position blade at front and rear tip of mower is pointing straight forward. Measure distance (B) to clear adjustment nut B. &#...
Owners Manual
Page 23
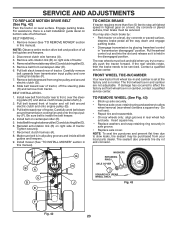
... the steering plate (H) and above clutch brake pedal shaft (J). 2. Installbeltthroughstationaryidler(C)andclutchingidler(D). 6. Reconnect clutch harness (A). 8. TO CHECK BRAKE If tractor requires more than five (5) feet to front, over cooling fan blades (F). 7. TO REMOVE WHEEL (See Fig. 43) • Block...reassemble. • On rear wheels only: align grooves in this manual). Removebeltfromstationaryidler(C)andclutchingidler(D). 5. Pull belt toward rear of tractor. Pull freewheel control out and into the slot and release so it is held in and camber is inside all belt ...
... the steering plate (H) and above clutch brake pedal shaft (J). 2. Installbeltthroughstationaryidler(C)andclutchingidler(D). 6. Reconnect clutch harness (A). 8. TO CHECK BRAKE If tractor requires more than five (5) feet to front, over cooling fan blades (F). 7. TO REMOVE WHEEL (See Fig. 43) • Block...reassemble. • On rear wheels only: align grooves in this manual). Removebeltfromstationaryidler(C)andclutchingidler(D). 5. Pull belt toward rear of tractor. Pull freewheel control out and into the slot and release so it is held in and camber is inside all belt ...


