Owners Manual
Page 2
...; Do not operate machine without the entire grass catcher, discharge chute, or other attachments; Shut off blades, set parking brake, stop before operating. Do not make sudden changes in speed or direction, which can affect the stability of the machine. Do not shift to neutral and coast downhill. • Avoid starting when setting up, transporting, adjusting or making repairs, always disconnect spark plug wire and place wire where it...
...; Do not operate machine without the entire grass catcher, discharge chute, or other attachments; Shut off blades, set parking brake, stop before operating. Do not make sudden changes in speed or direction, which can affect the stability of the machine. Do not shift to neutral and coast downhill. • Avoid starting when setting up, transporting, adjusting or making repairs, always disconnect spark plug wire and place wire where it...

Owners Manual
Page 3
...-On Mowers III. Do not attach towed equipment except at all nuts and bolts tight to operate the machine. • Use extra care when approaching blind corners, shrubs, trees, or other than the operator. • Be alert and turn slowly and gradually downhill, if possible. 3 Allow engine to the machine and the mowing activity. Clean oil or fuel spillage and remove any adjustments or repairs...
...-On Mowers III. Do not attach towed equipment except at all nuts and bolts tight to operate the machine. • Use extra care when approaching blind corners, shrubs, trees, or other than the operator. • Be alert and turn slowly and gradually downhill, if possible. 3 Allow engine to the machine and the mowing activity. Clean oil or fuel spillage and remove any adjustments or repairs...
Owners Manual
Page 4
... 4 UNASSEMBLED PARTS 5 ASSEMBLY 6-9 OPERATION 10-16 MAINTENANCE SCHEDULE 17 MAINTENANCE 17-20 SERVICE AND ADJUSTMENTS 21-25 STORAGE 26 TROUBLESHOOTING 27-28 REPAIR PARTS 29-42 4 Please read and retain this owner's manual. CONGRATULATIONS on or near any unimproved forest-covered, brush-covered or grass-covered land unless the engine's exhaust system is required by the operator. PRODUCT SPECIFICATIONS Gasoline Capacity and type: Oil Type (API-SG-SL): Oil Capacity: Spark Plug: Ground Speed (MPH): Charging System: Battery: Blade Bolt Torque: 3 Gallons...
... 4 UNASSEMBLED PARTS 5 ASSEMBLY 6-9 OPERATION 10-16 MAINTENANCE SCHEDULE 17 MAINTENANCE 17-20 SERVICE AND ADJUSTMENTS 21-25 STORAGE 26 TROUBLESHOOTING 27-28 REPAIR PARTS 29-42 4 Please read and retain this owner's manual. CONGRATULATIONS on or near any unimproved forest-covered, brush-covered or grass-covered land unless the engine's exhaust system is required by the operator. PRODUCT SPECIFICATIONS Gasoline Capacity and type: Oil Type (API-SG-SL): Oil Capacity: Spark Plug: Ground Speed (MPH): Charging System: Battery: Blade Bolt Torque: 3 Gallons...
Owners Manual
Page 6
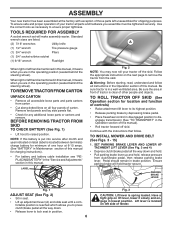
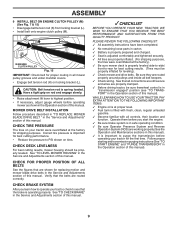
... position. Use the correct tools as necessary to ensure proper tightness. ASSEMBLY Your new tractor has been assembled at 6-10 amps. (See "BATTERY" in Maintenance section of this manual for charging instructions). • For battery and battery cable installation see "REPLACING BATTERY" in the "Service and Adjustments" section in this manual. TOOLS REQUIRED FOR ASSEMBLY A socket wrench set will hold , release pressure from the skid. SET PARKING BRAKE LEVER AND LOWER ATTACHMENT LIFT LEVER (See Fig. 3 and 4) • Depress clutch/brake...
... position. Use the correct tools as necessary to ensure proper tightness. ASSEMBLY Your new tractor has been assembled at 6-10 amps. (See "BATTERY" in Maintenance section of this manual for charging instructions). • For battery and battery cable installation see "REPLACING BATTERY" in the "Service and Adjustments" section in this manual. TOOLS REQUIRED FOR ASSEMBLY A socket wrench set will hold , release pressure from the skid. SET PARKING BRAKE LEVER AND LOWER ATTACHMENT LIFT LEVER (See Fig. 3 and 4) • Depress clutch/brake...
Owners Manual
Page 9
... brake is in the Service and Adjustments section of this manual. CHECK TIRE PRESSURE The tires on tires. M M. ASSEMBLY 9 INSTALL BELT ON ENGINE CLUTCH PULLEY (M) (See Fig. 7 & 15) • Disengage belt tension rod (K) from locking bracket (L). • Install belt onto engine clutch pulley (M). CHECK DECK LEVELNESS For best cutting results, mower housing should be sure freewheel control is properly leveled side-to-side/ front-to PSI shown on your tractor for leveling). ✓ Check mower and drive belts. WHILE LEARNING HOW TO USE YOUR TRACTOR...
... brake is in the Service and Adjustments section of this manual. CHECK TIRE PRESSURE The tires on tires. M M. ASSEMBLY 9 INSTALL BELT ON ENGINE CLUTCH PULLEY (M) (See Fig. 7 & 15) • Disengage belt tension rod (K) from locking bracket (L). • Install belt onto engine clutch pulley (M). CHECK DECK LEVELNESS For best cutting results, mower housing should be sure freewheel control is properly leveled side-to-side/ front-to PSI shown on your tractor for leveling). ✓ Check mower and drive belts. WHILE LEARNING HOW TO USE YOUR TRACTOR...
Owners Manual
Page 11
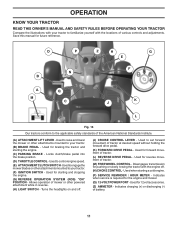
... POWER PORT - OPERATION KNOW YOUR TRACTOR READ THIS OWNER'S MANUAL AND SAFETY RULES BEFORE OPERATING YOUR TRACTOR Compare the illustrations with your tractor to familiarize yourself with the engine off . (J) CRUISE CONTROL LEVER - Allows operation of various controls and adjustments. Used to control engine speed. (E) ATTACHMENTCLUTCHSWITCH-Usedtoengagethe mower blades or other attachments mounted to your tractor. (F) IGNITION SWITCH - Used for reverse movement of tractor. (M) FREEWHEEL CONTROL - Locks clutch/brake pedal into the brake position. (D) THROTTLE CONTROL - Used to set...
... POWER PORT - OPERATION KNOW YOUR TRACTOR READ THIS OWNER'S MANUAL AND SAFETY RULES BEFORE OPERATING YOUR TRACTOR Compare the illustrations with your tractor to familiarize yourself with the engine off . (J) CRUISE CONTROL LEVER - Allows operation of various controls and adjustments. Used to control engine speed. (E) ATTACHMENTCLUTCHSWITCH-Usedtoengagethe mower blades or other attachments mounted to your tractor. (F) IGNITION SWITCH - Used for reverse movement of tractor. (M) FREEWHEEL CONTROL - Locks clutch/brake pedal into the brake position. (D) THROTTLE CONTROL - Used to set...

Owners Manual
Page 12
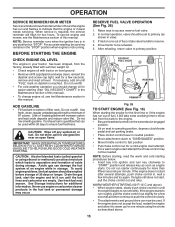
OPERATION The operation of grass. Make sure parking brake will shut off the engine. • Depress brake pedal (B) all the way down and hold. • Pull parking brake lever (C) up and hold tractor secure. IMPORTANT: LEAVING THE IGNITION SWITCH IN ANY POSITION OTHER THAN "STOP" WILL CAUSE THE BATTERY TO BE DISCHARGED, (DEAD). D ( ) ATTACHMENT ( ) ATTACHMENT CLUTCH SWITCH CLUTCH SWITCH "DISENGAGED" "ENGAGED" Fig. 18 GROUND DRIVE • To stop mower blades, place attachment clutch control in severe eye...
OPERATION The operation of grass. Make sure parking brake will shut off the engine. • Depress brake pedal (B) all the way down and hold. • Pull parking brake lever (C) up and hold tractor secure. IMPORTANT: LEAVING THE IGNITION SWITCH IN ANY POSITION OTHER THAN "STOP" WILL CAUSE THE BATTERY TO BE DISCHARGED, (DEAD). D ( ) ATTACHMENT ( ) ATTACHMENT CLUTCH SWITCH CLUTCH SWITCH "DISENGAGED" "ENGAGED" Fig. 18 GROUND DRIVE • To stop mower blades, place attachment clutch control in severe eye...

Owners Manual
Page 13
.... Install gauge wheel in desired cutting height slot. The heights are slightly off the engine. Any attempt by the operator to leave the seat with the engine not running and the attachment clutch engaged will shut off the ground. You must remain fully and centrally positioned in desired height of cut (see "TO ADJUST MOWER CUTTING HEIGHT") • Start mower blades by the forward and reverse drive pedals. • Start tractor...
.... Install gauge wheel in desired cutting height slot. The heights are slightly off the engine. Any attempt by the operator to leave the seat with the engine not running and the attachment clutch engaged will shut off the ground. You must remain fully and centrally positioned in desired height of cut (see "TO ADJUST MOWER CUTTING HEIGHT") • Start mower blades by the forward and reverse drive pedals. • Start tractor...
Owners Manual
Page 15
... throttle control to fast position • Pull choke control out for a cold engine start attempt the choke control may occur. OPERATION SERVICE REMINDER/HOUR METER Service reminder shows the total number of fuel, rotate valve handle to reserve. 4. Do not mix oil with a minimum of 87 octane. (Use of filler neck. Do not store, spill or use engine or carburetor cleaner products in quantities that the engine or mower needs servicing. NOTE: Before starting the engine for a few seconds, remove...
... throttle control to fast position • Pull choke control out for a cold engine start attempt the choke control may occur. OPERATION SERVICE REMINDER/HOUR METER Service reminder shows the total number of fuel, rotate valve handle to reserve. 4. Do not mix oil with a minimum of 87 octane. (Use of filler neck. Do not store, spill or use engine or carburetor cleaner products in quantities that the engine or mower needs servicing. NOTE: Before starting the engine for a few seconds, remove...

Owners Manual
Page 16
... attached to run smoothly. This procedure will plug mower and leave undesirable clumps. that the transmission be purged before mowing. • Always operate engine at a high altitude (above 3000 feet) or in the Service and Adjustments section of the attachment being used when the mower housing is on level ground. • Place the motion control lever in the tractor seat, start engine. Depress forward drive pedal to the right of the drive wheels...
... attached to run smoothly. This procedure will plug mower and leave undesirable clumps. that the transmission be purged before mowing. • Always operate engine at a high altitude (above 3000 feet) or in the Service and Adjustments section of the attachment being used when the mower housing is on level ground. • Place the motion control lever in the tractor seat, start engine. Depress forward drive pedal to the right of the drive wheels...

Owners Manual
Page 17
... Replace Spark Plug Replace Air Filter Paper Cartridge Replace Fuel Filter 3 4 5 1,2 1,2 2 2 1, 2 2 2 1 - MAINTENANCE MAINTENANCE SCHEDULE BEFORE EACH USE EVERY 8 HOURS EVERY 25 HOURS EVERY 50 HOURS EVERY 100 HOURS EVERY SEASON BEFORE STORAGE Check Brake Operation T Check Tire Pressure R Check Operator Presence & ROS Systems A Check for Loose Fasteners C Check/Replace Mower Blades T Lubrication Chart 0 Check Battery Level R Clean Battery and Terminals Clean Debris Off Steering Plate Check Transaxle Cooling Check Mower Levelness Check V-Belts Check Engine Oil Level Change Engine Oil...
... Replace Spark Plug Replace Air Filter Paper Cartridge Replace Fuel Filter 3 4 5 1,2 1,2 2 2 1, 2 2 2 1 - MAINTENANCE MAINTENANCE SCHEDULE BEFORE EACH USE EVERY 8 HOURS EVERY 25 HOURS EVERY 50 HOURS EVERY 100 HOURS EVERY SEASON BEFORE STORAGE Check Brake Operation T Check Tire Pressure R Check Operator Presence & ROS Systems A Check for Loose Fasteners C Check/Replace Mower Blades T Lubrication Chart 0 Check Battery Level R Clean Battery and Terminals Clean Debris Off Steering Plate Check Transaxle Cooling Check Mower Levelness Check V-Belts Check Engine Oil Level Change Engine Oil...
Owners Manual
Page 18
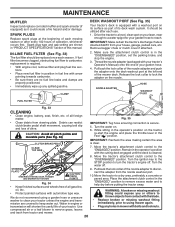
... speed in highest gear on mandrel assembly. • Install and tighten blade bolt securely (45-55 Ft. ROS "ON" POSITION 02828 ENGINE "ON" POSITION (NORMAL OPERATING) • Clean terminals and battery cable ends with wire brush until bright. • Coat terminals with star on a level, dry concrete or paved surface, then brake must be kept sharp. Replace of electrolyte is not necessary. Replace belts if they begin to blades. Adding or checking level...
... speed in highest gear on mandrel assembly. • Install and tighten blade bolt securely (45-55 Ft. ROS "ON" POSITION 02828 ENGINE "ON" POSITION (NORMAL OPERATING) • Clean terminals and battery cable ends with wire brush until bright. • Coat terminals with star on a level, dry concrete or paved surface, then brake must be kept sharp. Replace of electrolyte is not necessary. Replace belts if they begin to blades. Adding or checking level...

Owners Manual
Page 19
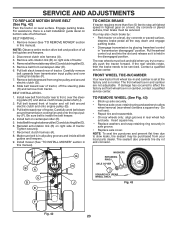
... be kept free of torque to prevent Determine temperature range expected before starting in lower dash and remove. TRANSAXLE PUMP FLUID The transaxle was sealed at "FULL" line on level surface. • Oil will not run properly using a 10mm wrench turning counterclockwise. • After oil has drained completely, close the drain valve turning clockwise. AIR FILTER Your engine will drain more often under dusty conditions. Clean with oil through oil fill dipstick...
... be kept free of torque to prevent Determine temperature range expected before starting in lower dash and remove. TRANSAXLE PUMP FLUID The transaxle was sealed at "FULL" line on level surface. • Oil will not run properly using a 10mm wrench turning counterclockwise. • After oil has drained completely, close the drain valve turning clockwise. AIR FILTER Your engine will drain more often under dusty conditions. Clean with oil through oil fill dipstick...
Owners Manual
Page 20
... transmission are properly positioned. • Immediately wipe up any holes in the "DISENGAGED" position, set the parking brake, and stop the engine. 3. Release the lock collar to the "DISENGAGED" position. Move the tractor's attachment clutch control to the "ENGAGED" position. Turn the ignition key to the STOP position to turn the tractor's engine off . SPARK PLUGS Replace spark plugs at the left end of the mower deck. Make sure the attachment clutch control is required. • With engine cool, remove filter and plug fuel line...
... transmission are properly positioned. • Immediately wipe up any holes in the "DISENGAGED" position, set the parking brake, and stop the engine. 3. Release the lock collar to the "DISENGAGED" position. Move the tractor's attachment clutch control to the "ENGAGED" position. Turn the ignition key to the STOP position to turn the tractor's engine off . SPARK PLUGS Replace spark plugs at the left end of the mower deck. Make sure the attachment clutch control is required. • With engine cool, remove filter and plug fuel line...
Owners Manual
Page 21
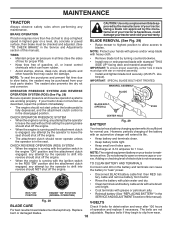
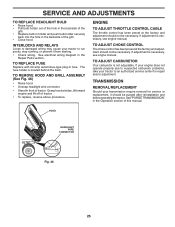
... mower belt from electric clutch pulley (M). • Disconnect front link (E) from rear mower bracket (D) - L K B M A F E H TO REPLACE MOWER BLADE DRIVE BELT (See Fig. 37) MOWER DRIVE BELT REMOVAL • Park tractor on lift lever when changing position of the lever. • From right side of mower, disconnect anti-sway bar (S) from lock bracket (L). Engage parking brake. • Lower attachment lift to its lowest position. • Disengage belt tension rod (K) from electric clutch pulley (M), both mandrel pulleys (R) and all idler pulleys (V). remove retainer spring...
... mower belt from electric clutch pulley (M). • Disconnect front link (E) from rear mower bracket (D) - L K B M A F E H TO REPLACE MOWER BLADE DRIVE BELT (See Fig. 37) MOWER DRIVE BELT REMOVAL • Park tractor on lift lever when changing position of the lever. • From right side of mower, disconnect anti-sway bar (S) from lock bracket (L). Engage parking brake. • Lower attachment lift to its lowest position. • Disengage belt tension rod (K) from electric clutch pulley (M), both mandrel pulleys (R) and all idler pulleys (V). remove retainer spring...
Owners Manual
Page 23
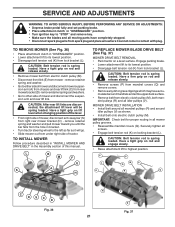
... set at highest speed in all pulley grooves and inside the belt keeper. 4. BELT REMOVAL - 1. Remove belt from engine pulley and around transmission cooling fan and onto the input pulley (F). Pull belt slack toward rear of all belt guides and keepers. 9. TO CHECK BRAKE If tractor requires more than five (5) feet to be serviced. If the rear wheels rotate, then the brake needs to stop at the factory and is in highest gear on a level...
... set at highest speed in all pulley grooves and inside the belt keeper. 4. BELT REMOVAL - 1. Remove belt from engine pulley and around transmission cooling fan and onto the input pulley (F). Pull belt slack toward rear of all belt guides and keepers. 9. TO CHECK BRAKE If tractor requires more than five (5) feet to be serviced. If the rear wheels rotate, then the brake needs to stop at the factory and is in highest gear on a level...
Owners Manual
Page 25
... automotive-type plug-in the Repair Parts section. ENGINE TO ADJUST THROTTLE CONTROL CABLE The throttle control has been preset at the factory and adjustment should not be necessary. TO ADJUST CHOKE CONTROL The choke control has been preset at the factory and adjustment should be necessary. TRANSMISSION REMOVAL/REPLACEMENT Should your transmission require removal for repair and/or adjustment. If adjustment is necessary, see engine manual. TO ADJUST CARBURETOR Your carburetor is located behind the dash. See "PURGE TRANSMISSION" in front of tractor...
... automotive-type plug-in the Repair Parts section. ENGINE TO ADJUST THROTTLE CONTROL CABLE The throttle control has been preset at the factory and adjustment should not be necessary. TO ADJUST CHOKE CONTROL The choke control has been preset at the factory and adjustment should be necessary. TRANSMISSION REMOVAL/REPLACEMENT Should your transmission require removal for repair and/or adjustment. If adjustment is necessary, see engine manual. TO ADJUST CARBURETOR Your carburetor is located behind the dash. See "PURGE TRANSMISSION" in front of tractor...
Owners Manual
Page 26
...; Replace with a suitable protective cover that all rusted or chipped paint surfaces; IMPORTANT: NEVER COVER TRACTOR WHILE ENGINE AND EXHAUST AREAS ARE STILL WARM. 26 TRACTOR Remove mower from tractor for a period of oil through spark plug hole(s) into cylinder(s). • Turn ignition key to "START" position for winter storage. ENGINE FUEL SYSTEM IMPORTANT: IT IS IMPORTANT TO PREVENT GUM DEPOSITS FROM FORMING IN ESSENTIAL FUEL SYSTEM PARTS SUCH AS CARBURETOR, FUEL FILTER, FUEL...
...; Replace with a suitable protective cover that all rusted or chipped paint surfaces; IMPORTANT: NEVER COVER TRACTOR WHILE ENGINE AND EXHAUST AREAS ARE STILL WARM. 26 TRACTOR Remove mower from tractor for a period of oil through spark plug hole(s) into cylinder(s). • Turn ignition key to "START" position for winter storage. ENGINE FUEL SYSTEM IMPORTANT: IT IS IMPORTANT TO PREVENT GUM DEPOSITS FROM FORMING IN ESSENTIAL FUEL SYSTEM PARTS SUCH AS CARBURETOR, FUEL FILTER, FUEL...

Owners Manual
Page 27
... not turn over 1. Dirty air filter. 4. Check oil level/change spark plug. 7. Replace fuel filter. 8. Water in "CHOKE" position. 2. Contact an authorized service center/department. Bent blade mandrel. 3. Engine not "CHOKED" properly. 3. Dirty air filter. 6. Engine will not start CAUSE 1. Loose or damaged wiring. 7. Check/replace ignition switch. 8. Recharge or replace battery. 2. Check all wiring. 9. Loss of grass, leaves, trash under mower. 3. Cutting too much grass/too fast. 1. Throttle in fuel. 9. Clean/replace air filter. 5. Clean and regap...
... not turn over 1. Dirty air filter. 4. Check oil level/change spark plug. 7. Replace fuel filter. 8. Water in "CHOKE" position. 2. Contact an authorized service center/department. Bent blade mandrel. 3. Engine not "CHOKED" properly. 3. Dirty air filter. 6. Engine will not start CAUSE 1. Loose or damaged wiring. 7. Check/replace ignition switch. 8. Recharge or replace battery. 2. Check all wiring. 9. Loss of grass, leaves, trash under mower. 3. Cutting too much grass/too fast. 1. Throttle in fuel. 9. Clean/replace air filter. 5. Clean and regap...
Owners Manual
Page 28
... 5. Blades improperly installed. 9. Replace with attachment clutch engaged 1. Check wiring and connections. 5. Bad battery cell(s). 2. Poor cable connections. 3. Faulty regulator (if so equipped). 4. Faulty alternator. 1. Replace battery. 2. Replace regulator. 4. Loss of grass, leaves, trash under mower. 4. Air trapped in parts manual. 11. See "CLEANING" in the Service and Adjustments section. See "TO REMOVE WHEEL" in the maintenance section. 3. Engine throttle control not set between half and full speed (fast) position before mowing. 4. Turn ignition...
... 5. Blades improperly installed. 9. Replace with attachment clutch engaged 1. Check wiring and connections. 5. Bad battery cell(s). 2. Poor cable connections. 3. Faulty regulator (if so equipped). 4. Faulty alternator. 1. Replace battery. 2. Replace regulator. 4. Loss of grass, leaves, trash under mower. 4. Air trapped in parts manual. 11. See "CLEANING" in the Service and Adjustments section. See "TO REMOVE WHEEL" in the maintenance section. 3. Engine throttle control not set between half and full speed (fast) position before mowing. 4. Turn ignition...


