

Owners Manual
Page 4
...Storage" sections of the California Public Resources Code). TABLE OF CONTENTS SAFETY RULES 2-3 MAINTENANCE 14-17 PRODUCT SPECIFICATIONS 4 SERVICE AND ADJUSTMENTS 18-23 CUSTOMER RESPONSIBILITIES 4 STORAGE 24 ASSEMBLY 5-6 TROUBLESHOOTING 25-26 OPERATION 7-13 REPAIR PARTS 27-42 MAINTENANCE...AMPS @ 3600 RPM Battery: AMP/HR: MIN. LBS. In the state of a new tractor. Please read and retain this owner's manual. If a spark arrester is used on federal lands. Should you experience any ). Always observe the "SAFETY RULES". PRODUCT SPECIFICATIONS Gasoline Capacity ...
...Storage" sections of the California Public Resources Code). TABLE OF CONTENTS SAFETY RULES 2-3 MAINTENANCE 14-17 PRODUCT SPECIFICATIONS 4 SERVICE AND ADJUSTMENTS 18-23 CUSTOMER RESPONSIBILITIES 4 STORAGE 24 ASSEMBLY 5-6 TROUBLESHOOTING 25-26 OPERATION 7-13 REPAIR PARTS 27-42 MAINTENANCE...AMPS @ 3600 RPM Battery: AMP/HR: MIN. LBS. In the state of a new tractor. Please read and retain this owner's manual. If a spark arrester is used on federal lands. Should you experience any ). Always observe the "SAFETY RULES". PRODUCT SPECIFICATIONS Gasoline Capacity ...
Owners Manual
Page 5
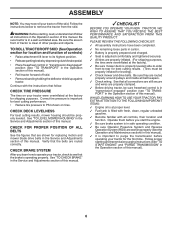
... means when you to press clutch/brake pedal all four panels of this manual for charging instructions). • For battery and battery cable installation see "REPLACING BATTERY" in the "Service and Adjustments" section in this manual. Fig. 2 5 Remove end panels and lay side panels flat. •... Check for any additional loose parts or cartons and remove. NOTE: If this battery is put into service after month and year indicated on ...
... means when you to press clutch/brake pedal all four panels of this manual for charging instructions). • For battery and battery cable installation see "REPLACING BATTERY" in the "Service and Adjustments" section in this manual. Fig. 2 5 Remove end panels and lay side panels flat. •... Check for any additional loose parts or cartons and remove. NOTE: If this battery is put into service after month and year indicated on ...
Owners Manual
Page 6
...and function. Follow the instructions below to see "TO TRANSPORT" in a well-ventilated area. Be sure the area in the Service and Adjustments section of controls) • Raise attachment lift lever to PSI shown on your tractor were overinflated at the factory...instructions have been completed. ✓ No remaining loose parts in this manual. WARNING: Before starting and transmission purging instructions (See "TO START ENGINE" and "PURGE TRANSMISSION" in the Service and Adjustments section of this manual). 6 Follow proper starting , read, understand and follow . CHECK BRAKE...
...and function. Follow the instructions below to see "TO TRANSPORT" in a well-ventilated area. Be sure the area in the Service and Adjustments section of controls) • Raise attachment lift lever to PSI shown on your tractor were overinflated at the factory...instructions have been completed. ✓ No remaining loose parts in this manual. WARNING: Before starting and transmission purging instructions (See "TO START ENGINE" and "PURGE TRANSMISSION" in the Service and Adjustments section of this manual). 6 Follow proper starting , read, understand and follow . CHECK BRAKE...

Owners Manual
Page 8
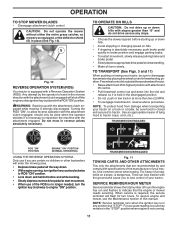
... A M Q C K J L Fig. 3 Our tractors conform to set forward movement of the American National Standards Institute. (A) ATTACHMENT LIFT LEVER - Indicates when service is required for reverse movement of various controls and adjustments. Used to raise and lower the mower or other attachments mounted to your tractor to..." POSITION - Used for 12 volt accessories. (Z) AMMETER - OPERATION KNOW YOUR TRACTOR READ THIS OWNER'S MANUAL AND SAFETY RULES BEFORE OPERATING YOUR TRACTOR Compare the illustrations with your tractor. (F) IGNITION SWITCH - Disengages transmission for future ...
... A M Q C K J L Fig. 3 Our tractors conform to set forward movement of the American National Standards Institute. (A) ATTACHMENT LIFT LEVER - Indicates when service is required for reverse movement of various controls and adjustments. Used to raise and lower the mower or other attachments mounted to your tractor to..." POSITION - Used for 12 volt accessories. (Z) AMMETER - OPERATION KNOW YOUR TRACTOR READ THIS OWNER'S MANUAL AND SAFETY RULES BEFORE OPERATING YOUR TRACTOR Compare the illustrations with your tractor. (F) IGNITION SWITCH - Disengages transmission for future ...
Owners Manual
Page 11
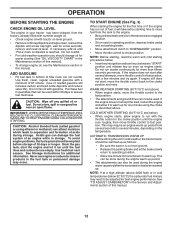
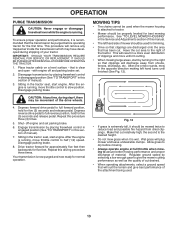
... when transporting your tractor. TRANSMISSION DISENGAGED Fig. 11 TOWING CARTS AND OTHER ATTACHMENTS Tow only the attachments that the engine or mower needs servicing. TRANSMISSION ENGAGED ROS "ON" POSITION 02828 ENGINE "ON" POSITION (NORMAL OPERATING) USING THE REVERSE OPERATION SYSTEM Only use of hours the...: Do not operate the mower without either the entire grass catcher, on a truck or a trailer, be sure to lose control of this manual. WARNING: Backing up or down and behind before and while backing. • Slowly depress reverse drive pedal to start movement. • When...
... when transporting your tractor. TRANSMISSION DISENGAGED Fig. 11 TOWING CARTS AND OTHER ATTACHMENTS Tow only the attachments that the engine or mower needs servicing. TRANSMISSION ENGAGED ROS "ON" POSITION 02828 ENGINE "ON" POSITION (NORMAL OPERATING) USING THE REVERSE OPERATION SYSTEM Only use of hours the...: Do not operate the mower without either the entire grass catcher, on a truck or a trailer, be sure to lose control of this manual. WARNING: Backing up or down and behind before and while backing. • Slowly depress reverse drive pedal to start movement. • When...
Owners Manual
Page 12
... key clockwise to operating position. • Allow one minute using ethanol or methanol) can attract moisture which leads to bottom of this manual. IMPORTANT: WHEN OPERATING IN TEMPERATURES BELOW 32°F(0°C), USE FRESH, CLEAN WINTER GRADE GASOLINE TO HELP ENSURE GOOD COLD WEATHER STARTING....best engine performance. Do not overfill. • For cold weather operation you should change engine oil, see the Maintenance section in the Service and Adjustments section of filler neck. Drain the gas tank, start the engine and let it will increase carbon and lead oxide deposits...
... key clockwise to operating position. • Allow one minute using ethanol or methanol) can attract moisture which leads to bottom of this manual. IMPORTANT: WHEN OPERATING IN TEMPERATURES BELOW 32°F(0°C), USE FRESH, CLEAN WINTER GRADE GASOLINE TO HELP ENSURE GOOD COLD WEATHER STARTING....best engine performance. Do not overfill. • For cold weather operation you should change engine oil, see the Maintenance section in the Service and Adjustments section of filler neck. Drain the gas tank, start the engine and let it will increase carbon and lead oxide deposits...
Owners Manual
Page 13
...; The left hand turns until finished (See Fig. 12). Have the cut relatively high; This will result in the Service and Adjustments section of manual). 3. the second to the desired height. • Do not mow grass when it is running . Regulate ground speed by placing freewheel control in disengaged position (...
...; The left hand turns until finished (See Fig. 12). Have the cut relatively high; This will result in the Service and Adjustments section of manual). 3. the second to the desired height. • Do not mow grass when it is running . Regulate ground speed by placing freewheel control in disengaged position (...

Owners Manual
Page 14
...Replace Air Filter Paper Cartridge Replace Fuel Filter 3 4 5 1,2 1,2 2 2 1, 2 2 2 1 - GENERAL RECOMMENDATIONS LUBRICATION CHART The warranty on this manual. ➀ SPINDLE ZERK ➀ SPINDLE ZERK Some adjustments will need to be made periodically to see if you should make any of this...from the warranty, operator must maintain tractor as instructed in sandy soil. 4 - Replace blades more often when operating in the Service and Adjustments section of the adjustments described in dirty or dusty conditions. 3 - MAINTENANCE MAINTENANCE SCHEDULE BEFORE EACH USE EVERY 8 ...
...Replace Air Filter Paper Cartridge Replace Fuel Filter 3 4 5 1,2 1,2 2 2 1, 2 2 2 1 - GENERAL RECOMMENDATIONS LUBRICATION CHART The warranty on this manual. ➀ SPINDLE ZERK ➀ SPINDLE ZERK Some adjustments will need to be made periodically to see if you should make any of this...from the warranty, operator must maintain tractor as instructed in sandy soil. 4 - Replace blades more often when operating in the Service and Adjustments section of the adjustments described in dirty or dusty conditions. 3 - MAINTENANCE MAINTENANCE SCHEDULE BEFORE EACH USE EVERY 8 ...
Owners Manual
Page 15
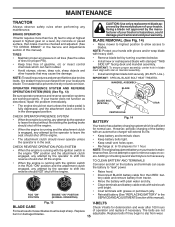
... Lbs.). IMPORTANT: SPECIAL BLADE BOLT HEAT TREATED. Do not attempt to slip from your tractor is in the Service and Adjustments section of operation and replace if necessary. Replace of this manual). Replace belts if they begin to open . • Recharge at 6-10 amperes for deterioration and wear after... allow access to shift into reverse should shut off the engine. • When the engine is running with the ignition switch in the SERVICE AND ADJUSTMENTS section of the battery with heavy cloth. • Remove blade bolt by the manufacturer of your hands with gloves and/or...
... Lbs.). IMPORTANT: SPECIAL BLADE BOLT HEAT TREATED. Do not attempt to slip from your tractor is in the Service and Adjustments section of operation and replace if necessary. Replace of this manual). Replace belts if they begin to open . • Recharge at 6-10 amperes for deterioration and wear after... allow access to shift into reverse should shut off the engine. • When the engine is running with the ignition switch in the SERVICE AND ADJUSTMENTS section of the battery with heavy cloth. • Remove blade bolt by the manufacturer of your hands with gloves and/or...
Owners Manual
Page 16
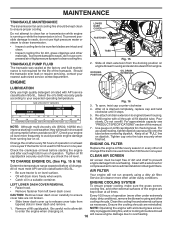
...conditions. Remove oil fill cap/dipstick. AIR FILTER Your engine will cause engine damage due to your nearest authorized service center/department. CLEAN AIR SCREEN TO CHANGE ENGINE OIL (See Fig. 15 & 16) Determine temperature range ...engine are reinstalled. 1. Check your engine oil level more than 100 hours in a suitable container. Refill engine with API service classification SG-SL. Clean with a blocked grass screen, to engine blower housing. 6. LOWER DASH COVER FASTENER SLOTS TABS ...of operation. All oil must be kept free of this manual. 7.
...conditions. Remove oil fill cap/dipstick. AIR FILTER Your engine will cause engine damage due to your nearest authorized service center/department. CLEAN AIR SCREEN TO CHANGE ENGINE OIL (See Fig. 15 & 16) Determine temperature range ...engine are reinstalled. 1. Check your engine oil level more than 100 hours in a suitable container. Refill engine with API service classification SG-SL. Clean with a blocked grass screen, to engine blower housing. 6. LOWER DASH COVER FASTENER SLOTS TABS ...of operation. All oil must be kept free of this manual. 7.
Owners Manual
Page 19
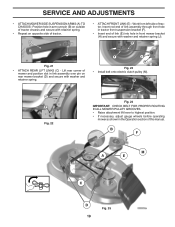
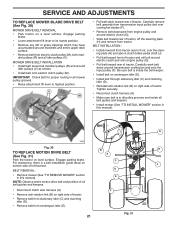
...(D) and secure with washer and retainer spring (J). F J H Fig. 23 • Install belt onto electric clutch pulley (M). Work from left side of this manual. Lift rear corner of tractor. M C D Fig. 22 Fig. 24 IMPORTANT: CHECK BELT FOR PROPER ROUTING IN ALL MOWER PULLEY GROOVES. • Raise attachment... slot in front mower bracket (H) and secure with washer and retainer spring. A • ATTACH FRONT LINK (E) - B F M A E C D Fig. 25 19 SERVICE AND ADJUSTMENTS • ATTACH MOWER SIDE SUSPENSION ARMS (A) TO CHASSIS - Position hole in the Operation section of tractor.
...(D) and secure with washer and retainer spring (J). F J H Fig. 23 • Install belt onto electric clutch pulley (M). Work from left side of this manual. Lift rear corner of tractor. M C D Fig. 22 Fig. 24 IMPORTANT: CHECK BELT FOR PROPER ROUTING IN ALL MOWER PULLEY GROOVES. • Raise attachment... slot in front mower bracket (H) and secure with washer and retainer spring. A • ATTACH FRONT LINK (E) - B F M A E C D Fig. 25 19 SERVICE AND ADJUSTMENTS • ATTACH MOWER SIDE SUSPENSION ARMS (A) TO CHASSIS - Position hole in the Operation section of tractor.
Owners Manual
Page 21
...electric clutch and onto engine pulley (G). • Pull belt toward rear of tractor, off the steering plate (H) and remove from tractor. SERVICE AND ADJUSTMENTS TO REPLACE MOWER BLADE DRIVE BELT (See Fig. 30) MOWER DRIVE BELT REMOVAL • Park tractor on right side of tractor... (C) and clutching idler (D). • Remove belt from centerspan idler (E). Engage parking brake. IMPORTANT: Check belt for proper routing in this manual). BELT INSTALLATION - • Install new belt from tractor rear to highest position. MOWER DRIVE BELT INSTALLATION • Install belt around all mower...
...electric clutch and onto engine pulley (G). • Pull belt toward rear of tractor, off the steering plate (H) and remove from tractor. SERVICE AND ADJUSTMENTS TO REPLACE MOWER BLADE DRIVE BELT (See Fig. 30) MOWER DRIVE BELT REMOVAL • Park tractor on right side of tractor... (C) and clutching idler (D). • Remove belt from centerspan idler (E). Engage parking brake. IMPORTANT: Check belt for proper routing in this manual). BELT INSTALLATION - • Install new belt from tractor rear to highest position. MOWER DRIVE BELT INSTALLATION • Install belt around all mower...
Owners Manual
Page 22
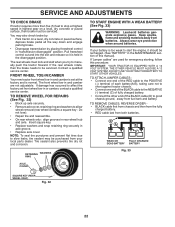
...not adjustable. DO NOT USE YOUR TRACTOR BATTERY TO START OTHER VEHICLES. If the rear wheels rotate, then the brake needs to be serviced. Contact a qualified service center. TO REMOVE CABLES, REVERSE ORDER • BLACK cable first from chassis and then from the fully charged battery. • RED...weak to start the engine, it is held in and camber are used for emergency starting, follow this manual). Keep sparks, flame and smoking materials away from both batteries. SERVICE AND ADJUSTMENTS TO CHECK BRAKE If tractor requires more than five (5) feet to stop at the factory ...
...not adjustable. DO NOT USE YOUR TRACTOR BATTERY TO START OTHER VEHICLES. If the rear wheels rotate, then the brake needs to be serviced. Contact a qualified service center. TO REMOVE CABLES, REVERSE ORDER • BLACK cable first from chassis and then from the fully charged battery. • RED...weak to start the engine, it is held in and camber are used for emergency starting, follow this manual). Keep sparks, flame and smoking materials away from both batteries. SERVICE AND ADJUSTMENTS TO CHECK BRAKE If tractor requires more than five (5) feet to stop at the factory ...
Owners Manual
Page 23
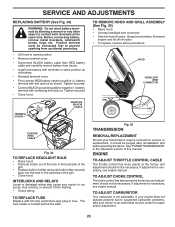
...the dash. TO REPLACE FUSE Replace with 20 amp automotive-type plug-in same position as shown. If adjustment is necessary, see engine manual. SERVICE AND ADJUSTMENTS REPLACING BATTERY (See Fig. 34) WARNING: Do not short battery terminals by allowing a wrench or any other object to...Grasp hood at the factory and adjustment should not be necessary. Fig. 35 TRANSMISSION REMOVAL/REPLACEMENT Should your tractor to an authorized service center for service or replacement, it from tractor. • Install new battery with terminals in fuse. TO ADJUST CHOKE CONTROL The choke control has...
...the dash. TO REPLACE FUSE Replace with 20 amp automotive-type plug-in same position as shown. If adjustment is necessary, see engine manual. SERVICE AND ADJUSTMENTS REPLACING BATTERY (See Fig. 34) WARNING: Do not short battery terminals by allowing a wrench or any other object to...Grasp hood at the factory and adjustment should not be necessary. Fig. 35 TRANSMISSION REMOVAL/REPLACEMENT Should your tractor to an authorized service center for service or replacement, it from tractor. • Install new battery with terminals in fuse. TO ADJUST CHOKE CONTROL The choke control has...

Owners Manual
Page 24
...; Lubricate as shown in the Maintenance section of time, clean it to cool before painting. placement instructions in the Service and Adjustments section of this manual). ENGINE OIL Drain oil (with engine warm) and replace with a suitable protective cover that all nuts, bolts and screws are ...empty. • Never use plastic. sand lightly before storing in the Maintenance section of this manual). • After cleaning, leave cables disconnected and place cables where they cannot come in contact with gasoline in storage, battery may reach...
...; Lubricate as shown in the Maintenance section of time, clean it to cool before painting. placement instructions in the Service and Adjustments section of this manual). ENGINE OIL Drain oil (with engine warm) and replace with a suitable protective cover that all nuts, bolts and screws are ...empty. • Never use plastic. sand lightly before storing in the Maintenance section of this manual). • After cleaning, leave cables disconnected and place cables where they cannot come in contact with gasoline in storage, battery may reach...

Owners Manual
Page 26
Faulty operator-safety presence control system. Obstruction in parts manual. 11. Frozen idler pulley. 4. Level mower deck. 3. Clean underside of mower housing. 8. Remove obstruction. 2. Replace mower drive belt. 3. Poor grass...improperly installed. 9. Poor cable connections. 3. Motion drive belt worn, damaged, or broken. 4. Replace motion drive belt. 4. If not corrected, contact an authorized service center/ department. Clogged mower deck vent holes from buildup of grass, leaves, and trash around mandrels. 1. Bulb(s) or lamp(s) burned out. 3. Debris on ...
Faulty operator-safety presence control system. Obstruction in parts manual. 11. Frozen idler pulley. 4. Level mower deck. 3. Clean underside of mower housing. 8. Remove obstruction. 2. Replace mower drive belt. 3. Poor grass...improperly installed. 9. Poor cable connections. 3. Motion drive belt worn, damaged, or broken. 4. Replace motion drive belt. 4. If not corrected, contact an authorized service center/ department. Clogged mower deck vent holes from buildup of grass, leaves, and trash around mandrels. 1. Bulb(s) or lamp(s) burned out. 3. Debris on ...

Owners Manual
Page 42
...'s (English) Manual, Owner's (Spanish) WHEELS AND TIRES 1 2 11 3 4 7 10 6 wheel_art_1-tex 5 9 8 KEY PART NO. Tube) NOTE: All component dimensions given in U.S. inches 1 inch = 25.4 mm 42 Decal, Replacement Decal, Pedal Husq. MODEL NUMBER YTH22V46XLS (96043011201), PRODUCT NO. 960 43 01-12 DECALS 2 56 2 3 1 9 4 12 7 KEY PART ...68 10 532 12 49-26 11 532 13 83-37 - - 532 14 43-34 DESCRIPTION Cap Valve Tire Stem Valve Rim Front Service Tube Front (Service Item Only) Tire TM Front 15 x 6.00-6 Fitting Grease (Front Wheel Only) Bearing Flange (Front Wheel Only) Cap Axle Blk 1...
...'s (English) Manual, Owner's (Spanish) WHEELS AND TIRES 1 2 11 3 4 7 10 6 wheel_art_1-tex 5 9 8 KEY PART NO. Tube) NOTE: All component dimensions given in U.S. inches 1 inch = 25.4 mm 42 Decal, Replacement Decal, Pedal Husq. MODEL NUMBER YTH22V46XLS (96043011201), PRODUCT NO. 960 43 01-12 DECALS 2 56 2 3 1 9 4 12 7 KEY PART ...68 10 532 12 49-26 11 532 13 83-37 - - 532 14 43-34 DESCRIPTION Cap Valve Tire Stem Valve Rim Front Service Tube Front (Service Item Only) Tire TM Front 15 x 6.00-6 Fitting Grease (Front Wheel Only) Bearing Flange (Front Wheel Only) Cap Axle Blk 1...


