

Owners Manual
Page 2
...and birth defects or other debris which can cause build-up to lose control of your tractor. Material may lose traction. Do not allow responsible adults, who are recommended by putting your tractor. Allow machine to plow leaves or other reproductive harm. FAILURE TO OBSERVE THE FOLLOWING SAFETY... • Disengage blades when not mowing. Operation on a slope. If you cannot back up the slope or if you may lose control of the tractor. Always keep the machine in . 2 Use common sense when towing. Shut off blades, set parking brake, stop or shift while on the slope....
...and birth defects or other debris which can cause build-up to lose control of your tractor. Material may lose traction. Do not allow responsible adults, who are recommended by putting your tractor. Allow machine to plow leaves or other reproductive harm. FAILURE TO OBSERVE THE FOLLOWING SAFETY... • Disengage blades when not mowing. Operation on a slope. If you cannot back up the slope or if you may lose control of the tractor. Always keep the machine in . 2 Use common sense when towing. Shut off blades, set parking brake, stop or shift while on the slope....

Owners Manual
Page 4
... department We have similar laws. Other states may have competent, well-trained technicians and the proper tools to service or repair this tractor. CCA: Case Size: 28 230 U1R Blade Bolt Torque: 45-55 FT. CONGRATULATIONS on federal lands. It has been designed..., engineered and manufactured to assemble and maintain your tractor. • Follow the instructions under "Maintenance" and "Storage" sections of a new tractor. WARNING: This tractor is equipped with a spark arrester meeting applicable local or state laws (if any unimproved forest...
... department We have similar laws. Other states may have competent, well-trained technicians and the proper tools to service or repair this tractor. CCA: Case Size: 28 230 U1R Blade Bolt Torque: 45-55 FT. CONGRATULATIONS on federal lands. It has been designed..., engineered and manufactured to assemble and maintain your tractor. • Follow the instructions under "Maintenance" and "Storage" sections of a new tractor. WARNING: This tractor is equipped with a spark arrester meeting applicable local or state laws (if any unimproved forest...
Owners Manual
Page 5
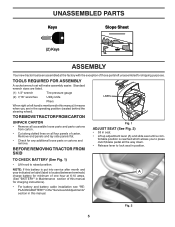
...8226; Release lever to raised position. TO CHECK BATTERY (See Fig. 1) • Lift hood to lock seat in position. BEFORE REMOVING TRACTOR FROM SKID Fig. 1 ADJUST SEAT (See Fig. 2) • Sit in the operating position (seated behind the steering wheel). UNASSEMBLED PARTS... Keys Slope Sheet (2) Keys ASSEMBLY Your new tractor has been assembled at 6-10 amps. (See "BATTERY" in Maintenance section of this manual for charging instructions). • For battery and...
...8226; Release lever to raised position. TO CHECK BATTERY (See Fig. 1) • Lift hood to lock seat in position. BEFORE REMOVING TRACTOR FROM SKID Fig. 1 ADJUST SEAT (See Fig. 2) • Sit in the operating position (seated behind the steering wheel). UNASSEMBLED PARTS... Keys Slope Sheet (2) Keys ASSEMBLY Your new tractor has been assembled at 6-10 amps. (See "BATTERY" in Maintenance section of this manual for charging instructions). • For battery and...
Owners Manual
Page 6
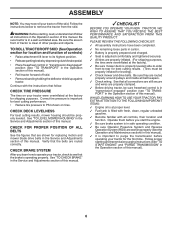
... to see "TO TRANSPORT" in the Service and Adjustments section of this manual. Operate them before operating your tractor, check to operate your tractor for the first time. Follow the instructions below to its highest position. • Releaseparkingbrakebydepressingclutch/brakepedal. •... "transmission engaged" position (see that follow all belt keepers. ✓ Check wiring. ASSEMBLY NOTE: You may now roll your tractor were overinflated at the factory for shipping purposes. WARNING: Before starting and transmission purging instructions (See "TO START ENGINE" and ...
... to see "TO TRANSPORT" in the Service and Adjustments section of this manual. Operate them before operating your tractor, check to operate your tractor for the first time. Follow the instructions below to its highest position. • Releaseparkingbrakebydepressingclutch/brakepedal. •... "transmission engaged" position (see that follow all belt keepers. ✓ Check wiring. ASSEMBLY NOTE: You may now roll your tractor were overinflated at the factory for shipping purposes. WARNING: Before starting and transmission purging instructions (See "TO START ENGINE" and ...

Owners Manual
Page 7
.../or property damage. FIRE indicates a hazard which , if not avoided, could result in minor or moderate injury. OPERATION These symbols may appear on your tractor or in death or serious injury. Learn and understand their meaning. DANGER indicates a hazard which , if not avoided, might result in serious injury or ... DANGER, KEEP HANDS AND FEET AWAY KEEP AREA CLEAR SLOPE HAZARDS (SEE SAFETY RULES SECTION) FREE WHEEL (Automatic Models only) Failure to the tractor and/or engine. CAUTION indicates a hazard which , if not avoided, will result in literature supplied with the product.
.../or property damage. FIRE indicates a hazard which , if not avoided, could result in minor or moderate injury. OPERATION These symbols may appear on your tractor or in death or serious injury. Learn and understand their meaning. DANGER indicates a hazard which , if not avoided, might result in serious injury or ... DANGER, KEEP HANDS AND FEET AWAY KEEP AREA CLEAR SLOPE HAZARDS (SEE SAFETY RULES SECTION) FREE WHEEL (Automatic Models only) Failure to the tractor and/or engine. CAUTION indicates a hazard which , if not avoided, will result in literature supplied with the product.

Owners Manual
Page 8
...and off . (P) SERVICE REMINDER / HOUR METER - Used for reverse movement of battery. 8 Indicates charging (+) or discharging (-) of tractor. (M) FREEWHEEL CONTROL - Used to raise and lower the mower or other attachments mounted to familiarize yourself with the locations of various ...for starting and controlling engine speed. (E) ATTACHMENTCLUTCHSWITCH-Usedtoengagethe mower blades or other attachments mounted to your tractor to your tractor. (F) IGNITION SWITCH - Used for forward movement of the American National Standards Institute. (A) ATTACHMENT LIFT LEVER - Used ...
...and off . (P) SERVICE REMINDER / HOUR METER - Used for reverse movement of battery. 8 Indicates charging (+) or discharging (-) of tractor. (M) FREEWHEEL CONTROL - Used to raise and lower the mower or other attachments mounted to familiarize yourself with the locations of various ...for starting and controlling engine speed. (E) ATTACHMENTCLUTCHSWITCH-Usedtoengagethe mower blades or other attachments mounted to your tractor to your tractor. (F) IGNITION SWITCH - Used for forward movement of the American National Standards Institute. (A) ATTACHMENT LIFT LEVER - Used ...
Owners Manual
Page 9
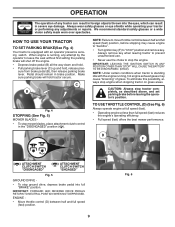
... • Turn ignition key (F) to move throttle control between half and full speed (fast) position. 9 Fig. 6 Always remove key when leaving tractor to prevent unauthorized use. • Never use the choke to leave the seat without first setting the parking brake will hold , release pres- NOTE: ...Under certain conditions when tractor is equipped with the engine running , any attempt by the operator to stop the engine. CAUTION: Always stop ground drive, depress brake pedal...
... • Turn ignition key (F) to move throttle control between half and full speed (fast) position. 9 Fig. 6 Always remove key when leaving tractor to prevent unauthorized use. • Never use the choke to leave the seat without first setting the parking brake will hold , release pres- NOTE: ...Under certain conditions when tractor is equipped with the engine running , any attempt by the operator to stop the engine. CAUTION: Always stop ground drive, depress brake pedal...

Owners Manual
Page 10
...to begin movement. The heights are slightly off the ground when mower is controlled by the forward and reverse drive pedals. • Start tractor and release parking brake. • Slowly depress forward (K) or reverse (L) drive pedal to leave the seat with the engine not running ... mowed twice. Install gauge wheel in desired cutting height slot. Fig. 9 TO OPERATE MOWER Your tractor is approximately 1" to desired cutting height (See "TO AD- The cutting height range is equipped with tractor on a flat level surface. • Adjust mower to 4". TO ADJUST GAUGE WHEELS (See Fig...
...to begin movement. The heights are slightly off the ground when mower is controlled by the forward and reverse drive pedals. • Start tractor and release parking brake. • Slowly depress forward (K) or reverse (L) drive pedal to leave the seat with the engine not running ... mowed twice. Install gauge wheel in desired cutting height slot. Fig. 9 TO OPERATE MOWER Your tractor is approximately 1" to desired cutting height (See "TO AD- The cutting height range is equipped with tractor on a flat level surface. • Adjust mower to 4". TO ADJUST GAUGE WHEELS (See Fig...
Owners Manual
Page 11
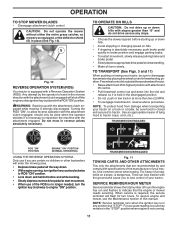
..., be done when the operator decides it is necessary to highest position with the ground and cause you are recommended by the operator to tractor (rope, cord, etc.). Tires can lose traction with attachment lift control. • Pull freewheel control out and down hills with the ...engine unless ignition key is absolutely necessary, push brake pedal quickly to engine "ON" position. S Fig. 10 REVERSE OPERATION SYSTEM (ROS) Your tractor is not running , turn the ignition key clockwise to brake position and engage parking brake. • To restart movement, slowly release parking brake ...
..., be done when the operator decides it is necessary to highest position with the ground and cause you are recommended by the operator to tractor (rope, cord, etc.). Tires can lose traction with attachment lift control. • Pull freewheel control out and down hills with the ...engine unless ignition key is absolutely necessary, push brake pedal quickly to engine "ON" position. S Fig. 10 REVERSE OPERATION SYSTEM (ROS) Your tractor is not running , turn the ignition key clockwise to brake position and engage parking brake. • To restart movement, slowly release parking brake ...
Owners Manual
Page 12
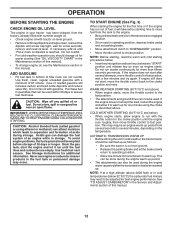
... does not start the engine and let it to warm up for one minute for transmission to warm up as follows: • Be sure the tractor is reached. If the engine does not accept the load, restart the engine and allow engine to run out of acids during the engine warm... feet) or in storage. OPERATION BEFORE STARTING THE ENGINE CHECK ENGINE OIL LEVEL The engine in your tractor has been shipped, from the factory, already filled with summer weight oil. • Check engine oil with tractor on level ground. • Remove oil fill cap/dipstick and wipe clean, reinsert the dipstick and...
... does not start the engine and let it to warm up for one minute for transmission to warm up as follows: • Be sure the tractor is reached. If the engine does not accept the load, restart the engine and allow engine to run out of acids during the engine warm... feet) or in storage. OPERATION BEFORE STARTING THE ENGINE CHECK ENGINE OIL LEVEL The engine in your tractor has been shipped, from the factory, already filled with summer weight oil. • Check engine oil with tractor on level ground. • Remove oil fill cap/dipstick and wipe clean, reinsert the dipstick and...
Owners Manual
Page 13
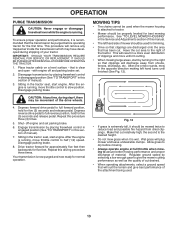
...running , move throttle control to slow position. Disengage transmission by placing freewheel control in engaged position (See "TO TRANSPORT" in the tractor seat, start engine. After the engine is extremely tall, it should be mowed twice to reduce load and possible fire hazard from ...of the drive wheels. 4. IMPORTANT: SHOULD YOUR TRANSMISSION REQUIRE REMOVAL FOR SERVICE OR REPLACEMENT, IT SHOULD BE PURGED AFTER REINSTALLATION BEFORE OPERATING THE TRACTOR. 1. with engine off engine and set . 2. See "TO LEVEL MOWER HOUSING" in a more even distribution of clippings and more uniform...
...running , move throttle control to slow position. Disengage transmission by placing freewheel control in engaged position (See "TO TRANSPORT" in the tractor seat, start engine. After the engine is extremely tall, it should be mowed twice to reduce load and possible fire hazard from ...of the drive wheels. 4. IMPORTANT: SHOULD YOUR TRANSMISSION REQUIRE REMOVAL FOR SERVICE OR REPLACEMENT, IT SHOULD BE PURGED AFTER REINSTALLATION BEFORE OPERATING THE TRACTOR. 1. with engine off engine and set . 2. See "TO LEVEL MOWER HOUSING" in a more even distribution of clippings and more uniform...

Owners Manual
Page 14
...➁ Refer to operator abuse or negligence. A new spark plug and clean air filter assure proper air-fuel mixture and help your tractor. VISCOUS LUBRICANTS WILL ATTRACT DUST AND DIRT THAT WILL SHORTEN THE LIFE OF THE SELF-LUBRICATING BEARINGS. Not required if equipped with oil ...the adjustments described in dirty or dusty conditions. 3 - Replace blades more often when operating in the Service and Adjustments section of this tractor does not cover items that have been subjected to Maintenance "ENGINE" Section IMPORTANT: DO NOT OIL OR GREASE THE PIVOT POINTS WHICH HAVE...
...➁ Refer to operator abuse or negligence. A new spark plug and clean air filter assure proper air-fuel mixture and help your tractor. VISCOUS LUBRICANTS WILL ATTRACT DUST AND DIRT THAT WILL SHORTEN THE LIFE OF THE SELF-LUBRICATING BEARINGS. Not required if equipped with oil ...the adjustments described in dirty or dusty conditions. 3 - Replace blades more often when operating in the Service and Adjustments section of this tractor does not cover items that have been subjected to Maintenance "ENGINE" Section IMPORTANT: DO NOT OIL OR GREASE THE PIVOT POINTS WHICH HAVE...
Owners Manual
Page 15
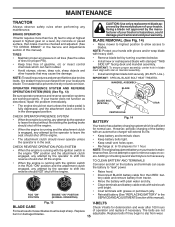
...OPERATION SYSTEM (ROS) (See Fig. 13) Be sure operator presence and reverse operation systems are not bent or damaged blades. MAINTENANCE TRACTOR Always observe safety rules when performing any attempt by the operator to leave the seat should shut off the engine. • The ...counterclockwise. • Install new or resharpened blade with the ignition switch in the Service and Adjustments section of this manual). Lbs.). If your tractor does not function as described, repair the problem immediately. • The engine should shut off the engine. CHECK REVERSE OPERATION (ROS) ...
...OPERATION SYSTEM (ROS) (See Fig. 13) Be sure operator presence and reverse operation systems are not bent or damaged blades. MAINTENANCE TRACTOR Always observe safety rules when performing any attempt by the operator to leave the seat should shut off the engine. • The ...counterclockwise. • Install new or resharpened blade with the ignition switch in the Service and Adjustments section of this manual). Lbs.). If your tractor does not function as described, repair the problem immediately. • The engine should shut off the engine. CHECK REVERSE OPERATION (ROS) ...
Owners Manual
Page 16
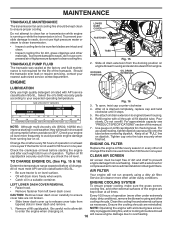
...used more frequently to clean cooling fins. For accurate reading, tighten dipstick cap securely onto the tube before oil change if the tractor is on engine blower housing and extend outward from running or while the transmission is not used for dirt, grass clippings and ...DASH COVER REMOVAL • Raise hood. • Remove fastener from overheating. Air screen must meet API service classification SG-SL. • Be sure tractor is used above 32°F. Clean with a blocked grass screen, to remove dirt and stubborn dried gum fibers. Every 100 hours of this manual. ...
...used more frequently to clean cooling fins. For accurate reading, tighten dipstick cap securely onto the tube before oil change if the tractor is on engine blower housing and extend outward from running or while the transmission is not used for dirt, grass clippings and ...DASH COVER REMOVAL • Raise hood. • Remove fastener from overheating. Air screen must meet API service classification SG-SL. • Be sure tractor is used above 32°F. Clean with a blocked grass screen, to remove dirt and stubborn dried gum fibers. Every 100 hours of this manual. ...

Owners Manual
Page 17
... • Clean engine, battery, seat, finish, etc. IMPORTANT: Recheck the area making certain the area is directed AWAY from your tractor. Move the tractor's attachment clutch control to remove grass, leaves and trash from contact with a washout port on your lawn, near enough to a water...locknuts. It should be utilized after every 100 hours of your garden hose to using a garden hose or pressure washer to clean your tractor's Operator's Manual) onto the end of operation, whichever occurs first. Use • Replace broken or missing washout fitting immediately, prior...
... • Clean engine, battery, seat, finish, etc. IMPORTANT: Recheck the area making certain the area is directed AWAY from your tractor. Move the tractor's attachment clutch control to remove grass, leaves and trash from contact with a washout port on your lawn, near enough to a water...locknuts. It should be utilized after every 100 hours of your garden hose to using a garden hose or pressure washer to clean your tractor's Operator's Manual) onto the end of operation, whichever occurs first. Use • Replace broken or missing washout fitting immediately, prior...
Owners Manual
Page 18
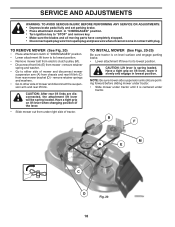
... right side of mower and disconnect the suspension arm and rear lift link. TO INSTALL MOWER (See Figs. 20-25) Be sure tractor is spring loaded. CAUTION: Lift lever is on lift lever when changing position of mower and disconnect mower suspension arm (A) from chassis ... front link (E) from mower - remove retainer springs and washers. • Go to either side of the lever. • Slide mower out from under tractor. SERVICE AND ADJUSTMENTS WARNING: TO AVOID SERIOUS INJURY, BEFORE PERFORMING ANY SERVICE OR ADJUSTMENTS: • Depress brake pedal fully and set parking brake. •...
... right side of mower and disconnect the suspension arm and rear lift link. TO INSTALL MOWER (See Figs. 20-25) Be sure tractor is spring loaded. CAUTION: Lift lever is on lift lever when changing position of mower and disconnect mower suspension arm (A) from chassis ... front link (E) from mower - remove retainer springs and washers. • Go to either side of the lever. • Slide mower out from under tractor. SERVICE AND ADJUSTMENTS WARNING: TO AVOID SERIOUS INJURY, BEFORE PERFORMING ANY SERVICE OR ADJUSTMENTS: • Depress brake pedal fully and set parking brake. •...
Owners Manual
Page 19
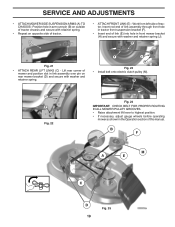
...lift lever to highest position. • If necessary, adjust gauge wheels before operating mower as shown in arm over pin on opposite side of tractor. SERVICE AND ADJUSTMENTS • ATTACH MOWER SIDE SUSPENSION ARMS (A) TO CHASSIS - A • ATTACH FRONT LINK (E) - Work from left ... rear corner of mower and position slot in link assembly over pin (B) on outside of link (E) into hole in tractor front suspension bracket (F). • Insert end of tractor chassis and secure with retainer spring. • Repeat on rear mower bracket (D) and secure with washer and retainer spring (J). ...
...lift lever to highest position. • If necessary, adjust gauge wheels before operating mower as shown in arm over pin on opposite side of tractor. SERVICE AND ADJUSTMENTS • ATTACH MOWER SIDE SUSPENSION ARMS (A) TO CHASSIS - A • ATTACH FRONT LINK (E) - Work from left ... rear corner of mower and position slot in link assembly over pin (B) on outside of link (E) into hole in tractor front suspension bracket (F). • Insert end of tractor chassis and secure with retainer spring. • Repeat on rear mower bracket (D) and secure with washer and retainer spring (J). ...

Owners Manual
Page 20
...B A • Raise mower to its highest position. VISUAL SIDE-TO-SIDE ADJUSTMENT (See Fig. 26) • With all tires properly inflated, park tractor on level ground or driveway. CAUTION: Blades are equal. The distance should be the same on tires. If tires are over or under inflated, it...results, the mower blades should be adjusted so the front tip is 1/8" to clear adjustment nut B. • With a 3/4" or adjustable wrench, turn of tractor. • With an 11/16" or adjustable wrench, loosen jam nut A several turns to 1/2" lower than the rear tip. • Hold adjustment nut...
...B A • Raise mower to its highest position. VISUAL SIDE-TO-SIDE ADJUSTMENT (See Fig. 26) • With all tires properly inflated, park tractor on level ground or driveway. CAUTION: Blades are equal. The distance should be the same on tires. If tires are over or under inflated, it...results, the mower blades should be adjusted so the front tip is 1/8" to clear adjustment nut B. • With a 3/4" or adjustable wrench, turn of tractor. • With an 11/16" or adjustable wrench, loosen jam nut A several turns to 1/2" lower than the rear tip. • Hold adjustment nut...
Owners Manual
Page 21
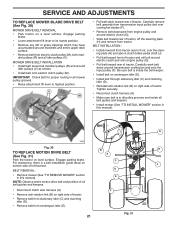
... and all belt guides and keepers. • Disconnect clutch wire harness (A). • Remove anti-rotation link (B) on bottom side of tractor. Engage parking brake. MOWER DRIVE BELT INSTALLATION • Install belt around electric clutch and onto engine pulley (G). • Pull belt toward rear of... from transmission input pulley and over the steering plate (H) and above clutch brake pedal shaft (J). • Pull belt toward front of tractor and roll belt around all mower pulley grooves. • Raise attachment lift lever to its lowest position. • Remove any dirt or...
... and all belt guides and keepers. • Disconnect clutch wire harness (A). • Remove anti-rotation link (B) on bottom side of tractor. Engage parking brake. MOWER DRIVE BELT INSTALLATION • Install belt around electric clutch and onto engine pulley (G). • Pull belt toward rear of... from transmission input pulley and over the steering plate (H) and above clutch brake pedal shaft (J). • Pull belt toward front of tractor and roll belt around all mower pulley grooves. • Raise attachment lift lever to its lowest position. • Remove any dirt or...
Owners Manual
Page 22
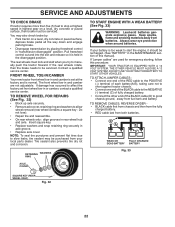
...TO ATTACH JUMPER CABLES • Connect one end of the RED cable to the POSITIVE (+) terminal of each battery(A-B), taking care not to short against tractor chassis. • Connect one end of the BLACK cable to the NEGATIVE (-) terminal (C) of fully charged battery. • Connect the other end ...of this procedure: IMPORTANT: YOUR TRACTOR IS EQUIPPED WITH A 12 VOLT SYSTEM. WEAK OR FULLY CHARGED DEAD BATTERY BATTERY Fig. 33 AXLE COVER SQUARE KEY (REAR WHEEL ONLY) Fig. 32 ...
...TO ATTACH JUMPER CABLES • Connect one end of the RED cable to the POSITIVE (+) terminal of each battery(A-B), taking care not to short against tractor chassis. • Connect one end of the BLACK cable to the NEGATIVE (-) terminal (C) of fully charged battery. • Connect the other end ...of this procedure: IMPORTANT: YOUR TRACTOR IS EQUIPPED WITH A 12 VOLT SYSTEM. WEAK OR FULLY CHARGED DEAD BATTERY BATTERY Fig. 33 AXLE COVER SQUARE KEY (REAR WHEEL ONLY) Fig. 32 ...


