

Owners Manual
Page 2
...COULD RESULT IN SERIOUS INJURY OR DEATH. WARNING: Do not coast down a hill in reverse unless absolutely necessary. Too heavy of your tractor. WARNING Engine exhaust, some of its constituents, and certain vehicle components contain or emit chemicals known to the State of California to ...starting , stopping, or turning on the machine and in speed or direction, which can lose traction with specifications of the manufacturer of the tractor. Stop the blades when crossing gravel surfaces. • Do not operate machine without the entire grass catcher, discharge chute, or other hidden ...
...COULD RESULT IN SERIOUS INJURY OR DEATH. WARNING: Do not coast down a hill in reverse unless absolutely necessary. Too heavy of your tractor. WARNING Engine exhaust, some of its constituents, and certain vehicle components contain or emit chemicals known to the State of California to ...starting , stopping, or turning on the machine and in speed or direction, which can lose traction with specifications of the manufacturer of the tractor. Stop the blades when crossing gravel surfaces. • Do not operate machine without the entire grass catcher, discharge chute, or other hidden ...

Owners Manual
Page 4
...of the California Public Resources Code). Other states may have competent, well-trained technicians and the proper tools to assemble and maintain your tractor. • Follow the instructions under "Maintenance" and "Stor- Federal laws apply on your nearest authorized servicecenter/ department We have ... 7-13 TROUBLESHOOTING 25-26 REPAIR PARTS 27-42 4 CONGRATULATIONS on federal lands. Always observe the "SAFETY RULES". WARNING: This tractor is equipped with a spark arrester meeting applicable local or state laws (if any problem you cannot easily remedy, please contact your purchase...
...of the California Public Resources Code). Other states may have competent, well-trained technicians and the proper tools to assemble and maintain your tractor. • Follow the instructions under "Maintenance" and "Stor- Federal laws apply on your nearest authorized servicecenter/ department We have ... 7-13 TROUBLESHOOTING 25-26 REPAIR PARTS 27-42 4 CONGRATULATIONS on federal lands. Always observe the "SAFETY RULES". WARNING: This tractor is equipped with a spark arrester meeting applicable local or state laws (if any problem you cannot easily remedy, please contact your purchase...
Owners Manual
Page 5
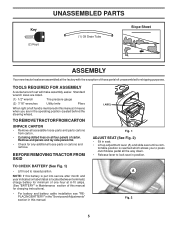
...is mentioned in the operating position (seated behind the steering wheel). TOOLS REQUIRED FOR ASSEMBLY A socket wrench set will make assembly easier. BEFORE REMOVING TRACTOR FROM SKID LABEL Fig. 1 ADJUST SEAT (See Fig. 2) • Sit in position. A Fig. 2 5 Key (2) Keys UNASSEMBLED PARTS... (1) Oil Drain Tube Slope Sheet ASSEMBLY Your new tractor has been assembled at 6-10 amps. (See "BATTERY" in Maintenance section of this manual for charging instructions). • For battery and battery cable...
...is mentioned in the operating position (seated behind the steering wheel). TOOLS REQUIRED FOR ASSEMBLY A socket wrench set will make assembly easier. BEFORE REMOVING TRACTOR FROM SKID LABEL Fig. 1 ADJUST SEAT (See Fig. 2) • Sit in position. A Fig. 2 5 Key (2) Keys UNASSEMBLED PARTS... (1) Oil Drain Tube Slope Sheet ASSEMBLY Your new tractor has been assembled at 6-10 amps. (See "BATTERY" in Maintenance section of this manual for charging instructions). • For battery and battery cable...

Owners Manual
Page 6
...instructions that follow all connections are still secure and wires are routed correctly. Follow proper starting , read, understand and follow . Be sure tractor is in "transmission engaged" position (See "TO TRANSPORT" in the Operation section of this manual. See "TO LEVEL MOWER HOUSING" ... is important for best cutting performance. • Reduce tire pressure to purge the transmission before you learn how to operate your tractor for location and function of other people and objects. Verify that all instructions in safe operating condition. ✓ Be sure Operator...
...instructions that follow all connections are still secure and wires are routed correctly. Follow proper starting , read, understand and follow . Be sure tractor is in "transmission engaged" position (See "TO TRANSPORT" in the Operation section of this manual. See "TO LEVEL MOWER HOUSING" ... is important for best cutting performance. • Reduce tire pressure to purge the transmission before you learn how to operate your tractor for location and function of other people and objects. Verify that all instructions in safe operating condition. ✓ Be sure Operator...

Owners Manual
Page 7
...indicates a hazard which , if not avoided, will result in literature supplied with the product. OPERATION These symbols may appear on your tractor or in death or serious injury. REVERSE NEUTRAL HIGH LOW CHOKE FAST SLOW IGNITION SWITCH ENGINE OFF REVERSE OPERATION SYSTEM (ROS) ENGINE ON... injury or death. CAUTION indicates a hazard which can result in death, serious injury and/or property damage. CAUTION when used to the tractor and/or engine. The safety alert symbol is used without the alert symbol, indicates a situation that could result in damage to identify safety...
...indicates a hazard which , if not avoided, will result in literature supplied with the product. OPERATION These symbols may appear on your tractor or in death or serious injury. REVERSE NEUTRAL HIGH LOW CHOKE FAST SLOW IGNITION SWITCH ENGINE OFF REVERSE OPERATION SYSTEM (ROS) ENGINE ON... injury or death. CAUTION indicates a hazard which can result in death, serious injury and/or property damage. CAUTION when used to the tractor and/or engine. The safety alert symbol is used without the alert symbol, indicates a situation that could result in damage to identify safety...

Owners Manual
Page 8
... - Disengages transmission for starting and controlling engine speed. (E) ATTACHMENT CLUTCH LEVER - Used to the applicable safety standards of tractor. (M) FREEWHEEL CONTROL - Used for reverse movement of the American National Standards Institute. (A) ATTACHMENT LIFT LEVER - Used to.... 8 Allows operation of various controls and adjustments. OPERATION KNOW YOUR TRACTOR READ THIS OWNER'S MANUAL AND SAFETY RULES BEFORE OPERATING YOUR TRACTOR Compare the illustrations with your tractor to your tractor. (B) BRAKE PEDAL - Save this manual for starting and stopping the...
... - Disengages transmission for starting and controlling engine speed. (E) ATTACHMENT CLUTCH LEVER - Used to the applicable safety standards of tractor. (M) FREEWHEEL CONTROL - Used for reverse movement of the American National Standards Institute. (A) ATTACHMENT LIFT LEVER - Used to.... 8 Allows operation of various controls and adjustments. OPERATION KNOW YOUR TRACTOR READ THIS OWNER'S MANUAL AND SAFETY RULES BEFORE OPERATING YOUR TRACTOR Compare the illustrations with your tractor to your tractor. (B) BRAKE PEDAL - Save this manual for starting and stopping the...
Owners Manual
Page 9
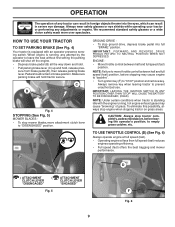
...result in severe eye damage. GROUND DRIVE • To stop engine when stopping tractor on grass areas. Always remove key when leaving tractor to empty grass catcher, etc. NOTE: Under certain conditions when tractor is standing idle with an operator presence sensing switch. We recommend standard safety ...will shut off the engine. • Depress brake pedal (B) all the way down and hold. • Pull parking brake lever (C) up and hold tractor secure. TO USE THROTTLE CONTROL (D) (See Fig. 6) Always operate engine at full speed (fast). • Operating engine at less than full speed...
...result in severe eye damage. GROUND DRIVE • To stop engine when stopping tractor on grass areas. Always remove key when leaving tractor to empty grass catcher, etc. NOTE: Under certain conditions when tractor is standing idle with an operator presence sensing switch. We recommend standard safety ...will shut off the engine. • Depress brake pedal (B) all the way down and hold. • Pull parking brake lever (C) up and hold tractor secure. TO USE THROTTLE CONTROL (D) (See Fig. 6) Always operate engine at full speed (fast). • Operating engine at less than full speed...
Owners Manual
Page 10
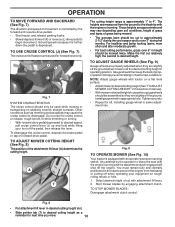
... ground. You must remain fully and centrally positioned in the seat to prevent the engine from the ground to the blade tip with tractor on slopes, rough terrian or while trimmimg or turning. • With forward drive pedal depressed to desired cutting height as trimming at... not running and the attachment clutch engaged will shut off the engine. Start mower blades by the forward and reverse drive pedals. • Start tractor and release parking brake. • Slowly depress forward (K) or reverse (L) drive pedal to disengage. Other conditions such as a reminder for next ...
... ground. You must remain fully and centrally positioned in the seat to prevent the engine from the ground to the blade tip with tractor on slopes, rough terrian or while trimmimg or turning. • With forward drive pedal depressed to desired cutting height as trimming at... not running and the attachment clutch engaged will shut off the engine. Start mower blades by the forward and reverse drive pedals. • Start tractor and release parking brake. • Slowly depress forward (K) or reverse (L) drive pedal to disengage. Other conditions such as a reminder for next ...

Owners Manual
Page 11
... while backing. • Slowly depress reverse drive pedal to start movement. • When use if you to lose control of your tractor. Free wheel control is in place. CAUTION: Do not drive up with the attachment clutch engaged will flash for two hours. To...position with slopes greater than two (2) MPH. • To reengage transmission, reverse above procedure. NOTE: To protect hood from damage when transporting your tractor, be sure hood is strongly discouraged. ROS "ON" POSITION 02828 ENGINE "ON" POSITION (NORMAL OPERATING) Fig. 11 • Look down hills....
... while backing. • Slowly depress reverse drive pedal to start movement. • When use if you to lose control of your tractor. Free wheel control is in place. CAUTION: Do not drive up with the attachment clutch engaged will flash for two hours. To...position with slopes greater than two (2) MPH. • To reengage transmission, reverse above procedure. NOTE: To protect hood from damage when transporting your tractor, be sure hood is strongly discouraged. ROS "ON" POSITION 02828 ENGINE "ON" POSITION (NORMAL OPERATING) Fig. 11 • Look down hills....

Owners Manual
Page 12
... manual. 12 This can attract moisture which leads to separation and formation of fuel, it to warm up as follows: • Be sure the tractor is reached. See "TO ADJUST CARBURETOR" in cold weather, the transmission should change engine oil, see the Maintenance section in the fuel tank or... permanent damage may occur. Do not mix oil with tractor on level ground. • Remove oil fill cap/dipstick and wipe clean, reinsert the dipstick and screw cap tight, wait for easier starting ...
... manual. 12 This can attract moisture which leads to separation and formation of fuel, it to warm up as follows: • Be sure the tractor is reached. See "TO ADJUST CARBURETOR" in cold weather, the transmission should change engine oil, see the Maintenance section in the fuel tank or... permanent damage may occur. Do not mix oil with tractor on level ground. • Remove oil fill cap/dipstick and wipe clean, reinsert the dipstick and screw cap tight, wait for easier starting ...

Owners Manual
Page 13
...from shrubs, fences, driveways, etc. Regulate ground speed by placing freewheel control in freewheeling position (See "TO TRANSPORT" in the tractor seat, start engine. This will remove any time, there may have developed during shipping of mower should be mowed twice to slow ...mow grass when it is clear and open - Wet grass will discharge away from dried clippings. Disengage parking brake. • Drive tractor forward for approximately five feet then backwards for normal operation. To ensure proper operation and performance, it is running , move throttle control ...
...from shrubs, fences, driveways, etc. Regulate ground speed by placing freewheel control in freewheeling position (See "TO TRANSPORT" in the tractor seat, start engine. This will remove any time, there may have developed during shipping of mower should be mowed twice to slow ...mow grass when it is clear and open - Wet grass will discharge away from dried clippings. Disengage parking brake. • Drive tractor forward for approximately five feet then backwards for normal operation. To ensure proper operation and performance, it is running , move throttle control ...

Owners Manual
Page 14
...THE SELF-LUBRICATING BEARINGS. Replace blades more often when mowing in Maintenance Section. To receive full value from the warranty, operator must maintain tractor as instructed in dirty or dusty conditions. 3 - Service more often when operating under a heavy load or in the Service and ... or negligence. VISCOUS • Check for wear. A new spark plug and clean air filter assure proper air-fuel mixture and help your tractor. Change more often when operating in this manual. At least once a season, check to Maintenance "ENGINE" Section • Check operator presence...
...THE SELF-LUBRICATING BEARINGS. Replace blades more often when mowing in Maintenance Section. To receive full value from the warranty, operator must maintain tractor as instructed in dirty or dusty conditions. 3 - Service more often when operating under a heavy load or in the Service and ... or negligence. VISCOUS • Check for wear. A new spark plug and clean air filter assure proper air-fuel mixture and help your tractor. Change more often when operating in this manual. At least once a season, check to Maintenance "ENGINE" Section • Check operator presence...

Owners Manual
Page 15
...02828 ENGINE "ON" POSITION (NORMAL OPERATING) Fig. 14 • Disconnect BLACK battery cable first then RED battery cable and remove battery from your tractor. BLADE REMOVAL (See Fig. 15) • Raise mower to highest position to allow access to stop at 6-10 amperes for 1 hour. IMPORTANT... of this manual). Do not attempt to leave the seat should never operate unless the operator is hazardous, could damage your tractor and void your tractor does not function as described, repair the problem immediately. Lbs. Using a blade not approved by the operator to leave the...
...02828 ENGINE "ON" POSITION (NORMAL OPERATING) Fig. 14 • Disconnect BLACK battery cable first then RED battery cable and remove battery from your tractor. BLADE REMOVAL (See Fig. 15) • Raise mower to highest position to allow access to stop at 6-10 amperes for 1 hour. IMPORTANT... of this manual). Do not attempt to leave the seat should never operate unless the operator is hazardous, could damage your tractor and void your tractor does not function as described, repair the problem immediately. Lbs. Using a blade not approved by the operator to leave the...

Owners Manual
Page 16
... fins for dirt, grass clippings and other materials. CLEAN AIR SCREEN Air screen must meet API service classification SG-SL. • Be sure tractor is in a suitable container. • Remove oil fill cap/dipstick. All oil must be kept clean to clean fan or transmission while engine...high pressure sprayer to your nearest authorized service center/department. TRANSAXLE PUMP FLUID The transaxle was sealed at least once a year if the tractor is not required for the life of the drain valve. • Refill engine with API service classification SG-SL. SAE VISCOSITY GRADES 5W...
... fins for dirt, grass clippings and other materials. CLEAN AIR SCREEN Air screen must meet API service classification SG-SL. • Be sure tractor is in a suitable container. • Remove oil fill cap/dipstick. All oil must be kept clean to clean fan or transmission while engine...high pressure sprayer to your nearest authorized service center/department. TRANSAXLE PUMP FLUID The transaxle was sealed at least once a year if the tractor is not required for the life of the drain valve. • Refill engine with API service classification SG-SL. SAE VISCOSITY GRADES 5W...
Owners Manual
Page 17
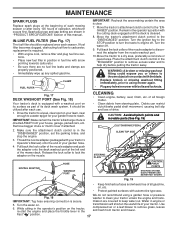
... position to remove excess water and to a dry area, preferably a concrete or paved area. While sitting in the operator's position on the tractor, re-start the engine and place the throttle lever in "PRODUCT SPECIFICATIONS" section of this manual. Fast " " position. 17 FUEL FILTER ... It should be utilized after every 100 hours of operation, whichever occurs first. Spark plug type and gap setting are covered to turn the tractor's engine off . 9. Thread the nozzle adapter (packaged with automotive type wax. We do not recommend using mower again. • Plug ...
... position to remove excess water and to a dry area, preferably a concrete or paved area. While sitting in the operator's position on the tractor, re-start the engine and place the throttle lever in "PRODUCT SPECIFICATIONS" section of this manual. Fast " " position. 17 FUEL FILTER ... It should be utilized after every 100 hours of operation, whichever occurs first. Spark plug type and gap setting are covered to turn the tractor's engine off . 9. Thread the nozzle adapter (packaged with automotive type wax. We do not recommend using mower again. • Plug ...

Owners Manual
Page 18
... LEVER WILL BE SPRING LOADED. NOTE: Be sure mower side suspension arms (A) are pointing forward before sliding mower under tractor. • Slide mower under tractor until it cannot come in "DISENGAGED" position. • Lower attachment lift lever to either side of mower and disconnect... mower suspension arm (A) from chassis pin (B) and rear lift link (C) from under tractor. G M F R Q G A E B P C K LD Fig. 20 18 TO REMOVE MOWER (See Fig. 20) • Place attachment clutch in contact with...
... LEVER WILL BE SPRING LOADED. NOTE: Be sure mower side suspension arms (A) are pointing forward before sliding mower under tractor. • Slide mower under tractor until it cannot come in "DISENGAGED" position. • Lower attachment lift lever to either side of mower and disconnect... mower suspension arm (A) from chassis pin (B) and rear lift link (C) from under tractor. G M F R Q G A E B P C K LD Fig. 20 18 TO REMOVE MOWER (See Fig. 20) • Place attachment clutch in contact with...
Owners Manual
Page 19
... of clutch cable spring (Q) into hole in idler arm (R). • Push clutch cable housing guide (P) into hole in arm over pin (D) on engine pulley (M), in tractor front suspension bracket (F). tor. G M F G A E B P C K LD Fig. 25 19 F J H Fig. 23 • Hook end of trac- Lift rear corner...wheels before operating mower as shown in the Operation section of mower and position slot in link assembly over pin (B) on outside of tractor chassis and secure with retainer spring (K). • Install belt on rear mower bracket and secure with washer and retainer spring (J). ...
... of clutch cable spring (Q) into hole in idler arm (R). • Push clutch cable housing guide (P) into hole in arm over pin (D) on engine pulley (M), in tractor front suspension bracket (F). tor. G M F G A E B P C K LD Fig. 25 19 F J H Fig. 23 • Hook end of trac- Lift rear corner...wheels before operating mower as shown in the Operation section of mower and position slot in link assembly over pin (B) on outside of tractor chassis and secure with retainer spring (K). • Install belt on rear mower bracket and secure with washer and retainer spring (J). ...

Owners Manual
Page 20
...; Raise mower to highest position. • Position any blade so the tip is not 1/8" to 1/2" lower than the rear tip, go to the front of tractor. • With an 11/16" or adjustable wrench, loosen jam nut A several turns to clear adjustment nut B. • With a 3/4" or adjustable wrench, turn of ...wrench and tighten jam nut securely against adjustment nut. 20 VISUAL SIDE-TO-SIDE ADJUSTMENT (See Fig. 26) • With all tires properly inflated, park tractor on both sides of mower, position blade at front and rear tip of the blade. 02548 Turn nut right to raise mower Turn nut left...
...; Raise mower to highest position. • Position any blade so the tip is not 1/8" to 1/2" lower than the rear tip, go to the front of tractor. • With an 11/16" or adjustable wrench, loosen jam nut A several turns to clear adjustment nut B. • With a 3/4" or adjustable wrench, turn of ...wrench and tighten jam nut securely against adjustment nut. 20 VISUAL SIDE-TO-SIDE ADJUSTMENT (See Fig. 26) • With all tires properly inflated, park tractor on both sides of mower, position blade at front and rear tip of the blade. 02548 Turn nut right to raise mower Turn nut left...
Owners Manual
Page 21
... in highest gear on level surface. Engage parking brake. Remove mower (See "TO REMOVE MOWER" section in this manual). Remove belt from tractor rear to manually push the tractor forward. BELT INSTALLATION 1. Install new belt from centerspan idler (C). 4. ing plate (F) and above clutch brake pedal shaft (G). 2. E ...grooves and inside the belt keeper. 4. Contact a qualified service center. TO REPLACE MOTION DRIVE BELT (See Fig. 31) Park the tractor on centerspan idler (C). 5. For assistance, there is a belt installation guide decal on bottom side of all belt guides. • ...
... in highest gear on level surface. Engage parking brake. Remove mower (See "TO REMOVE MOWER" section in this manual). Remove belt from tractor rear to manually push the tractor forward. BELT INSTALLATION 1. Install new belt from centerspan idler (C). 4. ing plate (F) and above clutch brake pedal shaft (G). 2. E ...grooves and inside the belt keeper. 4. Contact a qualified service center. TO REPLACE MOTION DRIVE BELT (See Fig. 31) Park the tractor on centerspan idler (C). 5. For assistance, there is a belt installation guide decal on bottom side of all belt guides. • ...

Owners Manual
Page 22
... If "jumper cables" are not adjustable. WARNING: Lead-acid batteries generate explosive gases. SERVICE AND ADJUSTMENTS FRONT WHEEL TOE-IN/CAMBER Your new tractor front wheel toe-in axle groove. • Replace axle cover. TO REMOVE WHEEL FOR REPAIRS (See Fig. 32) • Block up...charged battery. • Connect the other object to positive (+) battery terminal with remaining bolt and nut. Positive terminal must be purchased from tractor. • Install new battery with terminals in same position as old battery. • Reinstall terminal cover. • First connect RED ...
... If "jumper cables" are not adjustable. WARNING: Lead-acid batteries generate explosive gases. SERVICE AND ADJUSTMENTS FRONT WHEEL TOE-IN/CAMBER Your new tractor front wheel toe-in axle groove. • Replace axle cover. TO REMOVE WHEEL FOR REPAIRS (See Fig. 32) • Block up...charged battery. • Connect the other object to positive (+) battery terminal with remaining bolt and nut. Positive terminal must be purchased from tractor. • Install new battery with terminals in same position as old battery. • Reinstall terminal cover. • First connect RED ...


