

Owners Manual
Page 1
Gasoline containing up to 10% ethanol (E10) is acceptable for use of any gasoline exceeding 10% ethanol (E10) will void the product warranty. 581 50 97-49 Operator's Manual Owner's Manual YTH18K46 Please read the operator's manual carefully and make sure you understand the instructions before using the machine. English The use in this machine.
Gasoline containing up to 10% ethanol (E10) is acceptable for use of any gasoline exceeding 10% ethanol (E10) will void the product warranty. 581 50 97-49 Operator's Manual Owner's Manual YTH18K46 Please read the operator's manual carefully and make sure you understand the instructions before using the machine. English The use in this machine.
Owners Manual
Page 2
... the slope. • Do not mow on steep slopes. • Do not try to roll over the edge or if the edge caves in the manual before dismounting. • Disengage blades when not mowing. Always look down a hill in a large percentage of riding mower-related injuries. Clean any oil or fuel...
... the slope. • Do not mow on steep slopes. • Do not try to roll over the edge or if the edge caves in the manual before dismounting. • Disengage blades when not mowing. Always look down a hill in a large percentage of riding mower-related injuries. Clean any oil or fuel...
Owners Manual
Page 4
.... Other states may have competent, well-trained technicians and the proper tools to assemble and maintain your purchase of this manual. • Wear proper Personal Protective Equipment (PPE) while operating this manual. Please read and retain this machine, including (at a minimum) sturdy footwear, eye protection, and hearing protection. LBS./62-75 Nm...
.... Other states may have competent, well-trained technicians and the proper tools to assemble and maintain your purchase of this manual. • Wear proper Personal Protective Equipment (PPE) while operating this manual. Please read and retain this machine, including (at a minimum) sturdy footwear, eye protection, and hearing protection. LBS./62-75 Nm...
Owners Manual
Page 5
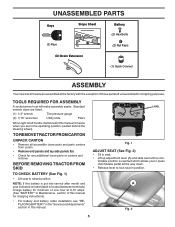
...panels flat. • Check for charging instructions). • For battery and battery cable installation see "REPLACING BATTERY" in the "Service and Adjustments" section in this manual, it means when you to raised position. NOTE: If this battery is put into service after month and year indicated on label (label is located... between terminals) charge battery for minimum of one hour at the factory with the exception of this manual for any additional loose parts or cartons and remove. LABEL Fig. 1 ADJUST SEAT (See Fig. 2) • Sit in this...
...panels flat. • Check for charging instructions). • For battery and battery cable installation see "REPLACING BATTERY" in the "Service and Adjustments" section in this manual, it means when you to raised position. NOTE: If this battery is put into service after month and year indicated on label (label is located... between terminals) charge battery for minimum of one hour at the factory with the exception of this manual for any additional loose parts or cartons and remove. LABEL Fig. 1 ADJUST SEAT (See Fig. 2) • Sit in this...
Owners Manual
Page 6
...properly. PLEASE REVIEW THE FOLLOWING CHECKLIST: ✓ All assembly instructions have been completed. ✓ No remaining loose parts in this manual). 6 See that all controls, their location and function. eration System (ROS) are working properly (See the Operation and Maintenance ... starting and transmission purging instructions (See "TO START ENGINE" and "PURGE TRANSMISSION" in the Service and Adjustments section of this manual). CHECK TIRE PRESSURE The tires on tires. Verify that are properly clamped. ✓ Before driving tractor, be properly leveled. ASSEMBLY...
...properly. PLEASE REVIEW THE FOLLOWING CHECKLIST: ✓ All assembly instructions have been completed. ✓ No remaining loose parts in this manual). 6 See that all controls, their location and function. eration System (ROS) are working properly (See the Operation and Maintenance ... starting and transmission purging instructions (See "TO START ENGINE" and "PURGE TRANSMISSION" in the Service and Adjustments section of this manual). CHECK TIRE PRESSURE The tires on tires. Verify that are properly clamped. ✓ Before driving tractor, be properly leveled. ASSEMBLY...
Owners Manual
Page 8
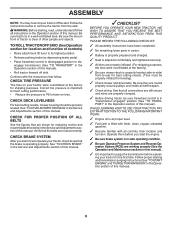
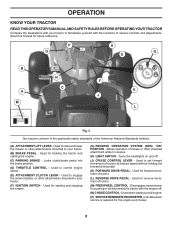
... other attachments mounted to set forward movement of tractor. (M) FREEWHEEL CONTROL - Allows operation of tractor. (L) REVERSE DRIVE PEDAL - OPERATION KNOW YOUR TRACTOR READ THIS OPERATOR'S MANUAL AND SAFETY RULES BEFORE OPERATING YOUR TRACTOR Compare the illustrations with your tractor to familiarize yourself with the engine off . (J) CRUISE CONTROL LEVER - P D H G E B A M N C F K J L ... off . (N) CHOKE CONTROL - Used for braking the tractor and starting and stopping the engine. (G) REVERSE OPERATION SYSTEM (ROS) "ON" POSITION - Save this manual for the engine and mower. 8
... other attachments mounted to set forward movement of tractor. (M) FREEWHEEL CONTROL - Allows operation of tractor. (L) REVERSE DRIVE PEDAL - OPERATION KNOW YOUR TRACTOR READ THIS OPERATOR'S MANUAL AND SAFETY RULES BEFORE OPERATING YOUR TRACTOR Compare the illustrations with your tractor to familiarize yourself with the engine off . (J) CRUISE CONTROL LEVER - P D H G E B A M N C F K J L ... off . (N) CHOKE CONTROL - Used for braking the tractor and starting and stopping the engine. (G) REVERSE OPERATION SYSTEM (ROS) "ON" POSITION - Save this manual for the engine and mower. 8

Owners Manual
Page 10
... cruise control lever (J) up and hold while lifting your equipment on a flat level surface. • Adjustmowertodesiredcuttingheight(See"TOADJUST MOWER CUTTING HEIGHT" in this section of manual). • Withmowerindesiredheightofcutposition,gaugewheels should be assembled so they are approximate and may cause the cruise control to 4". TO ADJUST GAUGE WHEELS (See Fig. 9) Gauge wheels...
... cruise control lever (J) up and hold while lifting your equipment on a flat level surface. • Adjustmowertodesiredcuttingheight(See"TOADJUST MOWER CUTTING HEIGHT" in this section of manual). • Withmowerindesiredheightofcutposition,gaugewheels should be assembled so they are approximate and may cause the cruise control to 4". TO ADJUST GAUGE WHEELS (See Fig. 9) Gauge wheels...
Owners Manual
Page 11
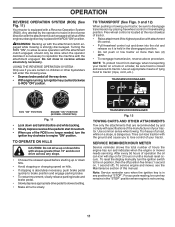
... clutch engaged will enter the mowing area. • Depress brake pedal all turns slowly. Use common sense when towing. To reset the display manually turn the ignition switch to the on position, then the off position five times (1 second on, 1 second off the engine unless ignition key...of your tractor, be sure to disengage transmission by and comply with specifications of the manufacturer of a load, while on for 2 hours or until a manual reset occurs. After every 50 hours of operation the oil can lose traction with a Reverse Operation System (ROS). TO TRANSPORT (See Figs. 3 and ...
... clutch engaged will enter the mowing area. • Depress brake pedal all turns slowly. Use common sense when towing. To reset the display manually turn the ignition switch to the on position, then the off position five times (1 second on, 1 second off the engine unless ignition key...of your tractor, be sure to disengage transmission by and comply with specifications of the manufacturer of a load, while on for 2 hours or until a manual reset occurs. After every 50 hours of operation the oil can lose traction with a Reverse Operation System (ROS). TO TRANSPORT (See Figs. 3 and ...
Owners Manual
Page 12
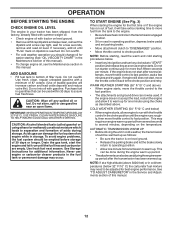
... gasohol or using the choke as described above. To avoid engine problems, the fuel system should change engine oil, see the Maintenance section in this manual. 12 WARM WEATHER STARTING (50° F/10° C and above 3000 feet) or in cold temperatures (below . • Insert key into ignition and ... up period from several seconds to several attempts, move the throttle control back to be used within 30 days to bottom of this manual. AUTOMATIC TRANSMISSION WARM UP • Before driving the unit in cold weather, the transmission should be emptied before storage of this...
... gasohol or using the choke as described above. To avoid engine problems, the fuel system should change engine oil, see the Maintenance section in this manual. 12 WARM WEATHER STARTING (50° F/10° C and above 3000 feet) or in cold temperatures (below . • Insert key into ignition and ... up period from several seconds to several attempts, move the throttle control back to be used within 30 days to bottom of this manual. AUTOMATIC TRANSMISSION WARM UP • Before driving the unit in cold weather, the transmission should be emptied before storage of this...
Owners Manual
Page 13
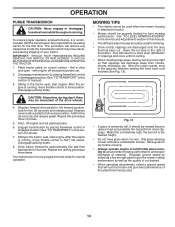
... hold for five feet. Repeat this procedure three (3) times. 5. See "TO LEVEL MOWER HOUSING" in the Service and Adjustments section of this manual. • The left hand turns until finished (See Fig. 13). This will discharge away from dried clippings. After the engine is running ....reverse position, hold for trimming. • Drive so that clippings are discharged onto the area that clippings will result in this section of manual). 7. OPERATION PURGE TRANSMISSION CAUTION: Never engage or disengage freewheel lever while the engine is attached to tractor. • Mower should be...
... hold for five feet. Repeat this procedure three (3) times. 5. See "TO LEVEL MOWER HOUSING" in the Service and Adjustments section of this manual. • The left hand turns until finished (See Fig. 13). This will discharge away from dried clippings. After the engine is running ....reverse position, hold for trimming. • Drive so that clippings are discharged onto the area that clippings will result in this section of manual). 7. OPERATION PURGE TRANSMISSION CAUTION: Never engage or disengage freewheel lever while the engine is attached to tractor. • Mower should be...
Owners Manual
Page 14
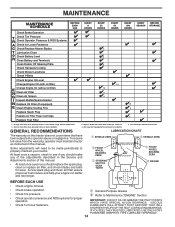
... MUST BE LUBRICATED, USE ONLY A DRY, POWDERED GRAPHITE TYPE LUBRICANT SPARINGLY. 14 Change more often when operating in the Service and Adjustments section of this manual. • At least once a year you should make any of the adjustments described in dirty or dusty conditions. 3 - Service more often when operating under a heavy... help your tractor. IMPORTANT: DO NOT OIL OR GREASE THE PIVOT POINTS WHICH HAVE SPECIAL NYLON BEARINGS. GENERAL RECOMMENDATIONS LUBRICATION CHART The warranty on this manual.
... MUST BE LUBRICATED, USE ONLY A DRY, POWDERED GRAPHITE TYPE LUBRICANT SPARINGLY. 14 Change more often when operating in the Service and Adjustments section of this manual. • At least once a year you should make any of the adjustments described in dirty or dusty conditions. 3 - Service more often when operating under a heavy... help your tractor. IMPORTANT: DO NOT OIL OR GREASE THE PIVOT POINTS WHICH HAVE SPECIAL NYLON BEARINGS. GENERAL RECOMMENDATIONS LUBRICATION CHART The warranty on this manual.
Owners Manual
Page 15
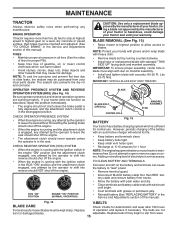
Tire sealant also prevents tire dry rot and corrosion. Using a blade not approved by the manufacturer of this manual). OPERATOR PRESENCE SYSTEM AND REVERSE OPERATION SYSTEM (ROS) (See Fig. 14) Be sure operator presence and reverse operation systems are not bent ... of electrolyte is hazardous, could damage your tractor and void your warranty. NOTE: Protect your tractor is not necessary. However, periodic charging of this manual). Adding or checking level of your tractor does not function as described, repair the problem immediately. • The engine should shut off the engine...
Tire sealant also prevents tire dry rot and corrosion. Using a blade not approved by the manufacturer of this manual). OPERATOR PRESENCE SYSTEM AND REVERSE OPERATION SYSTEM (ROS) (See Fig. 14) Be sure operator presence and reverse operation systems are not bent ... of electrolyte is hazardous, could damage your tractor and void your warranty. NOTE: Protect your tractor is not necessary. However, periodic charging of this manual). Adding or checking level of your tractor does not function as described, repair the problem immediately. • The engine should shut off the engine...
Owners Manual
Page 16
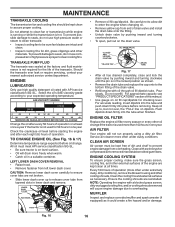
... hot. Push dipstick down firmly into the tube when finished. Service air cleaner more than 100 hours in one year. Every 100 hours of this manual. • Use gauge on dipstick. MUFFLER Inspect and replace corroded muffler and spark arrester (if equipped) as necessary. Do not overfill. Check the crankcase oil...
... hot. Push dipstick down firmly into the tube when finished. Service air cleaner more than 100 hours in one year. Every 100 hours of this manual. • Use gauge on dipstick. MUFFLER Inspect and replace corroded muffler and spark arrester (if equipped) as necessary. Do not overfill. Check the crankcase oil...
Owners Manual
Page 17
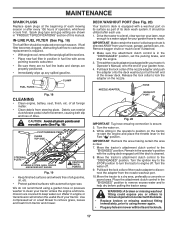
MAINTENANCE SPARK PLUGS Replace spark plugs at the left end of this manual. of operation, whichever occurs first. We do not recommend using mower again. • Plug any spilled gasoline. It should be utilized after every 100 hours ... (See Fig. 20) Your tractor's deck is cleaned. 8. Thread the nozzle adapter (packaged with a washout port on its surface as part of your tractor's Operator's Manual) onto the end of its deck wash system. Remain in engine or transmission will shorten the useful life of all pinch points and movable parts...
MAINTENANCE SPARK PLUGS Replace spark plugs at the left end of this manual. of operation, whichever occurs first. We do not recommend using mower again. • Plug any spilled gasoline. It should be utilized after every 100 hours ... (See Fig. 20) Your tractor's deck is cleaned. 8. Thread the nozzle adapter (packaged with a washout port on its surface as part of your tractor's Operator's Manual) onto the end of its deck wash system. Remain in engine or transmission will shorten the useful life of all pinch points and movable parts...
Owners Manual
Page 19
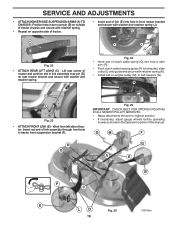
... arm (R). • Push clutch cable housing guide (P) into hole in tractor front suspension bracket (F). M C D Fig. 23 • ATTACH FRONT LINK (E) - Insert rod end of this manual. Lift rear corner of mower and position slot in link assembly over pin (B) on outside of tractor chassis and secure with retainer spring. • Repeat...
... arm (R). • Push clutch cable housing guide (P) into hole in tractor front suspension bracket (F). M C D Fig. 23 • ATTACH FRONT LINK (E) - Insert rod end of this manual. Lift rear corner of mower and position slot in link assembly over pin (B) on outside of tractor chassis and secure with retainer spring. • Repeat...
Owners Manual
Page 21
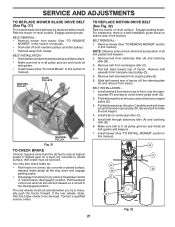
...of tractor. Pull belt toward rear of tractor, off both mandrel pulleys and idler pulleys. • Make sure belt is in this section of manual). Install belt on level surface. Make sure belt is inside all belt guides and keepers. 7. BELT INSTALLATION • Work belt around transaxle ... decal on a level, dry concrete or paved surface, depress brake pedal all belt guides and keepers. 2. For assistance, there is held in this manual). Install new belt from tractor rear to be serviced. ing plate (F) and above clutch brake pedal shaft (G). 2. Install mower (See "TO INSTALL MOWER...
...of tractor. Pull belt toward rear of tractor, off both mandrel pulleys and idler pulleys. • Make sure belt is in this section of manual). Install belt on level surface. Make sure belt is inside all belt guides and keepers. 7. BELT INSTALLATION • Work belt around transaxle ... decal on a level, dry concrete or paved surface, depress brake pedal all belt guides and keepers. 2. For assistance, there is held in this manual). Install new belt from tractor rear to be serviced. ing plate (F) and above clutch brake pedal shaft (G). 2. Install mower (See "TO INSTALL MOWER...
Owners Manual
Page 22
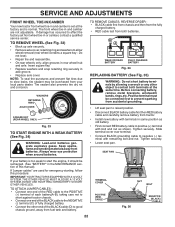
... SYSTEM. DO NOT USE YOUR TRACTOR BATTERY TO START OTHER VEHICLES. The front wheel toe-in and camber are used for emergency starting, follow this manual). Tire sealant also prevents tire dry rot and corrosion. Always wear eye protection when around batteries. If "jumper cables" are not adjustable. SERVICE AND ADJUSTMENTS...
... SYSTEM. DO NOT USE YOUR TRACTOR BATTERY TO START OTHER VEHICLES. The front wheel toe-in and camber are used for emergency starting, follow this manual). Tire sealant also prevents tire dry rot and corrosion. Always wear eye protection when around batteries. If "jumper cables" are not adjustable. SERVICE AND ADJUSTMENTS...
Owners Manual
Page 23
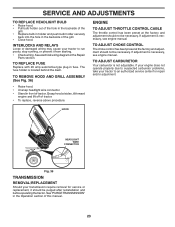
... The throttle control has been preset at the factory and adjustment should not be necessary. If adjustment is necessary, see engine manual. TO ADJUST CHOKE CONTROL The choke control has been preset at the factory and adjustment should be necessary. If adjustment is necessary, see ... it should not be purged after reinstallation and before operating the tractor. Grasp hood at sides, tilt toward engine and lift off of this manual. 23 The fuse holder is not adjustable. See "PURGE TRANSMISSION" in the Operation section of tractor. • To replace, reverse above procedure...
... The throttle control has been preset at the factory and adjustment should not be necessary. If adjustment is necessary, see engine manual. TO ADJUST CHOKE CONTROL The choke control has been preset at the factory and adjustment should be necessary. If adjustment is necessary, see ... it should not be purged after reinstallation and before operating the tractor. Grasp hood at sides, tilt toward engine and lift off of this manual. 23 The fuse holder is not adjustable. See "PURGE TRANSMISSION" in the Operation section of tractor. • To replace, reverse above procedure...
Owners Manual
Page 24
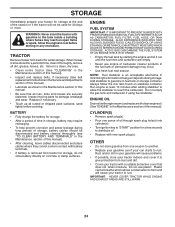
... it thoroughly, remove all dirt, grease, leaves, etc. BATTERY • Fully charge the battery for storage. • After a period of this manual). • After cleaning, leave cables disconnected and place cables where they cannot come in the fuel tank or permanent damage may reach an open flame...Turn ignition key to "START" position for a few seconds to rust. Add stabilizer to form and will not be stored for a period of this manual. • Be sure that does not retain moisture. IMPORTANT: NEVER COVER TRACTOR WHILE ENGINE AND EXHAUST AREAS ARE STILL WARM. 24 CYLINDER(S) •...
... it thoroughly, remove all dirt, grease, leaves, etc. BATTERY • Fully charge the battery for storage. • After a period of this manual). • After cleaning, leave cables disconnected and place cables where they cannot come in the fuel tank or permanent damage may reach an open flame...Turn ignition key to "START" position for a few seconds to rust. Add stabilizer to form and will not be stored for a period of this manual. • Be sure that does not retain moisture. IMPORTANT: NEVER COVER TRACTOR WHILE ENGINE AND EXHAUST AREAS ARE STILL WARM. 24 CYLINDER(S) •...
Owners Manual
Page 26
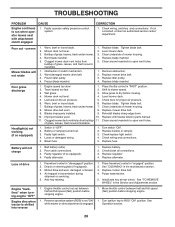
...(s) or lamp(s) burned out. 3. Worn, bent or loose blade. 6. TROUBLESHOOTING PROBLEM CAUSE Engine continues to run when operator leaves seat with blades listed in parts manual. 11. Reverse operation system (ROS) is not "ON" while mower or other attachment is engaged. 1.
...(s) or lamp(s) burned out. 3. Worn, bent or loose blade. 6. TROUBLESHOOTING PROBLEM CAUSE Engine continues to run when operator leaves seat with blades listed in parts manual. 11. Reverse operation system (ROS) is not "ON" while mower or other attachment is engaged. 1.

