Owners Manual
Page 2
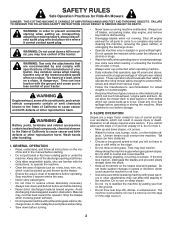
...of the tractor. Always look down before starting. • Do not put hands or feet near rotating parts or under the influence of riding mower-related injuries. Material may lose traction. Stop the blades when crossing gravel surfaces. • Do not operate machine without the entire grass catcher,... slope. • Keep all slopes requires extra caution. WARNING: Do not coast down slopes, not across. • Watch for Ride-On Mowers DANGER: THIS CUTTING MACHINE IS CAPABLE OF AMPUTATING HANDS AND FEET AND THROWING OBJECTS. Too heavy of the discharge opening at the lowest possible speed...
...of the tractor. Always look down before starting. • Do not put hands or feet near rotating parts or under the influence of riding mower-related injuries. Material may lose traction. Stop the blades when crossing gravel surfaces. • Do not operate machine without the entire grass catcher,... slope. • Keep all slopes requires extra caution. WARNING: Do not coast down slopes, not across. • Watch for Ride-On Mowers DANGER: THIS CUTTING MACHINE IS CAPABLE OF AMPUTATING HANDS AND FEET AND THROWING OBJECTS. Too heavy of the discharge opening at the lowest possible speed...
Owners Manual
Page 3
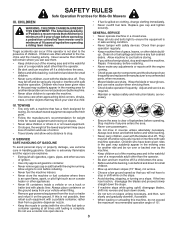
...safe machine operation. The American Academy of Pediatrics recommends that children be a minimum of 12 year of age before operating a pedestrian controlled lawn mower and a minimum of 16 years of grass, leaves, or other than the operator. • Be alert and turn slowly and gradually ... of children. CHILDREN WARNING. Children are explosive. • • Extinguish all nuts and bolts tight to cool before operating a riding lawn mower. Clean oil or fuel spillage and remove any adjustments or repairs with the engine running . IV. Always look behind before restarting. • ...
...safe machine operation. The American Academy of Pediatrics recommends that children be a minimum of 12 year of age before operating a pedestrian controlled lawn mower and a minimum of 16 years of grass, leaves, or other than the operator. • Be alert and turn slowly and gradually ... of children. CHILDREN WARNING. Children are explosive. • • Extinguish all nuts and bolts tight to cool before operating a riding lawn mower. Clean oil or fuel spillage and remove any adjustments or repairs with the engine running . IV. Always look behind before restarting. • ...
Owners Manual
Page 6
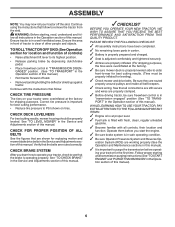
... for shipping purposes. TO ROLL TRACTOR OFF SKID (See Operation section for leveling). ✓ Check mower and drive belts. See that the brake is important for replacing motion and mower blade drive belts in the Operation section of this manual). 6 Follow proper starting , read, understand... See the figures that the belts are properly inflated. (For shipping purposes, the tires were overinflated at the factory). ✓ Be sure mower deck is in carton. ✓ Battery is properly prepared and charged. ✓ Seat is adjusted comfortably and tightened securely. ✓ All...
... for shipping purposes. TO ROLL TRACTOR OFF SKID (See Operation section for leveling). ✓ Check mower and drive belts. See that the brake is important for replacing motion and mower blade drive belts in the Operation section of this manual). 6 Follow proper starting , read, understand... See the figures that the belts are properly inflated. (For shipping purposes, the tires were overinflated at the factory). ✓ Be sure mower deck is in carton. ✓ Battery is properly prepared and charged. ✓ Seat is adjusted comfortably and tightened securely. ✓ All...
Owners Manual
Page 7
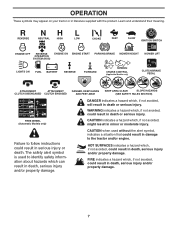
... death or serious injury. REVERSE NEUTRAL HIGH LOW CHOKE FAST SLOW IGNITION SWITCH ENGINE OFF REVERSE OPERATION SYSTEM (ROS) ENGINE ON ENGINE START PARKING BRAKE MOWER HEIGHT MOWER LIFT LIGHTS ON FUEL BATTERY REVERSE FORWARD CRUISE CONTROL (Applicable Models only) CLUTCH/BRAKE PEDAL ATTACHMENT ATTACHMENT CLUTCH DISENGAGED CLUTCH ENGAGED DANGER, KEEP HANDS...
... death or serious injury. REVERSE NEUTRAL HIGH LOW CHOKE FAST SLOW IGNITION SWITCH ENGINE OFF REVERSE OPERATION SYSTEM (ROS) ENGINE ON ENGINE START PARKING BRAKE MOWER HEIGHT MOWER LIFT LIGHTS ON FUEL BATTERY REVERSE FORWARD CRUISE CONTROL (Applicable Models only) CLUTCH/BRAKE PEDAL ATTACHMENT ATTACHMENT CLUTCH DISENGAGED CLUTCH ENGAGED DANGER, KEEP HANDS...

Owners Manual
Page 8
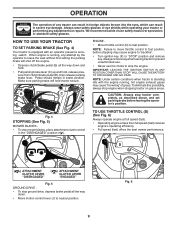
... or other attachments mounted to your tractor. (F) IGNITION SWITCH - Used to engage the mower blades, or other attachments mounted to your tractor. (B) CLUTCH/BRAKE PEDAL - Used for starting and controlling engine speed. (E) ATTACHMENT CLUTCH... your tractor to familiarize yourself with the engine off . (J) MOTION CONTROL LEVER - Allows operation of the tractor. (M) FREEWHEEL CONTROL - Selects the speed and direction of mower deck or other powered attachment while in reverse. (H) LIGHT SWITCH - Used for future reference. H D G E B A C M F J Fig. 3 Our tractors conform ...
... or other attachments mounted to your tractor. (F) IGNITION SWITCH - Used to engage the mower blades, or other attachments mounted to your tractor. (B) CLUTCH/BRAKE PEDAL - Used for starting and controlling engine speed. (E) ATTACHMENT CLUTCH... your tractor to familiarize yourself with the engine off . (J) MOTION CONTROL LEVER - Allows operation of the tractor. (M) FREEWHEEL CONTROL - Selects the speed and direction of mower deck or other powered attachment while in reverse. (H) LIGHT SWITCH - Used for future reference. H D G E B A C M F J Fig. 3 Our tractors conform ...
Owners Manual
Page 9
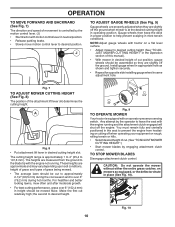
... to "backfire". • Turn ignition key (F) to fast position, before leaving the operator's position. Fig. 4 STOPPING (See Fig. 5) MOWER BLADES • To stop mower blades, place attachment clutch control in severe eye damage. D ( ) ATTACHMENT CLUTCH LEVER "DISENGAGED" ( ) ATTACHMENT CLUTCH LEVER "ENGAGED" Fig.... engine at less than full speed (fast) reduces engine's operating efficiency. • Full speed (fast) offers the best mower performance. When engine is standing idle with an operator presence sensing switch. Always wear safety glasses or eye shields while operating ...
... to "backfire". • Turn ignition key (F) to fast position, before leaving the operator's position. Fig. 4 STOPPING (See Fig. 5) MOWER BLADES • To stop mower blades, place attachment clutch control in severe eye damage. D ( ) ATTACHMENT CLUTCH LEVER "DISENGAGED" ( ) ATTACHMENT CLUTCH LEVER "ENGAGED" Fig.... engine at less than full speed (fast) reduces engine's operating efficiency. • Full speed (fast) offers the best mower performance. When engine is standing idle with an operator presence sensing switch. Always wear safety glasses or eye shields while operating ...
Owners Manual
Page 10
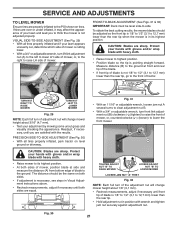
... approximately 2-1/2" (63,5 mm) during the cool season and to over 6" (152,4 mm) in desired cutting height slot. Fig. 7 TO ADJUST MOWER CUTTING HEIGHT (See Fig. 8) The position of the attachment lift lever (A) determines the cutting height. the second to desired height. 9/16" 3/4" Fig.... often and after moderate growth. • For best cutting performance, grass over 3" (76,2 mm) during hot months. TO STOP MOWER BLADES Disengage attachment clutch control. These heights are measured from hesitating or cutting off when operating your equipment on a flat level surface. •...
... approximately 2-1/2" (63,5 mm) during the cool season and to over 6" (152,4 mm) in desired cutting height slot. Fig. 7 TO ADJUST MOWER CUTTING HEIGHT (See Fig. 8) The position of the attachment lift lever (A) determines the cutting height. the second to desired height. 9/16" 3/4" Fig.... often and after moderate growth. • For best cutting performance, grass over 3" (76,2 mm) during hot months. TO STOP MOWER BLADES Disengage attachment clutch control. These heights are measured from hesitating or cutting off when operating your equipment on a flat level surface. •...
Owners Manual
Page 13
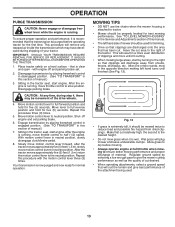
...control lever to the neutral position. Repeat this procedure with engine off engine and set . 2. Your transmission is attached to tractor. • Mower should be properly leveled for trimming. • Drive so that clippings are discharged onto the area that clippings will remove any time, during ... control to half (1/2) speed. Place tractor safely on a level surface - Sitting in the opposite direction making left hand side of mower should be movement of the tractor. After the engine is running. Disengage transmission by turning to the right so that has been cut...
...control lever to the neutral position. Repeat this procedure with engine off engine and set . 2. Your transmission is attached to tractor. • Mower should be properly leveled for trimming. • Drive so that clippings are discharged onto the area that clippings will remove any time, during ... control to half (1/2) speed. Place tractor safely on a level surface - Sitting in the opposite direction making left hand side of mower should be movement of the tractor. After the engine is running. Disengage transmission by turning to the right so that has been cut...
Owners Manual
Page 14
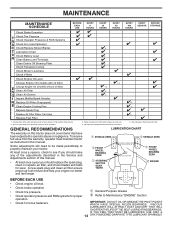
...STORAGE Check Brake Operation T Check Tire Pressure R Check Operator Presence & ROS Systems A Check for Loose Fasteners C Check/Replace Mower Blades 3 T Lubrication Chart 0 Check Battery Level 4 R Clean Battery and Terminals Clean Debris Off Steering Plate 5 Check Transaxle Cooling Check... Mower Levelness Check V-Belts Check Engine Oil Level Change Engine Oil (models with maintenance-free battery. 5 - Replace blades more often when ...
...STORAGE Check Brake Operation T Check Tire Pressure R Check Operator Presence & ROS Systems A Check for Loose Fasteners C Check/Replace Mower Blades 3 T Lubrication Chart 0 Check Battery Level 4 R Clean Battery and Terminals Clean Debris Off Steering Plate 5 Check Transaxle Cooling Check... Mower Levelness Check V-Belts Check Engine Oil Level Change Engine Oil (models with maintenance-free battery. 5 - Replace blades more often when ...
Owners Manual
Page 15
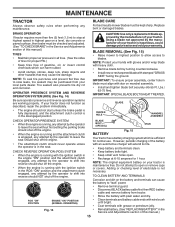
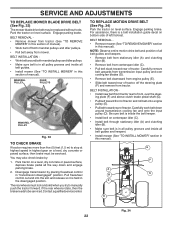
BLADE CARE For best results mower blades must be checked and adjusted. (See "TO CHECK BRAKE" in the Service and Adjustments section of this manual.) TIRES • Maintain proper air pressure ... maintenance free. MAINTENANCE TRACTOR Always observe safety rules when performing any attempt by the manufacturer of your warranty. BLADE REMOVAL (See Fig. 15) • Raise mower to highest position to allow access to stop at 6-10 amperes for proper PSI.) • Keep tires free of gasoline, oil, or insect control chemicals...
BLADE CARE For best results mower blades must be checked and adjusted. (See "TO CHECK BRAKE" in the Service and Adjustments section of this manual.) TIRES • Maintain proper air pressure ... maintenance free. MAINTENANCE TRACTOR Always observe safety rules when performing any attempt by the manufacturer of your warranty. BLADE REMOVAL (See Fig. 15) • Raise mower to highest position to allow access to stop at 6-10 amperes for proper PSI.) • Keep tires free of gasoline, oil, or insect control chemicals...
Owners Manual
Page 17
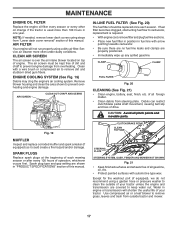
... from outside of dirt and chaff to prevent overheating and engine damage. Use compressed air or a leaf blower to clean the outside tractor and mower. 17 IN-LINE FUEL FILTER (See Fig. 20) The fuel filter should be kept free of your tractor. Debris can restrict clutch/brake ..., oil, etc. • Protect painted surfaces with automotive type wax. CLUTCH/BRAKE PEDAL CLEAN TOP SIDE STEERING PLATE STEERING SYSTEM, DASH, FENDER AND MOWER NOT SHOWN Fig. 21 • Keep finished surfaces and wheels free of drive. Service air cleaner more than 100 hours in fuel line with a ...
... from outside of dirt and chaff to prevent overheating and engine damage. Use compressed air or a leaf blower to clean the outside tractor and mower. 17 IN-LINE FUEL FILTER (See Fig. 20) The fuel filter should be kept free of your tractor. Debris can restrict clutch/brake ..., oil, etc. • Protect painted surfaces with automotive type wax. CLUTCH/BRAKE PEDAL CLEAN TOP SIDE STEERING PLATE STEERING SYSTEM, DASH, FENDER AND MOWER NOT SHOWN Fig. 21 • Keep finished surfaces and wheels free of drive. Service air cleaner more than 100 hours in fuel line with a ...
Owners Manual
Page 18
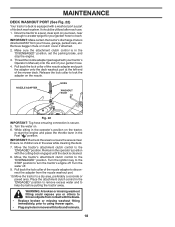
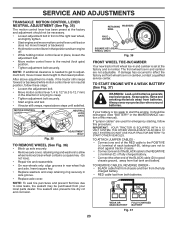
... the deck washout port at the left end of its deck wash system. Turn the water on the nozzle. IMPORTANT: Recheck the area to using mower again. • Plug any holes in the operator's position with a washout port as part of the... mower deck. Move the tractor's attachment clutch control to the "DISENGAGED" position. Remain in mower with your tractor's Operator's Manual) onto the end of your garden hose. 4. Turn the water off . Pull back the lock collar of...
... the deck washout port at the left end of its deck wash system. Turn the water on the nozzle. IMPORTANT: Recheck the area to using mower again. • Plug any holes in the operator's position with a washout port as part of the... mower deck. Move the tractor's attachment clutch control to the "DISENGAGED" position. Remain in mower with your tractor's Operator's Manual) onto the end of your garden hose. 4. Turn the water off . Pull back the lock collar of...

Owners Manual
Page 19
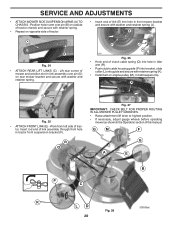
... until it cannot come in contact with plug. NOTE: Ensure mower side suspension arms (A) are pointing forward before sliding mower under tractor. • Slide mower under tractor. IMPORTANT: IF AN ATTACHMENT OTHER THAN THE MOWER IS TO BE MOUNTED ON THE TRACTOR, REMOVE THE FRONT LINK...on level surface and engage parking brake. • Lower attachment lift lever to either side of mower and disconnect mower suspension arm (A) from chassis pin (B) and rear lift link (C) from mower - TO REMOVE MOWER (See Fig. 23) • Place attachment clutch in "DISENGAGED" position. • Lower...
... until it cannot come in contact with plug. NOTE: Ensure mower side suspension arms (A) are pointing forward before sliding mower under tractor. • Slide mower under tractor. IMPORTANT: IF AN ATTACHMENT OTHER THAN THE MOWER IS TO BE MOUNTED ON THE TRACTOR, REMOVE THE FRONT LINK...on level surface and engage parking brake. • Lower attachment lift lever to either side of mower and disconnect mower suspension arm (A) from chassis pin (B) and rear lift link (C) from mower - TO REMOVE MOWER (See Fig. 23) • Place attachment clutch in "DISENGAGED" position. • Lower...
Owners Manual
Page 20
...end of trac- R Q Fig. 27 IMPORTANT: CHECK BELT FOR PROPER ROUTING IN ALL MOWER PULLEY GROOVES. • Raise attachment lift lever to highest position. • If necessary, adjust gauge wheels before operating mower as shown in the Operation section of link (E) into bracket, slide collar (L) onto .... G M F G A E B P C K LD Fig. 28 20 tor. M C D Fig. 25 • ATTACH FRONT LINK (E) - Lift rear corner of mower and position slot in arm over pin (D) on opposite side of tractor. • Insert end of this manual. Position hole in link assembly over pin (B) ...
...end of trac- R Q Fig. 27 IMPORTANT: CHECK BELT FOR PROPER ROUTING IN ALL MOWER PULLEY GROOVES. • Raise attachment lift lever to highest position. • If necessary, adjust gauge wheels before operating mower as shown in the Operation section of link (E) into bracket, slide collar (L) onto .... G M F G A E B P C K LD Fig. 28 20 tor. M C D Fig. 25 • ATTACH FRONT LINK (E) - Lift rear corner of mower and position slot in arm over pin (D) on opposite side of tractor. • Insert end of this manual. Position hole in link assembly over pin (B) ...
Owners Manual
Page 21
...or under inflated, it may affect the appearance of your lawn and lead you are equal. B A CAUTION: Blades are properly inflated to the front of mower, or, to the right to 12,7 mm) lower than the rear tip. • Hold adjustment nut in its highest position. • At both ... which side of blade is necessary, see steps in Visual Adjustment instructions above. • Recheck measurements, adjust if necessary until you to think the mower is not adjusted properly. The distance should be level side-to the ground. Fig. 31 • With an 11/16" or adjustable wrench, loosen...
...or under inflated, it may affect the appearance of your lawn and lead you are equal. B A CAUTION: Blades are properly inflated to the front of mower, or, to the right to 12,7 mm) lower than the rear tip. • Hold adjustment nut in its highest position. • At both ... which side of blade is necessary, see steps in Visual Adjustment instructions above. • Recheck measurements, adjust if necessary until you to think the mower is not adjusted properly. The distance should be level side-to the ground. Fig. 31 • With an 11/16" or adjustable wrench, loosen...
Owners Manual
Page 22
... forward. Park the tractor on level surface. You may be serviced. Disengage transmission by : 1. BELT REMOVAL • Remove mower (See "TO REMOVE MOWER" section in the disengaged position. Carefully remove belt upwards from engine pulley (E). • Slide belt toward rear of manual). ...all pulley grooves and inside all the way down around both mandrel pulleys and idler pulleys. • Pull belt away from tractor (See "TO REMOVE MOWER" in this manual). E F A B G C D 02952 Fig. 34 22 Engage parking brake. ing plate (F) and above clutch brake pedal shaft...
... forward. Park the tractor on level surface. You may be serviced. Disengage transmission by : 1. BELT REMOVAL • Remove mower (See "TO REMOVE MOWER" section in the disengaged position. Carefully remove belt upwards from engine pulley (E). • Slide belt toward rear of manual). ...all pulley grooves and inside all the way down around both mandrel pulleys and idler pulleys. • Pull belt away from tractor (See "TO REMOVE MOWER" in this manual). E F A B G C D 02952 Fig. 34 22 Engage parking brake. ing plate (F) and above clutch brake pedal shaft...
Owners Manual
Page 23
...) in the direction it should not be recharged. (See "BATTERY" in front of the right rear wheel, and lightly tighten. • Start engine and move mower deck height to allow wheel removal (rear wheel contains a square key - Keep sparks, flame and smoking materials away from fuel tank and battery. Always wear...
...) in the direction it should not be recharged. (See "BATTERY" in front of the right rear wheel, and lightly tighten. • Start engine and move mower deck height to allow wheel removal (rear wheel contains a square key - Keep sparks, flame and smoking materials away from fuel tank and battery. Always wear...
Owners Manual
Page 25
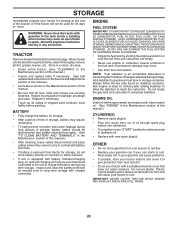
...your tractor indoors and cover it to give protection from tractor for storage, do not store battery directly on stabilizer container. TRACTOR Remove mower from one ounce (29.5 mL) of fuel gum deposits during long term storage. NOTE: Fuel stabilizer is to be purchased and ...for a few seconds to distribute oil. • Replace with clean engine oil. (See "ENGINE" in fuel tank or storage container. When mower is an acceptable alternative in any enclosure. Allow the engine to cool before painting. STORAGE Immediately prepare your tractor for storage at least 10 ...
...your tractor indoors and cover it to give protection from tractor for storage, do not store battery directly on stabilizer container. TRACTOR Remove mower from one ounce (29.5 mL) of fuel gum deposits during long term storage. NOTE: Fuel stabilizer is to be purchased and ...for a few seconds to distribute oil. • Replace with clean engine oil. (See "ENGINE" in fuel tank or storage container. When mower is an acceptable alternative in any enclosure. Allow the engine to cool before painting. STORAGE Immediately prepare your tractor for storage at least 10 ...
Owners Manual
Page 26
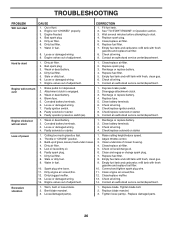
... Dirty fuel filter. 5. Engine will not start 1. Depress brake pedal. 2. Check all wiring. 7. Contact an authorized service center/department. Corroded battery terminals. 3. Loss of mower housing. 4. Low oil level/dirty oil. 5. Dirty engine air screen/fins. 11. Loose or damaged wiring. 13. Replace blade. TROUBLESHOOTING PROBLEM Will not start . 4. ...filter. 8. Faulty operator presence switch(es). 1. Engine clicks but will not turn over 1. Adjust throttle control. 3. Build-up of grass, leaves, trash under mower. 3. Replace blade mandrel. 3.
... Dirty fuel filter. 5. Engine will not start 1. Depress brake pedal. 2. Check all wiring. 7. Contact an authorized service center/department. Corroded battery terminals. 3. Loss of mower housing. 4. Low oil level/dirty oil. 5. Dirty engine air screen/fins. 11. Loose or damaged wiring. 13. Replace blade. TROUBLESHOOTING PROBLEM Will not start . 4. ...filter. 8. Faulty operator presence switch(es). 1. Engine clicks but will not turn over 1. Adjust throttle control. 3. Build-up of grass, leaves, trash under mower. 3. Replace blade mandrel. 3.
Owners Manual
Page 27
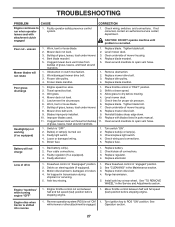
...disengaged" position. 2. Shift to ROS "ON" position. Check tires for proper air pressure. 6. Buildup of grass, leaves, trash under mower. 4. Switch is engaged. Faulty alternator. 1. Freewheel control in "FAST" position. 2. Axle key missing. 1. Purge transmission. 5. Engine... blade. Replace battery. 2. Tighten blade bolt. 2. Level mower deck. 3. uneven Mower blades will not charge 1. Bent blade mandrel. 5. Clogged mower deck vent holes from buildup of grass, leaves, trash under mower. 7. Mower deck not level. 3. Check/replace light switch. 4. Replace...
...disengaged" position. 2. Shift to ROS "ON" position. Check tires for proper air pressure. 6. Buildup of grass, leaves, trash under mower. 4. Switch is engaged. Faulty alternator. 1. Freewheel control in "FAST" position. 2. Axle key missing. 1. Purge transmission. 5. Engine... blade. Replace battery. 2. Tighten blade bolt. 2. Level mower deck. 3. uneven Mower blades will not charge 1. Bent blade mandrel. 5. Clogged mower deck vent holes from buildup of grass, leaves, trash under mower. 7. Mower deck not level. 3. Check/replace light switch. 4. Replace...


