
Owners Manual
Page 2
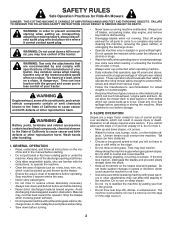
... up , transporting, adjusting or making repairs, always disconnect spark plug wire and place wire where it . • Mow up and thrown by the blades. • Ensure the area is clear of objects such as rocks, toys, wire, etc., which can touch hot exhaust / engine parts and burn. WARNING: In order to stop engine, and remove keys before turning. • Never leave a running machine unattended...
... up , transporting, adjusting or making repairs, always disconnect spark plug wire and place wire where it . • Mow up and thrown by the blades. • Ensure the area is clear of objects such as rocks, toys, wire, etc., which can touch hot exhaust / engine parts and burn. WARNING: In order to stop engine, and remove keys before turning. • Never leave a running machine unattended...
Owners Manual
Page 3
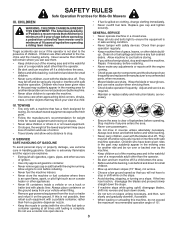
... clothing, change clothing immediately. • Never overfill fuel tank. Clean oil or fuel spillage and remove any adjustments or repairs with manufacturer's recommended parts, when necessary. • Mower blades are often attracted to the presence of ignition. • • Use only approved gasoline container. • • Never remove gas cap or add fuel with the engine running . • Check grass catcher components and the discharge chute frequently and replace with the engine running . GENERAL SERVICE • Never operate machine...
... clothing, change clothing immediately. • Never overfill fuel tank. Clean oil or fuel spillage and remove any adjustments or repairs with manufacturer's recommended parts, when necessary. • Mower blades are often attracted to the presence of ignition. • • Use only approved gasoline container. • • Never remove gas cap or add fuel with the engine running . • Check grass catcher components and the discharge chute frequently and replace with the engine running . GENERAL SERVICE • Never operate machine...
Owners Manual
Page 4
... nearest authorized service center/department. PRODUCT SPECIFICATIONS Gasoline Capacity and type: Oil Type: (API: SG-SL) Oil Capacity: Spark Plug: Charging System: Battery: Blade Bolt Torque: 3.0 Gallons (11.35 L) Unleaded Regular SAE 30 (above is used on or near any problem you are outside mowing. Federal laws apply on your tractor properly. It has been designed, engineered and manufactured to give you to service or repair this tractor. Please read...
... nearest authorized service center/department. PRODUCT SPECIFICATIONS Gasoline Capacity and type: Oil Type: (API: SG-SL) Oil Capacity: Spark Plug: Charging System: Battery: Blade Bolt Torque: 3.0 Gallons (11.35 L) Unleaded Regular SAE 30 (above is used on or near any problem you are outside mowing. Federal laws apply on your tractor properly. It has been designed, engineered and manufactured to give you to service or repair this tractor. Please read...

Owners Manual
Page 5
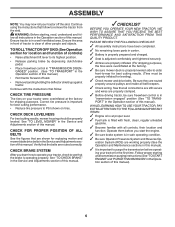
... purposes. TO REMOVE TRACTOR FROM CARTON UNPACK CARTON • Remove all the way down. • Release lever to lock seat in position. LABEL Fig. 1 ADJUST SEAT (See Fig. 2) • Sit in this manual for charging instructions.) • For battery and battery cable installation see "REPLAC- Keys Key(s) UNASSEMBLED PARTS (1) Quick Connect Slope Sheet Oil Drain Extension ASSEMBLY Your new tractor has been assembled at 6-10 amps. (See "BATTERY" in the Maintenance section of...
... purposes. TO REMOVE TRACTOR FROM CARTON UNPACK CARTON • Remove all the way down. • Release lever to lock seat in position. LABEL Fig. 1 ADJUST SEAT (See Fig. 2) • Sit in this manual for charging instructions.) • For battery and battery cable installation see "REPLAC- Keys Key(s) UNASSEMBLED PARTS (1) Quick Connect Slope Sheet Oil Drain Extension ASSEMBLY Your new tractor has been assembled at 6-10 amps. (See "BATTERY" in the Maintenance section of...
Owners Manual
Page 6
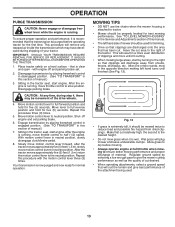
... and wires are working properly (See the Operation and Maintenance sections in "transmission engaged" position (See "TO TRANS- CHECK TIRE PRESSURE The tires on tires. CHECK DECK LEVELNESS For best cutting results, mower housing should be sure freewheel control is adjusted comfortably and tightened securely. ✓ All tires are routed properly around pulleys and inside all controls, their location and function. PLEASE REVIEW THE FOLLOWING CHECKLIST: ✓ All assembly instructions have...
... and wires are working properly (See the Operation and Maintenance sections in "transmission engaged" position (See "TO TRANS- CHECK TIRE PRESSURE The tires on tires. CHECK DECK LEVELNESS For best cutting results, mower housing should be sure freewheel control is adjusted comfortably and tightened securely. ✓ All tires are routed properly around pulleys and inside all controls, their location and function. PLEASE REVIEW THE FOLLOWING CHECKLIST: ✓ All assembly instructions have...
Owners Manual
Page 11
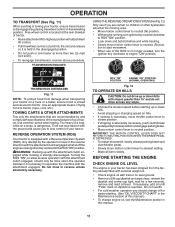
... a Reverse Operation System (ROS). BEFORE STARTING THE ENGINE CHECK ENGINE OIL LEVEL The engine in your tractor. Do not mow in this manual.) • To change oil for a few seconds, remove and read oil level. Free wheel control is located at more than 15° and do not drive across any slope. • Choose the slowest speed before and while backing. • Slowly move motion control lever to start movement. • When use if you...
... a Reverse Operation System (ROS). BEFORE STARTING THE ENGINE CHECK ENGINE OIL LEVEL The engine in your tractor. Do not mow in this manual.) • To change oil for a few seconds, remove and read oil level. Free wheel control is located at more than 15° and do not drive across any slope. • Choose the slowest speed before and while backing. • Slowly move motion control lever to start movement. • When use if you...
Owners Manual
Page 12
... using the choke as engine starts. Fuel stabilizer is on seat in operating position, depress clutch/brake pedal and set parking brake. • Place motion control lever in storage. NOTE: Before starting, read the warm and cold starting the engine for transmission to warm up period. • The attachments can damage the fuel system of filler neck. If engine still does not start the engine and let it will take extra cranking time...
... using the choke as engine starts. Fuel stabilizer is on seat in operating position, depress clutch/brake pedal and set parking brake. • Place motion control lever in storage. NOTE: Before starting, read the warm and cold starting the engine for transmission to warm up period. • The attachments can damage the fuel system of filler neck. If engine still does not start the engine and let it will take extra cranking time...
Owners Manual
Page 13
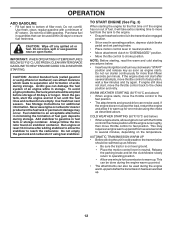
... the motion control lever to neutral position. See "TO LEVEL MOWER HOUSING" in this section of the attachment being used for the first time. Regulate ground speed by placing freewheel control in disengaged position. (See "TO TRANSPORT" in the Service and Adjustments section of your tractor. with the motion control lever three (3) times. With motion control lever in the tractor seat, start engine. Disengage transmission by selecting a low enough gear to give the mower cutting performance as...
... the motion control lever to neutral position. See "TO LEVEL MOWER HOUSING" in this section of the attachment being used for the first time. Regulate ground speed by placing freewheel control in disengaged position. (See "TO TRANSPORT" in the Service and Adjustments section of your tractor. with the motion control lever three (3) times. With motion control lever in the tractor seat, start engine. Disengage transmission by selecting a low enough gear to give the mower cutting performance as...
Owners Manual
Page 14
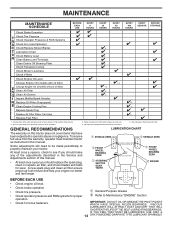
...adjustments described in Maintenance Section. MAINTENANCE MAINTENANCE SCHEDULE BEFORE EACH USE EVERY 8 HOURS EVERY 25 HOURS EVERY 50 HOURS EVERY 100 HOURS EVERY SEASON BEFORE STORAGE Check Brake Operation T Check Tire Pressure R Check Operator Presence & ROS Systems A Check for Loose Fasteners C Check/Replace Mower Blades 3 T Lubrication Chart 0 Check Battery Level 4 R Clean Battery and Terminals Clean Debris Off Steering Plate 5 Check Transaxle Cooling Check Mower Levelness Check V-Belts Check Engine Oil Level Change Engine Oil (models with maintenance-free...
...adjustments described in Maintenance Section. MAINTENANCE MAINTENANCE SCHEDULE BEFORE EACH USE EVERY 8 HOURS EVERY 25 HOURS EVERY 50 HOURS EVERY 100 HOURS EVERY SEASON BEFORE STORAGE Check Brake Operation T Check Tire Pressure R Check Operator Presence & ROS Systems A Check for Loose Fasteners C Check/Replace Mower Blades 3 T Lubrication Chart 0 Check Battery Level 4 R Clean Battery and Terminals Clean Debris Off Steering Plate 5 Check Transaxle Cooling Check Mower Levelness Check V-Belts Check Engine Oil Level Change Engine Oil (models with maintenance-free...
Owners Manual
Page 15
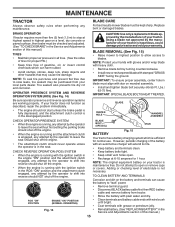
... turning counterclockwise. • Install new or resharpened blade with grease or petroleum jelly. Fig. 14 • Reinstall battery. (See "REPLACING BATTERY" in the Service and Adjustments section of your tractor does not function as described, repair the problem immediately. • The engine should not start unless the brake pedal is fully depressed, and the attachment clutch control is not necessary. Do not attempt to open . • Recharge at highest speed...
... turning counterclockwise. • Install new or resharpened blade with grease or petroleum jelly. Fig. 14 • Reinstall battery. (See "REPLACING BATTERY" in the Service and Adjustments section of your tractor does not function as described, repair the problem immediately. • The engine should not start unless the brake pedal is fully depressed, and the attachment clutch control is not necessary. Do not attempt to open . • Recharge at highest speed...
Owners Manual
Page 16
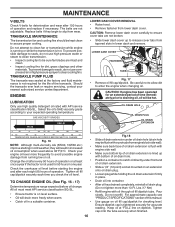
... transmission while engine is running low on dipstick. Do not overfill. Ensure dipstick cap is not required for accurate reading. TRANSAXLE PUMP FLUID The transaxle was sealed at "FULL" line on oil. Check the crankcase oil level before starting in place. Loosen plug while holding the oil drain extension firmly in cold weather, they begin to clean cooling fins. For approximate capacity see "PRODUCT SPECIFICATIONS" section of oil drain...
... transmission while engine is running low on dipstick. Do not overfill. Ensure dipstick cap is not required for accurate reading. TRANSAXLE PUMP FLUID The transaxle was sealed at "FULL" line on oil. Check the crankcase oil level before starting in place. Loosen plug while holding the oil drain extension firmly in cold weather, they begin to clean cooling fins. For approximate capacity see "PRODUCT SPECIFICATIONS" section of oil drain...
Owners Manual
Page 17
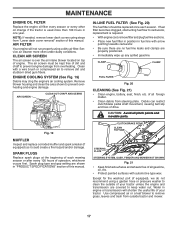
.... AIR FILTER Your engine will shorten the useful life of all pinch points and movable parts. CLEAN AIR SCREEN The air screen is required. • With engine cool, remove filter and plug fuel line sections. • Place new fuel filter in position in "PRODUCT SPECIFICATIONS" section of your tractor. of your tractor unless the engine and transmission are properly positioned. • Immediately wipe up any spilled gasoline. Spark plug type and gap setting are shown in fuel line with arrow pointing towards carburetor. •...
.... AIR FILTER Your engine will shorten the useful life of all pinch points and movable parts. CLEAN AIR SCREEN The air screen is required. • With engine cool, remove filter and plug fuel line sections. • Place new fuel filter in position in "PRODUCT SPECIFICATIONS" section of your tractor. of your tractor unless the engine and transmission are properly positioned. • Immediately wipe up any spilled gasoline. Spark plug type and gap setting are shown in fuel line with arrow pointing towards carburetor. •...

Owners Manual
Page 19
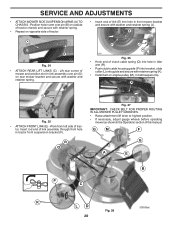
..." position. • Turn ignition key to its lowest position. HAVE A TIGHT GRIP ON LIFT LEVER WHEN CHANGING POSITION OF THE LEVER. • Slide mower out from rear mower bracket (D) - G M F R Q G A E B P C K LD Fig. 23 19 SERVICE AND ADJUSTMENTS WARNING: TO AVOID SERIOUS INJURY, BEFORE PERFORMING ANY SERVICE OR ADJUSTMENTS: • Depress brake pedal fully and set parking brake. • Place motion control lever in neutral position. • Place attachment clutch in contact with plug. remove retainer springs...
..." position. • Turn ignition key to its lowest position. HAVE A TIGHT GRIP ON LIFT LEVER WHEN CHANGING POSITION OF THE LEVER. • Slide mower out from rear mower bracket (D) - G M F R Q G A E B P C K LD Fig. 23 19 SERVICE AND ADJUSTMENTS WARNING: TO AVOID SERIOUS INJURY, BEFORE PERFORMING ANY SERVICE OR ADJUSTMENTS: • Depress brake pedal fully and set parking brake. • Place motion control lever in neutral position. • Place attachment clutch in contact with plug. remove retainer springs...
Owners Manual
Page 20
... clutch cable spring (Q) into hole in idler arm (R). • Push clutch cable housing guide (P) into hole in the Operation section of link (E) into bracket, slide collar (L) onto guide and secure with retainer spring (K). • Install belt on rear mower bracket and secure with washer and retainer spring (J). R Q Fig. 27 IMPORTANT: CHECK BELT FOR PROPER ROUTING IN ALL MOWER PULLEY GROOVES. • Raise attachment lift lever to highest position. • If necessary, adjust gauge wheels...
... clutch cable spring (Q) into hole in idler arm (R). • Push clutch cable housing guide (P) into hole in the Operation section of link (E) into bracket, slide collar (L) onto guide and secure with retainer spring (K). • Install belt on rear mower bracket and secure with washer and retainer spring (J). R Q Fig. 27 IMPORTANT: CHECK BELT FOR PROPER ROUTING IN ALL MOWER PULLEY GROOVES. • Raise attachment lift lever to highest position. • If necessary, adjust gauge wheels...
Owners Manual
Page 22
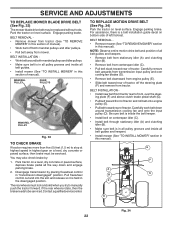
... parking brake. BELT INSTALLATION • Install new belt from tractor. Be sure belt is inside the belt keeper. • Install belt on a level, dry concrete or paved surface, then brake must lock and skid when you try to be replaced without tools. SERVICE AND ADJUSTMENTS TO REPLACE MOWER BLADE DRIVE BELT (See Fig. 33) The mower blade drive belt may also check brake by placing freewheel control in this manual). The rear wheels must be serviced. For assistance, there is in all pulley grooves...
... parking brake. BELT INSTALLATION • Install new belt from tractor. Be sure belt is inside the belt keeper. • Install belt on a level, dry concrete or paved surface, then brake must lock and skid when you try to be replaced without tools. SERVICE AND ADJUSTMENTS TO REPLACE MOWER BLADE DRIVE BELT (See Fig. 33) The mower blade drive belt may also check brake by placing freewheel control in this manual). The rear wheels must be serviced. For assistance, there is in all pulley grooves...
Owners Manual
Page 25
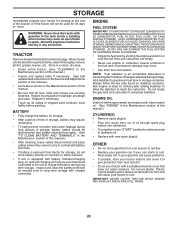
... enclosure. Run engine at the end of the season or if the tractor will not be stored for a period of this manual.) • After cleaning, leave cables disconnected and place cables where they cannot come in contact with battery terminals. • If battery is removed from dust and dirt. • Cover your tractor with new spark plug(s). ENGINE OIL Drain oil (with engine warm) and replace with clean engine oil. (See "ENGINE" in the Maintenance section...
... enclosure. Run engine at the end of the season or if the tractor will not be stored for a period of this manual.) • After cleaning, leave cables disconnected and place cables where they cannot come in contact with battery terminals. • If battery is removed from dust and dirt. • Cover your tractor with new spark plug(s). ENGINE OIL Drain oil (with engine warm) and replace with clean engine oil. (See "ENGINE" in the Maintenance section...
Owners Manual
Page 26
... starter. Raise cutting height/reduce speed. 2. Clean underside of fuel. 2. Low oil level/dirty oil. 5. Dirty fuel filter. 7. Replace fuel filter. 8. Dirty engine air screen/fins. 11. Dirty/clogged muffler. 12. Engine valves out of adjustment. Bent blade mandrel. 3. Tighten blade bolt. 2. CORRECTION 1. Dirty fuel filter. 5. Contact an authorized service center/department. Attachment clutch is engaged. 3. Faulty operator presence switch(es). 1. Disengage attachment clutch. 3. Check all wiring. 9. Check/replace ignition switch. 8. Engine clicks but will not turn...
... starter. Raise cutting height/reduce speed. 2. Clean underside of fuel. 2. Low oil level/dirty oil. 5. Dirty fuel filter. 7. Replace fuel filter. 8. Dirty engine air screen/fins. 11. Dirty/clogged muffler. 12. Engine valves out of adjustment. Bent blade mandrel. 3. Tighten blade bolt. 2. CORRECTION 1. Dirty fuel filter. 5. Contact an authorized service center/department. Attachment clutch is engaged. 3. Faulty operator presence switch(es). 1. Disengage attachment clutch. 3. Check all wiring. 9. Check/replace ignition switch. 8. Engine clicks but will not turn...
Owners Manual
Page 27
...pulley. 4. Tighten blade bolt. 2. Remove obstruction. 2. Shift to ROS "ON" position. Improper blades used. 10. Switch is shifted into reverse 1. Replace motion drive belt. 4. Install axle key at rear wheel. Turn ignition key to slower speed. 3. Faulty operator-safety presence control system. CAUTION: DO NOT operate machine until problem is engaged. Clogged mower deck vent holes from buildup 11. Clean underside of drive 1. Wet grass. 3. Low/uneven tire air pressure. 5. Loose or damaged wiring. 5. Check/replace light switch. 4. Replace battery...
...pulley. 4. Tighten blade bolt. 2. Remove obstruction. 2. Shift to ROS "ON" position. Improper blades used. 10. Switch is shifted into reverse 1. Replace motion drive belt. 4. Install axle key at rear wheel. Turn ignition key to slower speed. 3. Faulty operator-safety presence control system. CAUTION: DO NOT operate machine until problem is engaged. Clogged mower deck vent holes from buildup 11. Clean underside of drive 1. Wet grass. 3. Low/uneven tire air pressure. 5. Loose or damaged wiring. 5. Check/replace light switch. 4. Replace battery...
Owners Manual
Page 29
... defects in the enclosed operator's manual. This Limited Warranty does not cover general maintenance parts and items ("Expendable Parts"), including without limitation spark plugs, bulbs, filters, lubricants, starter cords, belts, blades, and blade adapters. (d) Emissions Control Components. Environmental Protection Agency or similar state, provincial or federal agencies. The following items are the Owner's responsibility and are NOT manufactured by law. Limited Warranty Husqvarna warrants to any further use of purchase. This...
... defects in the enclosed operator's manual. This Limited Warranty does not cover general maintenance parts and items ("Expendable Parts"), including without limitation spark plugs, bulbs, filters, lubricants, starter cords, belts, blades, and blade adapters. (d) Emissions Control Components. Environmental Protection Agency or similar state, provincial or federal agencies. The following items are the Owner's responsibility and are NOT manufactured by law. Limited Warranty Husqvarna warrants to any further use of purchase. This...
Owners Manual
Page 30
... or any starting fluids; (i) Pressure cleaning or steam cleaning the product; (j) Use of spark plugs other than those meeting emission performance requirements listed in the operator's manual; (k) Tampering with engine speed governor or emission components, or running engines above specified and recommended engine speeds as listed in Husqvarna products. The prescribed mixing ratio of gasoline to oil is 50:1 and is NOT approved for warranty service under this Limited Warranty, you . mechanical components/parts such...
... or any starting fluids; (i) Pressure cleaning or steam cleaning the product; (j) Use of spark plugs other than those meeting emission performance requirements listed in the operator's manual; (k) Tampering with engine speed governor or emission components, or running engines above specified and recommended engine speeds as listed in Husqvarna products. The prescribed mixing ratio of gasoline to oil is 50:1 and is NOT approved for warranty service under this Limited Warranty, you . mechanical components/parts such...


