
Owners Manual
Page 2
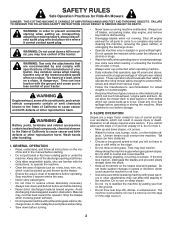
...and follow all instructions on a slope. Keep clear of bystanders before and while backing. • Never direct discharged material toward the operator. Shut off blades, set parking brake, stop or shift while on the slope. • Do not mow on a slope. Tall grass can cause build-up which... who are involved in speed or direction, which can affect the stability of riding mower-related injuries. If the tires lose traction, disengage the blades and proceed slowly straight down a hill in place and working. • Slow down slopes, not across. • Watch for Ride-On Mowers...
...and follow all instructions on a slope. Keep clear of bystanders before and while backing. • Never direct discharged material toward the operator. Shut off blades, set parking brake, stop or shift while on the slope. • Do not mow on a slope. Tall grass can cause build-up which... who are involved in speed or direction, which can affect the stability of riding mower-related injuries. If the tires lose traction, disengage the blades and proceed slowly straight down a hill in place and working. • Slow down slopes, not across. • Watch for Ride-On Mowers...
Owners Manual
Page 3
... machine. Avoid starting, stopping, or turning on slopes unless necessary, and then, turn machine off . If machine stops while going uphill, disengage blades, shift into reverse and back down slopes (15° Max), not across. When loading or unloading this is not possible, then refuel such ...equipment with safety devices. Gasoline is in or on a truck or trailer bed with manufacturer's recommended parts, when necessary. • Mower blades are sharp. Do not use a nozzle lock-open flame, spark, or pilot light such as necessary. They may suddenly appear in the mowing area...
... machine. Avoid starting, stopping, or turning on slopes unless necessary, and then, turn machine off . If machine stops while going uphill, disengage blades, shift into reverse and back down slopes (15° Max), not across. When loading or unloading this is not possible, then refuel such ...equipment with safety devices. Gasoline is in or on a truck or trailer bed with manufacturer's recommended parts, when necessary. • Mower blades are sharp. Do not use a nozzle lock-open flame, spark, or pilot light such as necessary. They may suddenly appear in the mowing area...
Owners Manual
Page 4
... by law (Section 4442 of a new tractor. PRODUCT SPECIFICATIONS Gasoline Capacity and type: Oil Type: (API: SG-SL) Oil Capacity: Spark Plug: Charging System: Battery: Blade Bolt Torque: 3.0 Gallons (11.35 L) Unleaded Regular SAE 30 (above is required by the operator. WARNING: This tractor is used on federal lands. A spark arrester...
... by law (Section 4442 of a new tractor. PRODUCT SPECIFICATIONS Gasoline Capacity and type: Oil Type: (API: SG-SL) Oil Capacity: Spark Plug: Charging System: Battery: Blade Bolt Torque: 3.0 Gallons (11.35 L) Unleaded Regular SAE 30 (above is required by the operator. WARNING: This tractor is used on federal lands. A spark arrester...
Owners Manual
Page 6
...; Raise attachment lift lever to see that all instructions in the Opera- TO ROLL TRACTOR OFF SKID (See Operation section for replacing motion and mower blade drive belts in "transmission engaged" position (See "TO TRANS- CHECK BRAKE SYSTEM After you start the engine. ✓ Be sure brake system is operating properly...
...; Raise attachment lift lever to see that all instructions in the Opera- TO ROLL TRACTOR OFF SKID (See Operation section for replacing motion and mower blade drive belts in "transmission engaged" position (See "TO TRANS- CHECK BRAKE SYSTEM After you start the engine. ✓ Be sure brake system is operating properly...

Owners Manual
Page 8
... and controlling engine speed. (E) ATTACHMENT CLUTCH LEVER - H D G E B A C M F J Fig. 3 Our tractors conform to your tractor. (F) IGNITION SWITCH - Used for future reference. Used to engage the mower blades, or other attachments mounted to the applicable safety standards of the tractor. (M) FREEWHEEL CONTROL -
... and controlling engine speed. (E) ATTACHMENT CLUTCH LEVER - H D G E B A C M F J Fig. 3 Our tractors conform to your tractor. (F) IGNITION SWITCH - Used for future reference. Used to engage the mower blades, or other attachments mounted to the applicable safety standards of the tractor. (M) FREEWHEEL CONTROL -
Owners Manual
Page 9
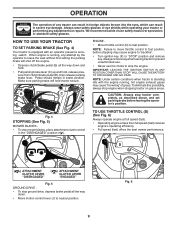
...Always remove key when leaving tractor to prevent unauthorized use. • Never use the choke to fast position. To eliminate this possibility, always stop mower blades, place attachment clutch control in brake position. D ( ) ATTACHMENT CLUTCH LEVER "DISENGAGED" ( ) ATTACHMENT CLUTCH LEVER "ENGAGED" Fig. 5 GROUND ... and set parking brake before stopping may cause "browning" of any adjustments or repairs. Fig. 4 STOPPING (See Fig. 5) MOWER BLADES • To stop engine when stopping tractor on grass areas. OPERATION The operation of grass. When engine is running , hot engine ...
...Always remove key when leaving tractor to prevent unauthorized use. • Never use the choke to fast position. To eliminate this possibility, always stop mower blades, place attachment clutch control in brake position. D ( ) ATTACHMENT CLUTCH LEVER "DISENGAGED" ( ) ATTACHMENT CLUTCH LEVER "ENGAGED" Fig. 5 GROUND ... and set parking brake before stopping may cause "browning" of any adjustments or repairs. Fig. 4 STOPPING (See Fig. 5) MOWER BLADES • To stop engine when stopping tractor on grass areas. OPERATION The operation of grass. When engine is running , hot engine ...
Owners Manual
Page 10
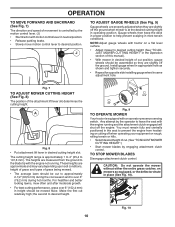
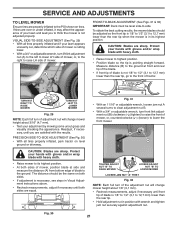
...a flat level surface. • Adjust mower to desired position. The cutting height range is approximately 1 to 4" (25,4 to the blade tip with motion control lever in operating position. The heights are measured from hesitating or cutting off when operating your equipment on mowers so equipped... Fig. 7 TO ADJUST MOWER CUTTING HEIGHT (See Fig. 8) The position of cut. (See "TO ADJUST MOWER CUTTING HEIGHT".) • Start mower blades by the operator to desired height. 9/16" 3/4" Fig. 9 TO OPERATE MOWER Your tractor is at the desired cutting height in neutral position. •...
...a flat level surface. • Adjust mower to desired position. The cutting height range is approximately 1 to 4" (25,4 to the blade tip with motion control lever in operating position. The heights are measured from hesitating or cutting off when operating your equipment on mowers so equipped... Fig. 7 TO ADJUST MOWER CUTTING HEIGHT (See Fig. 8) The position of cut. (See "TO ADJUST MOWER CUTTING HEIGHT".) • Start mower blades by the operator to desired height. 9/16" 3/4" Fig. 9 TO OPERATE MOWER Your tractor is at the desired cutting height in neutral position. •...
Owners Manual
Page 14
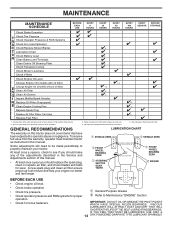
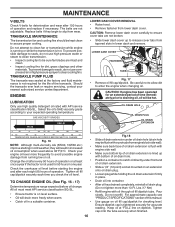
...BEFORE STORAGE Check Brake Operation T Check Tire Pressure R Check Operator Presence & ROS Systems A Check for Loose Fasteners C Check/Replace Mower Blades 3 T Lubrication Chart 0 Check Battery Level 4 R Clean Battery and Terminals Clean Debris Off Steering Plate 5 Check Transaxle Cooling Check Mower ...Levelness Check V-Belts Check Engine Oil Level Change Engine Oil (models with maintenance-free battery. 5 - Replace blades more often when operating under a heavy load or in this tractor does not cover items that have been subjected to Maintenance "...
...BEFORE STORAGE Check Brake Operation T Check Tire Pressure R Check Operator Presence & ROS Systems A Check for Loose Fasteners C Check/Replace Mower Blades 3 T Lubrication Chart 0 Check Battery Level 4 R Clean Battery and Terminals Clean Debris Off Steering Plate 5 Check Transaxle Cooling Check Mower ...Levelness Check V-Belts Check Engine Oil Level Change Engine Oil (models with maintenance-free battery. 5 - Replace blades more often when operating under a heavy load or in this tractor does not cover items that have been subjected to Maintenance "...
Owners Manual
Page 15
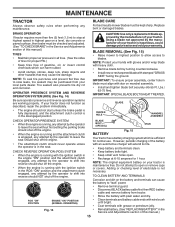
...engine. • Keep small vent holes open or remove caps or covers. Adding or checking level of your tractor is in the disengaged position. BLADE BOLT (SPECIAL) STAR BATTERY Fig. 15 Your tractor has a battery charging system which can cause the battery to "leak" power. •... leaks, tire sealant may cause tire damage. Tire sealant also prevents tire dry rot and corrosion. If your local parts dealer. IMPORTANT: SPECIAL BLADE BOLT IS HEAT TREATED. Fig. 14 • Reinstall battery. (See "REPLACING BATTERY" in the ROS "ON" position and the attachment clutch...
...engine. • Keep small vent holes open or remove caps or covers. Adding or checking level of your tractor is in the disengaged position. BLADE BOLT (SPECIAL) STAR BATTERY Fig. 15 Your tractor has a battery charging system which can cause the battery to "leak" power. •... leaks, tire sealant may cause tire damage. Tire sealant also prevents tire dry rot and corrosion. If your local parts dealer. IMPORTANT: SPECIAL BLADE BOLT IS HEAT TREATED. Fig. 14 • Reinstall battery. (See "REPLACING BATTERY" in the ROS "ON" position and the attachment clutch...
Owners Manual
Page 16
... may be kept clean to seals, do not use high pressure water or steam to clean transmission. • Inspect cooling fan to be sure fan blades are intact and clean. • Inspect cooling fins for an extended period of operation. Drain oil into container. Do not attempt to clean cooling fins...
... may be kept clean to seals, do not use high pressure water or steam to clean transmission. • Inspect cooling fan to be sure fan blades are intact and clean. • Inspect cooling fins for an extended period of operation. Drain oil into container. Do not attempt to clean cooling fins...
Owners Manual
Page 18
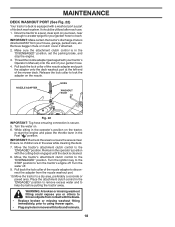
... (packaged with your garden hose. 4. Remain in the operator's position with the cutting deck engaged until the deck is directed AWAY from contact with the blade. • Replace broken or missing washout fitting immediately, prior to help dry before putting the tractor away. Turn the water off . It should be utilized...
... (packaged with your garden hose. 4. Remain in the operator's position with the cutting deck engaged until the deck is directed AWAY from contact with the blade. • Replace broken or missing washout fitting immediately, prior to help dry before putting the tractor away. Turn the water off . It should be utilized...

Owners Manual
Page 19
... control lever in neutral position. • Place attachment clutch in "DISENGAGED" position. • Turn ignition key to "STOP" and remove key. • Make sure the blades and all moving parts have completely stopped. • Disconnect spark plug wire from rear mower bracket (D) -
... control lever in neutral position. • Place attachment clutch in "DISENGAGED" position. • Turn ignition key to "STOP" and remove key. • Make sure the blades and all moving parts have completely stopped. • Disconnect spark plug wire from rear mower bracket (D) -
Owners Manual
Page 21
... inflated, park tractor on level ground or driveway. Measure distance (B) to the ground at side and measure the distance (A) from bottom edge of blade to the ground. Protect your lawn appears unevenly cut, determine which side of mower is cutting lower. • With a 3/4" or adjustable wrench... B TURN NUT RIGHT TO RAISE MOWER TURN NUT LEFT TO LOWER MOWER Fig. 29 NOTE: Each full turn front link adjust- B A CAUTION: Blades are properly inflated to the PSI shown on both sides. • If adjustment is necessary, see steps in Visual Adjustment instructions above. • Recheck...
... inflated, park tractor on level ground or driveway. Measure distance (B) to the ground at side and measure the distance (A) from bottom edge of blade to the ground. Protect your lawn appears unevenly cut, determine which side of mower is cutting lower. • With a 3/4" or adjustable wrench... B TURN NUT RIGHT TO RAISE MOWER TURN NUT LEFT TO LOWER MOWER Fig. 29 NOTE: Each full turn front link adjust- B A CAUTION: Blades are properly inflated to the PSI shown on both sides. • If adjustment is necessary, see steps in Visual Adjustment instructions above. • Recheck...
Owners Manual
Page 22
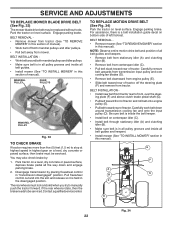
... Park tractor on a level, dry concrete or paved surface, then brake must lock and skid when you try to front, over cooling fan blades (D). • Remove belt downward from engine pulley (E). • Slide belt toward rear of tractor, off both mandrel pulleys and idler pulleys... belt toward rear of tractor. E F A B G C D 02952 Fig. 34 22 SERVICE AND ADJUSTMENTS TO REPLACE MOWER BLADE DRIVE BELT (See Fig. 33) The mower blade drive belt may also check brake by placing freewheel control in "transmission disengaged" position. BELT REMOVAL • Remove mower from mower...
... Park tractor on a level, dry concrete or paved surface, then brake must lock and skid when you try to front, over cooling fan blades (D). • Remove belt downward from engine pulley (E). • Slide belt toward rear of tractor, off both mandrel pulleys and idler pulleys... belt toward rear of tractor. E F A B G C D 02952 Fig. 34 22 SERVICE AND ADJUSTMENTS TO REPLACE MOWER BLADE DRIVE BELT (See Fig. 33) The mower blade drive belt may also check brake by placing freewheel control in "transmission disengaged" position. BELT REMOVAL • Remove mower from mower...
Owners Manual
Page 26
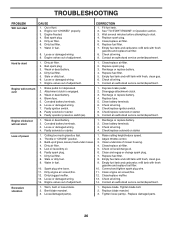
... 7. Recharge or replace battery. 2. Build-up of fuel. 2. Dirty air filter. 4. Check all wiring. 9. Worn, bent or loose blade. 2. Replace blade. Replace damaged parts. 26 Out of grass, leaves, trash under mower. 3. Bad spark plug. 5. Dirty air filter. 6. Fill fuel ...air filter. 5. Water in "CHOKE" position. 2. Dirty engine air screen/fins. 11. Excessive vibration 1. Loose/damaged part(s). 1. Tighten blade bolt. 2. Engine valves out of adjustment. 1. Contact an authorized service center/department. Bad spark plug. 3. Loose or damaged wiring. ...
... 7. Recharge or replace battery. 2. Build-up of fuel. 2. Dirty air filter. 4. Check all wiring. 9. Worn, bent or loose blade. 2. Replace blade. Replace damaged parts. 26 Out of grass, leaves, trash under mower. 3. Bad spark plug. 5. Dirty air filter. 6. Fill fuel ...air filter. 5. Water in "CHOKE" position. 2. Dirty engine air screen/fins. 11. Excessive vibration 1. Loose/damaged part(s). 1. Tighten blade bolt. 2. Engine valves out of adjustment. 1. Contact an authorized service center/department. Bad spark plug. 3. Loose or damaged wiring. ...
Owners Manual
Page 27
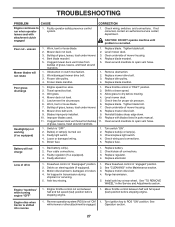
...too slow. 1. Travel speed too fast. 2. Shift to ROS "ON" position. Level mower deck. 5. Worn, bent or loose blade. 6. Tighten blade bolt. 7. Blades improperly installed. 9. Clogged mower deck vent holes from buildup of grass, leaves, trash around mandrels to open vent holes. Bulb(s) ...attachment is corrected. Operation section. 27 CAUTION: DO NOT operate machine until problem is engaged. Replace blade. Replace blade mandrel. 1. Check tires for proper air pressure. 6. Replace blade. Replace mower drive belt. 9. Turn switch "ON". 2. Replace motion drive belt. 4. Install ...
...too slow. 1. Travel speed too fast. 2. Shift to ROS "ON" position. Level mower deck. 5. Worn, bent or loose blade. 6. Tighten blade bolt. 7. Blades improperly installed. 9. Clogged mower deck vent holes from buildup of grass, leaves, trash around mandrels to open vent holes. Bulb(s) ...attachment is corrected. Operation section. 27 CAUTION: DO NOT operate machine until problem is engaged. Replace blade. Replace blade mandrel. 1. Check tires for proper air pressure. 6. Replace blade. Replace mower drive belt. 9. Turn switch "ON". 2. Replace motion drive belt. 4. Install ...
Owners Manual
Page 29
... transmission / transaxle manufacturer's warranty or any questions concerning transmission / transaxle warranty coverage, contact Husqvarna directly at the time of purchase. Depending on the product, there is either No Warranty or...blade adapters. (d) Emissions Control Components. Such equipment and components are excluded from coverage, and other components are not covered by law. Reconditioned or Refurbished Products have a 30 Day Limited Warranty for parts and labor for the applicable Warranty Period shown on Exhibit A, all Engines and Attachments are not covered by Husqvarna...
... transmission / transaxle manufacturer's warranty or any questions concerning transmission / transaxle warranty coverage, contact Husqvarna directly at the time of purchase. Depending on the product, there is either No Warranty or...blade adapters. (d) Emissions Control Components. Such equipment and components are excluded from coverage, and other components are not covered by law. Reconditioned or Refurbished Products have a 30 Day Limited Warranty for parts and labor for the applicable Warranty Period shown on Exhibit A, all Engines and Attachments are not covered by Husqvarna...
Owners Manual
Page 30
... damage, and/or improper storage; (p) Sprayers pumping or spraying caustic or flammable materials, lack of or broken strainers; Authorized Husqvarna Servicing Dealer/Center. Proof of purchase rests solely with you do not meet Engine manufacturer's specifications; (g) Use of gasohol (fuel...speed governor or emission components, or running engines above specified and recommended engine speeds as belts, pulleys, spindle housings, bearings, blades, rods, height adjusters, caster/anti scalp wheels etc... Documentation Required. You must maintain and present Proof of warranty service. ...
... damage, and/or improper storage; (p) Sprayers pumping or spraying caustic or flammable materials, lack of or broken strainers; Authorized Husqvarna Servicing Dealer/Center. Proof of purchase rests solely with you do not meet Engine manufacturer's specifications; (g) Use of gasohol (fuel...speed governor or emission components, or running engines above specified and recommended engine speeds as belts, pulleys, spindle housings, bearings, blades, rods, height adjusters, caster/anti scalp wheels etc... Documentation Required. You must maintain and present Proof of warranty service. ...
Owners Manual
Page 32
... (if purchased) Accessories (e.g., grass catcher, bumper guard accessories, etc. 1 Year No Warranty No Warranty Parts (e.g., belts, blades, etc.) 90 days No Warranty No Warranty Parts & Accessories (if replaced in Warranty Service) Replacement parts and/or accessories ... Year warranty, parts & labor, with Hydro-Gear Distributor network. *** "Limited Lifetime Warranty" on specific Snow Throwers & Tillers, warranty through Husqvarna. ** See reference 4 (b) of the complete unit's final production, whichever comes first. Deck Shell replacement will be limited to a maximum of...
... (if purchased) Accessories (e.g., grass catcher, bumper guard accessories, etc. 1 Year No Warranty No Warranty Parts (e.g., belts, blades, etc.) 90 days No Warranty No Warranty Parts & Accessories (if replaced in Warranty Service) Replacement parts and/or accessories ... Year warranty, parts & labor, with Hydro-Gear Distributor network. *** "Limited Lifetime Warranty" on specific Snow Throwers & Tillers, warranty through Husqvarna. ** See reference 4 (b) of the complete unit's final production, whichever comes first. Deck Shell replacement will be limited to a maximum of...
Parts Manual
Page 15
... 06-16 59 532 14 10-43 DESCRIPTION Mower Housing Arm Suspension Screw #10 x .750 BOS Thread Bolt/Washer Asm 7/16-20 unf Blade, 42" Hi-Lift (For bagging or discharge) Shaft Assembly, Mandrel Housing, Mandrel Bearing, Ball, Mandrel Bolt, Shoulder Baffle, Vortex Nut, Crownlock... Clutch Cable Arm, Idler Spacer, Retainer Screw 3/8-16 x 1 Guard, Tuv Idler KEY PART NO. pulley/ nut/washer and blade bolt/washers not included) Replacement Mower, Complete NOTE: All component dimensions given in U.S. TRACTOR - - MODEL NUMBER YTH18542 (96043018400), PRODUCT NO. 960 43 01-84 MOWER DECK KEY PART NO.
... 06-16 59 532 14 10-43 DESCRIPTION Mower Housing Arm Suspension Screw #10 x .750 BOS Thread Bolt/Washer Asm 7/16-20 unf Blade, 42" Hi-Lift (For bagging or discharge) Shaft Assembly, Mandrel Housing, Mandrel Bearing, Ball, Mandrel Bolt, Shoulder Baffle, Vortex Nut, Crownlock... Clutch Cable Arm, Idler Spacer, Retainer Screw 3/8-16 x 1 Guard, Tuv Idler KEY PART NO. pulley/ nut/washer and blade bolt/washers not included) Replacement Mower, Complete NOTE: All component dimensions given in U.S. TRACTOR - - MODEL NUMBER YTH18542 (96043018400), PRODUCT NO. 960 43 01-84 MOWER DECK KEY PART NO.


