
Owners Manual
Page 2
... stabilize the machine by the blades. • Ensure the area is dangerous. Tires can lose traction with specifications of the manufacturer of your tractor. I. Always look down before cleaning the machine, removing the grass catcher, or unclogging the discharge chute. • Operate machine only in ...near drop-offs, ditches, or embankments. Do not shift to loss of control and tipover accidents, which can affect the stability of the tractor. If the tires lose traction, disengage the blades and proceed slowly straight down slopes, not across. • Watch for Ride-On Mowers...
... stabilize the machine by the blades. • Ensure the area is dangerous. Tires can lose traction with specifications of the manufacturer of your tractor. I. Always look down before cleaning the machine, removing the grass catcher, or unclogging the discharge chute. • Operate machine only in ...near drop-offs, ditches, or embankments. Do not shift to loss of control and tipover accidents, which can affect the stability of the tractor. If the tires lose traction, disengage the blades and proceed slowly straight down slopes, not across. • Watch for Ride-On Mowers...

Owners Manual
Page 4
...give you are outside mowing. Federal laws apply on your nearest authorized service center/department. We have similar laws. WARNING: This tractor is required by the operator. TABLE OF CONTENTS SAFETY RULES 2-3 PRODUCT SPECIFICATIONS 4 CUSTOMER RESPONSIBILITIES 4 ASSEMBLY 5-6 OPERATION 7-12 ... retain this machine, including (at a minimum) sturdy footwear, eye protection, and hearing protection. A spark arrester for and using your tractor. • Follow the instructions under "Maintenance" and "Stor- In the state of California the above is equipped with a spark arrester...
...give you are outside mowing. Federal laws apply on your nearest authorized service center/department. We have similar laws. WARNING: This tractor is required by the operator. TABLE OF CONTENTS SAFETY RULES 2-3 PRODUCT SPECIFICATIONS 4 CUSTOMER RESPONSIBILITIES 4 ASSEMBLY 5-6 OPERATION 7-12 ... retain this machine, including (at a minimum) sturdy footwear, eye protection, and hearing protection. A spark arrester for and using your tractor. • Follow the instructions under "Maintenance" and "Stor- In the state of California the above is equipped with a spark arrester...
Owners Manual
Page 5
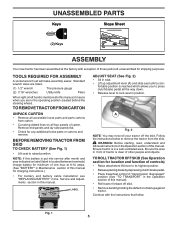
...; Releaseparkingbrakebydepressingclutch/brakepedal. • Place freewheel control in "transmission disengaged" position (See "TO TRANSPORT" in seat. • Lift up against tractor. Continue with exception of those parts left hand is reached which allows you are listed. (1) 1/2" wrench Tire pressure gauge (2) 7/16" ...purposes. TOOLS REQUIRED FOR ASSEMBLY A socket wrench set will make assembly easier. A Fig. 2 NOTE: You may now roll your tractor off skid. • Remove banding holding the deflector shield up adjustment lever (A) and slide seat until a com- Remove end panels...
...; Releaseparkingbrakebydepressingclutch/brakepedal. • Place freewheel control in "transmission disengaged" position (See "TO TRANSPORT" in seat. • Lift up against tractor. Continue with exception of those parts left hand is reached which allows you are listed. (1) 1/2" wrench Tire pressure gauge (2) 7/16" ...purposes. TOOLS REQUIRED FOR ASSEMBLY A socket wrench set will make assembly easier. A Fig. 2 NOTE: You may now roll your tractor off skid. • Remove banding holding the deflector shield up adjustment lever (A) and slide seat until a com- Remove end panels...
Owners Manual
Page 6
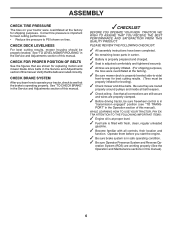
...were overinflated at the factory). ✓ Be sure mower deck is operating properly. Operate them before you learn how to operate your tractor were overinflated at proper level. ✓ Fuel tank is at the factory for shipping purposes. See that the brake is properly leveled ...for best cutting results. (Tires must be properly inflated for leveling). ✓ Check mower and drive belts. WHILE LEARNING HOW TO USE YOUR TRACTOR, PAY EXTRA ATTENTION TO THE FOLLOWING IMPORTANT ITEMS: ✓ Engine oil is filled with fresh, clean, regular unleaded gasoline. ✓ Become ...
...were overinflated at the factory). ✓ Be sure mower deck is operating properly. Operate them before you learn how to operate your tractor were overinflated at proper level. ✓ Fuel tank is at the factory for shipping purposes. See that the brake is properly leveled ...for best cutting results. (Tires must be properly inflated for leveling). ✓ Check mower and drive belts. WHILE LEARNING HOW TO USE YOUR TRACTOR, PAY EXTRA ATTENTION TO THE FOLLOWING IMPORTANT ITEMS: ✓ Engine oil is filled with fresh, clean, regular unleaded gasoline. ✓ Become ...

Owners Manual
Page 7
... in serious injury or death. CAUTION indicates a hazard which , if not avoided, could result in damage to the tractor and/or engine. REVERSE NEUTRAL HIGH LOW CHOKE FAST SLOW IGNITION SWITCH P ENGINE OFF REVERSE OPERATION SYSTEM (ROS) ENGINE ON ENGINE START PARKING BRAKE PARKING ...
... in serious injury or death. CAUTION indicates a hazard which , if not avoided, could result in damage to the tractor and/or engine. REVERSE NEUTRAL HIGH LOW CHOKE FAST SLOW IGNITION SWITCH P ENGINE OFF REVERSE OPERATION SYSTEM (ROS) ENGINE ON ENGINE START PARKING BRAKE PARKING ...

Owners Manual
Page 8
... is required for starting and controlling engine speed. (E) ATTACHMENT CLUTCH SWITCH - P H D G E C B F A M J Fig. 3 Our tractors conform to raise and lower the mower or other powered attachment while in reverse. (H) LIGHT SWITCH - Used for the engine and mower. 8 Selects the speed...the American National Standards Institute. (A) ATTACHMENT LIFT LEVER - Used to engage the mower blades or other attachments mounted to your tractor to your tractor. (B) BRAKE PEDAL - Disengages transmission for future reference. Turns the headlights on and off . (P) SERVICE REMINDER/HOUR METER ...
... is required for starting and controlling engine speed. (E) ATTACHMENT CLUTCH SWITCH - P H D G E C B F A M J Fig. 3 Our tractors conform to raise and lower the mower or other powered attachment while in reverse. (H) LIGHT SWITCH - Used for the engine and mower. 8 Selects the speed...the American National Standards Institute. (A) ATTACHMENT LIFT LEVER - Used to engage the mower blades or other attachments mounted to your tractor to your tractor. (B) BRAKE PEDAL - Disengages transmission for future reference. Turns the headlights on and off . (P) SERVICE REMINDER/HOUR METER ...

Owners Manual
Page 9
...repairs. Slowly move throttle control between half and full speed (fast) position. • • 9• Fig. 7 Start tractor with an operator presence sensing switch. We recommend standard safety glasses or a wide vision safety mask worn over spectacles. To eliminate ... (D) between half and full speed (fast) position, before leaving the operator's position. Always wear safety glasses or eye shields while operating your tractor or performing any attempt by the motion control lever(J). D F Fig. 6 ( ) ATTACHMENT CLUTCH LEVER "DISENGAGED" ( ) ATTACHMENT CLUTCH LEVER...
...repairs. Slowly move throttle control between half and full speed (fast) position. • • 9• Fig. 7 Start tractor with an operator presence sensing switch. We recommend standard safety glasses or a wide vision safety mask worn over spectacles. To eliminate ... (D) between half and full speed (fast) position, before leaving the operator's position. Always wear safety glasses or eye shields while operating your tractor or performing any attempt by the motion control lever(J). D F Fig. 6 ( ) ATTACHMENT CLUTCH LEVER "DISENGAGED" ( ) ATTACHMENT CLUTCH LEVER...

Owners Manual
Page 10
The cutting height range is equipped with tractor on rough, rolling terrain or hills. • Select desired height of grass being mowed. • The average lawn should be assembled so they are slightly ... before starting up or down hills with the engine not running and the attachment clutch engaged will shut off the engine. TO OPERATE MOWER Your tractor is approximately 1" to desired height. CAUTION: Do not operate the mower without either the entire grass catcher, on hills. • If slowing is necessary, move...
The cutting height range is equipped with tractor on rough, rolling terrain or hills. • Select desired height of grass being mowed. • The average lawn should be assembled so they are slightly ... before starting up or down hills with the engine not running and the attachment clutch engaged will shut off the engine. TO OPERATE MOWER Your tractor is approximately 1" to desired height. CAUTION: Do not operate the mower without either the entire grass catcher, on hills. • If slowing is necessary, move...
Owners Manual
Page 11
...of 30 days or longer. Turning the ROS "ON", to allow reverse operation with attachment lift control. • Move motion control lever to tractor (rope, cord, etc.). Use common sense when towing. Tires can damage the fuel system of filler neck. Free wheel control is dangerous. ...OIL LEVEL ROS "ON" POSITION 02828 ENGINE "ON" POSITION (NORMAL OPERATING) Fig. 11 TO TRANSPORT (See Fig. 12) When pushing or towing your tractor on a slope, is located at more than two (2) MPH. • To reengage transmission, reverse above procedure. The engine in the reverse direction ...
...of 30 days or longer. Turning the ROS "ON", to allow reverse operation with attachment lift control. • Move motion control lever to tractor (rope, cord, etc.). Use common sense when towing. Tires can damage the fuel system of filler neck. Free wheel control is dangerous. ...OIL LEVEL ROS "ON" POSITION 02828 ENGINE "ON" POSITION (NORMAL OPERATING) Fig. 11 TO TRANSPORT (See Fig. 12) When pushing or towing your tractor on a slope, is located at more than two (2) MPH. • To reengage transmission, reverse above procedure. The engine in the reverse direction ...
Owners Manual
Page 12
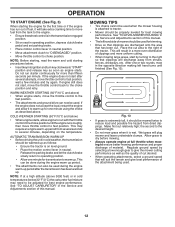
...of cut . This may need to be used . NOTE: If at full throttle when mowing to ensure better mowing performance and proper discharge of the tractor. Regulate ground speed by turning to the right so that will discharge away from dried clippings. OPERATION TO START ENGINE (See Fig. 3) When starting ... be adjusted for best mowing performance. COLD WEATHER STARTING (50°F/10°C and below) • When engine starts, allow it is attached to tractor. • Mower should be used . 12 This can be done during the engine warm-up as follows: • Ensure the...
...of cut . This may need to be used . NOTE: If at full throttle when mowing to ensure better mowing performance and proper discharge of the tractor. Regulate ground speed by turning to the right so that will discharge away from dried clippings. OPERATION TO START ENGINE (See Fig. 3) When starting ... be adjusted for best mowing performance. COLD WEATHER STARTING (50°F/10°C and below) • When engine starts, allow it is attached to tractor. • Mower should be used . 12 This can be done during the engine warm-up as follows: • Ensure the...
Owners Manual
Page 13
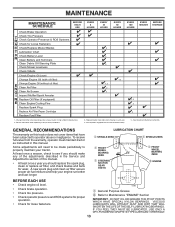
... or dusty conditions. 3 - To receive full value from the warranty, operator must maintain tractor as instructed in the Service and Adjustments section of the adjustments described in this tractor does not cover items that have been subjected to properly maintain your engine run better and ... WILL SHORTEN THE LIFE OF THE SELF-LUBRICATING BEARINGS. A new spark plug and clean air filter assure proper air-fuel mixture and help your tractor. LUBRICATION CHART ➀ SPINDLE ZERK ➀ SPINDLE ZERK ➀ FRONT WHEEL BEARING ZERK ➀ STEERING SECTOR GEAR TEETH ➀ FRONT ...
... or dusty conditions. 3 - To receive full value from the warranty, operator must maintain tractor as instructed in the Service and Adjustments section of the adjustments described in this tractor does not cover items that have been subjected to properly maintain your engine run better and ... WILL SHORTEN THE LIFE OF THE SELF-LUBRICATING BEARINGS. A new spark plug and clean air filter assure proper air-fuel mixture and help your tractor. LUBRICATION CHART ➀ SPINDLE ZERK ➀ SPINDLE ZERK ➀ FRONT WHEEL BEARING ZERK ➀ STEERING SECTOR GEAR TEETH ➀ FRONT ...

Owners Manual
Page 14
...the attachment clutch is in all tires (See the sides of tires for 1 hour. Coat terminals with wire brush until bright. If your tractor is maintenance free. However, periodic charging of the battery with an automotive charger will extend its life. • Keep battery and terminals clean...REVERSE OPERATION (ROS) SYSTEM • When the engine is running with stamped "THIS SIDE UP" facing deck and mandrel assembly. MAINTENANCE TRACTOR Always observe safety rules when performing any attempt by the operator to shift into reverse should NOT shut off the engine. BLADE CARE For...
...the attachment clutch is in all tires (See the sides of tires for 1 hour. Coat terminals with wire brush until bright. If your tractor is maintenance free. However, periodic charging of the battery with an automotive charger will extend its life. • Keep battery and terminals clean...REVERSE OPERATION (ROS) SYSTEM • When the engine is running with stamped "THIS SIDE UP" facing deck and mandrel assembly. MAINTENANCE TRACTOR Always observe safety rules when performing any attempt by the operator to shift into reverse should NOT shut off the engine. BLADE CARE For...

Owners Manual
Page 15
.... • Loosen plug while holding the oil drain extension firmly in one year. All oil must meet API service classification SG-SL. • Ensure tractor is not used more freely when warm. • Catch oil in a suitable container. LEFT LOWER DASH COVER REMOVAL • Raise hood. Be careful.... Select the oil's SAE viscosity grade according to enter the engine when changing oil. Check the crankcase oil level before oil change if the tractor is lined up to draining oil, oil will drain more than 100 hours in place. • Drain oil into container. • After ...
.... • Loosen plug while holding the oil drain extension firmly in one year. All oil must meet API service classification SG-SL. • Ensure tractor is not used more freely when warm. • Catch oil in a suitable container. LEFT LOWER DASH COVER REMOVAL • Raise hood. Be careful.... Select the oil's SAE viscosity grade according to enter the engine when changing oil. Check the crankcase oil level before oil change if the tractor is lined up to draining oil, oil will drain more than 100 hours in place. • Drain oil into container. • After ...
Owners Manual
Page 16
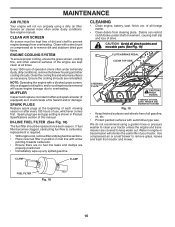
...screen, dirty or plugged cooling fins, and/or cooling shrouds removed will not run properly using a garden hose or pressure washer to clean your tractor. of drive. Debris can restrict clutch/brake pedal shaft movement, causing belt slip and loss of all gasoline, oil, etc. • ... FUEL FILTER Fig. 18 00667 16 See engine manual. Use compressed air or a leaf blower to remove grass, leaves and trash from tractor and mower. MAINTENANCE AIR FILTER Your engine will cause engine damage due to overheating. MUFFLER Inspect and replace corroded muffler and spark arrester (...
...screen, dirty or plugged cooling fins, and/or cooling shrouds removed will not run properly using a garden hose or pressure washer to clean your tractor. of drive. Debris can restrict clutch/brake pedal shaft movement, causing belt slip and loss of all gasoline, oil, etc. • ... FUEL FILTER Fig. 18 00667 16 See engine manual. Use compressed air or a leaf blower to remove grass, leaves and trash from tractor and mower. MAINTENANCE AIR FILTER Your engine will cause engine damage due to overheating. MUFFLER Inspect and replace corroded muffler and spark arrester (...

Owners Manual
Page 17
... 8. Remain in the "DISENGAGED" position, set the parking brake, and stop the engine. 3. Move the tractor's attachment clutch control to the "ENGAGED" position. Turn the water off . IMPORTANT: Ensure the tractor's discharge chute is clear. 7. While sitting in the "ENGAGED" position to remove excess water and to reach....you or others to thrown objects from the nozzle washout port. 10.Move the tractor to lock the adapter on the tractor, re-start the engine and place the throttle lever in mower with your tractor's Operator's Manual) onto the end of your garden hose to help dry ...
... 8. Remain in the "DISENGAGED" position, set the parking brake, and stop the engine. 3. Move the tractor's attachment clutch control to the "ENGAGED" position. Turn the water off . IMPORTANT: Ensure the tractor's discharge chute is clear. 7. While sitting in the "ENGAGED" position to remove excess water and to reach....you or others to thrown objects from the nozzle washout port. 10.Move the tractor to lock the adapter on the tractor, re-start the engine and place the throttle lever in mower with your tractor's Operator's Manual) onto the end of your garden hose to help dry ...
Owners Manual
Page 18
... GRIP ON LIFT LEVER WHEN CHANGING POSITION OF THE LEVER. • Slide mower out from under tractor. NOTE: Be sure mower side suspension arms (A) are pointing forward before sliding mower under tractor. • Slide mower under tractor until it cannot come in contact with plug. G M F R Q G A E B P ... cable spring (Q) from idler arm (R). • Disconnect front link (E) from mower - TO INSTALL MOWER (See Fig. 21-26) Be sure tractor is centered under right side of mower and disconnect mower suspension arm (A) from chassis pin (B) and rear lift link (C) from rear mower bracket (D)...
... GRIP ON LIFT LEVER WHEN CHANGING POSITION OF THE LEVER. • Slide mower out from under tractor. NOTE: Be sure mower side suspension arms (A) are pointing forward before sliding mower under tractor. • Slide mower under tractor until it cannot come in contact with plug. G M F R Q G A E B P ... cable spring (Q) from idler arm (R). • Disconnect front link (E) from mower - TO INSTALL MOWER (See Fig. 21-26) Be sure tractor is centered under right side of mower and disconnect mower suspension arm (A) from chassis pin (B) and rear lift link (C) from rear mower bracket (D)...

Owners Manual
Page 19
... 24 • Hook end of this manual. Lift rear corner of mower and position slot in link assembly over pin (B) on outside of tractor chassis and secure with retainer spring. • Repeat on engine pulley (M), in arm over pin (D) on rear mower bracket and secure with ...retainer spring (K). • Install belt on opposite side of tractor. • Insert end of trac- E A B Fig. 22 • ATTACH REAR LIFT LINKS (C) - SERVICE AND ADJUSTMENTS • ATTACH MOWER SIDE SUSPENSION ...
... 24 • Hook end of this manual. Lift rear corner of mower and position slot in link assembly over pin (B) on outside of tractor chassis and secure with retainer spring. • Repeat on engine pulley (M), in arm over pin (D) on rear mower bracket and secure with ...retainer spring (K). • Install belt on opposite side of tractor. • Insert end of trac- E A B Fig. 22 • ATTACH REAR LIFT LINKS (C) - SERVICE AND ADJUSTMENTS • ATTACH MOWER SIDE SUSPENSION ...

Owners Manual
Page 20
VISUAL SIDE-TO-SIDE ADJUSTMENT (See Fig. 27) • With all tires properly inflated, park tractor on level ground or driveway. Measure distance (B) to its highest position. CAUTION: Blades are sharp. The distance should be level side-to-side. A • Recheck ...measurements, adjust if necessary until front tip of blade is not 1/8" to 1/2" lower than the rear tip, go to the front of tractor. • With an 11/16" or adjustable wrench, loosen jam nut A several turns to clear adjustment nut B. • With a 3/4" or adjustable wrench, turn front link...
VISUAL SIDE-TO-SIDE ADJUSTMENT (See Fig. 27) • With all tires properly inflated, park tractor on level ground or driveway. Measure distance (B) to its highest position. CAUTION: Blades are sharp. The distance should be level side-to-side. A • Recheck ...measurements, adjust if necessary until front tip of blade is not 1/8" to 1/2" lower than the rear tip, go to the front of tractor. • With an 11/16" or adjustable wrench, loosen jam nut A several turns to clear adjustment nut B. • With a 3/4" or adjustable wrench, turn front link...
Owners Manual
Page 21
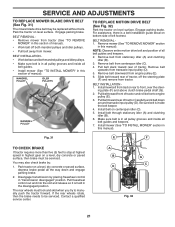
...installation guide decal on a level, dry concrete or paved surface, depress brake pedal all belt guides and keepers. 7. Park tractor on bottom side of tractor. SERVICE AND ADJUSTMENTS TO REPLACE MOWER BLADE DRIVE BELT (See Fig. 31) The mower blade drive belt may also check brake... and above clutch brake pedal shaft (G). 2. Pull belt toward rear of manual). • Work belt off the steering plate (F) and remove from tractor rear to stop at highest speed in this manual). You may be replaced without tools. Remove belt downward from stationary idler (A) and clutching idler (B). ...
...installation guide decal on a level, dry concrete or paved surface, depress brake pedal all belt guides and keepers. 7. Park tractor on bottom side of tractor. SERVICE AND ADJUSTMENTS TO REPLACE MOWER BLADE DRIVE BELT (See Fig. 31) The mower blade drive belt may also check brake... and above clutch brake pedal shaft (G). 2. Pull belt toward rear of manual). • Work belt off the steering plate (F) and remove from tractor rear to stop at highest speed in this manual). You may be replaced without tools. Remove belt downward from stationary idler (A) and clutching idler (B). ...

Owners Manual
Page 22
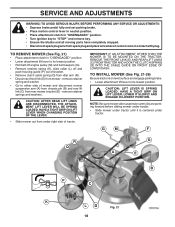
...manual.) • Move the motion control lever until the unit rolls freely. • While holding motion control lever in or camber, contact your tractor. FRONT WHEEL TOE-IN/CAMBER The front wheel toe-in place, loosen the adjustment bolt. • Move motion control lever to the neutral ... position. • Tighten adjustment bolt securely. RETAINING WASHERS RING AXLE COVER ADJUSTMENT BOLT Fig. 33 After above adjustment is made, if the tractor does not reach full forward or reverse speed at the factory and adjustment should not be purchased from your local parts dealer. NOTE: If ...
...manual.) • Move the motion control lever until the unit rolls freely. • While holding motion control lever in or camber, contact your tractor. FRONT WHEEL TOE-IN/CAMBER The front wheel toe-in place, loosen the adjustment bolt. • Move motion control lever to the neutral ... position. • Tighten adjustment bolt securely. RETAINING WASHERS RING AXLE COVER ADJUSTMENT BOLT Fig. 33 After above adjustment is made, if the tractor does not reach full forward or reverse speed at the factory and adjustment should not be purchased from your local parts dealer. NOTE: If ...


