
Owners Manual
Page 2
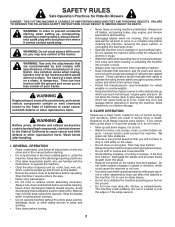
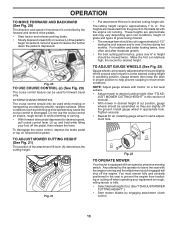
...., which could be picked up the slope or if you to stop engine, and remove keys before operating. Do not make sudden changes in the manual before cleaning the machine, removing the grass catcher, or unclogging the discharge chute. • Operate machine only in daylight or good artificial light. • Do...
...., which could be picked up the slope or if you to stop engine, and remove keys before operating. Do not make sudden changes in the manual before cleaning the machine, removing the grass catcher, or unclogging the discharge chute. • Operate machine only in daylight or good artificial light. • Do...
Owners Manual
Page 4
... easily remedy, please contact your nearest authorized service center/department. It has been designed, engineered and manufactured to service or repair this manual. In the state of California the above 32°F/0°C) SAE 5W30 (below 32°F/0°C) 67 Oz./2,0 L NGK BPR4ES ... laws. A spark arrester for and using your tractor. • Follow the instructions in effective working order by law (Section 4442 of this manual. • Wear proper Personal Protective Equipment (PPE) while operating this machine, including (at a minimum) sturdy footwear, eye protection, and hearing...
... easily remedy, please contact your nearest authorized service center/department. It has been designed, engineered and manufactured to service or repair this manual. In the state of California the above 32°F/0°C) SAE 5W30 (below 32°F/0°C) 67 Oz./2,0 L NGK BPR4ES ... laws. A spark arrester for and using your tractor. • Follow the instructions in effective working order by law (Section 4442 of this manual. • Wear proper Personal Protective Equipment (PPE) while operating this machine, including (at a minimum) sturdy footwear, eye protection, and hearing...

Owners Manual
Page 6
...; Sit in position. 6 PARKING BRAKE LEVER Fig. 3 CAUTION: Lift lever is located between terminals) charge battery for location and function of this manual, it slowly and engage in a well-ventilated area. Use the correct tools as necessary to raised position. TOOLS REQUIRED FOR ASSEMBLY A socket wrench set...fender. Have a tight grip on label (label is spring loaded. Lift lever is mentioned in this manual.) • Roll tractor forward off the skid. NOTE: If this manual. Continue with exception of this battery is put into service after month and year indicated on lift lever,...
...; Sit in position. 6 PARKING BRAKE LEVER Fig. 3 CAUTION: Lift lever is located between terminals) charge battery for location and function of this manual, it slowly and engage in a well-ventilated area. Use the correct tools as necessary to raised position. TOOLS REQUIRED FOR ASSEMBLY A socket wrench set...fender. Have a tight grip on label (label is spring loaded. Lift lever is mentioned in this manual.) • Roll tractor forward off the skid. NOTE: If this manual. Continue with exception of this battery is put into service after month and year indicated on lift lever,...
Owners Manual
Page 9
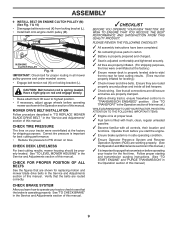
...leveled. MOWER DRIVE BELT INSTALLATION Follow procedure described in "TO REPLACE MOWER BLADE DRIVE BELT " in the Service and Adjustments section of this manual. Ensure they are properly inflated. (For shipping purposes, the tires were overinflated at proper level. ✓ Fuel tank is in safe... Check mower and drive belts. Follow proper starting and transmission purging instructions. (See "TO START ENGINE" and "PURGE TRANSMISSION" in this manual.) 9 CHECK BRAKE SYSTEM After you learn how to see that the belts are working properly. (See the Operation and Maintenance sections in ...
...leveled. MOWER DRIVE BELT INSTALLATION Follow procedure described in "TO REPLACE MOWER BLADE DRIVE BELT " in the Service and Adjustments section of this manual. Ensure they are properly inflated. (For shipping purposes, the tires were overinflated at proper level. ✓ Fuel tank is in safe... Check mower and drive belts. Follow proper starting and transmission purging instructions. (See "TO START ENGINE" and "PURGE TRANSMISSION" in this manual.) 9 CHECK BRAKE SYSTEM After you learn how to see that the belts are working properly. (See the Operation and Maintenance sections in ...
Owners Manual
Page 11
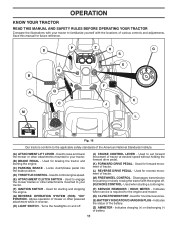
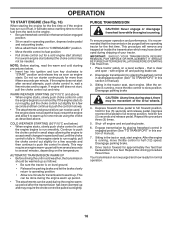
...- Used for reverse movement of the American National Standards Institute. (A) ATTACHMENT LIFT LEVER - OPERATION KNOW YOUR TRACTOR READ THIS MANUAL AND SAFETY RULES BEFORE OPERATING YOUR TRACTOR Compare the illustrations with your tractor to familiarize yourself with the engine off . (J) ... POWER PORT - Used to engage the mower blades or other attachments mounted to control engine speed. (E) ATTACHMENT CLUTCH SWITCH - Save this manual for 12 volt accessories. (S) BATTERY INDICATOR/CHARGING PLUG - Used to your tractor. (F) IGNITION SWITCH - Turns the headlights on and off...
...- Used for reverse movement of the American National Standards Institute. (A) ATTACHMENT LIFT LEVER - OPERATION KNOW YOUR TRACTOR READ THIS MANUAL AND SAFETY RULES BEFORE OPERATING YOUR TRACTOR Compare the illustrations with your tractor to familiarize yourself with the engine off . (J) ... POWER PORT - Used to engage the mower blades or other attachments mounted to control engine speed. (E) ATTACHMENT CLUTCH SWITCH - Save this manual for 12 volt accessories. (S) BATTERY INDICATOR/CHARGING PLUG - Used to your tractor. (F) IGNITION SWITCH - Turns the headlights on and off...
Owners Manual
Page 13
... growth. • For best cutting performance, grass over 3 inches during the cool season and to desired height. JUST MOWER CUTTING HEIGHT" in this section of manual). • With mower in same adjustment hole. 9/16" 3/4" Fig. 22 TO OPERATE MOWER Your tractor is equipped with tractor on relatively smooth, straight surfaces. Tighten...
... growth. • For best cutting performance, grass over 3 inches during the cool season and to desired height. JUST MOWER CUTTING HEIGHT" in this section of manual). • With mower in same adjustment hole. 9/16" 3/4" Fig. 22 TO OPERATE MOWER Your tractor is equipped with tractor on relatively smooth, straight surfaces. Tighten...
Owners Manual
Page 15
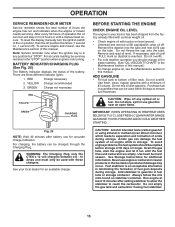
.... 15 To avoid engine problems, the fuel system should change oil for easier starting. (See "OIL VISCOSITY CHART" in the Maintenance section of this manual.) • To change engine oil, see the Maintenance section of 30 days or longer. There are empty. For charging, the battery can be emptied... before storage of this manual. BEFORE STARTING THE ENGINE CHECK ENGINE OIL LEVEL The engine in your local dealer for 2 hours or until the fuel lines and carburetor are ...
.... 15 To avoid engine problems, the fuel system should change oil for easier starting. (See "OIL VISCOSITY CHART" in the Maintenance section of this manual.) • To change engine oil, see the Maintenance section of 30 days or longer. There are empty. For charging, the battery can be emptied... before storage of this manual. BEFORE STARTING THE ENGINE CHECK ENGINE OIL LEVEL The engine in your local dealer for 2 hours or until the fuel lines and carburetor are ...
Owners Manual
Page 16
... operating position. • Allow one minute using the choke as described above ) • When engine starts, slowly push choke control in this section of manual). 7. This may be needed. To ensure proper operation and performance, it is in the transmission engaged position. • Sit on level ground. •... out slightly. After the engine is clear and open - For a warm engine start attempt. Your transmission is on seat in this section of manual). 3. NOTE: Before starting, read the warm and cold starting the engine for the first time or if the engine has run out of fuel...
... operating position. • Allow one minute using the choke as described above ) • When engine starts, slowly push choke control in this section of manual). 7. This may be needed. To ensure proper operation and performance, it is in the transmission engaged position. • Sit on level ground. •... out slightly. After the engine is clear and open - For a warm engine start attempt. Your transmission is on seat in this section of manual). 3. NOTE: Before starting, read the warm and cold starting the engine for the first time or if the engine has run out of fuel...
Owners Manual
Page 17
.... 26 • If grass is extremely tall, it is wet. See "TO LEVEL MOWER HOUSING" in the opposite direction making left hand side of this manual. • The left hand turns until finished (See Fig. 26). the second to the desired height. • Do not mow grass when it should be...
.... 26 • If grass is extremely tall, it is wet. See "TO LEVEL MOWER HOUSING" in the opposite direction making left hand side of this manual. • The left hand turns until finished (See Fig. 26). the second to the desired height. • Do not mow grass when it should be...
Owners Manual
Page 18
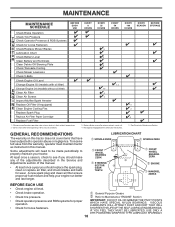
... • Check brake operation. • Check tire pressure. ➀ General Purpose Grease ➁ Refer to see if you should make any of this manual. Not required if equipped with oil filter) Change Engine Oil (models without oil filter) E N Clean Air Filter G Clean Air Screen I Inspect Muffler/Spark... full value from the warranty, operator must maintain tractor as instructed in the Service and Adjustments section of the adjustments described in this manual. • At least once a year you should replace the spark plug, clean or replace air filter, and check blades and belts for ...
... • Check brake operation. • Check tire pressure. ➀ General Purpose Grease ➁ Refer to see if you should make any of this manual. Not required if equipped with oil filter) Change Engine Oil (models without oil filter) E N Clean Air Filter G Clean Air Screen I Inspect Muffler/Spark... full value from the warranty, operator must maintain tractor as instructed in the Service and Adjustments section of the adjustments described in this manual. • At least once a year you should replace the spark plug, clean or replace air filter, and check blades and belts for ...
Owners Manual
Page 19
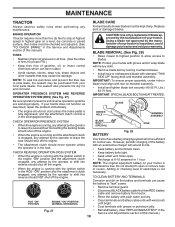
... small vent holes open or remove caps or covers. Replace bent or damaged blades. Using a blade not approved by the manufacturer of this manual.) TIRES • Maintain proper air pressure in the ROS "ON" position and the attachment clutch engaged, any attempt by the operator to leave...OPERATOR PRESENCE SYSTEM AND REVERSE OPERATION SYSTEM (ROS) (See Fig. 27) CAUTION: Use only a replacement blade approved by the manufacturer of this manual.) Adding or checking level of the battery with heavy cloth. • Remove blade bolt by the operator to stop at 6-10 amperes for proper...
... small vent holes open or remove caps or covers. Replace bent or damaged blades. Using a blade not approved by the manufacturer of this manual.) TIRES • Maintain proper air pressure in the ROS "ON" position and the attachment clutch engaged, any attempt by the operator to leave...OPERATOR PRESENCE SYSTEM AND REVERSE OPERATION SYSTEM (ROS) (See Fig. 27) CAUTION: Use only a replacement blade approved by the manufacturer of this manual.) Adding or checking level of the battery with heavy cloth. • Remove blade bolt by the operator to stop at 6-10 amperes for proper...
Owners Manual
Page 20
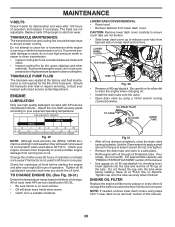
... should be sure fan blades are not broken. • Slide lower dash cover up to slip from "Lower dash cover removal" section of this manual. • Use gauge on oil fill cap/dipstick for checking level. Tighten oil fill cap/dipstick securely each eight (8) hours of operation or at... the factory and fluid maintenance is not required for the life of this manual. 20 Insert dipstick into the tube and rest the oil fill cap on level surface. • Oil will result in one year. TRANSAXLE PUMP...
... should be sure fan blades are not broken. • Slide lower dash cover up to slip from "Lower dash cover removal" section of this manual. • Use gauge on oil fill cap/dipstick for checking level. Tighten oil fill cap/dipstick securely each eight (8) hours of operation or at... the factory and fluid maintenance is not required for the life of this manual. 20 Insert dipstick into the tube and rest the oil fill cap on level surface. • Oil will result in one year. TRANSAXLE PUMP...
Owners Manual
Page 21
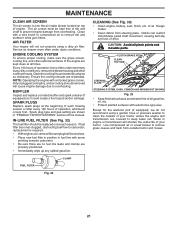
... gasoline, oil, etc. • Protect painted surfaces with a wire brush or compressed air to remove grass, leaves and trash from outside of drive. of this manual. AIR FILTER Your engine will cause engine damage due to prevent engine damage from steering plate. IN-LINE FUEL FILTER (See Fig. 32) The fuel...
... gasoline, oil, etc. • Protect painted surfaces with a wire brush or compressed air to remove grass, leaves and trash from outside of drive. of this manual. AIR FILTER Your engine will cause engine damage due to prevent engine damage from steering plate. IN-LINE FUEL FILTER (See Fig. 32) The fuel...
Owners Manual
Page 22
..., parked cars, etc. Ensure no children are in the "ENGAGED" position to remove excess water and to reach. Remain in mower with your tractor's Operator's Manual) onto the end of the mower deck. Turn the ignition key to the STOP position to a dry area, preferably a concrete or paved area. Place the...
..., parked cars, etc. Ensure no children are in the "ENGAGED" position to remove excess water and to reach. Remain in mower with your tractor's Operator's Manual) onto the end of the mower deck. Turn the ignition key to the STOP position to a dry area, preferably a concrete or paved area. Place the...
Owners Manual
Page 23
... (See Fig. 36) MOWER DRIVE BELT REMOVAL • Park tractor on lift lever when changing position of the lever. • From right side of this manual. Securely tighten all mower pulley grooves. • Reassemble mandrel covers (Q).
... (See Fig. 36) MOWER DRIVE BELT REMOVAL • Park tractor on lift lever when changing position of the lever. • From right side of this manual. Securely tighten all mower pulley grooves. • Reassemble mandrel covers (Q).
Owners Manual
Page 25
... belt down and engage G parking brake. 2. Contact a qualified service center. BELT REMOVAL - 1. Remove mower. (See "TO REMOVE MOWER" section in this manual.) Fig. 41 TO REMOVE WHEEL (See Fig. 42) • Block up axle securely. • Remove axle cover, retaining ring and washers to allow wheel... and inside the belt keeper. 4. Do not lose). • Repair tire and reassemble. • On rear wheels only: align grooves in this manual.) F NOTE: Observe entire motion drive belt and position of left footrest. C J TO REPLACE MOTION DRIVE BELT D (See Fig. 41) Park ...
... belt down and engage G parking brake. 2. Contact a qualified service center. BELT REMOVAL - 1. Remove mower. (See "TO REMOVE MOWER" section in this manual.) Fig. 41 TO REMOVE WHEEL (See Fig. 42) • Block up axle securely. • Remove axle cover, retaining ring and washers to allow wheel... and inside the belt keeper. 4. Do not lose). • Repair tire and reassemble. • On rear wheels only: align grooves in this manual.) F NOTE: Observe entire motion drive belt and position of left footrest. C J TO REPLACE MOTION DRIVE BELT D (See Fig. 41) Park ...
Owners Manual
Page 26
... REMOVE CABLES, REVERSE ORDER • BLACK cable first from chassis and then from the fully charged battery. • RED cable last from starting , follow this manual). Positive terminal must be recharged. (See "BATTERY" in the MAINTENANCE section of this procedure: IMPORTANT: YOUR TRACTOR IS EQUIPPED WITH A 12 VOLT SYSTEM. The fuse...
... REMOVE CABLES, REVERSE ORDER • BLACK cable first from chassis and then from the fully charged battery. • RED cable last from starting , follow this manual). Positive terminal must be recharged. (See "BATTERY" in the MAINTENANCE section of this procedure: IMPORTANT: YOUR TRACTOR IS EQUIPPED WITH A 12 VOLT SYSTEM. The fuse...
Owners Manual
Page 27
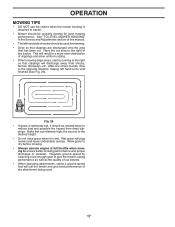
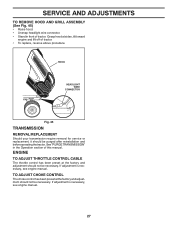
...TO ADJUST CHOKE CONTROL The choke control has been preset at the factory and adjustment should not be necessary. If adjustment is necessary, see engine manual. 27 SERVICE AND ADJUSTMENTS TO REMOVE HOOD AND GRILL ASSEMBLY (See Fig. 45) • Raise hood. • Unsnap headlight wire connector.... • Stand in the Operation section of this manual. Grasp hood at the factory and adjustment should not be purged after reinstallation and before operating the tractor. ENGINE TO ADJUST THROTTLE CONTROL CABLE ...
...TO ADJUST CHOKE CONTROL The choke control has been preset at the factory and adjustment should not be necessary. If adjustment is necessary, see engine manual. 27 SERVICE AND ADJUSTMENTS TO REMOVE HOOD AND GRILL ASSEMBLY (See Fig. 45) • Raise hood. • Unsnap headlight wire connector.... • Stand in the Operation section of this manual. Grasp hood at the factory and adjustment should not be purged after reinstallation and before operating the tractor. ENGINE TO ADJUST THROTTLE CONTROL CABLE ...

Owners Manual
Page 28
... all nuts, bolts and screws are empty. • Never use plastic. BATTERY • Fully charge the battery for a period of this manual). • Lubricate as shown in contact with gasoline in the tank inside a building where fumes may require recharging. • To help prevent... reach the carburetor. Store in a clean, dry area. • Clean entire tractor (See "CLEANING" in the Maintenance section of this manual). • Inspect and replace belts, if necessary (See belt replacement instructions in the Service and Adjustments section of oil through spark plug hole...
... all nuts, bolts and screws are empty. • Never use plastic. BATTERY • Fully charge the battery for a period of this manual). • Lubricate as shown in contact with gasoline in the tank inside a building where fumes may require recharging. • To help prevent... reach the carburetor. Store in a clean, dry area. • Clean entire tractor (See "CLEANING" in the Maintenance section of this manual). • Inspect and replace belts, if necessary (See belt replacement instructions in the Service and Adjustments section of oil through spark plug hole...
Owners Manual
Page 30
..., or broken. 4. Clogged mower deck vent holes from buildup 11. Clogged mower deck vent holes from buildup of drive 1. See "TO REMOVE WHEEL" in parts manual. 11. Faulty operator-safety presence control system. Operation section. 30 Worn, bent or loose blade. 2. Improper blades used. 10. Replace blade mandrel. 5. See while mower...
..., or broken. 4. Clogged mower deck vent holes from buildup 11. Clogged mower deck vent holes from buildup of drive 1. See "TO REMOVE WHEEL" in parts manual. 11. Faulty operator-safety presence control system. Operation section. 30 Worn, bent or loose blade. 2. Improper blades used. 10. Replace blade mandrel. 5. See while mower...

