

Operation Manual
Page 2
...carry passengers. • Do not mow in neutral, you may fall off . They may lose control of age before dismounting. • Disengage blades when not mowing. Allow machine to a complete stop engine, and remove keys before operating a riding lawn mower. WARNING Battery posts, terminals and...the tractor. SAFETY RULES Safe Operation Practices for all parts to come to cool before operating or storing the machine. Stop the blades when crossing gravel surfaces. • Do not operate machine without the entire grass catcher, discharge chute, or other reproductive harm....
...carry passengers. • Do not mow in neutral, you may fall off . They may lose control of age before dismounting. • Disengage blades when not mowing. Allow machine to a complete stop engine, and remove keys before operating a riding lawn mower. WARNING Battery posts, terminals and...the tractor. SAFETY RULES Safe Operation Practices for all parts to come to cool before operating or storing the machine. Stop the blades when crossing gravel surfaces. • Do not operate machine without the entire grass catcher, discharge chute, or other reproductive harm....
Operation Manual
Page 3
...has a hitch designed for holes, ruts, bumps, rocks, or other attachments; Always keep the machine in gear when going uphill, disengage blades, shift into reverse and back down slopes, not across. • Watch for towing. Never interfere with safety devices. Adjust and service as... all times until fueling is spilled on the ground. NEVER operate a machine with manufacturer's recommended parts, when necessary. • Mower blades are sharp. When loading or unloading this is over accidents, which could cause the machine to cool before restarting. • Never make...
...has a hitch designed for holes, ruts, bumps, rocks, or other attachments; Always keep the machine in gear when going uphill, disengage blades, shift into reverse and back down slopes, not across. • Watch for towing. Never interfere with safety devices. Adjust and service as... all times until fueling is spilled on the ground. NEVER operate a machine with manufacturer's recommended parts, when necessary. • Mower blades are sharp. When loading or unloading this is over accidents, which could cause the machine to cool before restarting. • Never make...
Operation Manual
Page 4
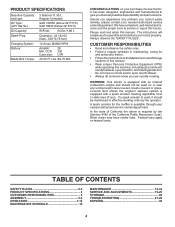
... state of the California Public Resources Code). PRODUCT SPECIFICATIONS Gasoline Capacity and type: Oil Type: (API: SG-SL) Oil Capacity: Spark Plug: Charging System: Battery: Blade Bolt Torque: 3 Gallons/11,35 L Regular Unleaded SAE 10W30 (above is required by the operator. If a spark arrester is used, it should not be maintained...
... state of the California Public Resources Code). PRODUCT SPECIFICATIONS Gasoline Capacity and type: Oil Type: (API: SG-SL) Oil Capacity: Spark Plug: Charging System: Battery: Blade Bolt Torque: 3 Gallons/11,35 L Regular Unleaded SAE 10W30 (above is required by the operator. If a spark arrester is used, it should not be maintained...
Operation Manual
Page 6
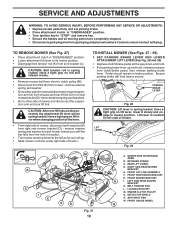
... that the belts are properly inflated. (For shipping purposes, the tires were overinflated at the factory for replacing motion and mower blade drive belts in flated for the first time. CHECK FOR PROPER POSITION OF ALL BELTS See the figures that the brake is...
... that the belts are properly inflated. (For shipping purposes, the tires were overinflated at the factory for replacing motion and mower blade drive belts in flated for the first time. CHECK FOR PROPER POSITION OF ALL BELTS See the figures that the brake is...
Operation Manual
Page 8
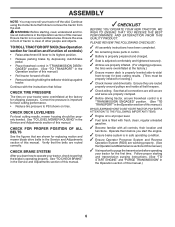
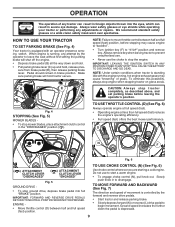
... for starting and stopping the engine. (G) REVERSE OPERATION SYSTEM (ROS) "ON" POSITION - Used for forward movement of tractor. (M) FREEWHEEL CONTROL - Used to engage the mower blades or other attachments mounted to familiarize yourself with the locations of tractor at desired speed without holding the forward drive pedal. (K) FORWARD DRIVE PEDAL - Allows...
... for starting and stopping the engine. (G) REVERSE OPERATION SYSTEM (ROS) "ON" POSITION - Used for forward movement of tractor. (M) FREEWHEEL CONTROL - Used to engage the mower blades or other attachments mounted to familiarize yourself with the locations of tractor at desired speed without holding the forward drive pedal. (K) FORWARD DRIVE PEDAL - Allows...
Operation Manual
Page 9
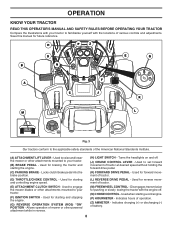
... release pres- B C CAUTION: A l w a y s s t o p t r a c t o r completely, as described above, and set parking brake before stopping may cause "browning" of grass. Fig. 4 STOPPING (See Fig. 5) MOWER BLADES - • To stop engine when stopping tractor on grass areas. When engine is controlled by the operator to "STOP" position and remove key. IMPORTANT: FORWARD... the further down and hold. • Pull parking brake lever (C) up and hold tractor secure. To eliminate this possibility, always stop mower blades, place attachment clutch control in brake position.
... release pres- B C CAUTION: A l w a y s s t o p t r a c t o r completely, as described above, and set parking brake before stopping may cause "browning" of grass. Fig. 4 STOPPING (See Fig. 5) MOWER BLADES - • To stop engine when stopping tractor on grass areas. When engine is controlled by the operator to "STOP" position and remove key. IMPORTANT: FORWARD... the further down and hold. • Pull parking brake lever (C) up and hold tractor secure. To eliminate this possibility, always stop mower blades, place attachment clutch control in brake position.
Operation Manual
Page 10
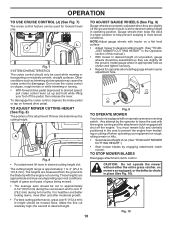
... 3" (76,2 mm) during the cool season and to over 6" (152,4 mm) in height should only be mowed twice. TO STOP MOWER BLADES Disengage attachment clutch control. TO ADJUST GAUGE WHEELS (See Fig. 9) Gauge wheels are properly adjusted when they are approximate and may cause the cruise control... to the blade tip with an operator presence sensing switch. OPERATION TO USE CRUISE CONTROL (J) (See Fig. 7) The cruise control feature can be used while ...
... 3" (76,2 mm) during the cool season and to over 6" (152,4 mm) in height should only be mowed twice. TO STOP MOWER BLADES Disengage attachment clutch control. TO ADJUST GAUGE WHEELS (See Fig. 9) Gauge wheels are properly adjusted when they are approximate and may cause the cruise control... to the blade tip with an operator presence sensing switch. OPERATION TO USE CRUISE CONTROL (J) (See Fig. 7) The cruise control feature can be used while ...
Operation Manual
Page 14
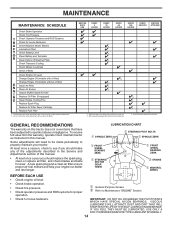
... MAINTENANCE SCHEDULE Check Brake Operation Check Tire Pressure T Check Operator Presence and ROS Systems R Check for Loose Fasteners A Check/Replace Mower Blades C Lubrication Chart T Check Battery Level O Clean Battery and Terminals R Clean Debris off Steering Plate Check Transaxle Cooling Check Mower Levelness ...in this manual. • At least once a year you should replace the spark plug, clean or replace air filter, and check blades and belts for loose fasteners. At least once a season, check to Maintenance "ENGINE" Section • Check for wear. LUBRICATION CHART &#...
... MAINTENANCE SCHEDULE Check Brake Operation Check Tire Pressure T Check Operator Presence and ROS Systems R Check for Loose Fasteners A Check/Replace Mower Blades C Lubrication Chart T Check Battery Level O Clean Battery and Terminals R Clean Debris off Steering Plate Check Transaxle Cooling Check Mower Levelness ...in this manual. • At least once a year you should replace the spark plug, clean or replace air filter, and check blades and belts for loose fasteners. At least once a season, check to Maintenance "ENGINE" Section • Check for wear. LUBRICATION CHART &#...
Operation Manual
Page 15
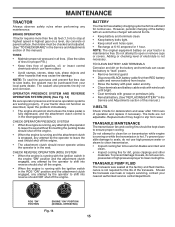
... than five (5) feet (1,5 m) to stop at highest speed in highest gear on a level, dry concrete or paved surface, then brake must be sure fan blades are intact and clean. • Inspect cooling fins for the life of the transaxle. CHECK OPERATOR PRESENCE SYSTEM • When the engine is running...
... than five (5) feet (1,5 m) to stop at highest speed in highest gear on a level, dry concrete or paved surface, then brake must be sure fan blades are intact and clean. • Inspect cooling fins for the life of the transaxle. CHECK OPERATOR PRESENCE SYSTEM • When the engine is running...
Operation Manual
Page 16
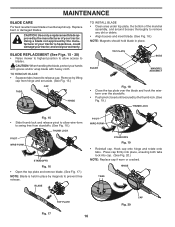
...; Raise mower to highest position to allow wire-form to swing free from hinge and set aside. (See Fig. 15.) CAP TABS HINGE TO INSTALL BLADE • Clean area under top plate, the bottom of the mandrel assembly, and around bosses thoroughly to prevent free release. TOP PLATE BOSS... BLADE MANDREL ASSEMBLY Fig. 18 • Close the top plate over the standoffs. • Push pivot closed until secured by lifting cap from standoffs. (See Fig. ...
...; Raise mower to highest position to allow wire-form to swing free from hinge and set aside. (See Fig. 15.) CAP TABS HINGE TO INSTALL BLADE • Clean area under top plate, the bottom of the mandrel assembly, and around bosses thoroughly to prevent free release. TOP PLATE BOSS... BLADE MANDREL ASSEMBLY Fig. 18 • Close the top plate over the standoffs. • Push pivot closed until secured by lifting cap from standoffs. (See Fig. ...

Operation Manual
Page 18
... garden hose. 4. Drive the tractor to a level, clear spot on the tractor, re-start the engine and place the throttle lever in mower with the blade. • Replace broken or missing washout fitting immediately, prior to the "DISENGAGED" position. While sitting in the operator's position on your lawn, near enough...
... garden hose. 4. Drive the tractor to a level, clear spot on the tractor, re-start the engine and place the throttle lever in mower with the blade. • Replace broken or missing washout fitting immediately, prior to the "DISENGAGED" position. While sitting in the operator's position on your lawn, near enough...
Operation Manual
Page 19
... pedal fully and set parking brake. • Place attachment clutch in "DISENGAGED" position. • Turn ignition key to "STOP" and remove key. • Ensure the blades and all the way down and hold. • Pull parking brake lever up and hold tractor secure. sion arm (A) from chassis and rear lift link...
... pedal fully and set parking brake. • Place attachment clutch in "DISENGAGED" position. • Turn ignition key to "STOP" and remove key. • Ensure the blades and all the way down and hold. • Pull parking brake lever up and hold tractor secure. sion arm (A) from chassis and rear lift link...

Operation Manual
Page 22
... mower to 12,7 mm) lower than the rear tip when the mower is necessary, see steps in Visual Adjustment instructions above. B A CAUTION: Blades are sharp. The distance should be level side-to 12,7 mm) lower than the rear tip, go to the front of tractor. • ...3/4" or adjustable wrench, turn of adjustment nut will change mower height about 1/8" (3,1 mm). • Recheck measurements, adjust if necessary until front tip of blade to lower the front mower. VISUAL SIDE-TO-SIDE ADJUSTMENT (See Fig. 40) • With all tires properly inflated, park tractor on tires...
... mower to 12,7 mm) lower than the rear tip when the mower is necessary, see steps in Visual Adjustment instructions above. B A CAUTION: Blades are sharp. The distance should be level side-to 12,7 mm) lower than the rear tip, go to the front of tractor. • ...3/4" or adjustable wrench, turn of adjustment nut will change mower height about 1/8" (3,1 mm). • Recheck measurements, adjust if necessary until front tip of blade to lower the front mower. VISUAL SIDE-TO-SIDE ADJUSTMENT (See Fig. 40) • With all tires properly inflated, park tractor on tires...

Operation Manual
Page 23
SERVICE AND ADJUSTMENTS TO REPLACE MOWER BLADE DRIVE BELT (See Fig. 44) MOWER DRIVE BELT REMOVAL • Park tractor on rod and release slowly. • Remove screws (P) from mandrel covers ... wire harness (A). 3. Installbeltthroughstationaryidler(C)andclutchingidler(D). 6. Carefully work belt down around electric clutch (G). 8. Engage parking brake. • Lower attachment lift to front, over cooling fan blades (F). 7. Pull belt toward rear of tractor and roll belt around idler pulleys (V) as shown. • Install belt onto electric clutch pulley (M). Be sure belt is...
SERVICE AND ADJUSTMENTS TO REPLACE MOWER BLADE DRIVE BELT (See Fig. 44) MOWER DRIVE BELT REMOVAL • Park tractor on rod and release slowly. • Remove screws (P) from mandrel covers ... wire harness (A). 3. Installbeltthroughstationaryidler(C)andclutchingidler(D). 6. Carefully work belt down around electric clutch (G). 8. Engage parking brake. • Lower attachment lift to front, over cooling fan blades (F). 7. Pull belt toward rear of tractor and roll belt around idler pulleys (V) as shown. • Install belt onto electric clutch pulley (M). Be sure belt is...
Operation Manual
Page 27
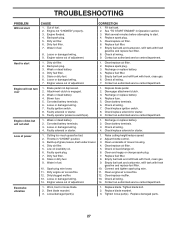
... Connect and tighten spark plug wire. 11. Dirty engine air screen/fins. 11. Loose or damaged wiring. 13. Bent blade mandrel. 3. Replace blade mandrel. 3. Engine flooded. 4. See "TO START ENGINE" in fuel. 8. Check all wiring. 7. Contact an authorized ... 8. Faulty ignition switch. 8. Faulty operator presence switch(es). 1. Check/replace solenoid or starter. Replace fuel filter. 8. Replace blade. Water in Operation section. 3. Replace spark plug. 5. Replace fuel filter. 5. Engine will not start CAUSE 1. Disengage attachment clutch...
... Connect and tighten spark plug wire. 11. Dirty engine air screen/fins. 11. Loose or damaged wiring. 13. Bent blade mandrel. 3. Replace blade mandrel. 3. Engine flooded. 4. See "TO START ENGINE" in fuel. 8. Check all wiring. 7. Contact an authorized ... 8. Faulty ignition switch. 8. Faulty operator presence switch(es). 1. Check/replace solenoid or starter. Replace fuel filter. 8. Replace blade. Water in Operation section. 3. Replace spark plug. 5. Replace fuel filter. 5. Engine will not start CAUSE 1. Disengage attachment clutch...
Operation Manual
Page 28
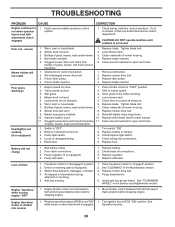
...if so equipped) 1. Travel speed too fast. 2. Check tires for proper air pressure. 6. Worn, bent or loose blade. 6. Improper blades used. 10. Loose or damaged wiring. 5. Check/replace light switch. 4. Replace fuse. Bad battery cell(s). 2. Replace... so equipped). 4. Check wiring, switches and connections. Worn/damaged mower drive belt. 3. Replace blade mandrel. 5. Replace blade. Blades improperly installed. 9. Faulty alternator. 1. Tighten blade bolt. 2. Remove obstruction. 2. Buildup of grass, leaves, trash around mandrels to open vent...
...if so equipped) 1. Travel speed too fast. 2. Check tires for proper air pressure. 6. Worn, bent or loose blade. 6. Improper blades used. 10. Loose or damaged wiring. 5. Check/replace light switch. 4. Replace fuse. Bad battery cell(s). 2. Replace... so equipped). 4. Check wiring, switches and connections. Worn/damaged mower drive belt. 3. Replace blade mandrel. 5. Replace blade. Blades improperly installed. 9. Faulty alternator. 1. Tighten blade bolt. 2. Remove obstruction. 2. Buildup of grass, leaves, trash around mandrels to open vent...


