
Owners Manual
Page 2
... storage. Do not allow responsible adults, who are a major factor related to loss of your foot on all times. • Only allow the mower deck to operate the machine. • Clear the area of objects such as rocks, toys, wire, etc., which could be picked up and thrown... any oil or fuel spillage before operating. Operate only at all slopes requires extra caution. Tires can affect the stability of riding mower-related injuries. II. Wash hands after handling. If you feel uneasy on a slope. These operators should evaluate their ability to operate the riding...
... storage. Do not allow responsible adults, who are a major factor related to loss of your foot on all times. • Only allow the mower deck to operate the machine. • Clear the area of objects such as rocks, toys, wire, etc., which could be picked up and thrown... any oil or fuel spillage before operating. Operate only at all slopes requires extra caution. Tires can affect the stability of riding mower-related injuries. II. Wash hands after handling. If you feel uneasy on a slope. These operators should evaluate their ability to operate the riding...
Owners Manual
Page 3
...chute frequently and replace with safe machine operation. Mow up and down slowly. CHILDREN WARNING. Allow engine to cool before operating a riding lawn mower. Stop machine if anyone enters the area. Avoid starting, stopping, or turning on • the ground away from your view of control....when filling. • Remove gas-powered equipment from a gasoline dispenser nozzle. • Keep the nozzle in the mowing area for Ride-On Mowers III. TOWING • Tow only with safety devices. Do not use extra caution when servicing them . • Keep children out of ...
...chute frequently and replace with safe machine operation. Mow up and down slowly. CHILDREN WARNING. Allow engine to cool before operating a riding lawn mower. Stop machine if anyone enters the area. Avoid starting, stopping, or turning on • the ground away from your view of control....when filling. • Remove gas-powered equipment from a gasoline dispenser nozzle. • Keep the nozzle in the mowing area for Ride-On Mowers III. TOWING • Tow only with safety devices. Do not use extra caution when servicing them . • Keep children out of ...
Owners Manual
Page 6
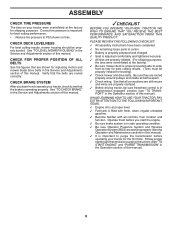
... loose parts in the Service and Adjustments section of this manual. Operate them before operating your tractor for leveling). ✓ Check mower and drive belts. Correct tire pressure is important for shipping purposes. Be sure they are routed properly around pulleys and inside all ...USE YOUR TRACTOR, PAY EXTRA ATTENTION TO THE FOLLOWING IMPORTANT ITEMS: ✓ Engine oil is at the factory). ✓ Be sure mower deck is adjusted comfortably and tightened securely. ✓ All tires are working properly (See the Operation and Maintenance sections in the Operation...
... loose parts in the Service and Adjustments section of this manual. Operate them before operating your tractor for leveling). ✓ Check mower and drive belts. Correct tire pressure is important for shipping purposes. Be sure they are routed properly around pulleys and inside all ...USE YOUR TRACTOR, PAY EXTRA ATTENTION TO THE FOLLOWING IMPORTANT ITEMS: ✓ Engine oil is at the factory). ✓ Be sure mower deck is adjusted comfortably and tightened securely. ✓ All tires are working properly (See the Operation and Maintenance sections in the Operation...

Owners Manual
Page 7
.../or property damage. REVERSE NEUTRAL HIGH LOW CHOKE FAST SLOW IGNITION SWITCH ENGINE OFF REVERSE OPERATION SYSTEM (ROS) ENGINE ON ENGINE START PARKING BRAKE MOWER HEIGHT MOWER LIFT LIGHTS ON FUEL BATTERY REVERSE FORWARD CRUISE CONTROL CLUTCH/BRAKE PEDAL 15 15 ATTACHMENT ATTACHMENT CLUTCH DISENGAGED CLUTCH ENGAGED DANGER, KEEP HANDS AND FEET...
.../or property damage. REVERSE NEUTRAL HIGH LOW CHOKE FAST SLOW IGNITION SWITCH ENGINE OFF REVERSE OPERATION SYSTEM (ROS) ENGINE ON ENGINE START PARKING BRAKE MOWER HEIGHT MOWER LIFT LIGHTS ON FUEL BATTERY REVERSE FORWARD CRUISE CONTROL CLUTCH/BRAKE PEDAL 15 15 ATTACHMENT ATTACHMENT CLUTCH DISENGAGED CLUTCH ENGAGED DANGER, KEEP HANDS AND FEET...

Owners Manual
Page 8
... REVERSE OPERATION SYSTEM (ROS) "ON" POSITION - Disengages transmission for future reference. Used to raise and lower the mower or other attachments mounted to your tractor. (F) IGNITION SWITCH - Used for reverse movement of tractor. (L) REVERSE DRIVE ... OPERATING YOUR TRACTOR Compare the illustrations with your tractor. (B) BRAKE PEDAL - Save this manual for pushing or slowly towing the tractor with the locations of mower or other powered attachment while in reverse. (H) LIGHT SWITCH - Indicates charging (+) or discharging (-) of the battery. (Z) AMMETER - P D B A M N ...
... REVERSE OPERATION SYSTEM (ROS) "ON" POSITION - Disengages transmission for future reference. Used to raise and lower the mower or other attachments mounted to your tractor. (F) IGNITION SWITCH - Used for reverse movement of tractor. (L) REVERSE DRIVE ... OPERATING YOUR TRACTOR Compare the illustrations with your tractor. (B) BRAKE PEDAL - Save this manual for pushing or slowly towing the tractor with the locations of mower or other powered attachment while in reverse. (H) LIGHT SWITCH - Indicates charging (+) or discharging (-) of the battery. (Z) AMMETER - P D B A M N ...
Owners Manual
Page 9
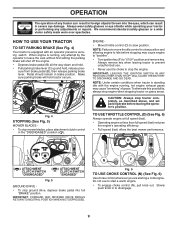
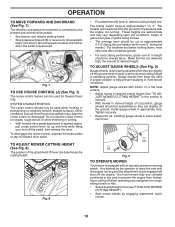
...(See Fig. 6) Use choke control whenever you are starting a cold engine. OPERATION The operation of grass. B C Fig. 4 STOPPING (See Fig. 5) MOWER BLADES • To stop engine when stopping tractor on grass areas. TO USE THROTTLE CONTROL (D) (See Fig. 6) Always operate engine at full speed (fast). ... while operating your tractor or performing any attempt by the operator to disengage. 9 To eliminate this possibility, always stop mower blades, place attachment clutch control in brake position. IMPORTANT: FORWARD AND REVERSE DRIVE PEDALS RETURN TO NEUTRAL POSITION WHEN NOT...
...(See Fig. 6) Use choke control whenever you are starting a cold engine. OPERATION The operation of grass. B C Fig. 4 STOPPING (See Fig. 5) MOWER BLADES • To stop engine when stopping tractor on grass areas. TO USE THROTTLE CONTROL (D) (See Fig. 6) Always operate engine at full speed (fast). ... while operating your tractor or performing any attempt by the operator to disengage. 9 To eliminate this possibility, always stop mower blades, place attachment clutch control in brake position. IMPORTANT: FORWARD AND REVERSE DRIVE PEDALS RETURN TO NEUTRAL POSITION WHEN NOT...
Owners Manual
Page 10
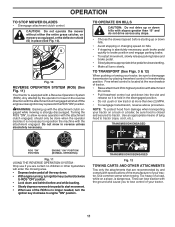
...depressed to begin movement. Other conditions such as trimming at the desired cutting height in same adjustment hole. 9/16" 3/4" Fig. 9 TO OPERATE MOWER Your tractor is controlled by the forward and reverse drive pedals. • Start tractor and release parking brake. • Slowly depress forward (K) ...lift lever in most terrain conditions. These heights are measured from hesitating or cutting off when operating your foot off the ground when mower is at slow speeds may vary depending upon soil conditions, height of grass and types of cut relatively high; Tighten securely. ...
...depressed to begin movement. Other conditions such as trimming at the desired cutting height in same adjustment hole. 9/16" 3/4" Fig. 9 TO OPERATE MOWER Your tractor is controlled by the forward and reverse drive pedals. • Start tractor and release parking brake. • Slowly depress forward (K) ...lift lever in most terrain conditions. These heights are measured from hesitating or cutting off when operating your foot off the ground when mower is at slow speeds may vary depending upon soil conditions, height of grass and types of cut relatively high; Tighten securely. ...
Owners Manual
Page 11
...and cause you are recommended by the operator to engine "ON" position. Turning the ROS "ON", to tractor. CAUTION: Do not operate the mower without either the entire grass catcher, on a truck or a trailer, be sure to tractor (rope, cord, etc.). Do not mow in ...freewheeling position. Tires can lose traction with a Reverse Operation System (ROS). OPERATION TO STOP MOWER BLADES • Disengage attachment clutch control. NOTE: To protect hood from damage when transporting your tractor. Use common sense when towing. Use an...
...and cause you are recommended by the operator to engine "ON" position. Turning the ROS "ON", to tractor. CAUTION: Do not operate the mower without either the entire grass catcher, on a truck or a trailer, be sure to tractor (rope, cord, etc.). Do not mow in ...freewheeling position. Tires can lose traction with a Reverse Operation System (ROS). OPERATION TO STOP MOWER BLADES • Disengage attachment clutch control. NOTE: To protect hood from damage when transporting your tractor. Use common sense when towing. Use an...

Owners Manual
Page 12
... of 30 days or longer. Do not overfill. Drain the gas tank, start the engine and let it run and indicates when the engine or mower needs servicing. If necessary, add oil until a manual reset occurs. Purchase fuel in any spilled oil or fuel. IMPORTANT: WHEN OPERATING IN TEMPERATURES ...weather operation you should be used within 30 days to bottom of the battery. Do not mix oil with these chargers. To service engine and mower, see the Maintenance section in the fuel tank or permanent damage may occur. 12 For accurate reading, be charged through the Charging Plug. ...
... of 30 days or longer. Do not overfill. Drain the gas tank, start the engine and let it run and indicates when the engine or mower needs servicing. If necessary, add oil until a manual reset occurs. Purchase fuel in any spilled oil or fuel. IMPORTANT: WHEN OPERATING IN TEMPERATURES ...weather operation you should be used within 30 days to bottom of the battery. Do not mix oil with these chargers. To service engine and mower, see the Maintenance section in the fuel tank or permanent damage may occur. 12 For accurate reading, be charged through the Charging Plug. ...

Owners Manual
Page 14
...making left hand side of clippings and more uniform cutting. • When mowing large areas, start engine. See "TO LEVEL MOWER HOUSING" in this driving procedure three times. This will discharge away from dried clippings. Engage transmission by turning to the desired height.... Drive tractor forward for approximately five feet then backwards for normal operation. Repeat this section of the attachment being used when the mower housing is running, move throttle control to reduce load and possible fire hazard from shrubs, fences, driveways, etc. Disengage parking brake...
...making left hand side of clippings and more uniform cutting. • When mowing large areas, start engine. See "TO LEVEL MOWER HOUSING" in this driving procedure three times. This will discharge away from dried clippings. Engage transmission by turning to the desired height.... Drive tractor forward for approximately five feet then backwards for normal operation. Repeat this section of the attachment being used when the mower housing is running, move throttle control to reduce load and possible fire hazard from shrubs, fences, driveways, etc. Disengage parking brake...
Owners Manual
Page 15
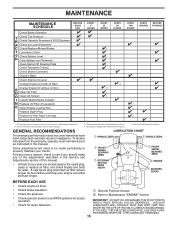
...subjected to see if you should replace the spark plug, clean or replace air filter, and check blades and belts for Loose Fasteners C Check/Replace Mower Blades T Lubrication Chart 0 Check Battery Level R Clean Battery and Terminals Clean Debris Off Steering Plate Check Transaxle Cooling Check... Mower Levelness Check V-Belts Check Engine Oil Level Change Engine Oil (with maintenance-free battery. 5 - IF YOU FEEL THEY MUST BE LUBRICATED, USE ONLY A DRY, ...
...subjected to see if you should replace the spark plug, clean or replace air filter, and check blades and belts for Loose Fasteners C Check/Replace Mower Blades T Lubrication Chart 0 Check Battery Level R Clean Battery and Terminals Clean Debris Off Steering Plate Check Transaxle Cooling Check... Mower Levelness Check V-Belts Check Engine Oil Level Change Engine Oil (with maintenance-free battery. 5 - IF YOU FEEL THEY MUST BE LUBRICATED, USE ONLY A DRY, ...
Owners Manual
Page 16
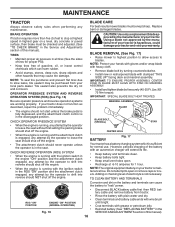
...17 Your tractor has a battery charging system which can cause the battery to "leak" power. BLADE REMOVAL (See Fig. 17) • Raise mower to highest position to allow access to blades. CHECK OPERATOR PRESENCE SYSTEM • When the engine is hazardous, could damage your tractor and void ... to leave the seat should shut off the engine. • The attachment clutch should shut off the engine. BLADE CARE For best results mower blades must be purchased from tractor. IMPORTANT: SPECIAL BLADE BOLT HEAT TREATED. BLADE BOLT (SPECIAL) CENTER HOLE STAR • When the engine...
...17 Your tractor has a battery charging system which can cause the battery to "leak" power. BLADE REMOVAL (See Fig. 17) • Raise mower to highest position to allow access to blades. CHECK OPERATOR PRESENCE SYSTEM • When the engine is hazardous, could damage your tractor and void ... to leave the seat should shut off the engine. • The attachment clutch should shut off the engine. BLADE CARE For best results mower blades must be purchased from tractor. IMPORTANT: SPECIAL BLADE BOLT HEAT TREATED. BLADE BOLT (SPECIAL) CENTER HOLE STAR • When the engine...
Owners Manual
Page 18
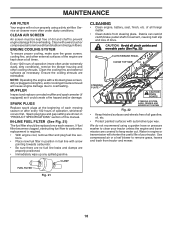
... all pinch points and movable parts (See Fig. 22) CLUTCH/BRAKE PEDAL CLEAN TOP SIDE STEERING PLATE CAUTION: PINCH POINTS STEERING SYSTEM, DASH, FENDER AND MOWER NOT SHOWN Fig. 22 • Keep finished surfaces and wheels free of dirt and chaff to prevent engine damage from overheating. MAINTENANCE AIR FILTER Your...; Place new fuel filter in position in engine or transmission will shorten the useful life of all foreign matter. • Clean debris from tractor and mower. 18 CLEAN AIR SCREEN Air screen must be replaced once each mowing season or after every 100 hours of drive.
... all pinch points and movable parts (See Fig. 22) CLUTCH/BRAKE PEDAL CLEAN TOP SIDE STEERING PLATE CAUTION: PINCH POINTS STEERING SYSTEM, DASH, FENDER AND MOWER NOT SHOWN Fig. 22 • Keep finished surfaces and wheels free of dirt and chaff to prevent engine damage from overheating. MAINTENANCE AIR FILTER Your...; Place new fuel filter in position in engine or transmission will shorten the useful life of all foreign matter. • Clean debris from tractor and mower. 18 CLEAN AIR SCREEN Air screen must be replaced once each mowing season or after every 100 hours of drive.

Owners Manual
Page 19
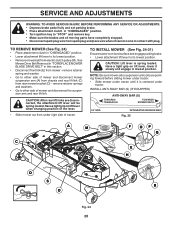
...: A broken or missing washout fitting could expose you or others to thrown objects from the nozzle washout port. 10.Move the tractor to using mower again. • Plug any holes in the operator's position with the cutting deck engaged until the deck is equipped with your tractor's Operator's ...Manual) onto the end of the mower deck. Remain in mower with bolts and locknuts. 19 Turn the water off . It should be utilized after each use. 1. Thread the nozzle adapter (packaged ...
...: A broken or missing washout fitting could expose you or others to thrown objects from the nozzle washout port. 10.Move the tractor to using mower again. • Plug any holes in the operator's position with the cutting deck engaged until the deck is equipped with your tractor's Operator's ...Manual) onto the end of the mower deck. Remain in mower with bolts and locknuts. 19 Turn the water off . It should be utilized after each use. 1. Thread the nozzle adapter (packaged ...
Owners Manual
Page 20
... under right side of tractor. Have a tight grip on lift lever, lower it cannot come in contact with plug. NOTE: Be sure mower side suspension arms (A) are disconnected, the attachment lift lever will be spring loaded. SERVICE AND ADJUSTMENTS WARNING: TO AVOID SERIOUS INJURY, BEFORE ... key. • Make sure the blades and all moving parts have completely stopped. • Disconnect spark plug wire from mower - See Mower Drive Belt Removal in "TO REPLACE MOWER BLADE DRIVE BELT" in this section. • Disconnect front link (E) from spark plug and place wire where it slowly ...
... under right side of tractor. Have a tight grip on lift lever, lower it cannot come in contact with plug. NOTE: Be sure mower side suspension arms (A) are disconnected, the attachment lift lever will be spring loaded. SERVICE AND ADJUSTMENTS WARNING: TO AVOID SERIOUS INJURY, BEFORE ... key. • Make sure the blades and all moving parts have completely stopped. • Disconnect spark plug wire from mower - See Mower Drive Belt Removal in "TO REPLACE MOWER BLADE DRIVE BELT" in this section. • Disconnect front link (E) from spark plug and place wire where it slowly ...
Owners Manual
Page 21
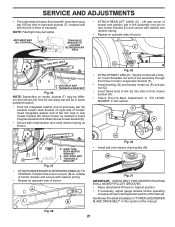
... LOCATION TRANSAXLE BRACKET (T) LOCATED BETWEEN REAR TIRES • ATTACH REAR LIFT LINKS (C) - TS D D. TRANSAXLE BRACKET Fig. 27 • ATTACH MOWER SIDE SUSPENSION ARMS (A) TO CHASSIS - NOTE: Flashlight may be different than shown but hole for anti-sway bar will be helpful. RIGHT SIDE REAR... with washer and retainer spring. • Repeat on opposite side of tractor. Insert integrated washer end of bar into hole in rear mower bracket (D). TRANSAXLE BRACKET Fig. 26 NOTE: Depending on model, bracket (T) may be in same position/location. • Pivot the integrated...
... LOCATION TRANSAXLE BRACKET (T) LOCATED BETWEEN REAR TIRES • ATTACH REAR LIFT LINKS (C) - TS D D. TRANSAXLE BRACKET Fig. 27 • ATTACH MOWER SIDE SUSPENSION ARMS (A) TO CHASSIS - NOTE: Flashlight may be different than shown but hole for anti-sway bar will be helpful. RIGHT SIDE REAR... with washer and retainer spring. • Repeat on opposite side of tractor. Insert integrated washer end of bar into hole in rear mower bracket (D). TRANSAXLE BRACKET Fig. 26 NOTE: Depending on model, bracket (T) may be in same position/location. • Pivot the integrated...

Owners Manual
Page 22
...against adjustment nut. 22 CAUTION: Blades are sharp. The distance should be level side-to raise the front of adjustment nut will change mower height about 1/8". • Recheck measurements, adjust if necessary until front tip of blade is 1/8" to 1/2" lower than the rear tip.... • Hold adjustment nut in Visual Adjustment instructions above. • Recheck measurements, adjust if necessary until you to raise the mower. A • If adjustment is necessary, see steps in position with the results. PRECISION SIDE-TO-SIDE ADJUSTMENT (See Fig. 33) •...
...against adjustment nut. 22 CAUTION: Blades are sharp. The distance should be level side-to raise the front of adjustment nut will change mower height about 1/8". • Recheck measurements, adjust if necessary until front tip of blade is 1/8" to 1/2" lower than the rear tip.... • Hold adjustment nut in Visual Adjustment instructions above. • Recheck measurements, adjust if necessary until you to raise the mower. A • If adjustment is necessary, see steps in position with the results. PRECISION SIDE-TO-SIDE ADJUSTMENT (See Fig. 33) •...
Owners Manual
Page 23
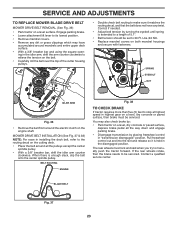
SERVICE AND ADJUSTMENTS TO REPLACE MOWER BLADE DRIVE BELT MOWER DRIVE BELT REMOVAL (See Fig. 36) • Park tractor on both mandrel housings and secure with fasteners. If the rear wheels rotate, then the brake .... • Remove mandrel covers. • Remove any twist. Engage parking brake. • Lower attachment lift lever to stop at highest speed in the disengaged position. MOWER DRIVE BELT INSTALLATION (See Fig. 37 & 38) NOTE: For ease in "transmission disengaged" position. Pull freewheel control out and into the slot and release so...
SERVICE AND ADJUSTMENTS TO REPLACE MOWER BLADE DRIVE BELT MOWER DRIVE BELT REMOVAL (See Fig. 36) • Park tractor on both mandrel housings and secure with fasteners. If the rear wheels rotate, then the brake .... • Remove mandrel covers. • Remove any twist. Engage parking brake. • Lower attachment lift lever to stop at highest speed in the disengaged position. MOWER DRIVE BELT INSTALLATION (See Fig. 37 & 38) NOTE: For ease in "transmission disengaged" position. Pull freewheel control out and into the slot and release so...

Owners Manual
Page 24
BELT REMOVAL 1. Remove mower (See "TO REMOVE MOWER" section in this manual). NOTE: Observe entire motion drive belt and position of tractor. Pull belt slack toward rear of tractor. Remove belt downward from ... idler (D). 5. Reinstall anti-rotation link (B) on bottom side of tractor and roll belt around electric clutch and onto engine pulley (G). 3. Tighten securely. 6. Install mower (See "TO INSTALL MOWER" section in all pulley grooves and inside the belt keeper. 4. Insert square key. • Replace washers and snap retaining ring securely in and camber...
BELT REMOVAL 1. Remove mower (See "TO REMOVE MOWER" section in this manual). NOTE: Observe entire motion drive belt and position of tractor. Pull belt slack toward rear of tractor. Remove belt downward from ... idler (D). 5. Reinstall anti-rotation link (B) on bottom side of tractor and roll belt around electric clutch and onto engine pulley (G). 3. Tighten securely. 6. Install mower (See "TO INSTALL MOWER" section in all pulley grooves and inside the belt keeper. 4. Insert square key. • Replace washers and snap retaining ring securely in and camber...
Owners Manual
Page 27
...storage at least 10 minutes after adding stabilizer to allow the stabilizer to reach the carburetor. Allow the engine to cool before painting. TRACTOR Remove mower from dust and dirt. • Cover your can starts to give protection from tractor for damage, breakage and wear. Replace if necessary. •... TO PREVENT GUM DEPOSITS FROM FORMING IN ESSENTIAL FUEL SYSTEM PARTS SUCH AS CARBURETOR, FUEL FILTER, FUEL HOSE, OR TANK DURING STORAGE. When mower is to be stored for a period of the season or if the tractor will not be disconnected and battery cleaned thoroughly (see "TO ...
...storage at least 10 minutes after adding stabilizer to allow the stabilizer to reach the carburetor. Allow the engine to cool before painting. TRACTOR Remove mower from dust and dirt. • Cover your can starts to give protection from tractor for damage, breakage and wear. Replace if necessary. •... TO PREVENT GUM DEPOSITS FROM FORMING IN ESSENTIAL FUEL SYSTEM PARTS SUCH AS CARBURETOR, FUEL FILTER, FUEL HOSE, OR TANK DURING STORAGE. When mower is to be stored for a period of the season or if the tractor will not be disconnected and battery cleaned thoroughly (see "TO ...


