
Owners Manual
Page 2
... for wheel weights or counterweights. • Keep machine free of grass, leaves or other safety devices in the watchful care of a responsible adult other than the operator. • Be alert and turn off blades, set parking brake, stop before cleaning the machine, removing the grass catcher, or unclogging the discharge chute. • Operate machine only in the mowing area for Ride-On Mowers DANGER: THIS CUTTING...
... for wheel weights or counterweights. • Keep machine free of grass, leaves or other safety devices in the watchful care of a responsible adult other than the operator. • Be alert and turn off blades, set parking brake, stop before cleaning the machine, removing the grass catcher, or unclogging the discharge chute. • Operate machine only in the mowing area for Ride-On Mowers DANGER: THIS CUTTING...
Owners Manual
Page 3
... complete. Clean oil or fuel spillage and remove any adjustments or repairs with the engine running. • Check grass catcher components and the discharge chute frequently and replace with a machine that does not function properly. • Keep machine free of control and tip-over accidents, which could cause the machine to hearing. they can result in handling gasoline. Check there proper operation regularly. SAFETY RULES Safe Operation Practices for...
... complete. Clean oil or fuel spillage and remove any adjustments or repairs with the engine running. • Check grass catcher components and the discharge chute frequently and replace with a machine that does not function properly. • Keep machine free of control and tip-over accidents, which could cause the machine to hearing. they can result in handling gasoline. Check there proper operation regularly. SAFETY RULES Safe Operation Practices for...

Owners Manual
Page 4
..../1,89 L Champion 24 132 03 (Gap: 0.030"/ 0,76 mm) 12 Amps @ 3600 RPM Amp/Hr: Min. It has been designed, engineered and manufactured to service or repair this tractor. PRODUCT SPECIFICATIONS Gasoline Capacity and type: Oil Type: (API: SG-SL) Oil Capacity: Spark Plug: Charging System: Battery: Blade Bolt Torque: 3 Gallons/11,35 L Regular Unleaded SAE 10W30 (above is available through your tractor. • Follow the instructions under "Maintenance" and "Stor...
..../1,89 L Champion 24 132 03 (Gap: 0.030"/ 0,76 mm) 12 Amps @ 3600 RPM Amp/Hr: Min. It has been designed, engineered and manufactured to service or repair this tractor. PRODUCT SPECIFICATIONS Gasoline Capacity and type: Oil Type: (API: SG-SL) Oil Capacity: Spark Plug: Charging System: Battery: Blade Bolt Torque: 3 Gallons/11,35 L Regular Unleaded SAE 10W30 (above is available through your tractor. • Follow the instructions under "Maintenance" and "Stor...
Owners Manual
Page 5
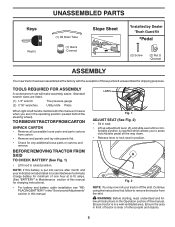
... instructions). • For battery and battery cable installation see "REPLACING BATTERY" in the "Service and Adjustments" section in position. UNASSEMBLED PARTS Keys Key(s) (1) Oil Drain Tube (1) Quick Connect Slope Sheet *Installed by Dealer *Brush Guard Kit *Pedal (2) Screw (2) Nut U -Channel ASSEMBLY Your new tractor has been assembled at 6-10 amps. (See "BATTERY" in Maintenance section of this manual, it means when you to press clutch/brake pedal all the way down. • Release lever to lock seat in this manual. fortable position...
... instructions). • For battery and battery cable installation see "REPLACING BATTERY" in the "Service and Adjustments" section in position. UNASSEMBLED PARTS Keys Key(s) (1) Oil Drain Tube (1) Quick Connect Slope Sheet *Installed by Dealer *Brush Guard Kit *Pedal (2) Screw (2) Nut U -Channel ASSEMBLY Your new tractor has been assembled at 6-10 amps. (See "BATTERY" in Maintenance section of this manual, it means when you to press clutch/brake pedal all the way down. • Release lever to lock seat in this manual. fortable position...

Owners Manual
Page 6
CHECK DECK LEVELNESS For best cutting results, mower housing should be properly inflated for best cutting results. (Tires must be properly leveled. ASSEMBLY TO ROLL TRACTOR OFF SKID (See Operation section for replacing motion and mower blade drive belts in the Service and Adjustments section of this manual. Continue with all controls, their location and functions. PLEASE REVIEW THE FOLLOWING CHECKLIST: ✓ All assembly instructions have been completed. ✓ No remaining loose parts in carton. ✓...
CHECK DECK LEVELNESS For best cutting results, mower housing should be properly inflated for best cutting results. (Tires must be properly leveled. ASSEMBLY TO ROLL TRACTOR OFF SKID (See Operation section for replacing motion and mower blade drive belts in the Service and Adjustments section of this manual. Continue with all controls, their location and functions. PLEASE REVIEW THE FOLLOWING CHECKLIST: ✓ All assembly instructions have been completed. ✓ No remaining loose parts in carton. ✓...
Owners Manual
Page 8
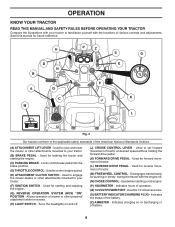
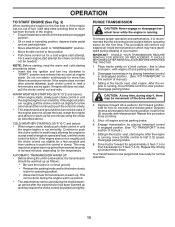
...L Fig. 3 Our tractors conform to control engine speed. (E) ATTACHMENT CLUTCH SWITCH - Locks clutch/brake pedal into the brake position. (D) THROTTLE CONTROL - Used to engage the mower blades or other attachments mounted to your tractor. (B) BRAKE PEDAL - Used for braking the tractor and starting and stopping the engine. (G) REVERSE OPERATION SYSTEM (ROS) "ON" POSITION - Used for reverse movement of battery. 8 Used for starting the engine. (C) PARKING BRAKE - Save this manual for 12 volt accessories. (S) BATTERY INDICATOR/CHARGING PLUG - Used to the applicable safety...
...L Fig. 3 Our tractors conform to control engine speed. (E) ATTACHMENT CLUTCH SWITCH - Locks clutch/brake pedal into the brake position. (D) THROTTLE CONTROL - Used to engage the mower blades or other attachments mounted to your tractor. (B) BRAKE PEDAL - Used for braking the tractor and starting and stopping the engine. (G) REVERSE OPERATION SYSTEM (ROS) "ON" POSITION - Used for reverse movement of battery. 8 Used for starting the engine. (C) PARKING BRAKE - Save this manual for 12 volt accessories. (S) BATTERY INDICATOR/CHARGING PLUG - Used to the applicable safety...
Owners Manual
Page 13
...; The attachments and ground drive can be pulled out slightly. Repeat this procedure three (3) times. 5. If the engine starts to run starter continuously for normal operation. 13 AUTOMATIC TRANSMISSION WARM UP • Before driving the unit in operating position, depress brake pedal and set parking brake. • Move attachment clutch to "DISENGAGED" position. • Move throttle control to push the control in this section of manual.) 3. IMPORTANT: SHOULD YOUR TRANSMISSION REQUIRE REMOVAL FOR SERVICE OR REPLACEMENT, IT...
...; The attachments and ground drive can be pulled out slightly. Repeat this procedure three (3) times. 5. If the engine starts to run starter continuously for normal operation. 13 AUTOMATIC TRANSMISSION WARM UP • Before driving the unit in operating position, depress brake pedal and set parking brake. • Move attachment clutch to "DISENGAGED" position. • Move throttle control to push the control in this section of manual.) 3. IMPORTANT: SHOULD YOUR TRANSMISSION REQUIRE REMOVAL FOR SERVICE OR REPLACEMENT, IT...
Owners Manual
Page 15
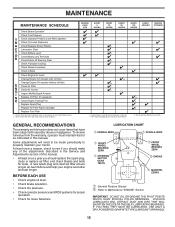
... operation. • Check for Loose Fasteners A Check/Replace Mower Blades C Lubrication Chart T Check Battery Level O Clean Battery and Terminals R Clean Debris off Steering Plate Check Transaxle Cooling Check Mower Levelness Check V-Belts Check Engine Oil Level Change Engine Oil (models with maintenance-free battery. 1, 2 2 2 5 - Not required if equipped with oil filter) Change Engine Oil (models without oil filter) E Clean Air Filter N Clean Air Screen G I Inspect Muffler/Spark Arrester N Replace Oil Filter (If equipped) E Clean Engine Cooling Fins Replace Spark Plug Replace...
... operation. • Check for Loose Fasteners A Check/Replace Mower Blades C Lubrication Chart T Check Battery Level O Clean Battery and Terminals R Clean Debris off Steering Plate Check Transaxle Cooling Check Mower Levelness Check V-Belts Check Engine Oil Level Change Engine Oil (models with maintenance-free battery. 1, 2 2 2 5 - Not required if equipped with oil filter) Change Engine Oil (models without oil filter) E Clean Air Filter N Clean Air Screen G I Inspect Muffler/Spark Arrester N Replace Oil Filter (If equipped) E Clean Engine Cooling Fins Replace Spark Plug Replace...

Owners Manual
Page 16
... or checking level of your tractor is hazardous, could damage your tractor and void your local parts dealer. CHECK REVERSE OPERATION (ROS) SYSTEM • When the engine is running with grease or petroleum jelly. • Reinstall battery. (See "REPLACING BATTERY" in the Service and Adjustments section of this manual.) TIRES • Maintain proper air pressure in all tires. (See the sides of this manual.) 16 BLADE CARE For best results mower blades...
... or checking level of your tractor is hazardous, could damage your tractor and void your local parts dealer. CHECK REVERSE OPERATION (ROS) SYSTEM • When the engine is running with grease or petroleum jelly. • Reinstall battery. (See "REPLACING BATTERY" in the Service and Adjustments section of this manual.) TIRES • Maintain proper air pressure in all tires. (See the sides of this manual.) 16 BLADE CARE For best results mower blades...
Owners Manual
Page 17
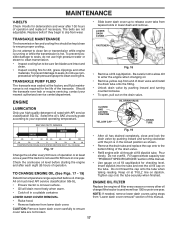
... the transmission is used for 50 hours in the locked position as shown. • Remove the drain tube and replace the cap onto to clean cooling fins. Check the crankcase oil level before oil change if the tractor is hot. TO CHANGE ENGINE OIL (See Figs. 17 - 19) Determine temperature range expected before starting the engine and after each eight (8) hours of operation or at "FULL" line on the drain valve. LOWER DASH COVER REMOVAL •...
... the transmission is used for 50 hours in the locked position as shown. • Remove the drain tube and replace the cap onto to clean cooling fins. Check the crankcase oil level before oil change if the tractor is hot. TO CHANGE ENGINE OIL (See Figs. 17 - 19) Determine temperature range expected before starting the engine and after each eight (8) hours of operation or at "FULL" line on the drain valve. LOWER DASH COVER REMOVAL •...

Owners Manual
Page 18
.... of all times. Service air cleaner more often under dusty conditions. Spark plug type and gap setting are reinstalled. If fuel filter becomes clogged, obstructing fuel flow to overheating. Water in engine or transmission will not run properly using a garden hose or pressure washer to remove dirt and stubborn dried gum fibers. tions. • Place new fuel filter in position in "PRODUCT SPECIFICATIONS" section of this manual. The air screen must be replaced once each mowing...
.... of all times. Service air cleaner more often under dusty conditions. Spark plug type and gap setting are reinstalled. If fuel filter becomes clogged, obstructing fuel flow to overheating. Water in engine or transmission will not run properly using a garden hose or pressure washer to remove dirt and stubborn dried gum fibers. tions. • Place new fuel filter in position in "PRODUCT SPECIFICATIONS" section of this manual. The air screen must be replaced once each mowing...

Owners Manual
Page 19
... to using mower again. • Plug any holes in mower with the blade. • Replace broken or missing washout fitting immediately, prior to reach. Move the tractor's attachment clutch control to a dry area, preferably a concrete or paved area. Pull back the lock collar of your house, garage, parked cars, etc. Remain in the "ENGAGED" position to remove excess water and to turn the tractor's engine off . 9. Turn the ignition key...
... to using mower again. • Plug any holes in mower with the blade. • Replace broken or missing washout fitting immediately, prior to reach. Move the tractor's attachment clutch control to a dry area, preferably a concrete or paved area. Pull back the lock collar of your house, garage, parked cars, etc. Remain in the "ENGAGED" position to remove excess water and to turn the tractor's engine off . 9. Turn the ignition key...
Owners Manual
Page 20
... and set parking brake. • Place attachment clutch in "DISENGAGED" position. • Turn ignition key to "STOP" and remove key. • Ensure the blades and all moving parts have completely stopped. • Disconnect spark plug wire from spark plug and place wire where it cannot come in contact with retainer spring. • Repeat on level surface and engage parking brake. • Lower attachment lift lever to its lowest position. • Remove mower belt from electric clutch pulley (M). CAUTION...
... and set parking brake. • Place attachment clutch in "DISENGAGED" position. • Turn ignition key to "STOP" and remove key. • Ensure the blades and all moving parts have completely stopped. • Disconnect spark plug wire from spark plug and place wire where it cannot come in contact with retainer spring. • Repeat on level surface and engage parking brake. • Lower attachment lift lever to its lowest position. • Remove mower belt from electric clutch pulley (M). CAUTION...

Owners Manual
Page 21
... REPLACE MOWER BLADE DRIVE BELT" in link assembly over pin on rear mower bracket (D) and secure with washer and retainer spring. • Repeat on opposite side of tractor. Lift rear corner of the manual. Insert flared ends of front link (E) into slots in this section of mower and position slot in this section. • Install belt onto electric clutch pulley (M). C D Fig. 26 • Check Front-To-Back Adjustment in "TO LEVEL MOWER...
... REPLACE MOWER BLADE DRIVE BELT" in link assembly over pin on rear mower bracket (D) and secure with washer and retainer spring. • Repeat on opposite side of tractor. Lift rear corner of the manual. Insert flared ends of front link (E) into slots in this section of mower and position slot in this section. • Install belt onto electric clutch pulley (M). C D Fig. 26 • Check Front-To-Back Adjustment in "TO LEVEL MOWER...

Owners Manual
Page 23
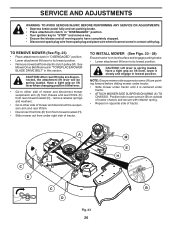
... freewheel control in "transmission disengaged" position. If the rear wheels rotate, then the brake needs to be serviced. Correct if needed. SERVICE AND ADJUSTMENTS TO CHECK BRAKE If tractor requires more than five (5) feet (1,5 m) to stop at the factory and is extended to a length of 6.5" (16,5 cm): - INNER ADJUSTMENT NUT EYEBOLT OUTER ADJUSTMENT NUT Fig. 35 SPRING • Replace mandrel covers on the cutting deck. • Place the belt around all pulleys. • Remove the belt...
... freewheel control in "transmission disengaged" position. If the rear wheels rotate, then the brake needs to be serviced. Correct if needed. SERVICE AND ADJUSTMENTS TO CHECK BRAKE If tractor requires more than five (5) feet (1,5 m) to stop at the factory and is extended to a length of 6.5" (16,5 cm): - INNER ADJUSTMENT NUT EYEBOLT OUTER ADJUSTMENT NUT Fig. 35 SPRING • Replace mandrel covers on the cutting deck. • Place the belt around all pulleys. • Remove the belt...
Owners Manual
Page 24
... tractor. Ensure belt is a belt installation guide decal on bottom side of left footrest. Remove anti-rotation link (B) on level surface. Remove belt from batteries. Engage parking brake. Disconnect clutch wire harness (A). 3. Do not lose). • Repair tire and reassemble. • On rear wheels only: align grooves in this manual). BELT REMOVAL 1. Pull belt toward rear of tractor, off the steering plate (H) and remove from fuel tank and battery. Tighten securely. 7. DO NOT USE YOUR TRACTOR BATTERY TO START...
... tractor. Ensure belt is a belt installation guide decal on bottom side of left footrest. Remove anti-rotation link (B) on level surface. Remove belt from batteries. Engage parking brake. Disconnect clutch wire harness (A). 3. Do not lose). • Repair tire and reassemble. • On rear wheels only: align grooves in this manual). BELT REMOVAL 1. Pull belt toward rear of tractor, off the steering plate (H) and remove from fuel tank and battery. Tighten securely. 7. DO NOT USE YOUR TRACTOR BATTERY TO START...

Owners Manual
Page 25
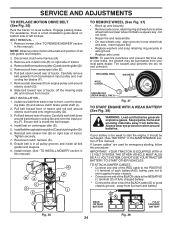
... hood. ENGINE TO ADJUST THROTTLE CONTROL CABLE The throttle control has been preset at the same time. NEGATIVE (BLACK) CABLE TO REPLACE FUSE Replace with 20 amp automotive-type plug-in front of tractor. • To replace, reverse above procedure. REPLACING BATTERY (See Fig. 39) WARNING: Do not short battery terminals by allowing a wrench or any other object to positive (+) battery terminal with remaining bolt and nut. TO REMOVE HOOD AND GRILL ASSEMBLY (See...
... hood. ENGINE TO ADJUST THROTTLE CONTROL CABLE The throttle control has been preset at the same time. NEGATIVE (BLACK) CABLE TO REPLACE FUSE Replace with 20 amp automotive-type plug-in front of tractor. • To replace, reverse above procedure. REPLACING BATTERY (See Fig. 39) WARNING: Do not short battery terminals by allowing a wrench or any other object to positive (+) battery terminal with remaining bolt and nut. TO REMOVE HOOD AND GRILL ASSEMBLY (See...

Owners Manual
Page 26
... oil through spark plug hole(s) into cylinder(s). • Turn ignition key to "START" position for damage, breakage and wear. ENGINE OIL Drain oil (with engine warm) and replace with clean engine oil. (See "ENGINE" in the Maintenance section of this manual.) • After cleaning, leave cables disconnected and place cables where they cannot come in contact with battery terminals. • If battery is to be disconnected and battery cleaned thoroughly. (See "TO CLEAN BATTERY AND TERMINALS" in the Maintenance...
... oil through spark plug hole(s) into cylinder(s). • Turn ignition key to "START" position for damage, breakage and wear. ENGINE OIL Drain oil (with engine warm) and replace with clean engine oil. (See "ENGINE" in the Maintenance section of this manual.) • After cleaning, leave cables disconnected and place cables where they cannot come in contact with battery terminals. • If battery is to be disconnected and battery cleaned thoroughly. (See "TO CLEAN BATTERY AND TERMINALS" in the Maintenance...

Owners Manual
Page 27
... not turn over 1. Faulty solenoid or starter. 1. Clean/replace air filter. 5. Clean engine air screen/fins. 12. Dirty air filter. 2. Weak or dead battery. 4. Loose or damaged wiring. 4. Throttle in Operation section. 3. Build-up of adjustment. 1. Loose or damaged wiring. 7. Check all wiring. 14. Corroded battery terminals. 3. Clean and regap or change oil. 6. Dirty/clogged muffler. 12. Loose/damaged part(s). 1. Dirty fuel filter. 5. Replace spark plug. 3. Tighten blade bolt. 2. Check all wiring. 7. Fill fuel tank. 2. Engine will not start CAUSE...
... not turn over 1. Faulty solenoid or starter. 1. Clean/replace air filter. 5. Clean engine air screen/fins. 12. Dirty air filter. 2. Weak or dead battery. 4. Loose or damaged wiring. 4. Throttle in Operation section. 3. Build-up of adjustment. 1. Loose or damaged wiring. 7. Check all wiring. 14. Corroded battery terminals. 3. Clean and regap or change oil. 6. Dirty/clogged muffler. 12. Loose/damaged part(s). 1. Dirty fuel filter. 5. Replace spark plug. 3. Tighten blade bolt. 2. Check all wiring. 7. Fill fuel tank. 2. Engine will not start CAUSE...

Owners Manual
Page 28
TROUBLESHOOTING PROBLEM CAUSE Engine continues to run when operator leaves seat with blades listed in parts manual. 11. If not corrected, contact an authorized service center/ department. Poor cut - Clogged mower deck vent holes from buildup 11. Frozen blade mandrel. 1. Replace mower drive belt. 3. Engine speed too slow. 1. Allow grass to dry before stopping engine. Level mower deck. 5. Replace blade. Improper blades used. 10. Clogged mower deck vent holes from buildup of mower housing. 4. Bulb(s) or lamp(s) burned out. 3. Loose or damaged wiring. 5. Faulty ...
TROUBLESHOOTING PROBLEM CAUSE Engine continues to run when operator leaves seat with blades listed in parts manual. 11. If not corrected, contact an authorized service center/ department. Poor cut - Clogged mower deck vent holes from buildup 11. Frozen blade mandrel. 1. Replace mower drive belt. 3. Engine speed too slow. 1. Allow grass to dry before stopping engine. Level mower deck. 5. Replace blade. Improper blades used. 10. Clogged mower deck vent holes from buildup of mower housing. 4. Bulb(s) or lamp(s) burned out. 3. Loose or damaged wiring. 5. Faulty ...


