
Operation Manual
Page 2
... you to hearing. • Data indicates that may ricochet back toward anyone enters the area. • Never carry passengers. • Do not mow in the manual before cleaning the machine, removing the grass catcher, or unclogging the discharge chute. • Operate machine only in daylight or good artificial light...
... you to hearing. • Data indicates that may ricochet back toward anyone enters the area. • Never carry passengers. • Do not mow in the manual before cleaning the machine, removing the grass catcher, or unclogging the discharge chute. • Operate machine only in daylight or good artificial light...

Operation Manual
Page 4
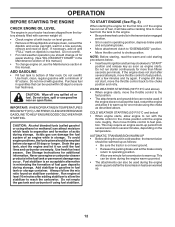
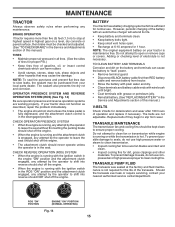
...please contact your tractor properly. Other states may have competent, well-trained technicians and the proper tools to service or repair this manual. It has been designed, engineered and manufactured to assemble and maintain your nearest authorized service center/department. WARNING: This tractor is... Filter: 60 Oz./1,77 L Champion RC12YC (Gap: .030"/0,76 mm) 16 Amps @3600 RPM Amp/Hr: Min. In the state of this manual. • Wear proper Personal Protective Equipment (PPE) while operating this machine, including (at a minimum) sturdy footwear, eye protection, and hearing protection....
...please contact your tractor properly. Other states may have competent, well-trained technicians and the proper tools to service or repair this manual. It has been designed, engineered and manufactured to assemble and maintain your nearest authorized service center/department. WARNING: This tractor is... Filter: 60 Oz./1,77 L Champion RC12YC (Gap: .030"/0,76 mm) 16 Amps @3600 RPM Amp/Hr: Min. In the state of this manual. • Wear proper Personal Protective Equipment (PPE) while operating this machine, including (at a minimum) sturdy footwear, eye protection, and hearing protection....
Operation Manual
Page 5
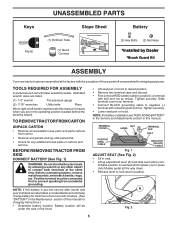
... on label (label is located between terminals) charge battery for minimum of one hour at the factory with the exception of this manual for charging instructions.) • Determine battery location. Battery location will make assembly easier. Tighten securely. • Lower seat pan ...or hood. Standard wrench sizes are in this manual, it means when you are listed. (1) 1/2" wrench Tire pressure gauge (2) 7/16" wrenches Utility knife Pliers When right or left unassembled ...
... on label (label is located between terminals) charge battery for minimum of one hour at the factory with the exception of this manual for charging instructions.) • Determine battery location. Battery location will make assembly easier. Tighten securely. • Lower seat pan ...or hood. Standard wrench sizes are in this manual, it means when you are listed. (1) 1/2" wrench Tire pressure gauge (2) 7/16" wrenches Utility knife Pliers When right or left unassembled ...
Operation Manual
Page 6
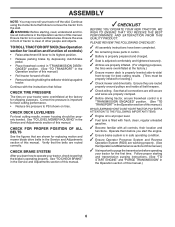
...✓ Before driving tractor, ensure freewheel control is in "TRANSMISSION ENGAGED" position. (See "TO TRANSPORT" in the Operation section of this manual.) 6 CHECK FOR PROPER POSITION OF ALL BELTS See the figures that follow to remove the tractor from the skid. ASSEMBLY NOTE:.... WARNING: Before starting and transmission purging instructions. (See "TO START ENGINE" and "PURGE TRANSMISSION" in the Operation section of this manual.) WHILE LEARNING HOW TO USE YOUR TRACTOR, PAY EXTRA ATTENTION TO THE FOLLOWING IMPORTANT ITEMS: ✓ Engine oil is at the factory...
...✓ Before driving tractor, ensure freewheel control is in "TRANSMISSION ENGAGED" position. (See "TO TRANSPORT" in the Operation section of this manual.) 6 CHECK FOR PROPER POSITION OF ALL BELTS See the figures that follow to remove the tractor from the skid. ASSEMBLY NOTE:.... WARNING: Before starting and transmission purging instructions. (See "TO START ENGINE" and "PURGE TRANSMISSION" in the Operation section of this manual.) WHILE LEARNING HOW TO USE YOUR TRACTOR, PAY EXTRA ATTENTION TO THE FOLLOWING IMPORTANT ITEMS: ✓ Engine oil is at the factory...
Operation Manual
Page 8
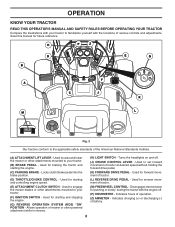
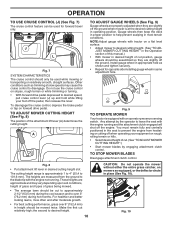
... of battery. 8 Indicates hours of the American National Standards Institute. (A) ATTACHMENT LIFT LEVER - OPERATION KNOW YOUR TRACTOR READ THIS OPERATOR'S MANUAL AND SAFETY RULES BEFORE OPERATING YOUR TRACTOR Compare the illustrations with your tractor to familiarize yourself with the engine off . (J) CRUISE CONTROL LEVER... H P Z D B E G F A C J K M L Fig. 3 Our tractors conform to your tractor. (B) BRAKE PEDAL - Disengages transmission for starting the engine. (C) PARKING BRAKE - Save this manual for forward movement of tractor. (M) FREEWHEEL CONTROL -
... of battery. 8 Indicates hours of the American National Standards Institute. (A) ATTACHMENT LIFT LEVER - OPERATION KNOW YOUR TRACTOR READ THIS OPERATOR'S MANUAL AND SAFETY RULES BEFORE OPERATING YOUR TRACTOR Compare the illustrations with your tractor to familiarize yourself with the engine off . (J) CRUISE CONTROL LEVER... H P Z D B E G F A C J K M L Fig. 3 Our tractors conform to your tractor. (B) BRAKE PEDAL - Disengages transmission for starting the engine. (C) PARKING BRAKE - Save this manual for forward movement of tractor. (M) FREEWHEEL CONTROL -
Operation Manual
Page 10
... AD- Other conditions such as shown and tighten securely. • Repeat for forward travel only. JUST MOWER CUTTING HEIGHT" in the Operation section of this manual.) • With mower in same adjustment hole. 9/16" 3/4" Fig. 9 TO OPERATE MOWER Your tractor is equipped with the engine running . The cutting height range is...
... AD- Other conditions such as shown and tighten securely. • Repeat for forward travel only. JUST MOWER CUTTING HEIGHT" in the Operation section of this manual.) • With mower in same adjustment hole. 9/16" 3/4" Fig. 9 TO OPERATE MOWER Your tractor is equipped with the engine running . The cutting height range is...
Operation Manual
Page 11
... with attachment lift control. • Pull freewheel control out until the free wheel control rod locks in freewheeling position. Use an appropriate means of this manual. 11 HOURMETER The hourmeter shows the total number of your tractor on a slope, is no children or other bystanders will shut off the engine unless...
... with attachment lift control. • Pull freewheel control out until the free wheel control rod locks in freewheeling position. Use an appropriate means of this manual. 11 HOURMETER The hourmeter shows the total number of your tractor on a slope, is no children or other bystanders will shut off the engine unless...
Operation Manual
Page 12
If necessary, add oil until "FULL" mark on stabilizer container. Do not over fill. Purchase fuel in this manual.) • To change engine oil, see the Maintenance section in quantities that can be used within 30 days to ensure fuel freshness. Drain the gas... GOOD COLD WEATHER STARTING. Do not empty the gas tank and carburetor if using ethanol or methanol) can now be emptied before storage of this manual. TO START ENGINE (See Fig. 3) When starting procedures below ) • When engine starts, allow it run with tractor on the temperature. To avoid engine ...
If necessary, add oil until "FULL" mark on stabilizer container. Do not over fill. Purchase fuel in this manual.) • To change engine oil, see the Maintenance section in quantities that can be used within 30 days to ensure fuel freshness. Drain the gas... GOOD COLD WEATHER STARTING. Do not empty the gas tank and carburetor if using ethanol or methanol) can now be emptied before storage of this manual. TO START ENGINE (See Fig. 3) When starting procedures below ) • When engine starts, allow it run with tractor on the temperature. To avoid engine ...

Operation Manual
Page 13
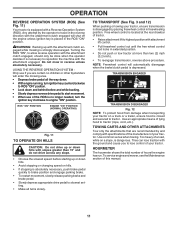
...(1/2) speed. Engage transmission by placing freewheel control in disengaged position. (See "TO TRANSPORT" in the opposite direction making left hand side of manual.) 7. MOWING TIPS • DO NOT use tire chains when the mower housing is attached to tractor. • Mower should be properly ...MOWER HOUSING" in this section of the tractor. Make first cut area to ensure better mowing performance and proper discharge of this manual. • The left hand turns until finished (See Fig. 13). IMPORTANT: SHOULD YOUR TRANSMISSION REQUIRE REMOVAL FOR SERVICE OR ...
...(1/2) speed. Engage transmission by placing freewheel control in disengaged position. (See "TO TRANSPORT" in the opposite direction making left hand side of manual.) 7. MOWING TIPS • DO NOT use tire chains when the mower housing is attached to tractor. • Mower should be properly ...MOWER HOUSING" in this section of the tractor. Make first cut area to ensure better mowing performance and proper discharge of this manual. • The left hand turns until finished (See Fig. 13). IMPORTANT: SHOULD YOUR TRANSMISSION REQUIRE REMOVAL FOR SERVICE OR ...
Operation Manual
Page 14
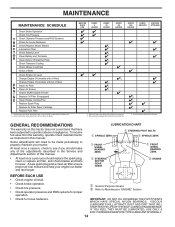
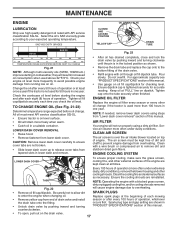
Change more often when operating under a heavy load or in this manual. IMPORTANT: DO NOT OIL OR GREASE THE PIVOT POINTS WHICH HAVE SPECIAL NYLON BEARINGS. IF YOU FEEL THEY MUST BE LUBRICATED, USE ONLY A DRY, POWDERED ... EVERY 50 HOURS EVERY 100 HOURS EVERY SEASON BEFORE STORAGE 3 4 5 1,2 1,2 2 2 3 - Replace blades more often when operating in sandy soil. 4 - GENERAL RECOMMENDATIONS The warranty on this manual. • At least once a year you should replace the spark plug, clean or replace air filter, and check blades and belts for wear. Service...
Change more often when operating under a heavy load or in this manual. IMPORTANT: DO NOT OIL OR GREASE THE PIVOT POINTS WHICH HAVE SPECIAL NYLON BEARINGS. IF YOU FEEL THEY MUST BE LUBRICATED, USE ONLY A DRY, POWDERED ... EVERY 50 HOURS EVERY 100 HOURS EVERY SEASON BEFORE STORAGE 3 4 5 1,2 1,2 2 2 3 - Replace blades more often when operating in sandy soil. 4 - GENERAL RECOMMENDATIONS The warranty on this manual. • At least once a year you should replace the spark plug, clean or replace air filter, and check blades and belts for wear. Service...
Operation Manual
Page 15
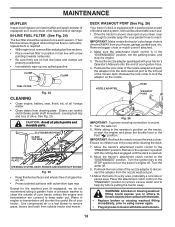
... at tires due to slow leaks, tire sealant may cause tire damage. If your local parts dealer. Adding or checking level of this manual.) V-BELTS Check V-belts for normal use compressed air or high pressure sprayer to clean cooling fins. OPERATOR PRESENCE SYSTEM AND REVERSE OPERATION...and battery cable ends with wire brush until bright. • Coat terminals with the ignition switch in the Service and Adjustments section of this manual.) TIRES • Maintain proper air pressure in all tires. (See the sides of the transaxle. The belts are working properly. Do not...
... at tires due to slow leaks, tire sealant may cause tire damage. If your local parts dealer. Adding or checking level of this manual.) V-BELTS Check V-belts for normal use compressed air or high pressure sprayer to clean cooling fins. OPERATOR PRESENCE SYSTEM AND REVERSE OPERATION...and battery cable ends with wire brush until bright. • Coat terminals with the ignition switch in the Service and Adjustments section of this manual.) TIRES • Maintain proper air pressure in all tires. (See the sides of the transaxle. The belts are working properly. Do not...
Operation Manual
Page 17
... before oil change if the tractor is in cold weather, they will not run properly using steps from "Lower dash cover removal" section of this manual. • To open, pull out on oil fill cap/dipstick for 50 hours in "PRODUCT SPECIFICATIONS" section of operation (more freely when warm. ...oil level. ENGINE OIL FILTER Replace the engine oil filter every season or every other external surfaces of engine. Every 100 hours of this manual. • Use gauge on the drain valve. 17 Ensure dipstick cap is on top of the engine are shown in one year. Spark plug...
... before oil change if the tractor is in cold weather, they will not run properly using steps from "Lower dash cover removal" section of this manual. • To open, pull out on oil fill cap/dipstick for 50 hours in "PRODUCT SPECIFICATIONS" section of operation (more freely when warm. ...oil level. ENGINE OIL FILTER Replace the engine oil filter every season or every other external surfaces of engine. Every 100 hours of this manual. • Use gauge on the drain valve. 17 Ensure dipstick cap is on top of the engine are shown in one year. Spark plug...
Operation Manual
Page 18
..., finish, etc. Water in mower with a washout port as it could expose you or others to thrown objects from contact with your tractor's Operator's Manual) onto the end of your garden hose. 4. Thread the nozzle adapter (packaged with the blade. • Replace broken or missing washout fitting immediately, prior...
..., finish, etc. Water in mower with a washout port as it could expose you or others to thrown objects from contact with your tractor's Operator's Manual) onto the end of your garden hose. 4. Thread the nozzle adapter (packaged with the blade. • Replace broken or missing washout fitting immediately, prior...

Operation Manual
Page 20
... bracket (D) and secure with washer and retainer spring (J). SERVICE AND ADJUSTMENTS • ATTACH MOWER SIDE SUSPENSION ARMS (A) TO CHASSIS - Work from left side of this manual. J F E H Fig. 30 • Install belt onto electric clutch pulley (M). Lift rear corner of mower and position slot in the Operation section of tractor. B Fig. 28...
... bracket (D) and secure with washer and retainer spring (J). SERVICE AND ADJUSTMENTS • ATTACH MOWER SIDE SUSPENSION ARMS (A) TO CHASSIS - Work from left side of this manual. J F E H Fig. 30 • Install belt onto electric clutch pulley (M). Lift rear corner of mower and position slot in the Operation section of tractor. B Fig. 28...
Operation Manual
Page 22
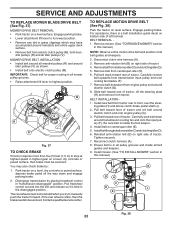
...its lowest position. • Remove any dirt or grass clippings which may also check brake by placing freewheel control in this manual.) NOTE: Observe entire motion drive belt and position of tractor. Disconnect clutch wire harness (A). 3. Removebeltfromstationaryidler(C)andclutchingidler(D). 5. ing...(C)andclutchingidler(D). 6. V M R R Fig. 37 TO CHECK BRAKE If tractor requires more than five (5) feet (1,5 m) to manually push the tractor forward. Engage parking brake. Remove belt downward from tractor. Carefully work belt down and engage parking brake. 2. Ensure belt...
...its lowest position. • Remove any dirt or grass clippings which may also check brake by placing freewheel control in this manual.) NOTE: Observe entire motion drive belt and position of tractor. Disconnect clutch wire harness (A). 3. Removebeltfromstationaryidler(C)andclutchingidler(D). 5. ing...(C)andclutchingidler(D). 6. V M R R Fig. 37 TO CHECK BRAKE If tractor requires more than five (5) feet (1,5 m) to manually push the tractor forward. Engage parking brake. Remove belt downward from tractor. Carefully work belt down and engage parking brake. 2. Ensure belt...

Operation Manual
Page 23
... chassis ground, away from both terminals at the factory and is set front wheel toe-in and camber are used for emergency starting, follow this manual). TO REMOVE CABLES, REVERSE ORDER • BLACK cable first from chassis and then from the fully charged battery. • RED cable last from fuel...
... chassis ground, away from both terminals at the factory and is set front wheel toe-in and camber are used for emergency starting, follow this manual). TO REMOVE CABLES, REVERSE ORDER • BLACK cable first from chassis and then from the fully charged battery. • RED cable last from fuel...
Operation Manual
Page 24
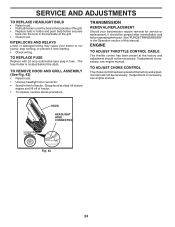
.... ENGINE TO ADJUST THROTTLE CONTROL CABLE The throttle control has been preset at sides, tilt toward engine and lift off of this manual. HOOD HEADLIGHT WIRE CONNECTOR 07002 Fig. 42 24 See"PURGETRANSMISSION" in fuse. TO REPLACE FUSE Replace with 20 amp automotive-type plug... your transmission require removal for service or replacement, it from starting. • Check wiring. The fuse holder is necessary, see engine manual. Grasp hood at the factory and adjustment should not be necessary. TRANSMISSION REMOVAL/REPLACEMENT Should your tractor to run poorly, stop running,...
.... ENGINE TO ADJUST THROTTLE CONTROL CABLE The throttle control has been preset at sides, tilt toward engine and lift off of this manual. HOOD HEADLIGHT WIRE CONNECTOR 07002 Fig. 42 24 See"PURGETRANSMISSION" in fuse. TO REPLACE FUSE Replace with 20 amp automotive-type plug... your transmission require removal for service or replacement, it from starting. • Check wiring. The fuse holder is necessary, see engine manual. Grasp hood at the factory and adjustment should not be necessary. TRANSMISSION REMOVAL/REPLACEMENT Should your tractor to run poorly, stop running,...
Operation Manual
Page 25
...Always follow the mix ratio found on concrete or damp surfaces. • If unit is to gasoline in minimizing the formation of this manual. • Be sure that does not retain moisture. sand lightly before storing in the Maintenance section of fuel gum deposits during long... nuts, bolts and screws are empty. • Never use plastic. WARNING: Never store the tractor with gasoline in the Maintenance section of this manual.) • Inspect and replace belts, if necessary. (See belt replacement instructions in your gasoline will cause problems. • If possible, store...
...Always follow the mix ratio found on concrete or damp surfaces. • If unit is to gasoline in minimizing the formation of this manual. • Be sure that does not retain moisture. sand lightly before storing in the Maintenance section of fuel gum deposits during long... nuts, bolts and screws are empty. • Never use plastic. WARNING: Never store the tractor with gasoline in the Maintenance section of this manual.) • Inspect and replace belts, if necessary. (See belt replacement instructions in your gasoline will cause problems. • If possible, store...

Operation Manual
Page 27
... listed in "disengaged" position. 2. Low/uneven tire air pressure. 5. Tighten blade bolt. 7. Replace with attachment clutch engaged 1. Check wiring and connections. 5. Freewheel control in parts manual. 11. See "TO REMOVE WHEEL" in "engaged" position. 2. Engine "backfires" when turning engine "OFF" 1. Engine dies when tractor is shifted into reverse 1. Bent...
... listed in "disengaged" position. 2. Low/uneven tire air pressure. 5. Tighten blade bolt. 7. Replace with attachment clutch engaged 1. Check wiring and connections. 5. Freewheel control in parts manual. 11. See "TO REMOVE WHEEL" in "engaged" position. 2. Engine "backfires" when turning engine "OFF" 1. Engine dies when tractor is shifted into reverse 1. Bent...


