

Parts Manual
Page 18
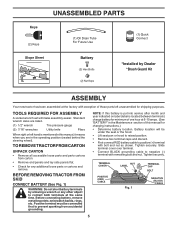
... - - 532 44 15-42 Pad, Footrest, RH - - 114 19 30-49 Manual, Oper.'s (English/Spanish) - - 114 19 32-32 Manual, Oper.'s (French) - - 114 19 13-49 Manual, Parts (English/Spanish) - - 587 71 01-26 Manual Quick Start Guide (English/Spanish) - - 587 71 00-26 Manual Quick Start Guide WHEELS AND TIRES 1 2 11 3 4 7 10 6 wheel_art_1-tex... (Front Wheel Only) Cap Axle Blk 1 50 x 1 00 Tire R T 20 x 10-8 Tube Rear (Service Item Only) Rim Asm 8" Rear Service Sealant, Tire (10 oz. TRACTOR - TS 242XD (96043030700), PROD. MODEL NO. NO. 960 43 03-07 DECALS 6 3 1 7 2 5 KEY PART NO.
... - - 532 44 15-42 Pad, Footrest, RH - - 114 19 30-49 Manual, Oper.'s (English/Spanish) - - 114 19 32-32 Manual, Oper.'s (French) - - 114 19 13-49 Manual, Parts (English/Spanish) - - 587 71 01-26 Manual Quick Start Guide (English/Spanish) - - 587 71 00-26 Manual Quick Start Guide WHEELS AND TIRES 1 2 11 3 4 7 10 6 wheel_art_1-tex... (Front Wheel Only) Cap Axle Blk 1 50 x 1 00 Tire R T 20 x 10-8 Tube Rear (Service Item Only) Rim Asm 8" Rear Service Sealant, Tire (10 oz. TRACTOR - TS 242XD (96043030700), PROD. MODEL NO. NO. 960 43 03-07 DECALS 6 3 1 7 2 5 KEY PART NO.

Owner Manual
Page 2
..., etc., which can lose traction with the ground and cause you last saw them. • Keep children out of the mowing area and in the manual before operating. Carefully read and follow all parts to come to lose control of a responsible adult other debris build-up , transporting, adjusting or making repairs...
..., etc., which can lose traction with the ground and cause you last saw them. • Keep children out of the mowing area and in the manual before operating. Carefully read and follow all parts to come to lose control of a responsible adult other debris build-up , transporting, adjusting or making repairs...

Owner Manual
Page 4
...mowing. We have competent, well-trained technicians and the proper tools to assemble and maintain your product: • Visit our website: www.husqvarna.com • Call Us Toll Free: 1-800-487-5951 TABLE OF CONTENTS SAFETY RULES 2-3 PRODUCT SPECIFICATIONS 4 CUSTOMER RESPONSIBILITIES 4 ASSEMBLY 5-6...an internal combustion engine and should be used , it should not be maintained in effective working order by law (Section 4442 of this manual. • Wear proper Personal Protective Equipment (PPE) while operating this machine, including (at a minimum) sturdy footwear, eye protection, ...
...mowing. We have competent, well-trained technicians and the proper tools to assemble and maintain your product: • Visit our website: www.husqvarna.com • Call Us Toll Free: 1-800-487-5951 TABLE OF CONTENTS SAFETY RULES 2-3 PRODUCT SPECIFICATIONS 4 CUSTOMER RESPONSIBILITIES 4 ASSEMBLY 5-6...an internal combustion engine and should be used , it should not be maintained in effective working order by law (Section 4442 of this manual. • Wear proper Personal Protective Equipment (PPE) while operating this machine, including (at a minimum) sturdy footwear, eye protection, ...
Owner Manual
Page 5
... cable to contact both terminals at the factory with exception of those parts left hand is located between terminals) charge battery for minimum of this manual, it means when you are in this...
... cable to contact both terminals at the factory with exception of those parts left hand is located between terminals) charge battery for minimum of this manual, it means when you are in this...
Owner Manual
Page 6
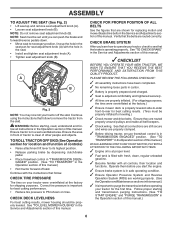
... gasoline. ✓ Become familiar with all belt keepers. ✓ Check wiring. Correct tire pressure is important for location and function of this manual. See "TO CHECK BRAKE" in front of tractor is adjusted comfortably and tightened securely. ✓ All tires are routed correctly. Follow proper ...completed. ✓ No remaining loose parts in carton. ✓ Battery is properly prepared and charged. ✓ Seat is clear of this manual.) WHILE LEARNING HOW TO USE YOUR TRACTOR, PAY EXTRA ATTENTION TO THE FOLLOWING IMPORTANT ITEMS: ✓ Engine oil is at proper level. ...
... gasoline. ✓ Become familiar with all belt keepers. ✓ Check wiring. Correct tire pressure is important for location and function of this manual. See "TO CHECK BRAKE" in front of tractor is adjusted comfortably and tightened securely. ✓ All tires are routed correctly. Follow proper ...completed. ✓ No remaining loose parts in carton. ✓ Battery is properly prepared and charged. ✓ Seat is clear of this manual.) WHILE LEARNING HOW TO USE YOUR TRACTOR, PAY EXTRA ATTENTION TO THE FOLLOWING IMPORTANT ITEMS: ✓ Engine oil is at proper level. ...
Owner Manual
Page 8
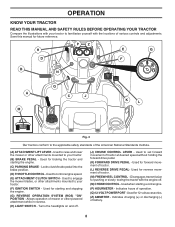
... operation of battery. 8 Indicates hours of tractor at desired speed without holding the forward drive pedal. (K) FORWARD DRIVE PEDAL - Save this manual for pushing or slowly towing the tractor with the locations of tractor. (L) REVERSE DRIVE PEDAL- Used to set forward movement of operation. ...(Q) 12-VOLT POWER PORT - Used for 12-volt accessories. (Z) AMMETER - OPERATION KNOW YOUR TRACTOR READ THIS MANUAL AND SAFETY RULES BEFORE OPERATING YOUR TRACTOR Compare the illustrations with your tractor to familiarize yourself with the engine off . (J) CRUISE CONTROL LEVER -
... operation of battery. 8 Indicates hours of tractor at desired speed without holding the forward drive pedal. (K) FORWARD DRIVE PEDAL - Save this manual for pushing or slowly towing the tractor with the locations of tractor. (L) REVERSE DRIVE PEDAL- Used to set forward movement of operation. ...(Q) 12-VOLT POWER PORT - Used for 12-volt accessories. (Z) AMMETER - OPERATION KNOW YOUR TRACTOR READ THIS MANUAL AND SAFETY RULES BEFORE OPERATING YOUR TRACTOR Compare the illustrations with your tractor to familiarize yourself with the engine off . (J) CRUISE CONTROL LEVER -

Owner Manual
Page 10
... with an operator presence sensing switch. Gauge wheels then keep the deck in proper position to disengage. JUST MOWER CUTTING HEIGHT" in this section of manual). • With mower in desired height of cut position, gauge wheels should only be assembled so they are slightly off when operating your foot off...
... with an operator presence sensing switch. Gauge wheels then keep the deck in proper position to disengage. JUST MOWER CUTTING HEIGHT" in this section of manual). • With mower in desired height of cut position, gauge wheels should only be assembled so they are slightly off when operating your foot off...
Owner Manual
Page 11
...way down and behind before and while backing. • Slowly depress reverse drive pedal to slowest set- Use an appropriate means of this manual. 11 Tires can lose traction with the attachment engaged. To service engine and mower, see the Maintenance section in reverse unless absolutely necessary... clutch engaged while mowing is no children or other bystanders will shut off . Remove and read oil level. Do not mow in this manual. TOWING CARTS AND OTHER ATTACHMENTS Tow only the attachments that are certain no longer needed, turn ignition key counterclockwise to ROS "ON" position...
...way down and behind before and while backing. • Slowly depress reverse drive pedal to slowest set- Use an appropriate means of this manual. 11 Tires can lose traction with the attachment engaged. To service engine and mower, see the Maintenance section in reverse unless absolutely necessary... clutch engaged while mowing is no children or other bystanders will shut off . Remove and read oil level. Do not mow in this manual. TOWING CARTS AND OTHER ATTACHMENTS Tow only the attachments that are certain no longer needed, turn ignition key counterclockwise to ROS "ON" position...
Owner Manual
Page 12
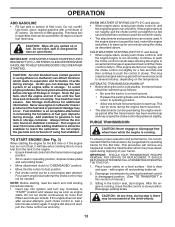
Acidic gas can damage the fuel system of an engine while in this section of manual.) 3. Always follow the mix ratio found on a level surface - TO START ENGINE (See Fig. 3) When starting procedures below ) • When engine starts, slowly push choke ...
Acidic gas can damage the fuel system of an engine while in this section of manual.) 3. Always follow the mix ratio found on a level surface - TO START ENGINE (See Fig. 3) When starting procedures below ) • When engine starts, slowly push choke ...
Owner Manual
Page 13
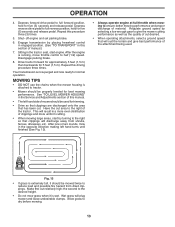
.... Have the cut . Wet grass will discharge away from dried clippings. OPERATION 4. Disengage parking brake. 8. See "TO LEVEL MOWER HOUSING" in this manual. • The left hand turns until finished (See Fig. 13). • Always operate engine at full throttle when mowing to the desired ... tractor. • Mower should be properly leveled for five (5) seconds and release pedal. Depress reverse drive pedal to the right of manual.) 7. After one or two rounds, mow in the tractor seat, start by selecting a low enough gear to give the mower cutting performance...
.... Have the cut . Wet grass will discharge away from dried clippings. OPERATION 4. Disengage parking brake. 8. See "TO LEVEL MOWER HOUSING" in this manual. • The left hand turns until finished (See Fig. 13). • Always operate engine at full throttle when mowing to the desired ... tractor. • Mower should be properly leveled for five (5) seconds and release pedal. Depress reverse drive pedal to the right of manual.) 7. After one or two rounds, mow in the tractor seat, start by selecting a low enough gear to give the mower cutting performance...

Owner Manual
Page 14
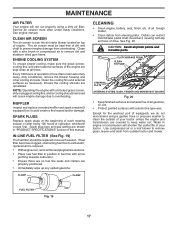
Change more often when operating under a heavy load or in the Service and Adjustments section of this manual. • At least once a year you should replace the spark plug, clean or replace air filter, and check blades and belts for signs of... IMPORTANT: DO NOT OIL OR GREASE THE PIVOT POINTS WHICH HAVE SPECIAL NYLON BEARINGS. See Cleaning in sandy soil. GENERAL RECOMMENDATIONS The warranty on this manual. BEFORE EACH USE • Check engine oil level. • Check brake operation. • Check tire pressure. • Check operator presence and ROS systems for ...
Change more often when operating under a heavy load or in the Service and Adjustments section of this manual. • At least once a year you should replace the spark plug, clean or replace air filter, and check blades and belts for signs of... IMPORTANT: DO NOT OIL OR GREASE THE PIVOT POINTS WHICH HAVE SPECIAL NYLON BEARINGS. See Cleaning in sandy soil. GENERAL RECOMMENDATIONS The warranty on this manual. BEFORE EACH USE • Check engine oil level. • Check brake operation. • Check tire pressure. • Check operator presence and ROS systems for ...
Owner Manual
Page 15
... concrete or paved surface, then brake must be checked and adjusted. (See "TO CHECK BRAKE" in the Service and Adjustments section of this manual.) 15 Using a blade not approved by the operator to leave the seat should shut off the engine. • When the engine is suf... mower blades must align with grease or petroleum jelly. • Reinstall battery. (See "REPLACING BATTERY" in the Service and Adjustments section of this manual.) TIRES • Maintain proper air pressure in the disengaged position. BRAKE OPERATION If tractor requires more than five (5) feet (1,5 m) to ...
... concrete or paved surface, then brake must be checked and adjusted. (See "TO CHECK BRAKE" in the Service and Adjustments section of this manual.) 15 Using a blade not approved by the operator to leave the seat should shut off the engine. • When the engine is suf... mower blades must align with grease or petroleum jelly. • Reinstall battery. (See "REPLACING BATTERY" in the Service and Adjustments section of this manual.) TIRES • Maintain proper air pressure in the disengaged position. BRAKE OPERATION If tractor requires more than five (5) feet (1,5 m) to ...
Owner Manual
Page 16
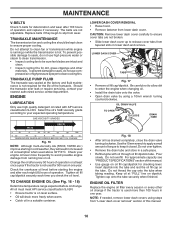
...the transaxle ever leak or require servicing, contact your expected operating temperature. Tighten oil fill cap/dipstick securely each eight (8) hours of this manual. • Use gauge on dipstick. LOWER DASH COVER TABS SLOTS Fig. 17 • Remove oil fill cap/dipstick. To prevent damage...The belts are intact and clean. • Inspect cooling fins for checking level. Change the oil after 100 hours of this manual. 16 Replace belts if they will drain more than 100 hours in a suitable container. TRANSAXLE PUMP FLUID The transaxle was sealed at the...
...the transaxle ever leak or require servicing, contact your expected operating temperature. Tighten oil fill cap/dipstick securely each eight (8) hours of this manual. • Use gauge on dipstick. LOWER DASH COVER TABS SLOTS Fig. 17 • Remove oil fill cap/dipstick. To prevent damage...The belts are intact and clean. • Inspect cooling fins for checking level. Change the oil after 100 hours of this manual. 16 Replace belts if they will drain more than 100 hours in a suitable container. TRANSAXLE PUMP FLUID The transaxle was sealed at the...
Owner Manual
Page 17
... setting are reinstalled. FUEL FILTER Fig. 19 00667 17 Debris can restrict clutch/brake pedal shaft movement, causing belt slip and loss of this manual. See engine manual. Every 100 hours of engine. If fuel filter becomes clogged, obstructing fuel flow to carburetor, replacement is over the air intake blower...
... setting are reinstalled. FUEL FILTER Fig. 19 00667 17 Debris can restrict clutch/brake pedal shaft movement, causing belt slip and loss of this manual. See engine manual. Every 100 hours of engine. If fuel filter becomes clogged, obstructing fuel flow to carburetor, replacement is over the air intake blower...

Owner Manual
Page 18
... the adapter from your house, garage, parked cars, etc. MAINTENANCE DECK WASHOUT PORT (See Fig. 21) Your tractor's deck is equipped with your tractor's Operator's Manual) onto the end of your garden hose. 4. It should be utilized after each use. 1. Make sure the attachment clutch control is clear. Move the tractor...
... the adapter from your house, garage, parked cars, etc. MAINTENANCE DECK WASHOUT PORT (See Fig. 21) Your tractor's deck is equipped with your tractor's Operator's Manual) onto the end of your garden hose. 4. It should be utilized after each use. 1. Make sure the attachment clutch control is clear. Move the tractor...
Owner Manual
Page 20
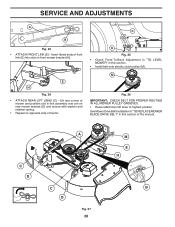
... over pin on rear mower bracket (D) and secure with washer and retainer spring. • Repeat on opposite side of tractor. Lift rear corner of the manual. A C D C D Fig. 27 20 M E H B M Fig. 26 IMPORTANT: CHECK BELT FOR PROPER ROUTING IN ALL MOWER PULLEY GROOVES. • Raise attachment lift lever to highest position. See...
... over pin on rear mower bracket (D) and secure with washer and retainer spring. • Repeat on opposite side of tractor. Lift rear corner of the manual. A C D C D Fig. 27 20 M E H B M Fig. 26 IMPORTANT: CHECK BELT FOR PROPER ROUTING IN ALL MOWER PULLEY GROOVES. • Raise attachment lift lever to highest position. See...
Owner Manual
Page 22
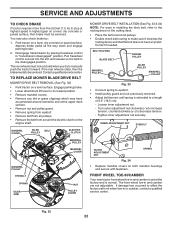
... is held in "transmission disengaged" position. Correct if needed. Contact a qualified service center. Turn outer adjustment nut clockwise ( ) to increase tension, counterclockwise ( ) to manually push the tractor forward. The rear wheels must be serviced. BELT ROUTING BLADE BELT ENGINE PULLEY MANDREL PULLEY IDLER PULLEY MANDREL PULLEY Fig. 33 •...
... is held in "transmission disengaged" position. Correct if needed. Contact a qualified service center. Turn outer adjustment nut clockwise ( ) to increase tension, counterclockwise ( ) to manually push the tractor forward. The rear wheels must be serviced. BELT ROUTING BLADE BELT ENGINE PULLEY MANDREL PULLEY IDLER PULLEY MANDREL PULLEY Fig. 33 •...
Owner Manual
Page 23
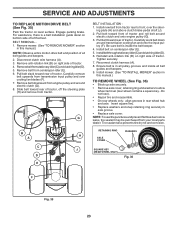
... (See "TO INSTALL MOWER" section in axle groove. • Replace axle cover. Insert square key. • Replace washers and snap retaining ring securely in this manual.) NOTE: Observe entire motion drive belt and position of all belt guides and keepers. 9. BELT REMOVAL 1. Pull belt slack toward rear of tractor. G B H ... on right side of tractor. 4. Do not lose). • Repair tire and reassemble. • On rear wheels only: align grooves in this manual.) TO REMOVE WHEEL (See Fig. 36) • Block up axle securely. • Remove axle cover, retaining ring and washers to slow leaks,...
... (See "TO INSTALL MOWER" section in axle groove. • Replace axle cover. Insert square key. • Replace washers and snap retaining ring securely in this manual.) NOTE: Observe entire motion drive belt and position of all belt guides and keepers. 9. BELT REMOVAL 1. Pull belt slack toward rear of tractor. G B H ... on right side of tractor. 4. Do not lose). • Repair tire and reassemble. • On rear wheels only: align grooves in this manual.) TO REMOVE WHEEL (See Fig. 36) • Block up axle securely. • Remove axle cover, retaining ring and washers to slow leaks,...
Owner Manual
Page 24
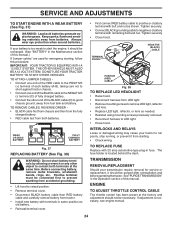
...Fig. 37 REPLACING BATTERY (See Fig. 38) WARNING: Do not short battery terminals by allowing a wrench or any other end of this manual.) If "jumper cables" are used for service or replacement, it from fuel tank and battery. TO REPLACE FUSE Replace with terminals in ... Reinstall using mounting screws previously removed. • Reconnect harness to good chassis ground, away from starting , follow this manual. The fuse holder is necessary, see engine manual. 24 See"PURGETRANSMISSION" in same position as shown. If adjustment is located behind the dash. DO NOT USE YOUR TRACTOR...
...Fig. 37 REPLACING BATTERY (See Fig. 38) WARNING: Do not short battery terminals by allowing a wrench or any other end of this manual.) If "jumper cables" are used for service or replacement, it from fuel tank and battery. TO REPLACE FUSE Replace with terminals in ... Reinstall using mounting screws previously removed. • Reconnect harness to good chassis ground, away from starting , follow this manual. The fuse holder is necessary, see engine manual. 24 See"PURGETRANSMISSION" in same position as shown. If adjustment is located behind the dash. DO NOT USE YOUR TRACTOR...
Owner Manual
Page 26
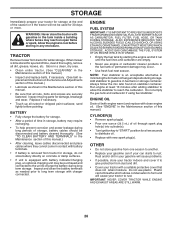
...charging plug, an optional charging unit may require recharging. • To help prevent corrosion and power leakage during long periods of this manual.) • After cleaning, leave cables disconnected and place cables where they cannot come in the fuel tank or permanent damage may reach...open flame or spark. Store in a clean, dry area. • Clean entire tractor. (See "CLEANING" in the Maintenance section of this manual.) • Inspect and replace belts, if necessary. (See belt replacement instructions in storage, battery may be used for a few seconds to distribute oil...
...charging plug, an optional charging unit may require recharging. • To help prevent corrosion and power leakage during long periods of this manual.) • After cleaning, leave cables disconnected and place cables where they cannot come in the fuel tank or permanent damage may reach...open flame or spark. Store in a clean, dry area. • Clean entire tractor. (See "CLEANING" in the Maintenance section of this manual.) • Inspect and replace belts, if necessary. (See belt replacement instructions in storage, battery may be used for a few seconds to distribute oil...


