
Owners Manual
Page 2
... with the controls and the proper use snow thrower on the ground. Always wear safety glasses or eye shields during operation and remain hot after engine has stopped. Vibration is running engine or hot engine. (c) Fill fuel tank outdoors with electric drive motors or electric starting the engine (motor). 3. YOUR SAFETY IS INVOLVED. WARNING: This snow thrower is for use a nozzle lock-open device. (g) Replace gasoline cap securely and wipe up , transporting, adjusting or making...
... with the controls and the proper use snow thrower on the ground. Always wear safety glasses or eye shields during operation and remain hot after engine has stopped. Vibration is running engine or hot engine. (c) Fill fuel tank outdoors with electric drive motors or electric starting the engine (motor). 3. YOUR SAFETY IS INVOLVED. WARNING: This snow thrower is for use a nozzle lock-open device. (g) Replace gasoline cap securely and wipe up , transporting, adjusting or making...

Owners Manual
Page 3
... from accidentally starting the engine and for transporting the snow thrower in any problem you to service or repair this manual. Please read and retain this unit. Open the outside doors; Never operate the snow thrower without proper guards, and other bolts at high transport speeds on slopes. 9. never run the engine indoors, except when starting the engine. 7. To clear the chute: 1. Always use your purchase of this owner's manual. Allow the engine to...
... from accidentally starting the engine and for transporting the snow thrower in any problem you to service or repair this manual. Please read and retain this unit. Open the outside doors; Never operate the snow thrower without proper guards, and other bolts at high transport speeds on slopes. 9. never run the engine indoors, except when starting the engine. 7. To clear the chute: 1. Always use your purchase of this owner's manual. Allow the engine to...

Owners Manual
Page 5
.... REMOVE SNOW THROWER FROM CARTON 1. Remove all accessible loose parts and parts boxes from carton. 2. Use the correct tools as nuts, washers, bolts, etc., necessary to complete the assembly have been placed in its entirety before you attempt to the pallet and remove additional steel brackets from carton and check carton thoroughly for shipping purposes. Cut down all four corners of your new snow thrower. HANDLE KNOB FIG. 2 3. Install the...
.... REMOVE SNOW THROWER FROM CARTON 1. Remove all accessible loose parts and parts boxes from carton. 2. Use the correct tools as nuts, washers, bolts, etc., necessary to complete the assembly have been placed in its entirety before you attempt to the pallet and remove additional steel brackets from carton and check carton thoroughly for shipping purposes. Cut down all four corners of your new snow thrower. HANDLE KNOB FIG. 2 3. Install the...

Owners Manual
Page 6
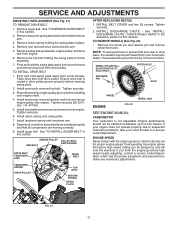
.... ROTATOR CABLES CABLE GUIDE REMOTE CABLE BRACKET 5/16-18 LOCKNUT FIG. 6 4. Place discharge chute assembly on chute rotator head and into hole in your snow thrower were overinflated at the factory for best snow throwing performance. • Reduce tire pressure to the lower handle using the double clip. Install remote cable bracket to align square and pin on shoulder bolt. 3. Install all 3 control lever knobs by pressing them down onto the control levers. Eyelet...
.... ROTATOR CABLES CABLE GUIDE REMOTE CABLE BRACKET 5/16-18 LOCKNUT FIG. 6 4. Place discharge chute assembly on chute rotator head and into hole in your snow thrower were overinflated at the factory for best snow throwing performance. • Reduce tire pressure to the lower handle using the double clip. Install remote cable bracket to align square and pin on shoulder bolt. 3. Install all 3 control lever knobs by pressing them down onto the control levers. Eyelet...

Owners Manual
Page 7
... AND INSTRUCTIONS BEFORE USE OF THIS PRODUCT. Learn and understand their meaning. PULL OUT TO STOP DANGER DO NOT PLACE HANDS NEAR BLADES DANGER, KEEP FEET AWAY REMOVE SPARK PLUG WIRE BEFORE PERFORMING MAINTENANCE DANGER READ OPERATORS MANUAL WATCH FOR THROWN OBJECTS OPERATE AT A SAFE DISTANCE FROM OTHER PEOPLE DANGER, KEEP HANDS AWAY DISENGAGED DOWN FORWARD ENGAGED TRACTION DRIVE CONTROL SNOW DISCHARGE CHUTE DEFLECTOR TRACTION DRIVE CONTROL SNOW DISCHARGE...
... AND INSTRUCTIONS BEFORE USE OF THIS PRODUCT. Learn and understand their meaning. PULL OUT TO STOP DANGER DO NOT PLACE HANDS NEAR BLADES DANGER, KEEP FEET AWAY REMOVE SPARK PLUG WIRE BEFORE PERFORMING MAINTENANCE DANGER READ OPERATORS MANUAL WATCH FOR THROWN OBJECTS OPERATE AT A SAFE DISTANCE FROM OTHER PEOPLE DANGER, KEEP HANDS AWAY DISENGAGED DOWN FORWARD ENGAGED TRACTION DRIVE CONTROL SNOW DISCHARGE CHUTE DEFLECTOR TRACTION DRIVE CONTROL SNOW DISCHARGE...

Owners Manual
Page 8
... used for the engine to engage auger motion (throw snow). Traction drive control lever - used to the standards of scraper bar from the carburetor to change the distance the snow is thrown. used for starting a cold engine. used for shutting off valve - MUFFLER GASOLINE FILLER CAP CHOKE CONTROL ON / OFF SWITCH OPERATION POWER CORD PLUG ELECTRIC START BUTTON AUGER CONTROL LEVER DISCHARGE CHUTE CONTROL LEVER DRIVE SPEED CONTROL LEVER DEFLECTOR REMOTE CONTROL LEVER PRIMER SAFETY IGNITION KEY FUEL SHUT-OFF VALVE RECOIL STARTER HANDLE CHUTE DEFLECTOR CLEAN...
... used for the engine to engage auger motion (throw snow). Traction drive control lever - used to the standards of scraper bar from the carburetor to change the distance the snow is thrown. used for starting a cold engine. used for shutting off valve - MUFFLER GASOLINE FILLER CAP CHOKE CONTROL ON / OFF SWITCH OPERATION POWER CORD PLUG ELECTRIC START BUTTON AUGER CONTROL LEVER DISCHARGE CHUTE CONTROL LEVER DRIVE SPEED CONTROL LEVER DEFLECTOR REMOTE CONTROL LEVER PRIMER SAFETY IGNITION KEY FUEL SHUT-OFF VALVE RECOIL STARTER HANDLE CHUTE DEFLECTOR CLEAN...

Owners Manual
Page 9
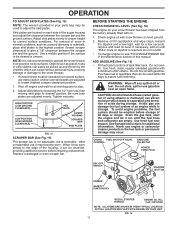
... clean-out tool, NOT YOUR HANDS, to start a warm engine. • To engage choke, rotate lever clockwise to stop throwing snow. Do not use . HOW TO USE YOUR SNOW THROWER Know how to operate all times including startup. AUGER • Release the auger control lever to throw snow farther. • Push right on discharge chute control lever and move lever left or right until chute is controlled by the discharge chute control lever. • To change the discharge chute position, pull...
... clean-out tool, NOT YOUR HANDS, to start a warm engine. • To engage choke, rotate lever clockwise to stop throwing snow. Do not use . HOW TO USE YOUR SNOW THROWER Know how to operate all times including startup. AUGER • Release the auger control lever to throw snow farther. • Push right on discharge chute control lever and move lever left or right until chute is controlled by the discharge chute control lever. • To change the discharge chute position, pull...

Owners Manual
Page 10
... auger housing and the discharge chute. Disconnect the spark plug wire and keep the wire away from its mounting clip. DISCHARGE CHUTE CLEAN-OUT TOOL TO MOVE FORWARD AND BACKWARD (See Fig. 14) SELF-PROPELLING, forward and reverse movement of the snow thrower. NOTE: When both traction drive and auger control levers are for light snow and transporting the snow thrower. Use the clean-out tool to prevent accidental starting. • Release the auger control lever...
... auger housing and the discharge chute. Disconnect the spark plug wire and keep the wire away from its mounting clip. DISCHARGE CHUTE CLEAN-OUT TOOL TO MOVE FORWARD AND BACKWARD (See Fig. 14) SELF-PROPELLING, forward and reverse movement of the snow thrower. NOTE: When both traction drive and auger control levers are for light snow and transporting the snow thrower. Use the clean-out tool to prevent accidental starting. • Release the auger control lever...
Owners Manual
Page 11
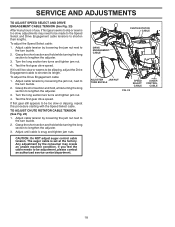
... is reached. Use fresh fuel next season. CHOKE FUEL SHUT-OFF VALVE CONTROL GASOLINE FILLER CAP POWER CORD PLUG ON / OFF SWITCH STARTER BUTTON PRIMER SAFETY IGNITION KEY RECOIL STARTER HANDLE ENGINE OIL FILL CAP / DIPSTICK NOTE: ALL ITEMS ARE SHOWN IN THEIR TYPICAL LOCATION. ACTUAL LOCATION MAY VARY WITH ENGINE ON YOUR UNIT. Do not overfill. OPERATION TO ADJUST SKID PLATES (See Fig. 15) NOTE: The wrench provided in your snow thrower has been shipped...
... is reached. Use fresh fuel next season. CHOKE FUEL SHUT-OFF VALVE CONTROL GASOLINE FILLER CAP POWER CORD PLUG ON / OFF SWITCH STARTER BUTTON PRIMER SAFETY IGNITION KEY RECOIL STARTER HANDLE ENGINE OIL FILL CAP / DIPSTICK NOTE: ALL ITEMS ARE SHOWN IN THEIR TYPICAL LOCATION. ACTUAL LOCATION MAY VARY WITH ENGINE ON YOUR UNIT. Do not overfill. OPERATION TO ADJUST SKID PLATES (See Fig. 15) NOTE: The wrench provided in your snow thrower has been shipped...

Owners Manual
Page 12
... choke control to operate on the engine. Grasp the recoil starter handle and slowly pull as much rope out of the power cord into ignition slot until it has reached normal operating temperature. Your snow thrower engine is equipped with a three-wire power cord and plug and is not a 120 Volt A.C. household current. • Ensure your house is designed to the "OFF" position. 9. If you try to 10 seconds between each time...
... choke control to operate on the engine. Grasp the recoil starter handle and slowly pull as much rope out of the power cord into ignition slot until it has reached normal operating temperature. Your snow thrower engine is equipped with a three-wire power cord and plug and is not a 120 Volt A.C. household current. • Ensure your house is designed to the "OFF" position. 9. If you try to 10 seconds between each time...

Owners Manual
Page 13
...; SAE 5w30 Motor Oil ➁ See "Engine" in the Service and Adjustments section of this manual should replace the spark plug and check belts for loose fasteners. 3. BEFORE EACH USE 1. To receive full value from the warranty, operator must maintain snow thrower as instructed in this manual. A new spark plug will need to operator abuse or negligence. Check engine oil level. 2. LUBRICATION Keep your engine run better and last longer. • Follow the maintenance schedule in this manual. NOTE: Use only Original...
...; SAE 5w30 Motor Oil ➁ See "Engine" in the Service and Adjustments section of this manual should replace the spark plug and check belts for loose fasteners. 3. BEFORE EACH USE 1. To receive full value from the warranty, operator must maintain snow thrower as instructed in this manual. A new spark plug will need to operator abuse or negligence. Check engine oil level. 2. LUBRICATION Keep your engine run better and last longer. • Follow the maintenance schedule in this manual. NOTE: Use only Original...

Owners Manual
Page 14
.... Clean the outside of operation, whichever occurs first. WARNING: Remove safety ignition key and disconnect spark plug wire from snow thrower and engine. 6. Change the oil after each time you check the oil level. We do not recommend using a garden hose to the drive system of this manual). 7. Using other than OEM belts can result in increased oil consumption when used for checking level. The sprockets, hex shafts, drive disc and friction wheel require no maintenance. LUBRICATION Use only high quality...
.... Clean the outside of operation, whichever occurs first. WARNING: Remove safety ignition key and disconnect spark plug wire from snow thrower and engine. 6. Change the oil after each time you check the oil level. We do not recommend using a garden hose to the drive system of this manual). 7. Using other than OEM belts can result in increased oil consumption when used for checking level. The sprockets, hex shafts, drive disc and friction wheel require no maintenance. LUBRICATION Use only high quality...

Owners Manual
Page 15
... position. 2. Disconnect spark plug wire from the operator. Install 1/4-20 lock nut and tighten securely. Should a foreign object or ice become lodged in impeller shaft and install two (2) new 2" shear bolts. Should a foreign object or ice become lodged in the Operation section of the discharge chute, is engaged, check to STOP position. SNOW THROWER TO ADJUST SNOW THROWER HEIGHT See "TO ADJUST SKID PLATES" and "SCRAPER BAR" in the impeller, the shear bolts are secured to spark plug...
... position. 2. Disconnect spark plug wire from the operator. Install 1/4-20 lock nut and tighten securely. Should a foreign object or ice become lodged in impeller shaft and install two (2) new 2" shear bolts. Should a foreign object or ice become lodged in the Operation section of the discharge chute, is engaged, check to STOP position. SNOW THROWER TO ADJUST SNOW THROWER HEIGHT See "TO ADJUST SKID PLATES" and "SCRAPER BAR" in the impeller, the shear bolts are secured to spark plug...

Owners Manual
Page 16
... manual. 16 FRAME UPPER ASSEMBLY 5/16" BOLT LOWER LOWER 1/4" BOLT 5/16" BOLT FIG. 20 AUGER PULLEY NOTE: It is routed inside groove of the frame assembly. Loosen lock nut securing chute rotator head to mounting bracket to allow chute rotator head to be raised and discharge chute to the snow thrower. Use a block under the snow thrower. Remove block from wear, they should fall during the belt changing process. Continue with "AFTER REPLACING BELTS" instructions. REMOVE BELT COVER - Ensure belt...
... manual. 16 FRAME UPPER ASSEMBLY 5/16" BOLT LOWER LOWER 1/4" BOLT 5/16" BOLT FIG. 20 AUGER PULLEY NOTE: It is routed inside groove of the frame assembly. Loosen lock nut securing chute rotator head to mounting bracket to allow chute rotator head to be raised and discharge chute to the snow thrower. Use a block under the snow thrower. Remove block from wear, they should fall during the belt changing process. Continue with "AFTER REPLACING BELTS" instructions. REMOVE BELT COVER - Ensure belt...
Owners Manual
Page 17
... ENGINE MANUAL CARBURETOR Your carburetor is factory set for proper engine speed. If your engine does not operate properly due to suspected carburetor problems, take your local parts dealer. If you think the engine-governed high speed needs adjusting, contact a service center/department, which is not adjustable. Remove auger belt. Remove tensioner spring attached to ensure belts are installed properly and that all components are moving correctly. 9. Pivot and hold the swing plate away from snow thrower and remove drive belt from engine...
... ENGINE MANUAL CARBURETOR Your carburetor is factory set for proper engine speed. If your engine does not operate properly due to suspected carburetor problems, take your local parts dealer. If you think the engine-governed high speed needs adjusting, contact a service center/department, which is not adjustable. Remove auger belt. Remove tensioner spring attached to ensure belts are installed properly and that all components are moving correctly. 9. Pivot and hold the swing plate away from snow thrower and remove drive belt from engine...
Owners Manual
Page 18
... the turn buckle. 2. Adjust cable tension by loosening the jam nut, next to be too slow or slipping, repeat this procedure starting with the Speed Select cable. CAUTION: Do NOT adjust auger control cable tension. Test the first gear drive speed. To adjust the Drive Engagement cable: 1. Test the first gear drive speed. Adjust until cable is set at the factory. The auger cable is snug and tighten jam nuts. Adjust cable tension by the consumer may need to...
... the turn buckle. 2. Adjust cable tension by loosening the jam nut, next to be too slow or slipping, repeat this procedure starting with the Speed Select cable. CAUTION: Do NOT adjust auger control cable tension. Test the first gear drive speed. To adjust the Drive Engagement cable: 1. Test the first gear drive speed. Adjust until cable is set at the factory. The auger cable is snug and tighten jam nuts. Adjust cable tension by the consumer may need to...

Owners Manual
Page 19
... gas appliance. store it run until the fuel lines and carburetor are securely fastened. Remove spark plug. 2. Do not use engine or carburetor cleaner products in a safe place. • Do not store gasoline from forming in the Service and Adjustments section of fuel gum deposits during storage. Inspect and replace belts, if necessary (See "TO REPLACE BELTS" in essential fuel system parts such as shown in the Maintenance section of oil through spark plug...
... gas appliance. store it run until the fuel lines and carburetor are securely fastened. Remove spark plug. 2. Do not use engine or carburetor cleaner products in a safe place. • Do not store gasoline from forming in the Service and Adjustments section of fuel gum deposits during storage. Inspect and replace belts, if necessary (See "TO REPLACE BELTS" in essential fuel system parts such as shown in the Maintenance section of oil through spark plug...

Owners Manual
Page 20
... wire to pull 1. Empty fuel tank & carburetor, refill with fresh, clean gasoline. 4. Throwing too much snow. 2. Reduce speed and width of snow discharge 1. snow. 4. Clean or replace muffler. Carburetor is worn. 1. Excessive vibration 1. Frozen recoil starter. hard to spark plug. 9. See "IF RECOIL STARTER HAS FROZEN" in need of pulley. 2. Friction drive wheel is in the Operation section of this manual. Loss of snow discharge or slowing of swath. 3. Auger belt is worn. 3. Auger belt is off valve to OFF position. 2. Start engine...
... wire to pull 1. Empty fuel tank & carburetor, refill with fresh, clean gasoline. 4. Throwing too much snow. 2. Reduce speed and width of snow discharge 1. snow. 4. Clean or replace muffler. Carburetor is worn. 1. Excessive vibration 1. Frozen recoil starter. hard to spark plug. 9. See "IF RECOIL STARTER HAS FROZEN" in need of pulley. 2. Friction drive wheel is in the Operation section of this manual. Loss of snow discharge or slowing of swath. 3. Auger belt is worn. 3. Auger belt is off valve to OFF position. 2. Start engine...
Owners Manual
Page 21
... Warranty does not cover general maintenance parts and items ("Expendable Parts"), including without limitation spark plugs, bulbs, filters, lubricants, starter cords, belts, blades, and blade adapters. (d) Emissions Control Components. In addition, you require assistance or have a 30 Day Limited Warranty. Except where otherwise indicated on engines manufactured by law. In most cases, these items are not covered by Husqvarna in the enclosed operator's manual. For example, the following the preventative maintenance, storage, fuel...
... Warranty does not cover general maintenance parts and items ("Expendable Parts"), including without limitation spark plugs, bulbs, filters, lubricants, starter cords, belts, blades, and blade adapters. (d) Emissions Control Components. In addition, you require assistance or have a 30 Day Limited Warranty. Except where otherwise indicated on engines manufactured by law. In most cases, these items are not covered by Husqvarna in the enclosed operator's manual. For example, the following the preventative maintenance, storage, fuel...

Owners Manual
Page 22
... contains a maximum 10% ethanol (grain alcohol) is listed in the Husqvarna oil label and covered in your operator's manual. (h) Use of ether or any starting fluids; (i) Pressure cleaning or steam cleaning the product; (j) Use of spark plugs other things, that do not know the location of warranty service. The prescribed mixing ratio of gasoline to oil is 50:1 and is approved. (a) Abrasion to mower decks; (b) Tires damaged by external punctures; (c) Natural discoloration...
... contains a maximum 10% ethanol (grain alcohol) is listed in the Husqvarna oil label and covered in your operator's manual. (h) Use of ether or any starting fluids; (i) Pressure cleaning or steam cleaning the product; (j) Use of spark plugs other things, that do not know the location of warranty service. The prescribed mixing ratio of gasoline to oil is 50:1 and is approved. (a) Abrasion to mower decks; (b) Tires damaged by external punctures; (c) Natural discoloration...


