
Owners Manual
Page 2
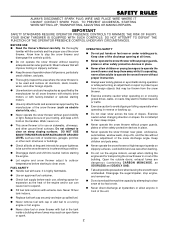
... q Handle fuel with extreme care. IMPORTANT SAFETY STANDARDS REQUIRE OPERATOR PRESENCE CONTROLS TO MINIMIZE THE RISK OF INJURY. SAFETY RULES ALWAYS DISCONNECT SPARK PLUG WIRE AND PLACE WIRE WHERE IT CANNOT CONTACT SPARK PLUG TO PREVENT ACCIDENTAL STARTING WHEN SETTING-UP, TRANSPORTING, ADJUSTING OR MAKING REPAIRS. Know how to operate the snow thrower without proper guards, plates or other ground level surfaces. never run the engine indoors, except when starting motors. DO NOT USE SNOW THROWER...
... q Handle fuel with extreme care. IMPORTANT SAFETY STANDARDS REQUIRE OPERATOR PRESENCE CONTROLS TO MINIMIZE THE RISK OF INJURY. SAFETY RULES ALWAYS DISCONNECT SPARK PLUG WIRE AND PLACE WIRE WHERE IT CANNOT CONTACT SPARK PLUG TO PREVENT ACCIDENTAL STARTING WHEN SETTING-UP, TRANSPORTING, ADJUSTING OR MAKING REPAIRS. Know how to operate the snow thrower without proper guards, plates or other ground level surfaces. never run the engine indoors, except when starting motors. DO NOT USE SNOW THROWER...
Owners Manual
Page 3
... ENGINE (OR ELECTRIC MOTOR) WHENEVER YOU LEAVE THE OPERATING POSITION, BEFORE UNCLOGGING THE AUGER/IMPELLER HOUSING OR DISCHARGE GUIDE, AND WHEN MAKING ANY REPAIRS, ADJUSTMENTS, OR INSPECTIONS. BECOME ALERT!!! q Disengage power to make certain the auger/impeller and all moving parts have stopped. IT MEANS-ATTENTION!!! The engine exhaust from this manual or the engine manual). REMOVE WIRE FROM SPARK PLUG OR DISCONNECT CORD FROM ELECTRIC MOTOR. Allow the engine to prevent accidental starting. Disconnect the spark plug wire...
... ENGINE (OR ELECTRIC MOTOR) WHENEVER YOU LEAVE THE OPERATING POSITION, BEFORE UNCLOGGING THE AUGER/IMPELLER HOUSING OR DISCHARGE GUIDE, AND WHEN MAKING ANY REPAIRS, ADJUSTMENTS, OR INSPECTIONS. BECOME ALERT!!! q Disengage power to make certain the auger/impeller and all moving parts have stopped. IT MEANS-ATTENTION!!! The engine exhaust from this manual or the engine manual). REMOVE WIRE FROM SPARK PLUG OR DISCONNECT CORD FROM ELECTRIC MOTOR. Allow the engine to prevent accidental starting. Disconnect the spark plug wire...
Owners Manual
Page 4
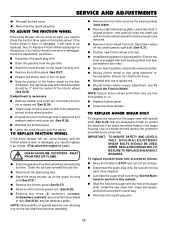
... To Adjust Scraper Bar 24 To Adjust Clutch Control Cables 24 To Adjust Belts Auger Drive Belt 24-25 Traction Drive Belt 25 To Replace Belts Auger Drive Belt 25 Traction Drive Belt 25 To Adjust The Belt Guides 25-26 To Adjust The Friction Wheel 26 To Replace Friction Wheel 26 To Replace Auger Shear Bolt 26 To Adjust Carburetor 27 To Adjust Or Replace The Spark Plug 27 STORAGE 28 TROUBLE SHOOTING 29 REPAIR PARTS 30-45 WARRANTY Back Cover NOTICE: Photographs and illustrations in case of loss or theft. MODEL NUMBER...
... To Adjust Scraper Bar 24 To Adjust Clutch Control Cables 24 To Adjust Belts Auger Drive Belt 24-25 Traction Drive Belt 25 To Replace Belts Auger Drive Belt 25 Traction Drive Belt 25 To Adjust The Belt Guides 25-26 To Adjust The Friction Wheel 26 To Replace Friction Wheel 26 To Replace Auger Shear Bolt 26 To Adjust Carburetor 27 To Adjust Or Replace The Spark Plug 27 STORAGE 28 TROUBLE SHOOTING 29 REPAIR PARTS 30-45 WARRANTY Back Cover NOTICE: Photographs and illustrations in case of loss or theft. MODEL NUMBER...

Owners Manual
Page 5
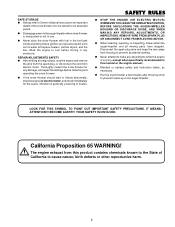
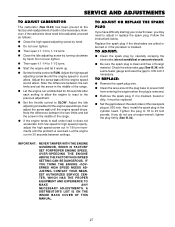
... START ENGINE RUN OFF ELECTRIC START ENGINE STOP ON CHOKE OFF CHOKE ON STOP THROTTLE FAST SLOW NEUTRAL PRIMER BUTTON IGNITION KEY IGNITION OFF IGNITION ON FUEL OIL FUEL OIL MIXTURE TRANSMISSION DRIVE CLUTCH AUGER CLUTCH AUGER/ COLLECTOR FORWARD REVERSE DISCHARGE CHUTE - TURN RIGHT DISCHARGE CHUTE - UP POSITION DISCHARGE CHUTE - DOWN POSITION IGNITION KEY INSERT TO RUN PULL OUT TO STOP DISCHARGE CHUTE - TURN LEFT CAUTION READ OWNER'S MANUAL KEEP HANDS, FEET, AND CLOTHING AWAY! KEEP BYSTANDERS AWAY BEWARE OF THROWN OBJECTS HOT SURFACE 5 DO NOT USE...
... START ENGINE RUN OFF ELECTRIC START ENGINE STOP ON CHOKE OFF CHOKE ON STOP THROTTLE FAST SLOW NEUTRAL PRIMER BUTTON IGNITION KEY IGNITION OFF IGNITION ON FUEL OIL FUEL OIL MIXTURE TRANSMISSION DRIVE CLUTCH AUGER CLUTCH AUGER/ COLLECTOR FORWARD REVERSE DISCHARGE CHUTE - TURN RIGHT DISCHARGE CHUTE - UP POSITION DISCHARGE CHUTE - DOWN POSITION IGNITION KEY INSERT TO RUN PULL OUT TO STOP DISCHARGE CHUTE - TURN LEFT CAUTION READ OWNER'S MANUAL KEEP HANDS, FEET, AND CLOTHING AWAY! KEEP BYSTANDERS AWAY BEWARE OF THROWN OBJECTS HOT SURFACE 5 DO NOT USE...

Owners Manual
Page 16
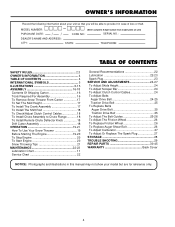
... Wrenches (or adjustable wrenches) 1 - CONTENTS OF SHIPPING CARTON 1- Spring for the crank assembly, shift rod assembly and knob and upper handle, which is in the folded down position. 1- Parts Box Containing: 1 - Chute Assembly (may be assembled) 1 - Spare 1/4-20 Locknuts 1 - 3/8 - 16 Hex Nut 2 - 3/8 Inch Flat Washers 1 - 3/8 Inch Lockwasher 2 - Spare Shear Bolt Spacers 1 - Shift Lever Knob 1 - Bag of 5W30 Oil 1 - Crank Assembly 1 - Owner's Manual (Not Shown) 1- Spring (Remote Chute Return) 16 Container of Assembly parts containing: ASSEMBLY TOOLS REQUIRED FOR...
... Wrenches (or adjustable wrenches) 1 - CONTENTS OF SHIPPING CARTON 1- Spring for the crank assembly, shift rod assembly and knob and upper handle, which is in the folded down position. 1- Parts Box Containing: 1 - Chute Assembly (may be assembled) 1 - Spare 1/4-20 Locknuts 1 - 3/8 - 16 Hex Nut 2 - 3/8 Inch Flat Washers 1 - 3/8 Inch Lockwasher 2 - Spare Shear Bolt Spacers 1 - Shift Lever Knob 1 - Bag of 5W30 Oil 1 - Crank Assembly 1 - Owner's Manual (Not Shown) 1- Spring (Remote Chute Return) 16 Container of Assembly parts containing: ASSEMBLY TOOLS REQUIRED FOR...
Owners Manual
Page 17
... snow thrower in the lower hole as shown. ASSEMBLY TO INSTALL THE CRANK ASSEMBLY q On the right side of crank rod around universal joint, lining up large holes. q Remove the plastic bag, plastic cap, cotter pin and washer from carton. q Cut the cable ties attached to the auger. q Place yoke end of the handle, install the following (found in parts box) in the shipping position. q Install "eye" bolt through assembly...
... snow thrower in the lower hole as shown. ASSEMBLY TO INSTALL THE CRANK ASSEMBLY q On the right side of crank rod around universal joint, lining up large holes. q Remove the plastic bag, plastic cap, cotter pin and washer from carton. q Cut the cable ties attached to the auger. q Place yoke end of the handle, install the following (found in parts box) in the shipping position. q Install "eye" bolt through assembly...

Owners Manual
Page 18
... in speed rod and attach washer and cotter pin (See III.7). TO CHECK/ADJUST CLUTCH CONTROL CABLES The control cables attached to the auger clutch lever and traction clutch lever may need to the shifter lever with tabs on checking or adjusting the control cables. Refer to ensure proper placement of the lever knob (See III. 8-A). q Position snow chute on snow chute flange and align the three holes in the snow chute with one (1) flatwasher and (1) cotter pin (See III.6). DRIFT CUTTER ASSEMBLY...
... in speed rod and attach washer and cotter pin (See III.7). TO CHECK/ADJUST CLUTCH CONTROL CABLES The control cables attached to the auger clutch lever and traction clutch lever may need to the shifter lever with tabs on checking or adjusting the control cables. Refer to ensure proper placement of the lever knob (See III. 8-A). q Position snow chute on snow chute flange and align the three holes in the snow chute with one (1) flatwasher and (1) cotter pin (See III.6). DRIFT CUTTER ASSEMBLY...
Owners Manual
Page 19
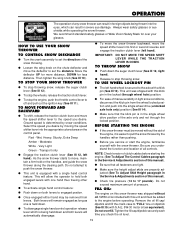
... speed you check the oil level. 19 q To stop throwing snow, release the auger clutch lever (See III 12). This will automatically disengage. Do not overfill. TO THROW SNOW q Push down and both levers to the engine before starting the engine. (See To Adjust The Control Cables paragraph in the Service & Adjustments section of any snow thrower can result in the locked (through the locked position. q To stop throwing snow. Be sure you service or start...
... speed you check the oil level. 19 q To stop throwing snow, release the auger clutch lever (See III 12). This will automatically disengage. Do not overfill. TO THROW SNOW q Push down and both levers to the engine before starting the engine. (See To Adjust The Control Cables paragraph in the Service & Adjustments section of any snow thrower can result in the locked (through the locked position. q To stop throwing snow. Be sure you service or start...
Owners Manual
Page 20
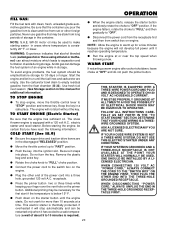
... longer. The snow thrower engine is thermally protected. q Run the engine at or near the top speed when throwing snow. electric starter and recoil starter. If the engine falters, rotate the choke to "FULL" and then gradually to a safe temperature (a wait of the power cord into the ignition slot. OPERATION FILL GAS: Fill the fuel tank with a 120 volt A.C. FOLLOW ALL INSTRUCTIONS CAREFULLY AS SET FORTH IN THE "TO START ENGINE" SECTION. WHEN...
... longer. The snow thrower engine is thermally protected. q Run the engine at or near the top speed when throwing snow. electric starter and recoil starter. If the engine falters, rotate the choke to "FULL" and then gradually to a safe temperature (a wait of the power cord into the ignition slot. OPERATION FILL GAS: Fill the fuel tank with a 120 volt A.C. FOLLOW ALL INSTRUCTIONS CAREFULLY AS SET FORTH IN THE "TO START ENGINE" SECTION. WHEN...

Owners Manual
Page 21
... be run at this power setting at 1-1/4" below the scraper bar (see To Adjust Skid Height paragraph in area of control levers. q Clean the snow thrower thoroughly after each path previously taken. MAKE SURE TO WIPE UP ANY SPILLED FUEL BEFORE STARTING THE ENGINE. Go slower in removing snow, adjust ground speed, NEVER the throttle. OPERATION GASOLINE IS FLAMMABLE AND CAUTION MUST BE USED WHEN HANDLING OR STORING IT. ALWAYS FILL FUEL TANK...
... be run at this power setting at 1-1/4" below the scraper bar (see To Adjust Skid Height paragraph in area of control levers. q Clean the snow thrower thoroughly after each path previously taken. MAKE SURE TO WIPE UP ANY SPILLED FUEL BEFORE STARTING THE ENGINE. Go slower in removing snow, adjust ground speed, NEVER the throttle. OPERATION GASOLINE IS FLAMMABLE AND CAUTION MUST BE USED WHEN HANDLING OR STORING IT. ALWAYS FILL FUEL TANK...
Owners Manual
Page 22
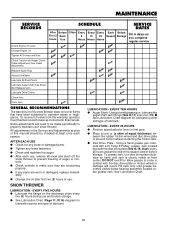
...lever in first gear. To receive full value from the warranty, operator must maintain snow thrower as you complete regular service Tighten All Screws and Nuts Check Traction and Auger Clutch Cable Adjustment (See Cable Adjustment) Replace Spark Plug Adjust Drive Belts Lubricate All Pivot Points Lubricate Auger Shaft (See Shear Bolt Replacement) Lubricate Drive Chains Check Fuel Drain Fuel GENERAL RECOMMENDATIONS The warranty on the discharge chute every five (5) hours during use and before storage. MAINTENANCE SERVICE RECORDS Check Engine Oil Level Change Engine Oil SCHEDULE SERVICE...
...lever in first gear. To receive full value from the warranty, operator must maintain snow thrower as you complete regular service Tighten All Screws and Nuts Check Traction and Auger Clutch Cable Adjustment (See Cable Adjustment) Replace Spark Plug Adjust Drive Belts Lubricate All Pivot Points Lubricate Auger Shaft (See Shear Bolt Replacement) Lubricate Drive Chains Check Fuel Drain Fuel GENERAL RECOMMENDATIONS The warranty on the discharge chute every five (5) hours during use and before storage. MAINTENANCE SERVICE RECORDS Check Engine Oil Level Change Engine Oil SCHEDULE SERVICE...

Owners Manual
Page 23
... spark plug wire. NOTE: For rocky or uneven surfaces, raise the front of the cables may be reversed. If the scraper bar must be cleaned. q Pull spring cover up to 17 pounds. It may be replaced due to allow 1/8" between the center and top of the hole in parts bag) under each end of the snow thrower down . If the auger drive belt is necessary: q Remove gas from drive lever...
... spark plug wire. NOTE: For rocky or uneven surfaces, raise the front of the cables may be reversed. If the scraper bar must be cleaned. q Pull spring cover up to 17 pounds. It may be replaced due to allow 1/8" between the center and top of the hole in parts bag) under each end of the snow thrower down . If the auger drive belt is necessary: q Remove gas from drive lever...
Owners Manual
Page 24
...constant spring pressure and does not require adjustment. AUGER DRIVE BELT If your nearest authorized service representative. q Remove belt from engine pulley. q Auger housing and motor mount frame will not move the auger idler pulley more than once to be replaced, proceed as follows: q Disconnect the spark plug wire. q Install new replacement belt of the same type onto traction pulley. q Reconnect the spark plug wire. q Remove auger drive belt from engine drive pulley. q Remove the belt cover. q Replace the belt cover. TO REPLACE BELTS The drive belts on this snow thrower are...
...constant spring pressure and does not require adjustment. AUGER DRIVE BELT If your nearest authorized service representative. q Remove belt from engine pulley. q Auger housing and motor mount frame will not move the auger idler pulley more than once to be replaced, proceed as follows: q Disconnect the spark plug wire. q Install new replacement belt of the same type onto traction pulley. q Reconnect the spark plug wire. q Remove auger drive belt from engine drive pulley. q Remove the belt cover. q Replace the belt cover. TO REPLACE BELTS The drive belts on this snow thrower are...
Owners Manual
Page 25
... pin connecting trunion nut to obtain the correct friction wheel position. q Lower the snow thrower onto the tracks. q Remove the bottom panel (See III.27). Ensure hex shaft turns freely. If adjustment is not worn or damaged, check the adjustment, as follows: q Move the throttle to original position. q Reinstall the bottom panel. Slip friction wheel off all moving parts have stopped. q Reconnect the spark plug wire. q Disconnect the spark plug wire. Install the new shear bolt, shear bolt...
... pin connecting trunion nut to obtain the correct friction wheel position. q Lower the snow thrower onto the tracks. q Remove the bottom panel (See III.27). Ensure hex shaft turns freely. If adjustment is not worn or damaged, check the adjustment, as follows: q Move the throttle to original position. q Reinstall the bottom panel. Slip friction wheel off all moving parts have stopped. q Reconnect the spark plug wire. q Disconnect the spark plug wire. Install the new shear bolt, shear bolt...
Owners Manual
Page 26
... SET FORPROPER ENGINE SPEED. ERNED HIGH SPEED NEEDS AD- SERVICE AND ADJUSTMENTS TO ADJUST CARBURETOR The carburetor (See III.33) has been pre-set at .030 inch. Adjust the high speed adjusting screw in the cylinder head. Adjust the screw out until the engine speed drops. Let the engine run undisturbed for 30 seconds between the two limits and set the screw in 1/8 turn increments until the engine speed or sound alters. TO REPLACE: q Remove the spark plug wire. q Remove the spark plug. Next, install the spark plug in until the problem...
... SET FORPROPER ENGINE SPEED. ERNED HIGH SPEED NEEDS AD- SERVICE AND ADJUSTMENTS TO ADJUST CARBURETOR The carburetor (See III.33) has been pre-set at .030 inch. Adjust the high speed adjusting screw in the cylinder head. Adjust the screw out until the engine speed drops. Let the engine run undisturbed for 30 seconds between the two limits and set the screw in 1/8 turn increments until the engine speed or sound alters. TO REPLACE: q Remove the spark plug wire. q Remove the spark plug. Next, install the spark plug in until the problem...

Owners Manual
Page 27
.... Drain the fuel and reinstall the fuel line. STORAGE q Start the engine and run at least 10 minutes after adding stabilizer to allow the stabilizer to reach the carburetor. q Remove the spark plug and squirt one (1) ounce of fuel gum deposits during storage. OTHER q If possible, store your snow thrower for storage at the end of the blower housing auger and the impeller with a suitable protective cover that...
.... Drain the fuel and reinstall the fuel line. STORAGE q Start the engine and run at least 10 minutes after adding stabilizer to allow the stabilizer to reach the carburetor. q Remove the spark plug and squirt one (1) ounce of fuel gum deposits during storage. OTHER q If possible, store your snow thrower for storage at the end of the blower housing auger and the impeller with a suitable protective cover that...
Owners Manual
Page 28
... auger housing. CORRECTION Replace defective plug. Adjust carburetor. Adjust auger drive belt; Adjust auger control cable. Foreign object lodged in fuel system. Tighten all bolts and make all necessary repairs. If vibration continues, have the unit serviced by a competent repairman. Replace shear bolt. Stop engine immediately and disconnect spark plug wire. TROUBLESHOOTING POINTS TROUBLE Difficult starting Engine runs erratic Engine stalls Engine runs erratic; Use carburetor bowl drain to flush and refill with fresh fuel. Replace drive belt. Loose parts...
... auger housing. CORRECTION Replace defective plug. Adjust carburetor. Adjust auger drive belt; Adjust auger control cable. Foreign object lodged in fuel system. Tighten all bolts and make all necessary repairs. If vibration continues, have the unit serviced by a competent repairman. Replace shear bolt. Stop engine immediately and disconnect spark plug wire. TROUBLESHOOTING POINTS TROUBLE Difficult starting Engine runs erratic Engine stalls Engine runs erratic; Use carburetor bowl drain to flush and refill with fresh fuel. Replace drive belt. Loose parts...
Owners Manual
Page 30
... 121 100 REF. SCREW 5/16-24X1.00 NUT, 5/16-24 HEXWD FLLK SCREW, 5/16-18X.50 WAHHTAP COVER, BOTTOM WHEEL DRIVE SCREW 1/4-20 X .63 WAHHTAP IDLER SPRING FLATWASHER, .53X1.00X.063 BEARING FLANGE ASSY, SHAFT AUG CLUTCH LEVER, ASSY AUGER CLUTCH SPRING PIN .165DIAX.88LG BEARING, FLANGE NUT, 1/2 PUSH ON CABLE, .205 EYE 6.125LG BOLT, 3/8-16X1.25 CARR. FLATWASHER .406X.81X.065 PULLEY, IDLER NUT, 3/8-16 HEXCTRLKJAM SPOOL, CABLE AUGER CLUTCH SCREW 1/4-20X1.75 FLATWASHER...
... 121 100 REF. SCREW 5/16-24X1.00 NUT, 5/16-24 HEXWD FLLK SCREW, 5/16-18X.50 WAHHTAP COVER, BOTTOM WHEEL DRIVE SCREW 1/4-20 X .63 WAHHTAP IDLER SPRING FLATWASHER, .53X1.00X.063 BEARING FLANGE ASSY, SHAFT AUG CLUTCH LEVER, ASSY AUGER CLUTCH SPRING PIN .165DIAX.88LG BEARING, FLANGE NUT, 1/2 PUSH ON CABLE, .205 EYE 6.125LG BOLT, 3/8-16X1.25 CARR. FLATWASHER .406X.81X.065 PULLEY, IDLER NUT, 3/8-16 HEXCTRLKJAM SPOOL, CABLE AUGER CLUTCH SCREW 1/4-20X1.75 FLATWASHER...

Owners Manual
Page 33
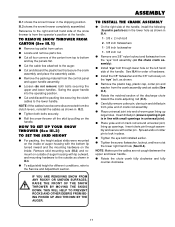
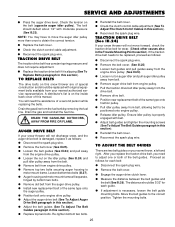
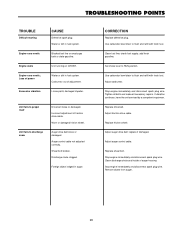
... 544 540 543 525 541 533 534 535 524 510 512 513 514 REF. 24" SNOW THROWER MODEL ST 724 AUGER HOUSING REPAIR PARTS 483 480 485 508 484 482 501 490 499 506 505 491 497 504 511 536 506 532 500 NOTE BOLT PATTERN ON FRAME BRACKETS ARE EXCLUSIVE TO 13" TIRE & TRAC APPLICATIONS. 530 493 REF... 14-11 BRACKET & NUTS ASSY 533 601 00 00-19 SCREW 3/8-16X.75 534 601 00 00-23 WASHER, RGSPTLK .393X.68X.10 535 601 00 00-12 NUT 3/8-16 REGHEXCTRLK 536 601 00 08-99 STUD, BRAKE ARM 540 601 00 17-45 BLADE, SCRAPER 24" 541 601 00 14-11 BOLT, 5/16-18X.75...
... 544 540 543 525 541 533 534 535 524 510 512 513 514 REF. 24" SNOW THROWER MODEL ST 724 AUGER HOUSING REPAIR PARTS 483 480 485 508 484 482 501 490 499 506 505 491 497 504 511 536 506 532 500 NOTE BOLT PATTERN ON FRAME BRACKETS ARE EXCLUSIVE TO 13" TIRE & TRAC APPLICATIONS. 530 493 REF... 14-11 BRACKET & NUTS ASSY 533 601 00 00-19 SCREW 3/8-16X.75 534 601 00 00-23 WASHER, RGSPTLK .393X.68X.10 535 601 00 00-12 NUT 3/8-16 REGHEXCTRLK 536 601 00 08-99 STUD, BRAKE ARM 540 601 00 17-45 BLADE, SCRAPER 24" 541 601 00 14-11 BOLT, 5/16-18X.75...

Owners Manual
Page 35
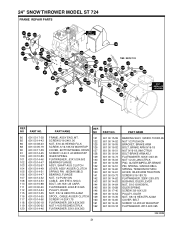
RIGHT WHEEL 653 676 652 655 671 654 675 671 650 655 678 656 675 677 678 673 REF. NO PART NO. 650 601 00 15-33 652 601 00 15-34 653 601 00 15-35 654 601 00 00-62 655 601 00 15-... 678 601 00 15-40 679 601 00 15-41 PART NAME SHAFT, AXLE WHEEL/MID SPROCKET & HUB ASSY SCREW 1/4-20X2.25 NUT, 1/4-20 REGHEXCTRLK BEARING, FLANGE CHAIN, ROLLER #42 X 40P FLATWASHER .765X1.12X.06 BUSHING, WHEEL 4"LG TIRE & RIM 13X5.0X6 SCREW, SHR 1/4-20X1.75 NUT 1/4-20 REGHEXCTRLK RING, RETAINING PIN, KLIK 318542E 36 24" SNOW THROWER MODEL ST 724 WHEEL ASSEMBLY REPAIR PARTS 679 REF. LEFT...
RIGHT WHEEL 653 676 652 655 671 654 675 671 650 655 678 656 675 677 678 673 REF. NO PART NO. 650 601 00 15-33 652 601 00 15-34 653 601 00 15-35 654 601 00 00-62 655 601 00 15-... 678 601 00 15-40 679 601 00 15-41 PART NAME SHAFT, AXLE WHEEL/MID SPROCKET & HUB ASSY SCREW 1/4-20X2.25 NUT, 1/4-20 REGHEXCTRLK BEARING, FLANGE CHAIN, ROLLER #42 X 40P FLATWASHER .765X1.12X.06 BUSHING, WHEEL 4"LG TIRE & RIM 13X5.0X6 SCREW, SHR 1/4-20X1.75 NUT 1/4-20 REGHEXCTRLK RING, RETAINING PIN, KLIK 318542E 36 24" SNOW THROWER MODEL ST 724 WHEEL ASSEMBLY REPAIR PARTS 679 REF. LEFT...


