
Owners Manual
Page 3
Contents Introduction 4 Good service 4 Serial Number 4 Symbols and Decals 6 Decals 6 Decal Locations 7 Safety 8 General Use 8 Preparations 9 Operating 10 Movement/Transport 11 Storage 11 Children 11 Fuel System 12 Maintenance 13 Assembly/Controls 14 Controls 15 Engine 16 Fueling 16 Cutting Unit 16 Depth Lever 16 Clutch 16 Blade versatility 17 Flail Blades 17 Delta Blades 17 Spring Tines 17 Operation 18 Seed Application 18 Preparing the Lawn 18 Seed Application Chart 18 Seed...
Contents Introduction 4 Good service 4 Serial Number 4 Symbols and Decals 6 Decals 6 Decal Locations 7 Safety 8 General Use 8 Preparations 9 Operating 10 Movement/Transport 11 Storage 11 Children 11 Fuel System 12 Maintenance 13 Assembly/Controls 14 Controls 15 Engine 16 Fueling 16 Cutting Unit 16 Depth Lever 16 Clutch 16 Blade versatility 17 Flail Blades 17 Delta Blades 17 Spring Tines 17 Operation 18 Seed Application 18 Preparing the Lawn 18 Seed Application Chart 18 Seed...
Owners Manual
Page 4
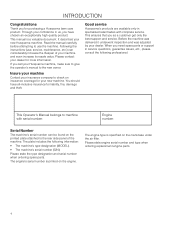
... and was adjusted by your new Husqvarna machine. Please contact your Husqvarna machine, make sure to give the operator's manual to use , service, maintenance, etc.) can be found on insurance coverage for more information. Insure your machine Contact your new machine. Please state engine serial number and type when ordering replacement engine parts. 4 Good service Husqvarna's products are available only in specialized retail trades with serial number: Engine number: Serial Number The machine's serial number can considerably...
... and was adjusted by your new Husqvarna machine. Please contact your Husqvarna machine, make sure to give the operator's manual to use , service, maintenance, etc.) can be found on insurance coverage for more information. Insure your machine Contact your new machine. Please state engine serial number and type when ordering replacement engine parts. 4 Good service Husqvarna's products are available only in specialized retail trades with serial number: Engine number: Serial Number The machine's serial number can considerably...
Owners Manual
Page 5
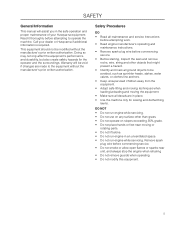
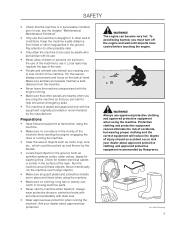
Read it thoroughly before commencing service. • Before starting, inspect the lawn and remove rocks, wire, string and other than grass. • Do not operate on any surface other objects that might present a hazard. • Identify and mark all ground objects to be avoided, such as sprinkler heads, stakes, water valves, or clothes line anchors. • Keep unsupervised children away from the...
Read it thoroughly before commencing service. • Before starting, inspect the lawn and remove rocks, wire, string and other than grass. • Do not operate on any surface other objects that might present a hazard. • Identify and mark all ground objects to be avoided, such as sprinkler heads, stakes, water valves, or clothes line anchors. • Keep unsupervised children away from the...
Owners Manual
Page 8
These safety instructions only address the basics for safe use the machine for sowing and dethatching lawns. For a replacement copy of tingling. If the user cannot read this manual, it before using the machine. The owner is responsible for training users. • Engage an authorized Husqvarna workshop for users and those in people who have impaired circulation. See the chapter "Symbols and...
These safety instructions only address the basics for safe use the machine for sowing and dethatching lawns. For a replacement copy of tingling. If the user cannot read this manual, it before using the machine. The owner is responsible for training users. • Engage an authorized Husqvarna workshop for users and those in people who have impaired circulation. See the chapter "Symbols and...
Owners Manual
Page 9
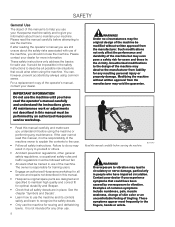
... starting the engine, engaging the drive or running the machine. Check for hidden electrical cables or similar in serviceable condition prior to be picked up and thrown by Husqvarna. 8011-670-aRunning 9 The engine can catch in moving machine parts. • Never use the machine in daylight or in other irregularities in the ground, such as rocks, toys, wire, etc., which could be used...
... starting the engine, engaging the drive or running the machine. Check for hidden electrical cables or similar in serviceable condition prior to be picked up and thrown by Husqvarna. 8011-670-aRunning 9 The engine can catch in moving machine parts. • Never use the machine in daylight or in other irregularities in the ground, such as rocks, toys, wire, etc., which could be used...
Owners Manual
Page 11
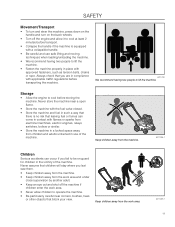
... fasteners, such as tension belts, chains or rope. Keep children away from children and adults untrained in use safe lifting and moving techniques when loading/unloading the machine. • We recommend having two people to lift the machine. Never assume that you are in compliance with flames or sparks from electrical machines, electric engines, relays, switches, boilers or similar...
... fasteners, such as tension belts, chains or rope. Keep children away from children and adults untrained in use safe lifting and moving techniques when loading/unloading the machine. • We recommend having two people to lift the machine. Never assume that you are in compliance with flames or sparks from electrical machines, electric engines, relays, switches, boilers or similar...
Owners Manual
Page 13
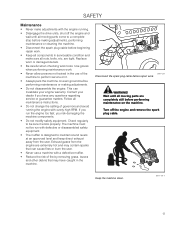
...! Turn off the engine and wait until all nuts, bolts, etc. Contact your engine warranty. Check regularly to be run the engine too fast, you have caught in the use a machine with a defective muffler. • Reduce the risk of governors and avoid running . • Disengage the drive units, shut off the engine and remove the spark plug cable. Keep the machine clean. 8011-121-1 13 Follow all moving parts are...
...! Turn off the engine and wait until all nuts, bolts, etc. Contact your engine warranty. Check regularly to be run the engine too fast, you have caught in the use a machine with a defective muffler. • Reduce the risk of governors and avoid running . • Disengage the drive units, shut off the engine and remove the spark plug cable. Keep the machine clean. 8011-121-1 13 Follow all moving parts are...
Owners Manual
Page 14
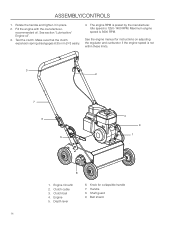
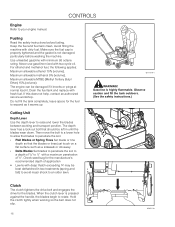
... the engine manual for collapsible handle 7. Engine 5. Engine Oil refill 2. Idle speed is 3600 RPM. Clutch cable 3. Knob for instructions on adjusting the regulator and carburetor if the engine speed is preset by the manufacturer. Make sure that the clutch expansion spring disengages 6.35 mm (¼") easily. 4. Belt shield 14 Maximum engine speed is 1250-1400 RPM. Fill the engine with the manufacturerrecommended oil. Test the clutch. The engine RPM is not within these limits. 3 2 7 6 5 4 9 1 8 1. Handle 8. Shaft guard 9. assembly/CONTROLS...
... the engine manual for collapsible handle 7. Engine 5. Engine Oil refill 2. Idle speed is 3600 RPM. Clutch cable 3. Knob for instructions on adjusting the regulator and carburetor if the engine speed is preset by the manufacturer. Make sure that the clutch expansion spring disengages 6.35 mm (¼") easily. 4. Belt shield 14 Maximum engine speed is 1250-1400 RPM. Fill the engine with the manufacturerrecommended oil. Test the clutch. The engine RPM is not within these limits. 3 2 7 6 5 4 9 1 8 1. Handle 8. Shaft guard 9. assembly/CONTROLS...
Owners Manual
Page 16
... use gasoline mixed with dirty fuel. For ethanol and methanol fuel, the following applies: Maximum allowable ethanol 10% (volume). Fueling Read the safety instructions before washing the machine. Keep the fuel and fuel tank clean. If this does not help, contact an authorized service workshop. Gasoline is highly flammable. Use unleaded gasoline with fresh fuel. Cutting Unit Depth Lever Use the depth lever to your engine manual. Drain the fuel tank and replace with...
... use gasoline mixed with dirty fuel. For ethanol and methanol fuel, the following applies: Maximum allowable ethanol 10% (volume). Fueling Read the safety instructions before washing the machine. Keep the fuel and fuel tank clean. If this does not help, contact an authorized service workshop. Gasoline is highly flammable. Use unleaded gasoline with fresh fuel. Cutting Unit Depth Lever Use the depth lever to your engine manual. Drain the fuel tank and replace with...
Owners Manual
Page 17
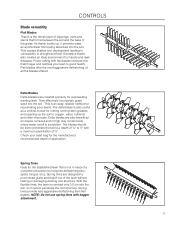
... blade is also useful as a vertical mower for overseeding existing lawn. CONTROLS Blade versatility Flail Blades Thatch is the dense layer of clippings, roots and stems that is not in high clay content soils where water runoff is a problem. Check your lawn to drought and frost. Flail blades offer the most aggressive dethatching of application. Delta Blades Delta blades were created primarily for cutting running stem grasses...
... blade is also useful as a vertical mower for overseeding existing lawn. CONTROLS Blade versatility Flail Blades Thatch is the dense layer of clippings, roots and stems that is not in high clay content soils where water runoff is a problem. Check your lawn to drought and frost. Flail blades offer the most aggressive dethatching of application. Delta Blades Delta blades were created primarily for cutting running stem grasses...

Owners Manual
Page 18
.../CLOSE lever Set application per chart and turn the seeder dial to the desired sowing setting. Push down until the bag is run. The safety door is spring loaded and will flip up against the chute. 1 2 3 1. operation Seed Application Preparing the Lawn • Cut the grass to ...2 8060-032 Secure bag clamp. Retighten wingnut. Faster running speeds results in two directions with a core-type ground aerator. • Fertilize the lawn. Pull back on the speed at which the machine is reinstalled. Rear nut Attach bag to encourage root growth. Selection dial 2. Safety...
.../CLOSE lever Set application per chart and turn the seeder dial to the desired sowing setting. Push down until the bag is run. The safety door is spring loaded and will flip up against the chute. 1 2 3 1. operation Seed Application Preparing the Lawn • Cut the grass to ...2 8060-032 Secure bag clamp. Retighten wingnut. Faster running speeds results in two directions with a core-type ground aerator. • Fertilize the lawn. Pull back on the speed at which the machine is reinstalled. Rear nut Attach bag to encourage root growth. Selection dial 2. Safety...
Owners Manual
Page 20
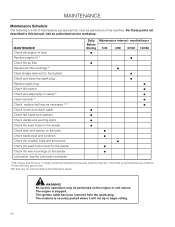
... authorized service workshop. 4) Performed every second year. WARNING! For those points not described in valves 3) Clean fuel tank 3) Check, replace fuel lines as necessary 3, 4) Check clutch and clutch cable Check flail blade lock washers Check decals and warning signs Check the seed holes for the seeder Check wear and tension on the belts Check blade wear and condition Check the chassis, bolts and set screws Check the seed control lever for fuel system Check and clean the spark plug Replace spark plug Check idle speed Check and adjust play in this manual, visit...
... authorized service workshop. 4) Performed every second year. WARNING! For those points not described in valves 3) Clean fuel tank 3) Check, replace fuel lines as necessary 3, 4) Check clutch and clutch cable Check flail blade lock washers Check decals and warning signs Check the seed holes for the seeder Check wear and tension on the belts Check blade wear and condition Check the chassis, bolts and set screws Check the seed control lever for fuel system Check and clean the spark plug Replace spark plug Check idle speed Check and adjust play in this manual, visit...
Owners Manual
Page 21
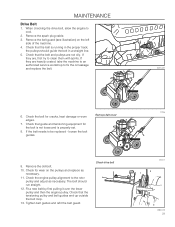
... checking the drive belt, allow the engine to the rotor pulley and adjust as necessary. 11. If the belt needs to clean them with spirits. Remove the spark plug cable. 3. Check that guide and tensioning equipment for cracks, heat damage or worn edges. 7. the pulleys should run straight. 12. If they are , first try to be replaced - If they are heavily coated, take the machine to an authorized service...
... checking the drive belt, allow the engine to the rotor pulley and adjust as necessary. 11. If the belt needs to clean them with spirits. Remove the spark plug cable. 3. Check that guide and tensioning equipment for cracks, heat damage or worn edges. 7. the pulleys should run straight. 12. If they are , first try to be replaced - If they are heavily coated, take the machine to an authorized service...
Owners Manual
Page 22
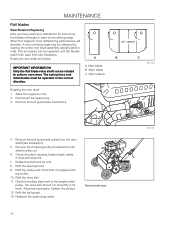
... the spark plug cable. The spring tines and delta blades must be obtained by rotating the entire rotor shaft assembly laterally (end to wear on the striking edge. After rotation Rotating the rotor shaft 1. Tighten the pulleys. 12. see illustration). 3.5" / 89mm B C 8011-006 4. New blade B. Remove the belt guard (see illustration. Refit the pulley and check that it is aligned with top pulley. 10. MAINTENANCE Flail blades Wear/Rotation/Replacing...
... the spark plug cable. The spring tines and delta blades must be obtained by rotating the entire rotor shaft assembly laterally (end to wear on the striking edge. After rotation Rotating the rotor shaft 1. Tighten the pulleys. 12. see illustration). 3.5" / 89mm B C 8011-006 4. New blade B. Remove the belt guard (see illustration. Refit the pulley and check that it is aligned with top pulley. 10. MAINTENANCE Flail blades Wear/Rotation/Replacing...

Owners Manual
Page 23
... type) that hold the blade shaft (2) in place (see the section "Two minute rule". MAINTENANCE Replacing worn flail blades 1. Install e-rings. 9. see the illustration). 5. Inspect the blade shafts and replace if bent or worn. 6. Repeat this procedure for blade/spacer placement. 8. The blades (4) and the plastic spacers (3) will fall off. 7. Fit the new blades and replace the plastic spacers as necessary. Disconnect the spark plug. 3. Reattach the spark plug cable...
... type) that hold the blade shaft (2) in place (see the section "Two minute rule". MAINTENANCE Replacing worn flail blades 1. Install e-rings. 9. see the illustration). 5. Inspect the blade shafts and replace if bent or worn. 6. Repeat this procedure for blade/spacer placement. 8. The blades (4) and the plastic spacers (3) will fall off. 7. Fit the new blades and replace the plastic spacers as necessary. Disconnect the spark plug. 3. Reattach the spark plug cable...
Owners Manual
Page 24
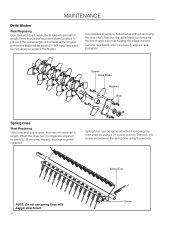
... be replaced without removing the rotor shaft. Screws Delta Blade Washers Nuts Spring tines Wear/Replacing Over time and due to replace delta blades without removing the rotor shaft by removing the two screws with bagger attachment. 24 Screw Spring Tine NOTE: Do not use spring tines with nuts holding the blade in place. Turn the new blade until it will diminish in length. Remove the screw and replace the spring tine using a ½" socket wrench. Remove the delta blade by using the...
... be replaced without removing the rotor shaft. Screws Delta Blade Washers Nuts Spring tines Wear/Replacing Over time and due to replace delta blades without removing the rotor shaft by removing the two screws with bagger attachment. 24 Screw Spring Tine NOTE: Do not use spring tines with nuts holding the blade in place. Turn the new blade until it will diminish in length. Remove the screw and replace the spring tine using a ½" socket wrench. Remove the delta blade by using the...
Owners Manual
Page 28
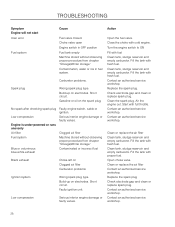
...with fuel Clean tank, sludge reservoir and empty carburetor. Carburetor problems. Spark plug Wrong spark plug type. Gasoline or oil on electrodes. Turn the engine switch to ON Fill with full throttle. Air the engine out. Clean tank, sludge reservoir and empty carburetor. Short circuit. Clean the spark plug. Open choke valve Clean or replace the air filter Contact an authorized service workshop. TROUBLESHOOTING Symptom Engine will not start User error Fuel system Cause Fuel valve closed. No spark after checking spark plug Faulty engine switch, cable or ignition...
...with fuel Clean tank, sludge reservoir and empty carburetor. Carburetor problems. Spark plug Wrong spark plug type. Gasoline or oil on electrodes. Turn the engine switch to ON Fill with full throttle. Air the engine out. Clean tank, sludge reservoir and empty carburetor. Short circuit. Clean the spark plug. Open choke valve Clean or replace the air filter Contact an authorized service workshop. TROUBLESHOOTING Symptom Engine will not start User error Fuel system Cause Fuel valve closed. No spark after checking spark plug Faulty engine switch, cable or ignition...
Owners Manual
Page 29
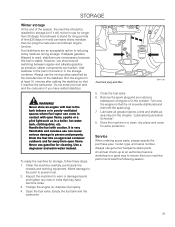
... purchase year, model, type, and serial number. Open the fuel valve. An annual check-up at least 10 minutes after adding the stabilizer so that your machine performs its best the following season. 29 WARNING! Turn over the engine so that the oil is very flammable and careless use genuine Husqvarna spare parts. It is evenly distributed and then refit the spark plug. 7.
... purchase year, model, type, and serial number. Open the fuel valve. An annual check-up at least 10 minutes after adding the stabilizer so that your machine performs its best the following season. 29 WARNING! Turn over the engine so that the oil is very flammable and careless use genuine Husqvarna spare parts. It is evenly distributed and then refit the spark plug. 7.

Owners Manual
Page 30
Engine Primary drive Dethatching width Clutch control Clutch Seeding Width Depth setting Flail blade reel Delta blade reel Handle Catcher Bag Seed hopper Weight Width Length Height Distance between axles Bearings Wheels TECHNICAL DATA 22" POWER RAKE Honda, Briggs & Stratton or none V-belt 22" Handle-mounted with automatic safety declutching Belt tightener with spring return and idling pulley mechanism 22" (55.8 cm) Adjustable depth control with lever mechanism 32 case-hardened steel...
Engine Primary drive Dethatching width Clutch control Clutch Seeding Width Depth setting Flail blade reel Delta blade reel Handle Catcher Bag Seed hopper Weight Width Length Height Distance between axles Bearings Wheels TECHNICAL DATA 22" POWER RAKE Honda, Briggs & Stratton or none V-belt 22" Handle-mounted with automatic safety declutching Belt tightener with spring return and idling pulley mechanism 22" (55.8 cm) Adjustable depth control with lever mechanism 32 case-hardened steel...
Owners Manual
Page 31
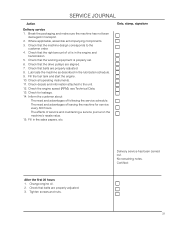
... on the machine's resale value. 15. Fill the fuel tank and start the engine. 10. Check decals and information attached to the customer order. 4. Check the engine speed (RPM), see Technical Data. 13. The effects of oil is properly set. 6. Check that belts are properly adjusted. 8. Delivery service has been carried out. Certified: 31 Change engine oil. 2. No remaining notes. Check that the working equipment is in the lubrication...
... on the machine's resale value. 15. Fill the fuel tank and start the engine. 10. Check decals and information attached to the customer order. 4. Check the engine speed (RPM), see Technical Data. 13. The effects of oil is properly set. 6. Check that belts are properly adjusted. 8. Delivery service has been carried out. Certified: 31 Change engine oil. 2. No remaining notes. Check that the working equipment is in the lubrication...


