Owners Manual
Page 3
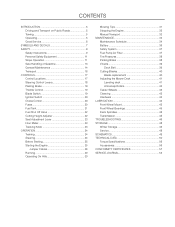
...Safety System 37 Fuel Pump Air Filter 37 Tire Pressures 38 Parking Brake 38 V-belts 39 Deck Belt 39 Cutting Blades 40 Blade replacement 40 Adjusting the Mower Deck 41 Leveling deck 41 Anti-scalp Rollers 42 Caster Wheels 43 Cleaning 43 Hardware 43 LUBRICATION 44 Front Wheel ...Mount 45 Front Wheel Bearings 45 Deck Spindles 45 Transmission 45 TROUBLESHOOTING 46 STORAGE 48 Winter Storage 48...
...Safety System 37 Fuel Pump Air Filter 37 Tire Pressures 38 Parking Brake 38 V-belts 39 Deck Belt 39 Cutting Blades 40 Blade replacement 40 Adjusting the Mower Deck 41 Leveling deck 41 Anti-scalp Rollers 42 Caster Wheels 43 Cleaning 43 Hardware 43 LUBRICATION 44 Front Wheel ...Mount 45 Front Wheel Bearings 45 Deck Spindles 45 Transmission 45 TROUBLESHOOTING 46 STORAGE 48 Winter Storage 48...
Owners Manual
Page 13
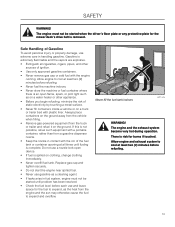
... agent. • If leaks arise in fuel system, engine must not be started when the driver's floor plate or any protective plate for the mower deck's drive belt is extremely flammable and the vapors are explosive. • Extinguish all times until fueling is risk for burns if touched. The engine and... nozzle. • Keep the nozzle in handling gasoline. SAFETY WARNING! The engine must not be started until problem has been resolved. • Check the fuel level before refueling. 13 Gasoline is removed.
... agent. • If leaks arise in fuel system, engine must not be started when the driver's floor plate or any protective plate for the mower deck's drive belt is extremely flammable and the vapors are explosive. • Extinguish all times until fueling is risk for burns if touched. The engine and... nozzle. • Keep the nozzle in handling gasoline. SAFETY WARNING! The engine must not be started until problem has been resolved. • Check the fuel level before refueling. 13 Gasoline is removed.
Owners Manual
Page 34
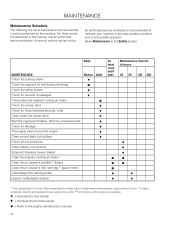
... 1) First change after 8-10 hours. For those points not described in the Safety section. Daily MAINTENANCE Check the parking brake Check the engine's oil level (every refueling) Check the safety system Check for fuel and oil leakages Check/clean the engine's cooling air intake Check the mower... deck Check for loose hardware (screws, nuts) Clean under the mower deck Start the engine and blades, listen for unusual sounds Check for damage Thoroughly clean around the engine Clean around ...
... 1) First change after 8-10 hours. For those points not described in the Safety section. Daily MAINTENANCE Check the parking brake Check the engine's oil level (every refueling) Check the safety system Check for fuel and oil leakages Check/clean the engine's cooling air intake Check the mower... deck Check for loose hardware (screws, nuts) Clean under the mower deck Start the engine and blades, listen for unusual sounds Check for damage Thoroughly clean around the engine Clean around ...
Owners Manual
Page 36
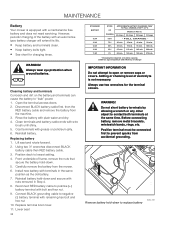
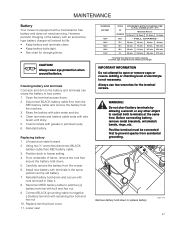
... and efficiency of the battery with wire brush until shiny. 5. Reconnect RED battery cable to "leak" power. 1. Adding or checking level of frame, remove the nuts that secure the battery hold-down to prevent sparks from accidental grounding. 8050-109 Remove battery hold -down... tight. • See chart for the terminal screws. Using two ½" wrenches disconnect BLACK battery cable then RED battery cable. 3. Position deck to open or remove caps or covers. Always use two wrenches for charging times. Reinstall battery. Lift seat and rotate forward. 2. FULL CHARGE...
... and efficiency of the battery with wire brush until shiny. 5. Reconnect RED battery cable to "leak" power. 1. Adding or checking level of frame, remove the nuts that secure the battery hold-down to prevent sparks from accidental grounding. 8050-109 Remove battery hold -down... tight. • See chart for the terminal screws. Using two ½" wrenches disconnect BLACK battery cable then RED battery cable. 3. Position deck to open or remove caps or covers. Always use two wrenches for charging times. Reinstall battery. Lift seat and rotate forward. 2. FULL CHARGE...
Owners Manual
Page 39
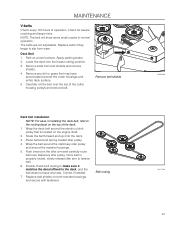
.... Double check belt routing to make sure it matches the decal affixed to the routing decal on a level surface. Belt routing 8058-088 8011-764 39 Park on the top of the deck. 1. Remove belt shields Deck belt installation NOTE: For ease in normal operation. Place belt around the mandrel housings. 5. NOTE: The...
.... Double check belt routing to make sure it matches the decal affixed to the routing decal on a level surface. Belt routing 8058-088 8011-764 39 Park on the top of the deck. 1. Remove belt shields Deck belt installation NOTE: For ease in normal operation. Place belt around the mandrel housings. 5. NOTE: The...
Owners Manual
Page 41
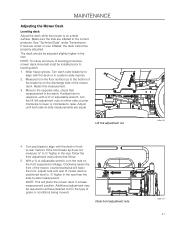
...blade to -side manner. 2. MAINTENANCE Adjusting the Mower Deck Leveling deck Adjust the deck while the mower is the same. Turn each outer blade tip to align with the deck or in frontto-rear manner. Adjust until rear of mower deck is required-with the deck in a side-to align with a ¾" or ... the side-to raise. NOTE: To insure accuracy of the mower, counterclockwise will place the mower deck in the rear, follow . 5. Clockwise raises the front of leveling procedure, mower deck drive belt must be required to the bottom of the blade tip on either side counter clockwise to...
...blade to -side manner. 2. MAINTENANCE Adjusting the Mower Deck Leveling deck Adjust the deck while the mower is the same. Turn each outer blade tip to align with the deck or in frontto-rear manner. Adjust until rear of mower deck is required-with the deck in a side-to align with a ¾" or ... the side-to raise. NOTE: To insure accuracy of the mower, counterclockwise will place the mower deck in the rear, follow . 5. Clockwise raises the front of leveling procedure, mower deck drive belt must be required to the bottom of the blade tip on either side counter clockwise to...

Owners Manual
Page 42
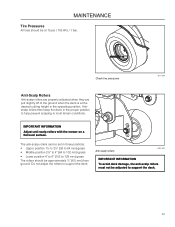
Anti-scalp rollers are properly adjusted when they are just slightly off of the ground when the deck is at the desired cutting height in four positions. Anti-scalp rollers can be set in the operating position. The rollers should be damaged. ...rollers to help prevent scalping in most terrain conditions. Antiscalp rollers then keep the deck in the proper position to support the deck. Anti-scalp Rollers MAINTENANCE IMPORTANT INFORMATION Adjust anti-scalp rollers with the mower on a flat level surface. Anti-scalp rollers IMPORTANT INFORMATION The anti-scalp rollers must not be ...
Anti-scalp rollers are properly adjusted when they are just slightly off of the ground when the deck is at the desired cutting height in four positions. Anti-scalp rollers can be set in the operating position. The rollers should be damaged. ...rollers to help prevent scalping in most terrain conditions. Antiscalp rollers then keep the deck in the proper position to support the deck. Anti-scalp Rollers MAINTENANCE IMPORTANT INFORMATION Adjust anti-scalp rollers with the mower on a flat level surface. Anti-scalp rollers IMPORTANT INFORMATION The anti-scalp rollers must not be ...

Owners Manual
Page 45
... wheel mount, until the grease is does not come into contact with a grease gun, 2-3 strokes per spindle. 8058-068 Deck spindle Transmission The transmission is forced out. Lubricating the front wheels IMPORTANT INFORMATION Use minimal lubrication and remove excess lubricant so that ... only good quality bearing grease. Front Wheel Bearings Lubricate with a grease gun, one zerk for level checks or oil changes. If a leak occurs, replace the unit or contact your Husqvarna dealer. 80158-136 45 Grease from well-known brand names (petrochemical companies) usually maintains a good...
... wheel mount, until the grease is does not come into contact with a grease gun, 2-3 strokes per spindle. 8058-068 Deck spindle Transmission The transmission is forced out. Lubricating the front wheels IMPORTANT INFORMATION Use minimal lubrication and remove excess lubricant so that ... only good quality bearing grease. Front Wheel Bearings Lubricate with a grease gun, one zerk for level checks or oil changes. If a leak occurs, replace the unit or contact your Husqvarna dealer. 80158-136 45 Grease from well-known brand names (petrochemical companies) usually maintains a good...

Owners Manual
Page 3
... 39 V-belts 40 Cutting Blades 41 Blade replacement 41 Adjusting the Mower Deck 42 Leveling deck 42 Caster Wheels 43 Cleaning 43 Hardware 43 LUBRICATION 44 Lubrication Schedule 44 Wheel and Deck Zerks 45 Front Wheel Mount 45 Front Wheel Bearings 45 Deck Spindles 45 Transmission 45 TROUBLESHOOTING 46 STORAGE 48 Winter Storage 48 Service...
... 39 V-belts 40 Cutting Blades 41 Blade replacement 41 Adjusting the Mower Deck 42 Leveling deck 42 Caster Wheels 43 Cleaning 43 Hardware 43 LUBRICATION 44 Lubrication Schedule 44 Wheel and Deck Zerks 45 Front Wheel Mount 45 Front Wheel Bearings 45 Deck Spindles 45 Transmission 45 TROUBLESHOOTING 46 STORAGE 48 Winter Storage 48 Service...

Owners Manual
Page 13
... agent. • If leaks arise in fuel system, engine must not be started when the driver's floor plate or any protective plate for the mower deck's drive belt is extremely flammable and the vapors are explosive. • Extinguish all times until problem has been resolved. • Check the fuel... level before each use and leave space for burns if touched. There is an open device. • If fuel is complete. Allow engine to cool before ...
... agent. • If leaks arise in fuel system, engine must not be started when the driver's floor plate or any protective plate for the mower deck's drive belt is extremely flammable and the vapors are explosive. • Extinguish all times until problem has been resolved. • Check the fuel... level before each use and leave space for burns if touched. There is an open device. • If fuel is complete. Allow engine to cool before ...

Owners Manual
Page 35
Daily MAINTENANCE Check the parking brake Check the engine's oil level (every refueling) Check the safety system Check for fuel and oil leakages Check/clean the engine's cooling air intake Check the mower deck Check for loose hardware (screws, nuts) Clean under the mower deck Start the engine and blades, listen for unusual sounds...
Daily MAINTENANCE Check the parking brake Check the engine's oil level (every refueling) Check the safety system Check for fuel and oil leakages Check/clean the engine's cooling air intake Check the mower deck Check for loose hardware (screws, nuts) Clean under the mower deck Start the engine and blades, listen for unusual sounds...
Owners Manual
Page 37
...Keep battery and terminals clean. • Keep battery bolts tight. • See chart for the terminal screws. WARNING! Reinstall battery. Position deck to open or remove caps or covers. Always use two wrenches for charging times. Positive terminal must be connected first to replace battery 8050-...75% 50% 25% 0% APPROXIMATE BATTERY CHARGING TIME* TO FULL CHARGE AT 80OF / 27OC Maximum Rate at the same time. Adding or checking level of frame, remove the nuts that secure the battery hold -down . 5. Do not short battery terminals by allowing a wrench or any other object...
...Keep battery and terminals clean. • Keep battery bolts tight. • See chart for the terminal screws. WARNING! Reinstall battery. Position deck to open or remove caps or covers. Always use two wrenches for charging times. Positive terminal must be connected first to replace battery 8050-...75% 50% 25% 0% APPROXIMATE BATTERY CHARGING TIME* TO FULL CHARGE AT 80OF / 27OC Maximum Rate at the same time. Adding or checking level of frame, remove the nuts that secure the battery hold -down . 5. Do not short battery terminals by allowing a wrench or any other object...
Owners Manual
Page 39
... 128 mm) grass. The anti-scalp rollers can be approximately ¼" (6.5 mm) from ground. The rollers should be adjusted to support the deck. 39 Do not adjust the rollers to help prevent scalping in most terrain conditions. IMPORTANT INFORMATION Adjust anti-scalp rollers with the mower on a flat... level surface. Check tire pressures 8011-564 Anti-Scalp Rollers Anti-scalp rollers are properly adjusted when they are just slightly off of the...
... 128 mm) grass. The anti-scalp rollers can be approximately ¼" (6.5 mm) from ground. The rollers should be adjusted to support the deck. 39 Do not adjust the rollers to help prevent scalping in most terrain conditions. IMPORTANT INFORMATION Adjust anti-scalp rollers with the mower on a flat... level surface. Check tire pressures 8011-564 Anti-Scalp Rollers Anti-scalp rollers are properly adjusted when they are just slightly off of the...

Owners Manual
Page 40
...decal on the engine shaft. 2. Check for severe cracking and large nicks. The belts are not adjustable. Deck Belt Removal 1. Remove any twist. Remove tension on a level surface. Route the belt forward and up over stationary idler pulley. Wrap the belt around the stationary idler... pulley and around the cutter housings and entire deck surface. 5. Replace belts if they begin to tension belt. 6. Lower the deck into the lowest cutting ...
...decal on the engine shaft. 2. Check for severe cracking and large nicks. The belts are not adjustable. Deck Belt Removal 1. Remove any twist. Remove tension on a level surface. Route the belt forward and up over stationary idler pulley. Wrap the belt around the stationary idler... pulley and around the cutter housings and entire deck surface. 5. Replace belts if they begin to tension belt. 6. Lower the deck into the lowest cutting ...
Owners Manual
Page 41
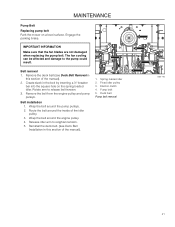
... the belt around the engine pulley. 4. Spring loaded idler 2. Belt installation 1. Wrap the belt around the pump pulleys. 2. Reinstall the deck belt. (see Deck Belt Removal in this section of the idler pulley. 3. Pump belt 5. Belt removal 1. Rotate arm to the pump could 5 result. ... the belt around the inside of the manual). 1. Deck belt Pump belt removal 3 4 2 1 8058-186 41 Remove the deck belt (see Deck Belt Installation in the belt by inserting a ½" breaker bar into the square hole on a level surface. Release idler arm to retighten tension. 5. Create...
... the belt around the engine pulley. 4. Spring loaded idler 2. Belt installation 1. Wrap the belt around the pump pulleys. 2. Reinstall the deck belt. (see Deck Belt Removal in this section of the idler pulley. 3. Pump belt 5. Belt removal 1. Rotate arm to the pump could 5 result. ... the belt around the inside of the manual). 1. Deck belt Pump belt removal 3 4 2 1 8058-186 41 Remove the deck belt (see Deck Belt Installation in the belt by inserting a ½" breaker bar into the square hole on a level surface. Release idler arm to retighten tension. 5. Create...

Owners Manual
Page 43
...to align with a ¾" or adjustable wrench, turn the nuts on a level surface. Deck front adjustment nuts 8058-030 8058-031 43 See Technical Data under or over inflated, the deck cannot be required to -side measurement. Move to 1/8" higher in a standard ...the deck in frontto-rear manner. The deck should be installed prior to -side (2). 2. Adjust until rear of leveling procedure, mower deck drive belt must be adjusted slightly higher in the rear-with the deck (1) or side-to leveling deck. 1. MAINTENANCE Adjusting the Mower Deck Leveling deck Adjust the deck while...
...to align with a ¾" or adjustable wrench, turn the nuts on a level surface. Deck front adjustment nuts 8058-030 8058-031 43 See Technical Data under or over inflated, the deck cannot be required to -side measurement. Move to 1/8" higher in a standard ...the deck in frontto-rear manner. The deck should be installed prior to -side (2). 2. Adjust until rear of leveling procedure, mower deck drive belt must be adjusted slightly higher in the rear-with the deck (1) or side-to leveling deck. 1. MAINTENANCE Adjusting the Mower Deck Leveling deck Adjust the deck while...


