
Owners Manual
Page 3
...Handling of Gasoline 13 General Maintenance 14 Transport 16 Controls 17 Control Locations 17 Steering Control Levers 18 Parking Brake 19 Throttle Control 19 Blade Switch 19 Ignition Switch 20 Choke Control 20 Fuses 20 Fuel Tank 21 Fuel Shut Off Valve 22 Cutting Height Adjuster 22 Seat ...34 Battery 36 Safety System 37 Fuel Pump Air Filter 37 Tire Pressures 38 Parking Brake 38 V-belts 39 Deck Belt 39 Cutting Blades 40 Blade replacement 40 Adjusting the Mower Deck 41 Leveling deck 41 Anti-scalp Rollers 42 Caster Wheels 43 Cleaning 43 Hardware 43 LUBRICATION 44 Front...
...Handling of Gasoline 13 General Maintenance 14 Transport 16 Controls 17 Control Locations 17 Steering Control Levers 18 Parking Brake 19 Throttle Control 19 Blade Switch 19 Ignition Switch 20 Choke Control 20 Fuses 20 Fuel Tank 21 Fuel Shut Off Valve 22 Cutting Height Adjuster 22 Seat ...34 Battery 36 Safety System 37 Fuel Pump Air Filter 37 Tire Pressures 38 Parking Brake 38 V-belts 39 Deck Belt 39 Cutting Blades 40 Blade replacement 40 Adjusting the Mower Deck 41 Leveling deck 41 Anti-scalp Rollers 42 Caster Wheels 43 Cleaning 43 Hardware 43 LUBRICATION 44 Front...

Owners Manual
Page 8
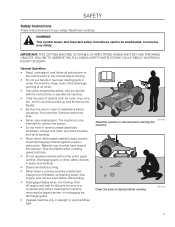
Rotating blades, keep away from the machine Use on slopes No passengers no greater than 10° Whole body Severing of fingers exposure to and toes thrown ... open or remove safety shields while engine is running Careful backing up, watch for other people Careful going forward, watch for other people Moving sharp blades under cover Battery acid is corrosive, explosive and flammable Warning! symbols and decals Read Operator's Manual Shut off engine and remove key before performing any...
Rotating blades, keep away from the machine Use on slopes No passengers no greater than 10° Whole body Severing of fingers exposure to and toes thrown ... open or remove safety shields while engine is running Careful backing up, watch for other people Careful going forward, watch for other people Moving sharp blades under cover Battery acid is corrosive, explosive and flammable Warning! symbols and decals Read Operator's Manual Shut off engine and remove key before performing any...
Owners Manual
Page 9
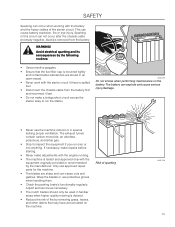
.... Always look down before starting . • Do not put hands or feet near rotating parts or under the machine. Shut off blades, set parking brake, stop before cleaning the machine, removing the grass catcher, or unclogging the discharge guard. • Operate machine only...complete stop engine, and remove keys before and while backing. • Never direct discharged material toward the operator. WARNING! Stop the blades when crossing gravel surfaces. • Do not operate machine without the entire grass catcher, discharge guard, or other safety devices in reverse...
.... Always look down before starting . • Do not put hands or feet near rotating parts or under the machine. Shut off blades, set parking brake, stop before cleaning the machine, removing the grass catcher, or unclogging the discharge guard. • Operate machine only...complete stop engine, and remove keys before and while backing. • Never direct discharged material toward the operator. WARNING! Stop the blades when crossing gravel surfaces. • Do not operate machine without the entire grass catcher, discharge guard, or other safety devices in reverse...
Owners Manual
Page 11
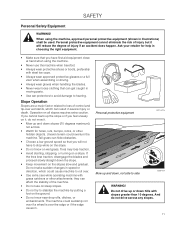
.... SAFETY Personal Safety Equipment WARNING! Slope Operation Slopes are a major factor related to hearing. If the tires lose traction, disengage the blades and proceed slowly straight down slopes (10 degrees maximum), not across any slopes. 11 Do not drive up and down hills with slopes...toe caps. • Always wear approved protective glasses or a full visor when assembling or driving. • Always wear gloves when handling the blades. • Never wear loose clothing that you have to side 6003-004 WARNING! they can hide obstacles. • Choose a low ground ...
.... SAFETY Personal Safety Equipment WARNING! Slope Operation Slopes are a major factor related to hearing. If the tires lose traction, disengage the blades and proceed slowly straight down slopes (10 degrees maximum), not across any slopes. 11 Do not drive up and down hills with slopes...toe caps. • Always wear approved protective glasses or a full visor when assembling or driving. • Always wear gloves when handling the blades. • Never wear loose clothing that you have to side 6003-004 WARNING! they can hide obstacles. • Choose a low ground ...

Owners Manual
Page 12
... if a child enters the area. • Before and while backing, look behind and down for another ride and be seriously injured or interfere with the blades shut off.
... if a child enters the area. • Before and while backing, look behind and down for another ride and be seriously injured or interfere with the blades shut off.
Owners Manual
Page 14
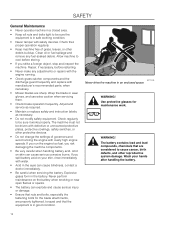
... compounds, chemicals that the equipment is in safe working condition. • Never tamper with manufacturer's recommended parts, when necessary. • Mower blades are considered to cause cancer, birth defects, and other debris buildup. SAFETY General Maintenance • Never operate machine in a closed area. &#... to be sure the equipment is in good condition. 8011-515 Never drive the machine in an enclosed space WARNING! Wrap the blade or wear gloves, and use extra caution when servicing them. • Check brake operation frequently. Check their proper operation regularly. ...
... compounds, chemicals that the equipment is in safe working condition. • Never tamper with manufacturer's recommended parts, when necessary. • Mower blades are considered to cause cancer, birth defects, and other debris buildup. SAFETY General Maintenance • Never operate machine in a closed area. &#... to be sure the equipment is in good condition. 8011-515 Never drive the machine in an enclosed space WARNING! Wrap the blade or wear gloves, and use extra caution when servicing them. • Check brake operation frequently. Check their proper operation regularly. ...
Owners Manual
Page 15
...8226; Stop to run over or into anything. Sparking in spaces lacking proper ventilation. WARNING! Wrap the blades or use approved repair parts for the machine. • The blades are stored in familiar areas when higher quality mowing is spilled fuel. • Disconnect the chassis cable from... use protective gloves when handling them. • Check the parking brake's functionality regularly. Adjust and service as necessary. • The mulch blades should only be used in an open vessel. • Never work with the engine running. • The machine is removed from the ...
...8226; Stop to run over or into anything. Sparking in spaces lacking proper ventilation. WARNING! Wrap the blades or use approved repair parts for the machine. • The blades are stored in familiar areas when higher quality mowing is spilled fuel. • Disconnect the chassis cable from... use protective gloves when handling them. • Check the parking brake's functionality regularly. Adjust and service as necessary. • The mulch blades should only be used in an open vessel. • Never work with the engine running. • The machine is removed from the ...
Owners Manual
Page 17
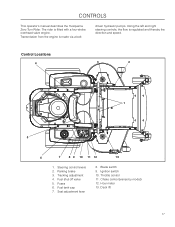
... left and right steering controls, the flow is fitted with a four-stroke overhead valve engine. Ignition switch 10. Blade switch 9. Hour meter 13. Fuel shut off valve 5. CONTROLS This operator's manual describes the Husqvarna Zero Turn Rider. Fuses 6. Control Locations 4 3 2 1 5 6 7 8 9 10 11 12 13 1. Steering control levers 2. The rider is regulated and...
... left and right steering controls, the flow is fitted with a four-stroke overhead valve engine. Ignition switch 10. Blade switch 9. Hour meter 13. Fuel shut off valve 5. CONTROLS This operator's manual describes the Husqvarna Zero Turn Rider. Fuses 6. Control Locations 4 3 2 1 5 6 7 8 9 10 11 12 13 1. Steering control levers 2. The rider is regulated and...
Owners Manual
Page 19
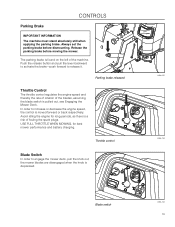
...button and pull the lever backward to activate the brake-push forward to engage the mower deck, pull the knob out; Throttle control Blade Switch In order to release it. Parking brake released Throttle Control The throttle control regulates the engine speed and thereby the rate of rotation of... the machine. The parking brake is found on the left of the blades, assuming the blade switch is depressed. 8058-020 8058-134 Blade switch 8058-134 19 Release the parking brake before dismounting. In order to increase or decrease the engine speed,...
...button and pull the lever backward to activate the brake-push forward to engage the mower deck, pull the knob out; Throttle control Blade Switch In order to release it. Parking brake released Throttle Control The throttle control regulates the engine speed and thereby the rate of rotation of... the machine. The parking brake is found on the left of the blades, assuming the blade switch is depressed. 8058-020 8058-134 Blade switch 8058-134 19 Release the parking brake before dismounting. In order to increase or decrease the engine speed,...
Owners Manual
Page 22
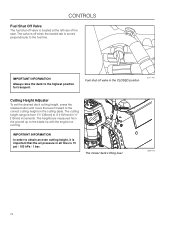
... In order to obtain an even cutting height, it is important that the air pressure in all tires is from the ground up to the blade tip with the engine not running. The cutting height range is 15 psi / 103 kPa / 1 bar. IMPORTANT INFORMATION Always raise the deck to the correct...
... In order to obtain an even cutting height, it is important that the air pressure in all tires is from the ground up to the blade tip with the engine not running. The cutting height range is 15 psi / 103 kPa / 1 bar. IMPORTANT INFORMATION Always raise the deck to the correct...
Owners Manual
Page 24
... moving backwards. In order to an open, flat area, without other in Operation section), adjust engine speed to idle, disengage parking brake, do not engage blades at this will allow mower to become familiar with controls. Until operator becomes comfortable with the machine. Slowly move forward and backward The direction and...
... moving backwards. In order to an open, flat area, without other in Operation section), adjust engine speed to idle, disengage parking brake, do not engage blades at this will allow mower to become familiar with controls. Until operator becomes comfortable with the machine. Slowly move forward and backward The direction and...
Owners Manual
Page 25
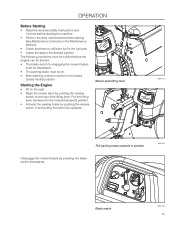
... to activate. The following conditions must be fulfilled before starting the machine. • Perform the daily maintenance before the engine can be started: • The blade switch for engaging the mower blades must be depressed. • The parking brake must be on the top of the lifting lever. Disengage the mower... blades by pushing the release button in the locked (outer) neutral position. Starting the Engine • Sit on the seat. • Raise the mower deck by ...
... to activate. The following conditions must be fulfilled before starting the machine. • Perform the daily maintenance before the engine can be started: • The blade switch for engaging the mower blades must be depressed. • The parking brake must be on the top of the lifting lever. Disengage the mower... blades by pushing the release button in the locked (outer) neutral position. Starting the Engine • Sit on the seat. • Raise the mower deck by ...
Owners Manual
Page 29
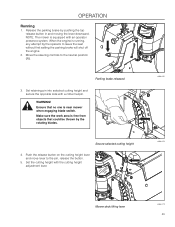
Release the parking brake by the rotating blades. Parking brake released 3. Ensure that could be thrown by pushing the top release button in and moving the lever downward. Set the cutting height with a ... the parking brake will shut off the engine. 2. Make sure the work area is free from objects that no one is near mower when engaging blade switch. WARNING! Secure selected cutting height 4. operation Running 1. When the engine is equipped with an operator presence system. Set retaining pin into selected cutting height...
Release the parking brake by the rotating blades. Parking brake released 3. Ensure that could be thrown by pushing the top release button in and moving the lever downward. Set the cutting height with a ... the parking brake will shut off the engine. 2. Make sure the work area is free from objects that no one is near mower when engaging blade switch. WARNING! Secure selected cutting height 4. operation Running 1. When the engine is equipped with an operator presence system. Set retaining pin into selected cutting height...
Owners Manual
Page 30
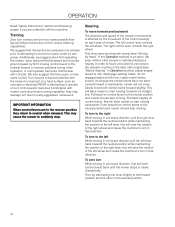
...speed and direction are in the "Safety Instructions". WARNING! Do not drive up or down hills with slopes greater than 10 degrees. Set blade engagement and throttle control Operating On Hills Read the Safety Instructions "Driving on hills. • If stopping is reduced and the machine ... position, the machine stands still. Do not drive across slopes. • The slowest speed possible should be achieved by pulling out the blade switch. 7. The rotation of the unit. When both controls an equal amount forward or backward, the machine moves in neutral position IMPORTANT INFORMATION...
...speed and direction are in the "Safety Instructions". WARNING! Do not drive up or down hills with slopes greater than 10 degrees. Set blade engagement and throttle control Operating On Hills Read the Safety Instructions "Driving on hills. • If stopping is reduced and the machine ... position, the machine stands still. Do not drive across slopes. • The slowest speed possible should be achieved by pulling out the blade switch. 7. The rotation of the unit. When both controls an equal amount forward or backward, the machine moves in neutral position IMPORTANT INFORMATION...
Owners Manual
Page 31
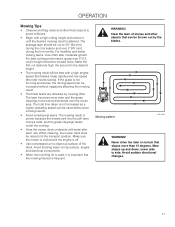
... lawn, clumps build, and the grass clippings fasten under the cowling. • Hose the mower deck underside with a high engine speed (the blades rotate rapidly) and low speed (the rider moves slowly). The total time taken is off. • Use compressed air to clean top surface ... electrical components. • When the mulching kit is used without negatively affecting the mowing result. • The finest lawns are obtained by the blades. The mowing result is attained. Make the first cut to side. WARNING! Clear the lawn of the deck. For healthier and better looking lawns...
... lawn, clumps build, and the grass clippings fasten under the cowling. • Hose the mower deck underside with a high engine speed (the blades rotate rapidly) and low speed (the rider moves slowly). The total time taken is off. • Use compressed air to clean top surface ... electrical components. • When the mulching kit is used without negatively affecting the mowing result. • The finest lawns are obtained by the blades. The mowing result is attained. Make the first cut to side. WARNING! Clear the lawn of the deck. For healthier and better looking lawns...
Owners Manual
Page 32
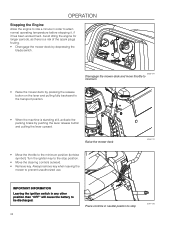
... key. Avoid idling the engine for longer periods, as there is a risk of the spark plugs fouling. • Disengage the mower deck by depressing the blade switch. 8058-134 Disengage the mower deck and move throttle to minimum • Raise the mower deck by pressing the release button on the lever...
... key. Avoid idling the engine for longer periods, as there is a risk of the spark plugs fouling. • Disengage the mower deck by depressing the blade switch. 8058-134 Disengage the mower deck and move throttle to minimum • Raise the mower deck by pressing the release button on the lever...
Owners Manual
Page 34
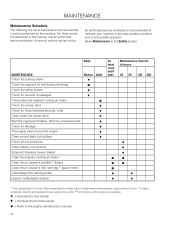
...cooling air intake Check the mower deck Check for loose hardware (screws, nuts) Clean under the mower deck Start the engine and blades, listen for unusual sounds Check for damage Thoroughly clean around the engine Clean around belts, belt pulleys Check the tire pressures Before... After Check battery connections Sharpen3)/ Replace mower blades Clean the engine's cooling air intake 2) Clean the air cleaner's pre-filter 2) (foam) Clean the air cleaner's filter cartridge 2) (...
...cooling air intake Check the mower deck Check for loose hardware (screws, nuts) Clean under the mower deck Start the engine and blades, listen for unusual sounds Check for damage Thoroughly clean around the engine Clean around belts, belt pulleys Check the tire pressures Before... After Check battery connections Sharpen3)/ Replace mower blades Clean the engine's cooling air intake 2) Clean the air cleaner's pre-filter 2) (foam) Clean the air cleaner's filter cartridge 2) (...
Owners Manual
Page 35
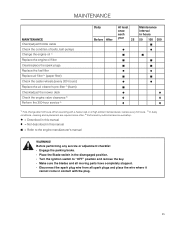
Before performing any service or adjustment checklist • Engage the parking brake. • Place the Blade-switch in the disengaged position. • Turn the ignition switch to the engine manufacturer's manual WARNING! When operating with the plug. 35 MAINTENANCE MAINTENANCE ...After At least once each year 25 Maintenance interval in this manual ■ = Refer to "OFF" position and remove the key. • Make sure the blades and all moving parts have completely stopped. • Disconnect the spark plug wire from all spark plugs and place the wire where it cannot come...
Before performing any service or adjustment checklist • Engage the parking brake. • Place the Blade-switch in the disengaged position. • Turn the ignition switch to the engine manufacturer's manual WARNING! When operating with the plug. 35 MAINTENANCE MAINTENANCE ...After At least once each year 25 Maintenance interval in this manual ■ = Refer to "OFF" position and remove the key. • Make sure the blades and all moving parts have completely stopped. • Disconnect the spark plug wire from all spark plugs and place the wire where it cannot come...
Owners Manual
Page 37
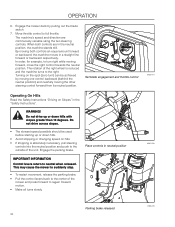
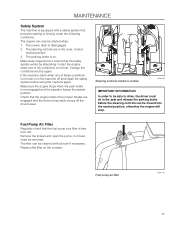
... must sit in the outer, locked neutral position. 3. Check that the safety system works by attempting to ensure that the engine stops if the mower blades are in the seat and release the parking brake before using the machine again. The filter can be moved into the neutral position, otherwise the...
... must sit in the outer, locked neutral position. 3. Check that the safety system works by attempting to ensure that the engine stops if the mower blades are in the seat and release the parking brake before using the machine again. The filter can be moved into the neutral position, otherwise the...

Owners Manual
Page 40
... by turning counterclockwise. 2. Let the service workshop decide whether the blade can be repaired/ ground or must be replaced. Check the blades WARNING! Install and tighten blade bolt securely. 4. Blade 2. Protect your hands with gloves and/or wrap blades with a Husqvarna bolt if required. MAINTENANCE Cutting Blades In order to 90 ft/lbs (122 Nm). 1 2 IMPORTANT INFORMATION...
... by turning counterclockwise. 2. Let the service workshop decide whether the blade can be repaired/ ground or must be replaced. Check the blades WARNING! Install and tighten blade bolt securely. 4. Blade 2. Protect your hands with gloves and/or wrap blades with a Husqvarna bolt if required. MAINTENANCE Cutting Blades In order to 90 ft/lbs (122 Nm). 1 2 IMPORTANT INFORMATION...


