
Owners Manual
Page 3
...19 Throttle Control 19 Ignition Switch 19 Choke Control 20 Refueling 20 Fuel Shut Off Valve 21 Mower Deck Lifting Lever 21 Tracking 21 Blade Control Lever 22 Bypass Linkages 22 OPERATION 23 Training 23 Steering 23 Before Starting 24 Starting the Engine 24 Jumper cables 27 Running ...Maintenance Schedule 33 Battery 35 Safety System 36 Tire Pressures 36 Parking Brake 37 V-belts 37 Deck Belt 37 EZT Belt 38 Cutting Blades 38 Blade Replacement 38 Adjusting the Mower Deck 39 Leveling Deck 39 Caster Wheels 40 Cleaning 40 Hardware 40 LUBRICATION 41 Front Wheel Mount 42 ...
...19 Throttle Control 19 Ignition Switch 19 Choke Control 20 Refueling 20 Fuel Shut Off Valve 21 Mower Deck Lifting Lever 21 Tracking 21 Blade Control Lever 22 Bypass Linkages 22 OPERATION 23 Training 23 Steering 23 Before Starting 24 Starting the Engine 24 Jumper cables 27 Running ...Maintenance Schedule 33 Battery 35 Safety System 36 Tire Pressures 36 Parking Brake 37 V-belts 37 Deck Belt 37 EZT Belt 38 Cutting Blades 38 Blade Replacement 38 Adjusting the Mower Deck 39 Leveling Deck 39 Caster Wheels 40 Cleaning 40 Hardware 40 LUBRICATION 41 Front Wheel Mount 42 ...

Owners Manual
Page 8
Rotating blades, keep away from the machine Use on slopes no greater than 10° No passengers Whole body Severing of fingers exposure to and toes thrown ... open or remove safety shields while engine is running Careful backing up, watch for other people Careful going forward, watch for other people Moving sharp blades under cover Battery acid is corrosive, explosive and flammable Warning! SYMBOLS AND DECALS Read Operator's Manual Shut off engine and remove key before performing any...
Rotating blades, keep away from the machine Use on slopes no greater than 10° No passengers Whole body Severing of fingers exposure to and toes thrown ... open or remove safety shields while engine is running Careful backing up, watch for other people Careful going forward, watch for other people Moving sharp blades under cover Battery acid is corrosive, explosive and flammable Warning! SYMBOLS AND DECALS Read Operator's Manual Shut off engine and remove key before performing any...
Owners Manual
Page 9
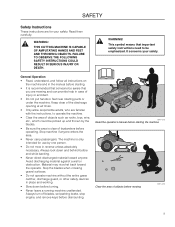
... material toward the operator. WARNING! WARNING! Material may ricochet back toward anyone enters the area. • Never carry passengers. Always turn off blades, set parking brake, stop engine, and remove keys before dismounting. 8011-512 Read the operator's manual before starting . • It is recommended...9 It concerns your safety. This symbol means that you are familiar with the instructions, to be picked up and thrown by the blades. • Be sure the area is only intended for your safety. Stop machine if anyone . Avoid discharging material against a wall or ...
... material toward the operator. WARNING! WARNING! Material may ricochet back toward anyone enters the area. • Never carry passengers. Always turn off blades, set parking brake, stop engine, and remove keys before dismounting. 8011-512 Read the operator's manual before starting . • It is recommended...9 It concerns your safety. This symbol means that you are familiar with the instructions, to be picked up and thrown by the blades. • Be sure the area is only intended for your safety. Stop machine if anyone . Avoid discharging material against a wall or ...

Owners Manual
Page 10
... parts and burn. Engine exhaust and certain vehicle components contain or emit chemicals considered to plow leaves or other reproductive system damage. SAFETY • Disengage blades when not mowing.
... parts and burn. Engine exhaust and certain vehicle components contain or emit chemicals considered to plow leaves or other reproductive system damage. SAFETY • Disengage blades when not mowing.

Owners Manual
Page 11
.... • Always wear approved protective glasses or a full visor when assembling or driving. • Always wear gloves when handling the blades. • Never wear loose clothing that you will reduce the degree of control and tip-over accidents, which could overturn the machine....can hide obstacles. • Choose a low ground speed so that you have to hearing. If the tires lose traction, disengage the blades and proceed slowly straight down slopes (10 degrees maximum), not across any slopes. 11 SAFETY Personal Safety Equipment WARNING! Personal protective equipment cannot...
.... • Always wear approved protective glasses or a full visor when assembling or driving. • Always wear gloves when handling the blades. • Never wear loose clothing that you will reduce the degree of control and tip-over accidents, which could overturn the machine....can hide obstacles. • Choose a low ground speed so that you have to hearing. If the tires lose traction, disengage the blades and proceed slowly straight down slopes (10 degrees maximum), not across any slopes. 11 SAFETY Personal Safety Equipment WARNING! Personal protective equipment cannot...

Owners Manual
Page 12
... could suddenly roll over the edge or if the edge caves in the mowing area for small children. • Never carry children, even with the blades shut off and be run over or backed over by putting a foot on the ground. • Do not mow near drop-offs, ditches, or embankments...
... could suddenly roll over the edge or if the edge caves in the mowing area for small children. • Never carry children, even with the blades shut off and be run over or backed over by putting a foot on the ground. • Do not mow near drop-offs, ditches, or embankments...
Owners Manual
Page 14
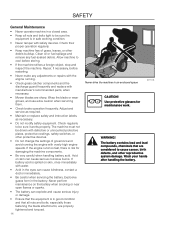
... spillage and remove any adjustments or repairs with the engine running the engine with manufacturer's recommended parts, when necessary. • Mower blades are sharp. Adjust and service as required. • Maintain or replace safety and instruction labels, as necessary. • Do not.... SAFETY General Maintenance • Never operate machine in a closed area. • Keep all nuts and bolts, especially those fastening the blade attachments, are considered to cool before restarting. • Never make any fuel-soaked debris. Allow machine to cause cancer, birth defects, and...
... spillage and remove any adjustments or repairs with the engine running the engine with manufacturer's recommended parts, when necessary. • Mower blades are sharp. Adjust and service as required. • Maintain or replace safety and instruction labels, as necessary. • Do not.... SAFETY General Maintenance • Never operate machine in a closed area. • Keep all nuts and bolts, especially those fastening the blade attachments, are considered to cool before restarting. • Never make any fuel-soaked debris. Allow machine to cause cancer, birth defects, and...
Owners Manual
Page 15
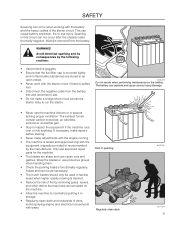
Adjust and service as necessary. • The mulch blades should only be used in familiar areas when higher quality mowing is desired. • Reduce the risk of fire by removing grass, leaves, and other ... of the starter circuit. Only use protective gloves when handling them. • Check the parking brake's functionality regularly. Wrap the blades or use approved repair parts for the machine. • The blades are stored in this circuit can cause cuts and gashes. The battery can cause battery explosion, fire or eye injury...
Adjust and service as necessary. • The mulch blades should only be used in familiar areas when higher quality mowing is desired. • Reduce the risk of fire by removing grass, leaves, and other ... of the starter circuit. Only use protective gloves when handling them. • Check the parking brake's functionality regularly. Wrap the blades or use approved repair parts for the machine. • The blades are stored in this circuit can cause cuts and gashes. The battery can cause battery explosion, fire or eye injury...

Owners Manual
Page 17
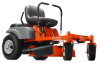
... controls, the flow is fitted with a Briggs & Stratton four-stroke overhead valve engine. Choke/throttle control 4. Motion control levers 7. CONTROLS This operator's manual describes the Husqvarna Zero Turn Rider. The rider is regulated and thereby the direction and speed. 1 2 3 4 5 6 7 8 9 1. Bypass linkage 8058-111 17 Cutting height handle 2. Park brake 3. Transmission from...
... controls, the flow is fitted with a Briggs & Stratton four-stroke overhead valve engine. Choke/throttle control 4. Motion control levers 7. CONTROLS This operator's manual describes the Husqvarna Zero Turn Rider. The rider is regulated and thereby the direction and speed. 1 2 3 4 5 6 7 8 9 1. Bypass linkage 8058-111 17 Cutting height handle 2. Park brake 3. Transmission from...

Owners Manual
Page 19
... absolutely still when applying the parking brake. In order to release it. Ignition Switch The ignition key is placed on the right side of the blades. Parking brake not activated Throttle Control The throttle control regulates the engine speed and thereby the rate of rotation of the machine. CONTROLS Parking Brake...
... absolutely still when applying the parking brake. In order to release it. Ignition Switch The ignition key is placed on the right side of the blades. Parking brake not activated Throttle Control The throttle control regulates the engine speed and thereby the rate of rotation of the machine. CONTROLS Parking Brake...

Owners Manual
Page 22
...the mower, be carried out unless: • the engine stopped • the ignition key removed • the parking brake activated 8058-074 Mower deck blade control lever in the bypass position. • Release park brake. • To reengage the EZT's to engage the EZT Hydrogear bypass linkages. Set bypass... linkages into the the lock notch. CONTROLS Blade Control Lever To engage the mower blades, slowly lift the lever up and into slots on the rear of the frame, below the rear engine guard. • Raise...
...the mower, be carried out unless: • the engine stopped • the ignition key removed • the parking brake activated 8058-074 Mower deck blade control lever in the bypass position. • Release park brake. • To reengage the EZT's to engage the EZT Hydrogear bypass linkages. Set bypass... linkages into the the lock notch. CONTROLS Blade Control Lever To engage the mower blades, slowly lift the lever up and into slots on the rear of the frame, below the rear engine guard. • Raise...

Owners Manual
Page 23
... . Pull back slightly on each side of the control lever(s) on control levers, this will allow mower to idle, disengage parking brake, do not engage blades at this will not move both control levers back until becoming comfortable with the machine. To zero turn While moving in its entirety prior to...
... . Pull back slightly on each side of the control lever(s) on control levers, this will allow mower to idle, disengage parking brake, do not engage blades at this will not move both control levers back until becoming comfortable with the machine. To zero turn While moving in its entirety prior to...

Owners Manual
Page 24
... lock notch and into the down position. 8050-020 8058-085 Set the blade control lever to the transport position (F). 3. Starting the Engine 1. Start conditions Raise the mower deck 4. Disengage the mower blades by pulling the lifting lever upward to the down in the lower position. ... maintenance before the engine can be started: • The driver must be seated on the seat. • The blade control lever for engaging the mower blades must be down position 8058-074 24 The following conditions must be fulfilled before starting (see Maintenance Schedule in the Maintenance...
... lock notch and into the down position. 8050-020 8058-085 Set the blade control lever to the transport position (F). 3. Starting the Engine 1. Start conditions Raise the mower deck 4. Disengage the mower blades by pulling the lifting lever upward to the down in the lower position. ... maintenance before the engine can be started: • The driver must be seated on the seat. • The blade control lever for engaging the mower blades must be down position 8058-074 24 The following conditions must be fulfilled before starting (see Maintenance Schedule in the Maintenance...

Owners Manual
Page 28
... a straight line forward or backward respectively. The rotation of the right wheel is equipped with an operator presence system. Engage the mower blade by placing the lever into the lock notch. 6. Turning on the spot (zero turn right while moving the other steering control forward ...from its neutral position. 28 Mower deck's lifting lever 8058-085 8058-075 Mower blade control lever locked into blade engagement Move the steering controls to full throttle. 5. Select the cutting height by sliding the lever upwards and into the ...
... a straight line forward or backward respectively. The rotation of the right wheel is equipped with an operator presence system. Engage the mower blade by placing the lever into the lock notch. 6. Turning on the spot (zero turn right while moving the other steering control forward ...from its neutral position. 28 Mower deck's lifting lever 8058-085 8058-075 Mower blade control lever locked into blade engagement Move the steering controls to full throttle. 5. Select the cutting height by sliding the lever upwards and into the ...
Owners Manual
Page 30
...healthier and better looking lawns, mow often after each use. Make the first cut to avoid collisions. • Begin with a high engine speed (the blades rotate rapidly) and low speed (the rider moves slowly). Make sure the mower is cooled and the engine is off. • Use compressed air to... high, the second to side. If the grass is used without negatively affecting the mowing result. • The finest lawns are obtained by the blades. Never drive the rider on top surface, engine and electrical components. • When the mulching kit is not too long and dense, the driving...
...healthier and better looking lawns, mow often after each use. Make the first cut to avoid collisions. • Begin with a high engine speed (the blades rotate rapidly) and low speed (the rider moves slowly). Make sure the mower is cooled and the engine is off. • Use compressed air to... high, the second to side. If the grass is used without negatively affecting the mowing result. • The finest lawns are obtained by the blades. Never drive the rider on top surface, engine and electrical components. • When the mulching kit is not too long and dense, the driving...

Owners Manual
Page 31
...choke to stop position. Raise the mower deck with the lifting lever 8058-074 8058-085 31 Raise the mower deck by sliding the blade control lever out of the spark plugs fouling. 1. Remove the key. Avoid idling the engine for longer periods, as there is standing... When the machine is a risk of the lock notch and down into the lower position. Move the steering controls outward. 6. Disengage the mower blades 2. Move the throttle to the transport position. 3. IMPORTANT INFORMATION Leaving the ignition switch in order to attain normal operating temperature before stopping it, ...
...choke to stop position. Raise the mower deck with the lifting lever 8058-074 8058-085 31 Raise the mower deck by sliding the blade control lever out of the spark plugs fouling. 1. Remove the key. Avoid idling the engine for longer periods, as there is standing... When the machine is a risk of the lock notch and down into the lower position. Move the steering controls outward. 6. Disengage the mower blades 2. Move the throttle to the transport position. 3. IMPORTANT INFORMATION Leaving the ignition switch in order to attain normal operating temperature before stopping it, ...

Owners Manual
Page 33
...Check the mower deck ● Check for loose hardware (screws, nuts) ● Clean under the mower deck ● Start the engine and blades, listen for unusual sounds ♦ Check for damage ♦ Thoroughly clean around the engine ♦ Clean around belts, belt pulleys ♦ ...Check the tire pressures Check battery Sharpen/replace mower blades Clean the engine's cooling air intake 2) Clean the air cleaner's pre-filter 2) (foam) Clean the air cleaner's filter cartridge 2) (...
...Check the mower deck ● Check for loose hardware (screws, nuts) ● Clean under the mower deck ● Start the engine and blades, listen for unusual sounds ♦ Check for damage ♦ Thoroughly clean around the engine ♦ Clean around belts, belt pulleys ♦ ...Check the tire pressures Check battery Sharpen/replace mower blades Clean the engine's cooling air intake 2) Clean the air cleaner's pre-filter 2) (foam) Clean the air cleaner's filter cartridge 2) (...

Owners Manual
Page 34
... valve clearance 4) Perform the 300-hour service 4) Lubricate according to OFF position and remove the key. • Make sure the blades and all moving parts have completely stopped. • Disconnect the spark plug wire from all spark plugs and place the wire where ... WARNING! When operating with the plug. 34 Before performing any service or adjustment checklist: • Engage the parking brake. • Place the Blade-switch in the disengaged position. • Turn the ignition switch to Lubrication Schedule 3,4) Daily Before After Weekly At Maintenance interval in this manual ...
... valve clearance 4) Perform the 300-hour service 4) Lubricate according to OFF position and remove the key. • Make sure the blades and all moving parts have completely stopped. • Disconnect the spark plug wire from all spark plugs and place the wire where ... WARNING! When operating with the plug. 34 Before performing any service or adjustment checklist: • Engage the parking brake. • Place the Blade-switch in the disengaged position. • Turn the ignition switch to Lubrication Schedule 3,4) Daily Before After Weekly At Maintenance interval in this manual ...

Owners Manual
Page 36
.... The driver is disengaged. 2. The parking brake is not engaged and the operator leaves the seated position. Check that the engine stops if the mower blades are in the driver's seat. 4. Start conditions 8050-020 IMPORTANT INFORMATION In order to be able to ensure that prevents starting or driving under the...
.... The driver is disengaged. 2. The parking brake is not engaged and the operator leaves the seated position. Check that the engine stops if the mower blades are in the driver's seat. 4. Start conditions 8050-020 IMPORTANT INFORMATION In order to be able to ensure that prevents starting or driving under the...

Owners Manual
Page 37
... 4. V-belts Check every 100 hours of parking brake Deck Belt To replace deck belt Deck belt removal. 1. To adjust the parking brake, contact the Husqvarna service workshop. The belts are not adjustable. Disengage the clutch by sliding the blade control lever downwards. Replace belt (refer to slip from deck. 5. Apply park brake. 2.
... 4. V-belts Check every 100 hours of parking brake Deck Belt To replace deck belt Deck belt removal. 1. To adjust the parking brake, contact the Husqvarna service workshop. The belts are not adjustable. Disengage the clutch by sliding the blade control lever downwards. Replace belt (refer to slip from deck. 5. Apply park brake. 2.


