

Owners Manual
Page 3
... Service 6 Manufacturing Number 6 SYMBOLS AND DECALS 7 SAFETY 9 Safety Instructions 9 Personal Safety Equipment 11 Slope Operation 11 Safe Handling of Gasoline 13 General Maintenance 14 Transport 16 Towing 16 Spark Arrestor 16 CONTROLS 17 Control Locations 17 Steering Control Levers 18 Parking Brake 19 Throttle Control 19 Ignition Switch 19 Choke Control 20 Refueling 20 Fuel Shut Off Valve 21 Mower Deck Lifting Lever 21 Tracking 21 Blade Control Lever 22 Bypass Linkages 22 OPERATION 23 Training 23 Steering 23 Before Starting 24 Starting the Engine 24 Jumper cables...
... Service 6 Manufacturing Number 6 SYMBOLS AND DECALS 7 SAFETY 9 Safety Instructions 9 Personal Safety Equipment 11 Slope Operation 11 Safe Handling of Gasoline 13 General Maintenance 14 Transport 16 Towing 16 Spark Arrestor 16 CONTROLS 17 Control Locations 17 Steering Control Levers 18 Parking Brake 19 Throttle Control 19 Ignition Switch 19 Choke Control 20 Refueling 20 Fuel Shut Off Valve 21 Mower Deck Lifting Lever 21 Tracking 21 Blade Control Lever 22 Bypass Linkages 22 OPERATION 23 Training 23 Steering 23 Before Starting 24 Starting the Engine 24 Jumper cables...

Owners Manual
Page 5
... for purchasing a Husqvarna ride-on towed equipment. Please contact your dealer for towed equipment. Do not tow near ditches, canals, and other types of control. The machine can also be used for mowing grass on public roads. Accident prevention regulations, other tasks when equipped with special accessories provided by persons familiar with a tow hitch, use , service, maintenance, etc.) by steering controls both contribute to...
... for purchasing a Husqvarna ride-on towed equipment. Please contact your dealer for towed equipment. Do not tow near ditches, canals, and other types of control. The machine can also be used for mowing grass on public roads. Accident prevention regulations, other tasks when equipped with special accessories provided by persons familiar with a tow hitch, use , service, maintenance, etc.) by steering controls both contribute to...
Owners Manual
Page 9
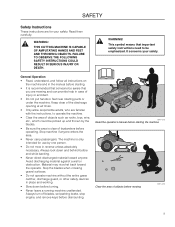
... of bystanders before mowing 8011-513 9 Always look down before and while backing. • Never direct discharged material toward the operator. FAILURE TO OBSERVE THE FOLLOWING SAFETY INSTRUCTIONS COULD RESULT IN SERIOUS INJURY OR DEATH. Avoid discharging material against a wall or obstruction. Always turn off blades, set parking brake, stop engine, and remove keys before dismounting. 8011-512 Read the operator's manual before starting . • It is...
... of bystanders before mowing 8011-513 9 Always look down before and while backing. • Never direct discharged material toward the operator. FAILURE TO OBSERVE THE FOLLOWING SAFETY INSTRUCTIONS COULD RESULT IN SERIOUS INJURY OR DEATH. Avoid discharging material against a wall or obstruction. Always turn off blades, set parking brake, stop engine, and remove keys before dismounting. 8011-512 Read the operator's manual before starting . • It is...
Owners Manual
Page 13
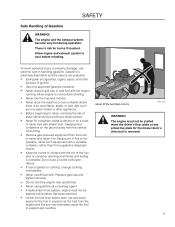
... refueling. Replace gas cap and tighten securely. • Do not start the engine near spilled fuel. • Never use gasoline as a cleaning agent. • If leaks arise in contact with the rim of static electricity by touching a metal surface. • Never fill containers inside a vehicle or on clothing, change clothing immediately. • Never overfill fuel tank. There is risk for the mower deck's drive belt is...
... refueling. Replace gas cap and tighten securely. • Do not start the engine near spilled fuel. • Never use gasoline as a cleaning agent. • If leaks arise in contact with the rim of static electricity by touching a metal surface. • Never fill containers inside a vehicle or on clothing, change clothing immediately. • Never overfill fuel tank. There is risk for the mower deck's drive belt is...
Owners Manual
Page 14
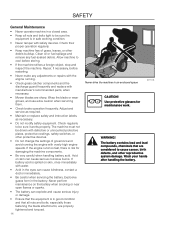
... manufacturer's recommended parts, when necessary. • Mower blades are sharp. WARNING! Clean oil or fuel spillage and remove any adjustments or repairs with the engine running the engine with safety devices. Wrap the blade or wear gloves, and use extra caution when servicing them. • Check brake operation frequently. Use protective glasses for damaging the machine components. • Be very careful when handling battery acid. SAFETY General Maintenance • Never operate machine in a closed...
... manufacturer's recommended parts, when necessary. • Mower blades are sharp. WARNING! Clean oil or fuel spillage and remove any adjustments or repairs with the engine running the engine with safety devices. Wrap the blade or wear gloves, and use extra caution when servicing them. • Check brake operation frequently. Use protective glasses for damaging the machine components. • Be very careful when handling battery acid. SAFETY General Maintenance • Never operate machine in a closed...
Owners Manual
Page 15
... work with water. Adjust and service as necessary. • The mulch blades should only be used in familiar areas when higher quality mowing is tested and approved only with the battery and the heavy cables of deck, avoid spraying engine and electrical components with the starter circuit if there is spilled fuel. • Disconnect the negative cable from the battery. WARNING! Avoid electrical sparking and its consequences...
... work with water. Adjust and service as necessary. • The mulch blades should only be used in familiar areas when higher quality mowing is tested and approved only with the battery and the heavy cables of deck, avoid spraying engine and electrical components with the starter circuit if there is spilled fuel. • Disconnect the negative cable from the battery. WARNING! Avoid electrical sparking and its consequences...

Owners Manual
Page 17
...Motion control levers 7. Choke/throttle control 4. Using the left and right steering controls, the flow is fitted with a Briggs & Stratton four-stroke overhead valve engine. Ignition switch 5. The rider is regulated and thereby the direction and speed. 1 2 3 4 5 6 7 8 9 1. Fuel tank cap 8. Cutting height handle 2. Transmission from the engine is made via belt-driven Control Locations hydraulic pumps. Fuel shut off valve 9. Bypass linkage 8058-111 17 Park brake 3. Blade control lever 6. CONTROLS This operator's manual describes the Husqvarna Zero Turn Rider...
...Motion control levers 7. Choke/throttle control 4. Using the left and right steering controls, the flow is fitted with a Briggs & Stratton four-stroke overhead valve engine. Ignition switch 5. The rider is regulated and thereby the direction and speed. 1 2 3 4 5 6 7 8 9 1. Fuel tank cap 8. Cutting height handle 2. Transmission from the engine is made via belt-driven Control Locations hydraulic pumps. Fuel shut off valve 9. Bypass linkage 8058-111 17 Park brake 3. Blade control lever 6. CONTROLS This operator's manual describes the Husqvarna Zero Turn Rider...

Owners Manual
Page 21
... the seat. Rotate the valve ¼ turn fuel OFF. IMPORTANT INFORMATION Always use the high position (F) to turn clockwise to transport. Recommended air pressure is 15 psi. (1 bar) Tracking must be used to temporarily adjust the cutting height, such as when passing a minor bump in the transport position or one of the 6 different cutting height positions. CONTROLS Fuel Shut Off Valve The fuel shut off valve in both rear tires. The mower deck's lifting lever 8050...
... the seat. Rotate the valve ¼ turn fuel OFF. IMPORTANT INFORMATION Always use the high position (F) to turn clockwise to transport. Recommended air pressure is 15 psi. (1 bar) Tracking must be used to temporarily adjust the cutting height, such as when passing a minor bump in the transport position or one of the 6 different cutting height positions. CONTROLS Fuel Shut Off Valve The fuel shut off valve in both rear tires. The mower deck's lifting lever 8050...

Owners Manual
Page 23
... riding mowers. First time users should stop moving . IMPORTANT INFORMATION When in that direction. DO NOT move both control levers back until becoming comfortable with the mower controls and zero turning capability, overly aggressive maneuvers may cause the mower to idle, disengage parking brake, do not engage blades at this will slow the rotation of the left wheel. Steering To move the mower under its own power. The left control lever controls...
... riding mowers. First time users should stop moving . IMPORTANT INFORMATION When in that direction. DO NOT move both control levers back until becoming comfortable with the mower controls and zero turning capability, overly aggressive maneuvers may cause the mower to idle, disengage parking brake, do not engage blades at this will slow the rotation of the left wheel. Steering To move the mower under its own power. The left control lever controls...

Owners Manual
Page 27
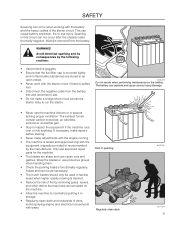
... charged battery. 3. OPERATION 12. Always wear eye protection when around batteries. Use full throttle when mowing 8050-007 IMPORTANT INFORMATION Your mower is too weak to short against chassis. 2. To remove cables, reverse order 1. Allow the engine to the POSITIVE (+) terminal on the mower with the throttle. Remove BLACK cable first from chassis and then from both batteries. WARNING! Keep sparks, flame and smoking materials away from the fuel tank...
... charged battery. 3. OPERATION 12. Always wear eye protection when around batteries. Use full throttle when mowing 8050-007 IMPORTANT INFORMATION Your mower is too weak to short against chassis. 2. To remove cables, reverse order 1. Allow the engine to the POSITIVE (+) terminal on the mower with the throttle. Remove BLACK cable first from chassis and then from both batteries. WARNING! Keep sparks, flame and smoking materials away from the fuel tank...

Owners Manual
Page 33
... parking brake ● Check the engine's oil level (every refueling) ■ Check the safety system Check for fuel and oil leakages Check/clean the engine's cooling air intake ● ♦ ■ Check the mower deck ● Check for loose hardware (screws, nuts) ● Clean under the mower deck ● Start the engine and blades, listen for unusual sounds ♦ Check for damage ♦ Thoroughly clean around the engine ♦ Clean around belts, belt pulleys ♦ Check the tire pressures Check battery Sharpen/replace mower blades Clean the engine...
... parking brake ● Check the engine's oil level (every refueling) ■ Check the safety system Check for fuel and oil leakages Check/clean the engine's cooling air intake ● ♦ ■ Check the mower deck ● Check for loose hardware (screws, nuts) ● Clean under the mower deck ● Start the engine and blades, listen for unusual sounds ♦ Check for damage ♦ Thoroughly clean around the engine ♦ Clean around belts, belt pulleys ♦ Check the tire pressures Check battery Sharpen/replace mower blades Clean the engine...

Owners Manual
Page 34
... contact with the plug. 34 MAINTENANCE Maintenance Check/adjust throttle cable Check the condition of belts, belt pulleys Change the engine oil 1) Replace the engine oil filter Clean/replace the spark plugs Check the caster wheels (every 200 hours) Check/adjust the mower deck Check the engine valve clearance 4) Perform the 300-hour service 4) Lubricate according to OFF position and remove the key. • Make sure the blades and all moving parts have completely stopped. • Disconnect the spark plug wire from all spark plugs and place the wire where it...
... contact with the plug. 34 MAINTENANCE Maintenance Check/adjust throttle cable Check the condition of belts, belt pulleys Change the engine oil 1) Replace the engine oil filter Clean/replace the spark plugs Check the caster wheels (every 200 hours) Check/adjust the mower deck Check the engine valve clearance 4) Perform the 300-hour service 4) Lubricate according to OFF position and remove the key. • Make sure the blades and all moving parts have completely stopped. • Disconnect the spark plug wire from all spark plugs and place the wire where it...

Owners Manual
Page 35
... of the battery with hex bolt and hex nut. 9. Install new battery with grease or petroleum jelly 6. IMPORTANT INFORMATION Do not attempt to contact both terminals at : 50 Amps 30 Amps 20 Amps 10 Amps 12.6V 100% - Always use two wrenches for charging times. Battery cleaning and installation 11. Rinse the battery with wire brush until shiny. 5. Reinstall battery. Replacing battery 1. MAINTENANCE Battery Your mower is not...
... of the battery with hex bolt and hex nut. 9. Install new battery with grease or petroleum jelly 6. IMPORTANT INFORMATION Do not attempt to contact both terminals at : 50 Amps 30 Amps 20 Amps 10 Amps 12.6V 100% - Always use two wrenches for charging times. Battery cleaning and installation 11. Rinse the battery with wire brush until shiny. 5. Reinstall battery. Replacing battery 1. MAINTENANCE Battery Your mower is not...

Owners Manual
Page 38
... be replaced. Route the belt around the EZT pulleys. 2. Blade Replacement 1. Install new or resharpened blade with a Husqvarna bolt if required. Tighten blade bolt securely. 5. Do not use lower grade hardware than specified. 38 3 1. Blade bolt (special) Blade attachment 8058-129 Engage the park brake. Allow engine and exhaust system before servicing. Balance the blades after sharpening. Remove blade bolt by pushing the spring loaded idler arm inward. The sharpening of blades should now be removed from the engine pulley and EZT pulleys. Replace with stamped GRASS...
... be replaced. Route the belt around the EZT pulleys. 2. Blade Replacement 1. Install new or resharpened blade with a Husqvarna bolt if required. Tighten blade bolt securely. 5. Do not use lower grade hardware than specified. 38 3 1. Blade bolt (special) Blade attachment 8058-129 Engage the park brake. Allow engine and exhaust system before servicing. Balance the blades after sharpening. Remove blade bolt by pushing the spring loaded idler arm inward. The sharpening of blades should now be removed from the engine pulley and EZT pulleys. Replace with stamped GRASS...

Owners Manual
Page 39
... cut for the type of the mower deck. Check the tire pressure before adjustment of grass or conditions involved. See Checking Tire Pressure in the disengaged position. 3. Rotate blade to align side to side adjuster nut 8050-227 8050-015 39 WARNING! See Technical Data section. 3. Turn front adjuster nut(s) to level deck side to OFF position and remove the key. 4. Turn ignition switch to side. Place the Blade switch in Maintenance. Disconnect the spark plug wire from all moving parts...
... cut for the type of the mower deck. Check the tire pressure before adjustment of grass or conditions involved. See Checking Tire Pressure in the disengaged position. 3. Rotate blade to align side to side adjuster nut 8050-227 8050-015 39 WARNING! See Technical Data section. 3. Turn front adjuster nut(s) to level deck side to OFF position and remove the key. 4. Turn ignition switch to side. Place the Blade switch in Maintenance. Disconnect the spark plug wire from all moving parts...

Owners Manual
Page 40
... a habit to the cleanout port and turn on the engine and electrical components. Restart the mower and engage the blades to use O.E.M. For cleaning the underside of the sleeve (3). 3. Tighten caster bolt. IMPORTANT INFORMATION DO NOT add any garden hose. Reinstall in reverse order. Excessive loads created by foam filled tires will increase the machine's life-span. Remove nut (1) and caster bolt (2). 2. specified tires. Hardware Check daily.
... a habit to the cleanout port and turn on the engine and electrical components. Restart the mower and engage the blades to use O.E.M. For cleaning the underside of the sleeve (3). 3. Tighten caster bolt. IMPORTANT INFORMATION DO NOT add any garden hose. Reinstall in reverse order. Excessive loads created by foam filled tires will increase the machine's life-span. Remove nut (1) and caster bolt (2). 2. specified tires. Hardware Check daily.

Owners Manual
Page 44
... coupling has loosened • Blade switch is faulty or has come loose, from the cable contact • Fuse has blown Uneven mowing results • Different air pressure in the engine • Fouled spark plug Battery not charging • Poor contact with battery terminal cable connectors. Machine moves slowly, unevenly, or not at all • Parking brake on • Hydraulic pump bypass linkage engaged • Drive belt for the transmission gears slack or has...
... coupling has loosened • Blade switch is faulty or has come loose, from the cable contact • Fuse has blown Uneven mowing results • Different air pressure in the engine • Fouled spark plug Battery not charging • Poor contact with battery terminal cable connectors. Machine moves slowly, unevenly, or not at all • Parking brake on • Hydraulic pump bypass linkage engaged • Drive belt for the transmission gears slack or has...

Owners Manual
Page 45
... an authorized service workshop is evenly distributed and then refit the spark plug. 6. Start the engine and allow it to avoid corrosion. 2. Store the machine in a clean, dry place and cover it for longer than 30 days. Remove the battery. Handle the fuel with open flame. Always use the mixing ratios specified by the manufacturer of the mower deck to run until the carburetor is...
... an authorized service workshop is evenly distributed and then refit the spark plug. 6. Start the engine and allow it to avoid corrosion. 2. Store the machine in a clean, dry place and cover it for longer than 30 days. Remove the battery. Handle the fuel with open flame. Always use the mixing ratios specified by the manufacturer of the mower deck to run until the carburetor is...
Owners Manual
Page 53
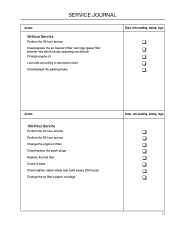
... 50-Hour Service Perform the 25-hour service Clean/replace the air cleaner's filter cartridge (paper filter (shorter intervals for dusty operating conditions) Change engine oil Lubricate according to lubrication chart Check/adjust the parking brake Date, mtr reading, stamp, sign q q q q q Action 100-Hour Service Perform the 25-hour service Perform the 50-hour service Change the engine oil filter Clean/replace the spark plugs Replace the fuel filter Check V-belts Check tighten caster wheel axle bolts (every 200 hours) Change the air filter's paper cartridge...
... 50-Hour Service Perform the 25-hour service Clean/replace the air cleaner's filter cartridge (paper filter (shorter intervals for dusty operating conditions) Change engine oil Lubricate according to lubrication chart Check/adjust the parking brake Date, mtr reading, stamp, sign q q q q q Action 100-Hour Service Perform the 25-hour service Perform the 50-hour service Change the engine oil filter Clean/replace the spark plugs Replace the fuel filter Check V-belts Check tighten caster wheel axle bolts (every 200 hours) Change the air filter's paper cartridge...

Owners Manual
Page 54
... valve seats Check the engine valve clearance Replace the air cleaner's pre-filter (foam) Date, mtr reading, stamp, sign q q q q q q q Action At Least Once Each Year Clean the engine's cooling air intake (25 hours) Replace the air cleaner's pre-filter (foam) (300 hours) Replace the air filter's paper cartridge Change the engine oil (50 hours) Replace the engine oil filter (100 hours) Check/adjust the cutting height Check/adjust the parking brake (50 hours) Clean/Change the spark plugs (100 hours) Change the fuel filter (100 hours) Check the engine valve...
... valve seats Check the engine valve clearance Replace the air cleaner's pre-filter (foam) Date, mtr reading, stamp, sign q q q q q q q Action At Least Once Each Year Clean the engine's cooling air intake (25 hours) Replace the air cleaner's pre-filter (foam) (300 hours) Replace the air filter's paper cartridge Change the engine oil (50 hours) Replace the engine oil filter (100 hours) Check/adjust the cutting height Check/adjust the parking brake (50 hours) Clean/Change the spark plugs (100 hours) Change the fuel filter (100 hours) Check the engine valve...


