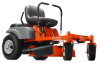

Owners Manual
Page 3
...19 Throttle Control 19 Ignition Switch 19 Choke Control 20 Refueling 20 Fuel Shut Off Valve 21 Mower Deck Lifting Lever 21 Tracking 21 Blade Control Lever 22 Bypass Linkages 22 OPERATION 23 Training 23 Steering 23 Before Starting 24 Starting the Engine 24 Jumper cables 27 Running ...Maintenance Schedule 33 Battery 35 Safety System 36 Tire Pressures 36 Parking Brake 37 V-belts 37 Deck Belt 37 EZT Belt 38 Cutting Blades 38 Blade Replacement 38 Adjusting the Mower Deck 39 Leveling Deck 39 Caster Wheels 40 Cleaning 40 Hardware 40 LUBRICATION 41 Front Wheel Mount 42 ...
...19 Throttle Control 19 Ignition Switch 19 Choke Control 20 Refueling 20 Fuel Shut Off Valve 21 Mower Deck Lifting Lever 21 Tracking 21 Blade Control Lever 22 Bypass Linkages 22 OPERATION 23 Training 23 Steering 23 Before Starting 24 Starting the Engine 24 Jumper cables 27 Running ...Maintenance Schedule 33 Battery 35 Safety System 36 Tire Pressures 36 Parking Brake 37 V-belts 37 Deck Belt 37 EZT Belt 38 Cutting Blades 38 Blade Replacement 38 Adjusting the Mower Deck 39 Leveling Deck 39 Caster Wheels 40 Cleaning 40 Hardware 40 LUBRICATION 41 Front Wheel Mount 42 ...

Owners Manual
Page 8
Rotating blades, keep away from the machine Use on slopes no greater than 10° No passengers Whole body Severing of fingers exposure to and toes thrown ... open or remove safety shields while engine is running Careful backing up, watch for other people Careful going forward, watch for other people Moving sharp blades under cover Battery acid is corrosive, explosive and flammable Warning! SYMBOLS AND DECALS Read Operator's Manual Shut off engine and remove key before performing any...
Rotating blades, keep away from the machine Use on slopes no greater than 10° No passengers Whole body Severing of fingers exposure to and toes thrown ... open or remove safety shields while engine is running Careful backing up, watch for other people Careful going forward, watch for other people Moving sharp blades under cover Battery acid is corrosive, explosive and flammable Warning! SYMBOLS AND DECALS Read Operator's Manual Shut off engine and remove key before performing any...
Owners Manual
Page 9
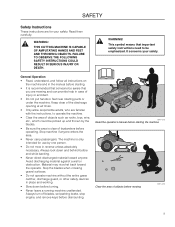
... the manual before starting the machine Clear the area of objects before turning. • Never leave a running machine unattended. Stop the blades when crossing gravel surfaces. • Do not operate machine without the entire grass catcher, discharge guard, or other safety devices in place...direct discharged material toward the operator. Always look down before mowing 8011-513 9 This symbol means that you are for use by the blades. • Be sure the area is recommended that someone be aware that important safety instructions need to operate the machine. • ...
... the manual before starting the machine Clear the area of objects before turning. • Never leave a running machine unattended. Stop the blades when crossing gravel surfaces. • Do not operate machine without the entire grass catcher, discharge guard, or other safety devices in place...direct discharged material toward the operator. Always look down before mowing 8011-513 9 This symbol means that you are for use by the blades. • Be sure the area is recommended that someone be aware that important safety instructions need to operate the machine. • ...

Owners Manual
Page 10
... certain vehicle components contain or emit chemicals considered to a complete stop before operating or storing the machine. • Allow machine to occur. SAFETY • Disengage blades when not mowing. Local laws may regulate the age of the user. • Keep machine free of riding mower-related injuries. Do not mow in...
... certain vehicle components contain or emit chemicals considered to a complete stop before operating or storing the machine. • Allow machine to occur. SAFETY • Disengage blades when not mowing. Local laws may regulate the age of the user. • Keep machine free of riding mower-related injuries. Do not mow in...

Owners Manual
Page 11
...steel toe caps. • Always wear approved protective glasses or a full visor when assembling or driving. • Always wear gloves when handling the blades. • Never wear loose clothing that can get caught in illustrations) shall be used. Do not drive up and down the slope. •...Uneven terrain could cause machine to hearing. Do not make sudden changes in severe injury or death. If the tires lose traction, disengage the blades and proceed slowly straight down slopes (10 degrees maximum), not across any slopes. 11 When using the machine. • Never use the ...
...steel toe caps. • Always wear approved protective glasses or a full visor when assembling or driving. • Always wear gloves when handling the blades. • Never wear loose clothing that can get caught in illustrations) shall be used. Do not drive up and down the slope. •...Uneven terrain could cause machine to hearing. Do not make sudden changes in severe injury or death. If the tires lose traction, disengage the blades and proceed slowly straight down slopes (10 degrees maximum), not across any slopes. 11 When using the machine. • Never use the ...

Owners Manual
Page 12
... presence of a responsible adult other objects that may suddenly appear in the mowing area for another ride and be seriously injured or interfere with the blades shut off if a child enters the area. • Before and while backing, look behind and down for small children. • Never carry children, even with...
... presence of a responsible adult other objects that may suddenly appear in the mowing area for another ride and be seriously injured or interfere with the blades shut off if a child enters the area. • Before and while backing, look behind and down for small children. • Never carry children, even with...
Owners Manual
Page 14
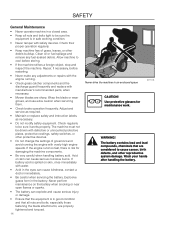
... as required. • Maintain or replace safety and instruction labels, as necessary. • Do not modify safety equipment. Wrap the blade or wear gloves, and use extra caution when servicing them. • Check brake operation frequently. The battery contains lead and lead compounds...fuel spillage and remove any adjustments or repairs with the engine running the engine with manufacturer's recommended parts, when necessary. • Mower blades are sharp. Check their proper operation regularly. • Keep machine free of governors and avoid running . • Check grass catcher ...
... as required. • Maintain or replace safety and instruction labels, as necessary. • Do not modify safety equipment. Wrap the blade or wear gloves, and use extra caution when servicing them. • Check brake operation frequently. The battery contains lead and lead compounds...fuel spillage and remove any adjustments or repairs with the engine running the engine with manufacturer's recommended parts, when necessary. • Mower blades are sharp. Check their proper operation regularly. • Keep machine free of governors and avoid running . • Check grass catcher ...
Owners Manual
Page 15
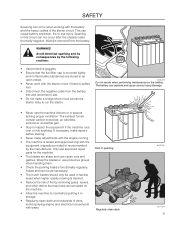
Only use protective gloves when handling them. • Check the parking brake's functionality regularly. Wrap the blades or use approved repair parts for the machine. • The blades are stored in an open vessel. • Never work with the battery and the heavy cables of fire by the ...is mounted tightly and no flammable substances are sharp and can cause cuts and gashes. Adjust and service as necessary. • The mulch blades should only be used in familiar areas when higher quality mowing is spilled fuel. • Disconnect the negative cable from the battery. ...
Only use protective gloves when handling them. • Check the parking brake's functionality regularly. Wrap the blades or use approved repair parts for the machine. • The blades are stored in an open vessel. • Never work with the battery and the heavy cables of fire by the ...is mounted tightly and no flammable substances are sharp and can cause cuts and gashes. Adjust and service as necessary. • The mulch blades should only be used in familiar areas when higher quality mowing is spilled fuel. • Disconnect the negative cable from the battery. ...

Owners Manual
Page 17
... thereby the direction and speed. 1 2 3 4 5 6 7 8 9 1. Using the left and right steering controls, the flow is made via belt-driven Control Locations hydraulic pumps. Park brake 3. Blade control lever 6. Cutting height handle 2. Choke/throttle control 4. Bypass linkage 8058-111 17 Fuel tank cap 8. Motion control levers 7. The rider is fitted with a Briggs...
... thereby the direction and speed. 1 2 3 4 5 6 7 8 9 1. Using the left and right steering controls, the flow is made via belt-driven Control Locations hydraulic pumps. Park brake 3. Blade control lever 6. Cutting height handle 2. Choke/throttle control 4. Bypass linkage 8058-111 17 Fuel tank cap 8. Motion control levers 7. The rider is fitted with a Briggs...

Owners Manual
Page 19
... brake before dismounting. Ignition switch 8050-005 8050-006 8050-006 19 Ignition Switch The ignition key is placed on the right side of the blades. Throttle control IMPORTANT INFORMATION Do not run the starter for best mower performance and battery charging. Pull the lever backward to activate the brake and...
... brake before dismounting. Ignition switch 8050-005 8050-006 8050-006 19 Ignition Switch The ignition key is placed on the right side of the blades. Throttle control IMPORTANT INFORMATION Do not run the starter for best mower performance and battery charging. Pull the lever backward to activate the brake and...

Owners Manual
Page 22
... to be carried out unless: • the engine stopped • the ignition key removed • the parking brake activated 8058-074 Mower deck blade control lever in the bypass position. • Release park brake. • To reengage the EZT's to engage the EZT Hydrogear bypass linkages. Set... bypass linkages into the slots. WARNING! CONTROLS Blade Control Lever To engage the mower blades, slowly lift the lever up and into the the lock notch. Release linkages to hold in the disengaged position Bypass Linkages...
... to be carried out unless: • the engine stopped • the ignition key removed • the parking brake activated 8058-074 Mower deck blade control lever in the bypass position. • Release park brake. • To reengage the EZT's to engage the EZT Hydrogear bypass linkages. Set... bypass linkages into the slots. WARNING! CONTROLS Blade Control Lever To engage the mower blades, slowly lift the lever up and into the the lock notch. Release linkages to hold in the disengaged position Bypass Linkages...

Owners Manual
Page 23
..., flat area, without other in the reverse position, complete the turn in Operation section), adjust engine speed to idle, disengage parking brake, do not engage blades at this will not move the mower under its own power, the operator must be reviewed in its own power. This may damage turf. Then...
..., flat area, without other in the reverse position, complete the turn in Operation section), adjust engine speed to idle, disengage parking brake, do not engage blades at this will not move the mower under its own power, the operator must be reviewed in its own power. This may damage turf. Then...

Owners Manual
Page 24
Activate the parking brake. Start conditions Raise the mower deck 4. Disengage the mower blades by pulling the lifting lever upward to the transport position (F). 3. OPERATION Before Starting ... must be seated on the seat. • The blade control lever for engaging the mower blades must be down position 8058-074 24 Raise the mower deck by lowering the blade control lever out of the lock notch and into the... down position. 8050-020 8058-085 Set the blade control lever to the desired position. Sit on . • Both steering controls must be...
Activate the parking brake. Start conditions Raise the mower deck 4. Disengage the mower blades by pulling the lifting lever upward to the transport position (F). 3. OPERATION Before Starting ... must be seated on the seat. • The blade control lever for engaging the mower blades must be down position 8058-074 24 Raise the mower deck by lowering the blade control lever out of the lock notch and into the... down position. 8050-020 8058-085 Set the blade control lever to the desired position. Sit on . • Both steering controls must be...

Owners Manual
Page 28
... Move throttle control to the neutral position (N). In order, for example, to the right. Parking brake not activated 3. Engage the mower blade by moving one is equipped with an operator presence system. Move the steering controls to full throttle. 5. The machine's speed and direction are... in a straight line forward or backward respectively. NOTE: The mower is near mower when engaging blade control lever. 4. When both controls an equal amount forward or backward, the machine moves in the neutral position, the machine stands still....
... Move throttle control to the neutral position (N). In order, for example, to the right. Parking brake not activated 3. Engage the mower blade by moving one is equipped with an operator presence system. Move the steering controls to full throttle. 5. The machine's speed and direction are... in a straight line forward or backward respectively. NOTE: The mower is near mower when engaging blade control lever. 4. When both controls an equal amount forward or backward, the machine moves in the neutral position, the machine stands still....
Owners Manual
Page 30
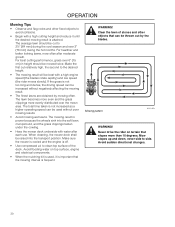
... lawn, clumps build, and the grass clippings fasten under the cowling. • Hose the mower deck underside with a high engine speed (the blades rotate rapidly) and low speed (the rider moves slowly). For healthier and better looking lawns, mow often after each use. The mowing result is...will be used , it until the desired mowing result is used without negatively affecting the mowing result. • The finest lawns are obtained by the blades. For best cutting performance, grass over 6" (15 cm) in height should be cut relatively high, the second to avoid collisions. • Begin ...
... lawn, clumps build, and the grass clippings fasten under the cowling. • Hose the mower deck underside with a high engine speed (the blades rotate rapidly) and low speed (the rider moves slowly). For healthier and better looking lawns, mow often after each use. The mowing result is...will be used , it until the desired mowing result is used without negatively affecting the mowing result. • The finest lawns are obtained by the blades. For best cutting performance, grass over 6" (15 cm) in height should be cut relatively high, the second to avoid collisions. • Begin ...

Owners Manual
Page 31
...to the transport position. 3. Raise the mower deck with the lifting lever 8058-074 8058-085 31 Raise the mower deck by sliding the blade control lever out of the spark plugs fouling. 1. Move the steering controls outward. 6. Always remove key when leaving the mower to prevent unauthorized... worked hard. When the machine is a risk of the lock notch and down into the lower position. Remove the key. Disengage the mower blades 2. OPERATION Stopping the Engine Allow the engine to idle a minute in any other position than OFF will cause the battery to the minimum position...
...to the transport position. 3. Raise the mower deck with the lifting lever 8058-074 8058-085 31 Raise the mower deck by sliding the blade control lever out of the spark plugs fouling. 1. Move the steering controls outward. 6. Always remove key when leaving the mower to prevent unauthorized... worked hard. When the machine is a risk of the lock notch and down into the lower position. Remove the key. Disengage the mower blades 2. OPERATION Stopping the Engine Allow the engine to idle a minute in any other position than OFF will cause the battery to the minimum position...

Owners Manual
Page 33
...Check the mower deck ● Check for loose hardware (screws, nuts) ● Clean under the mower deck ● Start the engine and blades, listen for unusual sounds ♦ Check for damage ♦ Thoroughly clean around the engine ♦ Clean around belts, belt pulleys ♦ ...Check the tire pressures Check battery Sharpen/replace mower blades Clean the engine's cooling air intake 2) Clean the air cleaner's pre-filter 2) (foam) Clean the air cleaner's filter cartridge 2) (...
...Check the mower deck ● Check for loose hardware (screws, nuts) ● Clean under the mower deck ● Start the engine and blades, listen for unusual sounds ♦ Check for damage ♦ Thoroughly clean around the engine ♦ Clean around belts, belt pulleys ♦ ...Check the tire pressures Check battery Sharpen/replace mower blades Clean the engine's cooling air intake 2) Clean the air cleaner's pre-filter 2) (foam) Clean the air cleaner's filter cartridge 2) (...

Owners Manual
Page 34
Before performing any service or adjustment checklist: • Engage the parking brake. • Place the Blade-switch in the disengaged position. • Turn the ignition switch to Lubrication Schedule 3,4) Daily Before After Weekly At Maintenance interval in least hours once ...mower deck Check the engine valve clearance 4) Perform the 300-hour service 4) Lubricate according to OFF position and remove the key. • Make sure the blades and all moving parts have completely stopped. • Disconnect the spark plug wire from all spark plugs and place the wire where it cannot come...
Before performing any service or adjustment checklist: • Engage the parking brake. • Place the Blade-switch in the disengaged position. • Turn the ignition switch to Lubrication Schedule 3,4) Daily Before After Weekly At Maintenance interval in least hours once ...mower deck Check the engine valve clearance 4) Perform the 300-hour service 4) Lubricate according to OFF position and remove the key. • Make sure the blades and all moving parts have completely stopped. • Disconnect the spark plug wire from all spark plugs and place the wire where it cannot come...

Owners Manual
Page 36
MAINTENANCE Safety System The machine is equipped with a safety system that the engine stops if the mower blades are in the outer, locked neutral position. 3. Make daily inspections to ensure that the safety system works by attempting to drive, the driver must sit ...
MAINTENANCE Safety System The machine is equipped with a safety system that the engine stops if the mower blades are in the outer, locked neutral position. 3. Make daily inspections to ensure that the safety system works by attempting to drive, the driver must sit ...

Owners Manual
Page 37
...operation. Carefully lift the belt away from belt keepers and off deck pulleys and remove from wear. Disengage the clutch by sliding the blade control lever downwards. The belts are not adjustable. Disengage clutch to the lowest cutting position. 3. Replace belt (refer to the parking... belt will show some small cracks in reduced braking ability and can result in normal operation. To adjust the parking brake, contact the Husqvarna service workshop. WARNING! V-belts Check every 100 hours of parking brake Deck Belt To replace deck belt Deck belt removal. 1. Replace...
...operation. Carefully lift the belt away from belt keepers and off deck pulleys and remove from wear. Disengage the clutch by sliding the blade control lever downwards. The belts are not adjustable. Disengage clutch to the lowest cutting position. 3. Replace belt (refer to the parking... belt will show some small cracks in reduced braking ability and can result in normal operation. To adjust the parking brake, contact the Husqvarna service workshop. WARNING! V-belts Check every 100 hours of parking brake Deck Belt To replace deck belt Deck belt removal. 1. Replace...


