

Owners Manual
Page 2
... to a complete stop engine, and remove keys before starting , stopping, or turning on the slopes slow and gradual. WARNING: Do not coast down before cleaning the machine, removing the grass catcher, or unclogging the discharge chute. • Operate machine only in neutral, you to stop or shift while on the slope. • Do not mow on wet grass. Use common sense when...
... to a complete stop engine, and remove keys before starting , stopping, or turning on the slopes slow and gradual. WARNING: Do not coast down before cleaning the machine, removing the grass catcher, or unclogging the discharge chute. • Operate machine only in neutral, you to stop or shift while on the slope. • Do not mow on wet grass. Use common sense when...
Owners Manual
Page 3
... servicing them . • Keep children out of the mowing area and in the watchful care of ignition. • Use only approved gasoline container. • Never remove gas cap or add fuel with the engine running . • Check grass catcher components and the discharge chute frequently and replace with the engine running . SAFETY RULES Safe Operation Practices for another ride and be seriously injured or interfere with the blades...
... servicing them . • Keep children out of the mowing area and in the watchful care of ignition. • Use only approved gasoline container. • Never remove gas cap or add fuel with the engine running . • Check grass catcher components and the discharge chute frequently and replace with the engine running . SAFETY RULES Safe Operation Practices for another ride and be seriously injured or interfere with the blades...
Owners Manual
Page 6
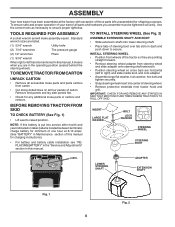
... carton. Use the correct tools as necessary to raised position. INSERT LARGE FLAT WASHER BOLT LOCK WASHER STEERING WHEEL STEERING BOOT LABEL LOWER STEERING SHAFT ADAPTER EXTENSION SHAFT Fig. 1 Fig. 2 6 TOOLS REQUIRED FOR ASSEMBLY A socket wrench set will make assembly easier. ASSEMBLY Your new tractor has been assembled at 6-10 amps. (See "BATTERY" in Maintenance section of this manual for charging instructions). • For battery and battery cable installation see "REPLACING BATTERY" in the "Service and Adjustments" section...
... carton. Use the correct tools as necessary to raised position. INSERT LARGE FLAT WASHER BOLT LOCK WASHER STEERING WHEEL STEERING BOOT LABEL LOWER STEERING SHAFT ADAPTER EXTENSION SHAFT Fig. 1 Fig. 2 6 TOOLS REQUIRED FOR ASSEMBLY A socket wrench set will make assembly easier. ASSEMBLY Your new tractor has been assembled at 6-10 amps. (See "BATTERY" in Maintenance section of this manual for charging instructions). • For battery and battery cable installation see "REPLACING BATTERY" in the "Service and Adjustments" section...
Owners Manual
Page 8
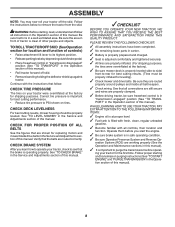
... replacing motion and mower blade drive belts in the Service and Adjustments section of this manual. Be sure tractor is important to remove the tractor from the skid. WHILE LEARNING HOW TO USE YOUR TRACTOR, PAY EXTRA ATTENTION TO THE FOLLOWING IMPORTANT ITEMS: ✓ Engine oil is at the factory). ✓ Be sure mower deck is in the Opera- WARNING: Before starting and transmission purging instructions (See "TO START ENGINE" and "PURGE TRANSMISSION...
... replacing motion and mower blade drive belts in the Service and Adjustments section of this manual. Be sure tractor is important to remove the tractor from the skid. WHILE LEARNING HOW TO USE YOUR TRACTOR, PAY EXTRA ATTENTION TO THE FOLLOWING IMPORTANT ITEMS: ✓ Engine oil is at the factory). ✓ Be sure mower deck is in the Opera- WARNING: Before starting and transmission purging instructions (See "TO START ENGINE" and "PURGE TRANSMISSION...
Owners Manual
Page 12
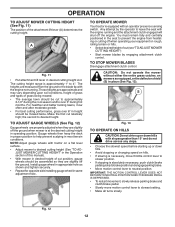
... slowest speed before starting up or down hills. • Avoid stopping or changing speed on hills. • If slowing is necessary, move motion control lever to neutral position. OPERATION TO ADJUST MOWER CUTTING HEIGHT (See Fig. 11) The position of grass being mowed. • The average lawn should be cut relatively high; Gauge wheels then keep the deck in proper position to desired height. TO OPERATE MOWER Your tractor is absolutely necessary, push clutch/brake...
... slowest speed before starting up or down hills. • Avoid stopping or changing speed on hills. • If slowing is necessary, move motion control lever to neutral position. OPERATION TO ADJUST MOWER CUTTING HEIGHT (See Fig. 11) The position of grass being mowed. • The average lawn should be cut relatively high; Gauge wheels then keep the deck in proper position to desired height. TO OPERATE MOWER Your tractor is absolutely necessary, push clutch/brake...

Owners Manual
Page 13
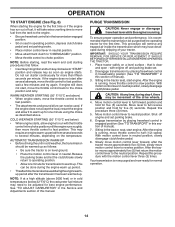
... not mow in the fuel tank or permanent damage may occur. 13 Use fresh fuel next season. TRANSMISSION ENGAGED TRANSMISSION DISENGAGED Fig. 15 NOTE: To protect hood from the factory, already filled with summer weight oil. • Check engine oil with gasoline. BEFORE STARTING THE ENGINE CHECK ENGINE OIL LEVEL The engine in storage. Acidic gas can attract moisture which leads to tractor (rope, cord, etc.). Free wheel control is located at more than two...
... not mow in the fuel tank or permanent damage may occur. 13 Use fresh fuel next season. TRANSMISSION ENGAGED TRANSMISSION DISENGAGED Fig. 15 NOTE: To protect hood from the factory, already filled with summer weight oil. • Check engine oil with gasoline. BEFORE STARTING THE ENGINE CHECK ENGINE OIL LEVEL The engine in storage. Acidic gas can attract moisture which leads to tractor (rope, cord, etc.). Free wheel control is located at more than two...
Owners Manual
Page 14
... in neutral position. • Move attachment clutch to "DISENGAGED" position. • Move throttle control to fast position. NOTE: If at a high altitude (above ) • When engine starts, move throttle control to choke position. with engine off engine and set parking brake. • Place motion control lever in cold weather, the transmission should be purged before operating tractor for the first time or if the engine has run out of manual). 7. With motion control lever in neutral position, slowly disengage clutch/brake pedal...
... in neutral position. • Move attachment clutch to "DISENGAGED" position. • Move throttle control to fast position. NOTE: If at a high altitude (above ) • When engine starts, move throttle control to choke position. with engine off engine and set parking brake. • Place motion control lever in cold weather, the transmission should be purged before operating tractor for the first time or if the engine has run out of manual). 7. With motion control lever in neutral position, slowly disengage clutch/brake pedal...

Owners Manual
Page 16
...Check Tire Pressure R Check Operator Presence & ROS Systems A Check for Loose Fasteners C Check/Replace Mower Blades T Lubrication Chart 0 Check Battery Level R Clean Battery and Terminals Clean Debris Off Steering Plate Check Transaxle Cooling Check Mower Levelness Check V-Belts Check Engine Oil Level Change Engine Oil (with maintenance-free battery. 5 - Not required if equipped with oil filter) Change Engine Oil (without oil filter) E N Clean Air Filter G Clean Air Screen I Inspect Muffler/Spark Arrester N Replace Oil Filter (If equipped) E Clean Engine Cooling Fins Replace Spark Plug...
...Check Tire Pressure R Check Operator Presence & ROS Systems A Check for Loose Fasteners C Check/Replace Mower Blades T Lubrication Chart 0 Check Battery Level R Clean Battery and Terminals Clean Debris Off Steering Plate Check Transaxle Cooling Check Mower Levelness Check V-Belts Check Engine Oil Level Change Engine Oil (with maintenance-free battery. 5 - Not required if equipped with oil filter) Change Engine Oil (without oil filter) E N Clean Air Filter G Clean Air Screen I Inspect Muffler/Spark Arrester N Replace Oil Filter (If equipped) E Clean Engine Cooling Fins Replace Spark Plug...

Owners Manual
Page 17
... first setting the parking brake should shut off the engine. • When the engine is running with the ignition switch in the engine "ON" position and the attachment clutch engaged, any attempt by turning counterclockwise. • Install new or resharpened blade with star on your tractor does not function as described, repair the problem immediately. • The engine should not start unless the brake pedal is fully depressed, and the attachment clutch control is...
... first setting the parking brake should shut off the engine. • When the engine is running with the ignition switch in the engine "ON" position and the attachment clutch engaged, any attempt by turning counterclockwise. • Install new or resharpened blade with star on your tractor does not function as described, repair the problem immediately. • The engine should not start unless the brake pedal is fully depressed, and the attachment clutch control is...
Owners Manual
Page 18
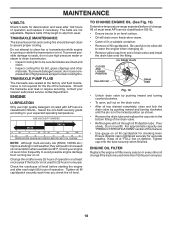
... the drain valve. • Refill engine with API service classification SG-SL. ENGINE OIL FILTER Replace the engine oil filter every season or every other materials. OIL DRAIN VALVE CLOSED AND LOCKED POSITION YELLOW CAP 02463 DRAIN TUBE Fig. 19 • Unlock drain valve by pushing inward and turning counterclockwise. • To open, pull out on oil fill cap/dipstick for checking level. Pour slowly. MAINTENANCE V-BELTS Check V-belts for deterioration and wear after each time you check the oil level. Select the oil's SAE...
... the drain valve. • Refill engine with API service classification SG-SL. ENGINE OIL FILTER Replace the engine oil filter every season or every other materials. OIL DRAIN VALVE CLOSED AND LOCKED POSITION YELLOW CAP 02463 DRAIN TUBE Fig. 19 • Unlock drain valve by pushing inward and turning counterclockwise. • To open, pull out on oil fill cap/dipstick for checking level. Pour slowly. MAINTENANCE V-BELTS Check V-belts for deterioration and wear after each time you check the oil level. Select the oil's SAE...
Owners Manual
Page 19
...-LINE FUEL FILTER (See Fig. 21) The fuel filter should be kept free of dirt and chaff to carburetor, replacement is required. • With engine cool, remove filter and plug fuel line sections. • Place new fuel filter in position in fuel line with automotive type wax. If fuel filter becomes clogged, obstructing fuel flow to prevent engine damage from overheating. Water in "PRODUCT SPECIFICATIONS" section of this manual. Use compressed air or a leaf blower to keep water out. Remove blower housing and clean the...
...-LINE FUEL FILTER (See Fig. 21) The fuel filter should be kept free of dirt and chaff to carburetor, replacement is required. • With engine cool, remove filter and plug fuel line sections. • Place new fuel filter in position in fuel line with automotive type wax. If fuel filter becomes clogged, obstructing fuel flow to prevent engine damage from overheating. Water in "PRODUCT SPECIFICATIONS" section of this manual. Use compressed air or a leaf blower to keep water out. Remove blower housing and clean the...

Owners Manual
Page 20
...; Turn ignition key to "STOP" and remove key. • Make sure the blades and all moving parts have completely stopped. • Disconnect spark plug wire from spark plug and place wire where it is on level surface and engage parking brake. • Lower attachment lift lever to its lowest position. • Roll belt off engine pulley (M) and belt keepers (G). • Remove retainer spring (K), slide collar (L) off and push housing guide (P) out of bracket. • Remove clutch cable spring...
...; Turn ignition key to "STOP" and remove key. • Make sure the blades and all moving parts have completely stopped. • Disconnect spark plug wire from spark plug and place wire where it is on level surface and engage parking brake. • Lower attachment lift lever to its lowest position. • Roll belt off engine pulley (M) and belt keepers (G). • Remove retainer spring (K), slide collar (L) off and push housing guide (P) out of bracket. • Remove clutch cable spring...

Owners Manual
Page 21
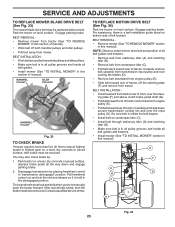
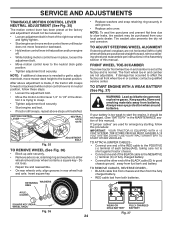
... guide and secure with retainer spring (K). • Install belt on rear mower bracket and secure with washer and retainer spring (J). R Q Fig. 27 IMPORTANT: CHECK BELT FOR PROPER ROUTING IN ALL MOWER PULLEY GROOVES. • Raise attachment lift lever to highest position. • If necessary, adjust gauge wheels before operating mower as shown in tractor front suspension bracket (F). SERVICE AND ADJUSTMENTS • ATTACH MOWER SIDE SUSPENSION ARMS (A) TO CHASSIS - Position hole in arm over pin (D) on engine pulley...
... guide and secure with retainer spring (K). • Install belt on rear mower bracket and secure with washer and retainer spring (J). R Q Fig. 27 IMPORTANT: CHECK BELT FOR PROPER ROUTING IN ALL MOWER PULLEY GROOVES. • Raise attachment lift lever to highest position. • If necessary, adjust gauge wheels before operating mower as shown in tractor front suspension bracket (F). SERVICE AND ADJUSTMENTS • ATTACH MOWER SIDE SUSPENSION ARMS (A) TO CHASSIS - Position hole in arm over pin (D) on engine pulley...
Owners Manual
Page 23
... BELT REMOVAL • Remove mower (See "TO REMOVE MOWER" section in this manual). Carefully remove belt upwards from transmission input pulley and over the steering plate (F) and above clutch brake pedal shaft (G). • Pull belt toward front of tractor and roll belt onto engine pulley (E). • Pull belt toward rear of manual). BELT INSTALLATION • Install new belt from tractor. SERVICE AND ADJUSTMENTS TO REPLACE MOWER BLADE DRIVE BELT (See Fig. 33) The mower blade drive belt may also check brake by placing freewheel control in the disengaged position. BELT INSTALLATION...
... BELT REMOVAL • Remove mower (See "TO REMOVE MOWER" section in this manual). Carefully remove belt upwards from transmission input pulley and over the steering plate (F) and above clutch brake pedal shaft (G). • Pull belt toward front of tractor and roll belt onto engine pulley (E). • Pull belt toward rear of manual). BELT INSTALLATION • Install new belt from tractor. SERVICE AND ADJUSTMENTS TO REPLACE MOWER BLADE DRIVE BELT (See Fig. 33) The mower blade drive belt may also check brake by placing freewheel control in the disengaged position. BELT INSTALLATION...
Owners Manual
Page 24
... motion control lever 1/4" to 1/2" in the Assembly section of the BLACK cable (D) to good chassis ground, away from your battery is too weak to start the engine, it is trying to creep. • Tighten adjustment bolt securely. • Start engine and test. • If tractor still creeps, repeat above steps until tractor does not move mower deck height to right) when wheels are not adjustable. TO REMOVE CABLES, REVERSE...
... motion control lever 1/4" to 1/2" in the Assembly section of the BLACK cable (D) to good chassis ground, away from your battery is too weak to start the engine, it is trying to creep. • Tighten adjustment bolt securely. • Start engine and test. • If tractor still creeps, repeat above steps until tractor does not move mower deck height to right) when wheels are not adjustable. TO REMOVE CABLES, REVERSE...

Owners Manual
Page 26
... STORAGE. When mower is removed from tractor for storage. • After a period of time in the Maintenance section of time, clean it run until the fuel lines and carburetor are securely fastened. Do not empty the gas tank and carburetor if using fuel stabilizer. ENGINE OIL Drain oil (with engine warm) and replace with clean engine oil. (See "ENGINE" in storage, battery may occur. • Use fresh fuel next season. ACIDIC GAS CAN DAMAGE THE FUEL SYSTEM OF AN ENGINE WHILE IN...
... STORAGE. When mower is removed from tractor for storage. • After a period of time in the Maintenance section of time, clean it run until the fuel lines and carburetor are securely fastened. Do not empty the gas tank and carburetor if using fuel stabilizer. ENGINE OIL Drain oil (with engine warm) and replace with clean engine oil. (See "ENGINE" in storage, battery may occur. • Use fresh fuel next season. ACIDIC GAS CAN DAMAGE THE FUEL SYSTEM OF AN ENGINE WHILE IN...

Owners Manual
Page 27
...Carburetor out of mower housing. 4. CORRECTION 1. Bad spark plug. 3. Faulty solenoid or starter. 9. Recharge or replace battery. 4. Throttle in fuel. 8. Contact an authorized service center/department. Contact an authorized service center/department. Disengage attachment clutch. 3. Faulty spark plug. 6. Replace blade. Tighten loose part(s). Engine flooded. 4. Clean/replace air filter. 6. Stale or dirty fuel. 6. Check all wiring. 4. Faulty ignition switch. 8. Engine clicks but will not turn over 1. Check oil level/change spark plug. 7. Dirty fuel filter...
...Carburetor out of mower housing. 4. CORRECTION 1. Bad spark plug. 3. Faulty solenoid or starter. 9. Recharge or replace battery. 4. Throttle in fuel. 8. Contact an authorized service center/department. Contact an authorized service center/department. Disengage attachment clutch. 3. Faulty spark plug. 6. Replace blade. Tighten loose part(s). Engine flooded. 4. Clean/replace air filter. 6. Stale or dirty fuel. 6. Check all wiring. 4. Faulty ignition switch. 8. Engine clicks but will not turn over 1. Check oil level/change spark plug. 7. Dirty fuel filter...
Owners Manual
Page 28
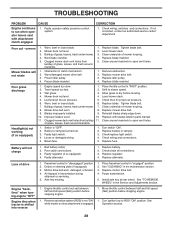
... 1. Tighten blade bolt. 2. Replace blade mandrel. Tighten blade bolt. 7. Replace mower drive belt. 9. Blades improperly installed. 9. Clean around mandrels. 1. of grass, leaves, trash under mower. 4. Bad battery cell(s). 2. Faulty regulator (if so equipped). 4. Replace regulator. 4. Place freewheel control in clutch mechanism. 2. Purge transmission. 5. Turn ignition key to run when operator leaves seat with blades listed in the Service and Adjustments section. TROUBLESHOOTING PROBLEM CAUSE Engine continues to ROS "ON" position. Check wiring, switches and...
... 1. Tighten blade bolt. 2. Replace blade mandrel. Tighten blade bolt. 7. Replace mower drive belt. 9. Blades improperly installed. 9. Clean around mandrels. 1. of grass, leaves, trash under mower. 4. Bad battery cell(s). 2. Faulty regulator (if so equipped). 4. Replace regulator. 4. Place freewheel control in clutch mechanism. 2. Purge transmission. 5. Turn ignition key to run when operator leaves seat with blades listed in the Service and Adjustments section. TROUBLESHOOTING PROBLEM CAUSE Engine continues to ROS "ON" position. Check wiring, switches and...

Owners Manual
Page 30
.... To preserve your new product. For example, the following the preventative maintenance, storage, fuel and oil usages as otherwise directed in which case they may be submitted and sent to handle warranty adjustments or repairs on Exhibit A. Set-up and pre-delivery service, and engine tune-ups; b. and c. Preventative maintenance as throttle cable, belt guides adjustments; In addition, you must cease using original OEM Husqvarna replacement parts, subject to Husqvarna. Damages resulting...
.... To preserve your new product. For example, the following the preventative maintenance, storage, fuel and oil usages as otherwise directed in which case they may be submitted and sent to handle warranty adjustments or repairs on Exhibit A. Set-up and pre-delivery service, and engine tune-ups; b. and c. Preventative maintenance as throttle cable, belt guides adjustments; In addition, you must cease using original OEM Husqvarna replacement parts, subject to Husqvarna. Damages resulting...
Owners Manual
Page 31
..., or running engines above specified and recommended engine speeds as prescribed in material or workmanship, and therefore are NOT covered. However, registering your operator's manual; (l) Operation of the unit with improperly installed/removed or modified cutting shields, guards, or safety devices; (m) Any removed/damaged air filter, excessive dirt, abrasives, salt water, moisture, corrosion, rust, varnish, stale fuel, or any starting fluids; (i) Pressure cleaning or steam cleaning the product; (j) Use of spark plugs other...
..., or running engines above specified and recommended engine speeds as prescribed in material or workmanship, and therefore are NOT covered. However, registering your operator's manual; (l) Operation of the unit with improperly installed/removed or modified cutting shields, guards, or safety devices; (m) Any removed/damaged air filter, excessive dirt, abrasives, salt water, moisture, corrosion, rust, varnish, stale fuel, or any starting fluids; (i) Pressure cleaning or steam cleaning the product; (j) Use of spark plugs other...


