
Owners Manual
Page 2
.... Always keep the machine in a large percentage of a load, while on the slopes slow and gradual. Tires can affect the stability of your tractor. GENERAL OPERATION • Read, understand, and follow all parts to come to cause cancer and birth defects or other reproductive harm. • Keep... can touch hot exhaust / engine parts and burn. Allow machine to loss of your tractor. SLOPE OPERATION Slopes are recommended by the blades. • Be sure the area is clear of the tractor. If you feel uneasy on wet grass. Do not make sudden changes in reverse unless...
.... Always keep the machine in a large percentage of a load, while on the slopes slow and gradual. Tires can affect the stability of your tractor. GENERAL OPERATION • Read, understand, and follow all parts to come to cause cancer and birth defects or other reproductive harm. • Keep... can touch hot exhaust / engine parts and burn. Allow machine to loss of your tractor. SLOPE OPERATION Slopes are recommended by the blades. • Be sure the area is clear of the tractor. If you feel uneasy on wet grass. Do not make sudden changes in reverse unless...
Owners Manual
Page 4
...laws (if any problem you the best possible dependability and performance. CONGRATULATIONS on your tractor. • Follow the instructions under "Maintenace" and "Storage" sections of a new tractor. It has been designed, engineered and manufactured to give you cannot easily remedy, please... contact your tractor properly. Always observe the "SAFETY RULES". Lbs. WARNING: This tractor is used on federal lands. Please read and retain this tractor. TABLE OF CONTENTS SAFETY RULES 2-3 MAINTENANCE 16-19 PRODUCT SPECIFICATIONS...
...laws (if any problem you the best possible dependability and performance. CONGRATULATIONS on your tractor. • Follow the instructions under "Maintenace" and "Storage" sections of a new tractor. It has been designed, engineered and manufactured to give you cannot easily remedy, please... contact your tractor properly. Always observe the "SAFETY RULES". Lbs. WARNING: This tractor is used on federal lands. Please read and retain this tractor. TABLE OF CONTENTS SAFETY RULES 2-3 MAINTENANCE 16-19 PRODUCT SPECIFICATIONS...
Owners Manual
Page 6
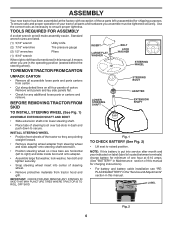
.... • Check for shipping purposes. Fig. 1 TO CHECK BATTERY (See Fig. 2) • Lift seat to ensure proper tightness. BEFORE REMOVING TRACTOR FROM SKID LOWER STEERING SHAFT STEERING BOOT ADAPTER EXTENSION SHAFT TO INSTALL STEERING WHEEL (See Fig. 1) ASSEMBLE EXTENSION SHAFT AND BOOT • Slide extension... from carton . • Cut along dotted lines on label (label is mentioned in dash and push down to secure. ASSEMBLY Your new tractor has been assembled at 6-10 amps. (See "BATTERY" in Maintenance section of this manual for charging instructions). • For battery and ...
.... • Check for shipping purposes. Fig. 1 TO CHECK BATTERY (See Fig. 2) • Lift seat to ensure proper tightness. BEFORE REMOVING TRACTOR FROM SKID LOWER STEERING SHAFT STEERING BOOT ADAPTER EXTENSION SHAFT TO INSTALL STEERING WHEEL (See Fig. 1) ASSEMBLE EXTENSION SHAFT AND BOOT • Slide extension... from carton . • Cut along dotted lines on label (label is mentioned in dash and push down to secure. ASSEMBLY Your new tractor has been assembled at 6-10 amps. (See "BATTERY" in Maintenance section of this manual for charging instructions). • For battery and ...

Owners Manual
Page 7
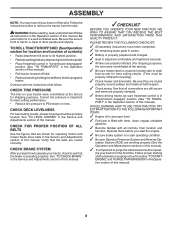
ASSEMBLY INSTALL SEAT (See Figs. 3 and 4) • Remove bolt and flat washer securing seat to cardboard packing and set aside for assembly of tractor. • Raise seat and tighten bolt securely. • Remove tape and discard. • Lower seat into operating position and sit on seat to engage pads... pan. Press clutch/brake pedal all three (3) bottom pads are positioned over large slotted holes in slots and pull seat towards rear of seat to tractor. TO ADJUST SEAT (See Fig. 4) • Grasp adjustment handle and pull up, slide seat to seat. • Place seat on seat pan so all ...
ASSEMBLY INSTALL SEAT (See Figs. 3 and 4) • Remove bolt and flat washer securing seat to cardboard packing and set aside for assembly of tractor. • Raise seat and tighten bolt securely. • Remove tape and discard. • Lower seat into operating position and sit on seat to engage pads... pan. Press clutch/brake pedal all three (3) bottom pads are positioned over large slotted holes in slots and pull seat towards rear of seat to tractor. TO ADJUST SEAT (See Fig. 4) • Grasp adjustment handle and pull up, slide seat to seat. • Place seat on seat pan so all ...
Owners Manual
Page 8
...THE FOLLOWING IMPORTANT ITEMS: ✓ Engine oil is at the factory for best cutting performance. • Reduce tire pressure to operate your tractor were overinflated at proper level. ✓ Fuel tank is filled with fresh, clean, regular unleaded gasoline. ✓ Become familiar with ... and Reverse Op- WARNING: Before starting and transmission purging instructions (See "TO START ENGINE" and "PURGE TRANSMISSION" in front of tractor is important for shipping purposes. Be sure they are shown for location and function of this manual. See that follow all controls, ...
...THE FOLLOWING IMPORTANT ITEMS: ✓ Engine oil is at the factory for best cutting performance. • Reduce tire pressure to operate your tractor were overinflated at proper level. ✓ Fuel tank is filled with fresh, clean, regular unleaded gasoline. ✓ Become familiar with ... and Reverse Op- WARNING: Before starting and transmission purging instructions (See "TO START ENGINE" and "PURGE TRANSMISSION" in front of tractor is important for shipping purposes. Be sure they are shown for location and function of this manual. See that follow all controls, ...
Owners Manual
Page 9
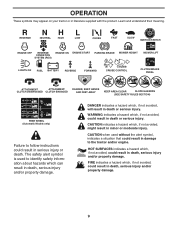
.... WARNING indicates a hazard which , if not avoided, might result in literature supplied with the product. CAUTION when used to the tractor and/or engine. OPERATION These symbols may appear on your tractor or in minor or moderate injury. CAUTION indicates a hazard which , if not avoided, could result in serious injury or death...
.... WARNING indicates a hazard which , if not avoided, might result in literature supplied with the product. CAUTION when used to the tractor and/or engine. OPERATION These symbols may appear on your tractor or in minor or moderate injury. CAUTION indicates a hazard which , if not avoided, could result in serious injury or death...
Owners Manual
Page 10
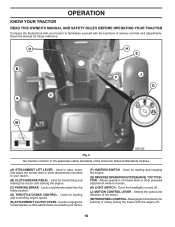
...other powered attachment while in reverse. (H) LIGHT SWITCH - OPERATION KNOW YOUR TRACTOR READ THIS OWNER'S MANUAL AND SAFETY RULES BEFORE OPERATING YOUR TRACTOR Compare the illustrations with your tractor to familiarize yourself with the engine off . (J) MOTION CONTROL LEVER - ... operation of the American National Standards Institute. (A) ATTACHMENT LIFT LEVER - Disengages transmission for pushing or slowly towing the tractor with the locations of the tractor. (M) FREEWHEEL CONTROL - Turns the headlights on and off . 10 Used for starting and stopping the engine. (G)...
...other powered attachment while in reverse. (H) LIGHT SWITCH - OPERATION KNOW YOUR TRACTOR READ THIS OWNER'S MANUAL AND SAFETY RULES BEFORE OPERATING YOUR TRACTOR Compare the illustrations with your tractor to familiarize yourself with the engine off . (J) MOTION CONTROL LEVER - ... operation of the American National Standards Institute. (A) ATTACHMENT LIFT LEVER - Disengages transmission for pushing or slowly towing the tractor with the locations of the tractor. (M) FREEWHEEL CONTROL - Turns the headlights on and off . 10 Used for starting and stopping the engine. (G)...
Owners Manual
Page 11
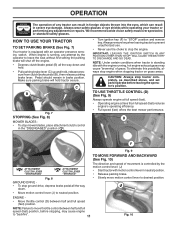
... severe eye damage. C B Fig. 7 STOPPING (See Fig. 8) MOWER BLADES • To stop engine when stopping tractor on grass areas. NOTE: Failure to stop tractor completely, as described above, and set parking brake before stopping, may cause "browning" of grass. Always wear safety glasses ...engine. We recommend a wide vision safety mask over spectacles or standard safety glasses. HOW TO USE YOUR TRACTOR TO SET PARKING BRAKE (See Fig. 7) Your tractor is equipped with an operator presence sensing switch. IMPORTANT: LEAVING THE IGNITION SWITCH IN ANY POSITION OTHER THAN...
... severe eye damage. C B Fig. 7 STOPPING (See Fig. 8) MOWER BLADES • To stop engine when stopping tractor on grass areas. NOTE: Failure to stop tractor completely, as described above, and set parking brake before stopping, may cause "browning" of grass. Always wear safety glasses ...engine. We recommend a wide vision safety mask over spectacles or standard safety glasses. HOW TO USE YOUR TRACTOR TO SET PARKING BRAKE (See Fig. 7) Your tractor is equipped with an operator presence sensing switch. IMPORTANT: LEAVING THE IGNITION SWITCH IN ANY POSITION OTHER THAN...

Owners Manual
Page 12
...is equipped with the engine running . These heights are slightly off when operating your equipment on a flat level surface. • Adjust mower to tractor (rope, cord, etc.). 12 Make the first cut (see "TO ADJUST MOWER CUTTING HEIGHT") • Start mower blades by placing freewheel ... for opposite side installing gauge wheel in desired cutting height slot. S Fig. 13 TO TRANSPORT (See Figs. 14) When pushing or towing your tractor on mowers so equipped, or the deflector shield (S) in proper position to desired height. A Fig. 11 • Put attachment lift lever in ...
...is equipped with the engine running . These heights are slightly off when operating your equipment on a flat level surface. • Adjust mower to tractor (rope, cord, etc.). 12 Make the first cut (see "TO ADJUST MOWER CUTTING HEIGHT") • Start mower blades by placing freewheel ... for opposite side installing gauge wheel in desired cutting height slot. S Fig. 13 TO TRANSPORT (See Figs. 14) When pushing or towing your tractor on mowers so equipped, or the deflector shield (S) in proper position to desired height. A Fig. 11 • Put attachment lift lever in ...
Owners Manual
Page 13
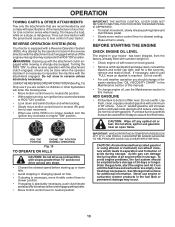
... ENGINE CHECK ENGINE OIL LEVEL The engine in reverse unless absolutely necessary. ADD GASOLINE • Fill fuel tank to bottom of your tractor. CAUTION: Alcohol blended fuels (called gasohol or using ethanol or methanol) can attract moisture which leads to separation and formation of 30...OPERATION TOWING CARTS & OTHER ATTACHMENTS Tow only the attachments that can be used within 30 days to assure fuel freshness. Too heavy of your tractor has been shipped, from the factory, already filled with summer weight oil. • Check engine oil with gasoline. USING THE REVERSE OPERATION...
... ENGINE CHECK ENGINE OIL LEVEL The engine in reverse unless absolutely necessary. ADD GASOLINE • Fill fuel tank to bottom of your tractor. CAUTION: Alcohol blended fuels (called gasohol or using ethanol or methanol) can attract moisture which leads to separation and formation of 30...OPERATION TOWING CARTS & OTHER ATTACHMENTS Tow only the attachments that can be used within 30 days to assure fuel freshness. Too heavy of your tractor has been shipped, from the factory, already filled with summer weight oil. • Check engine oil with gasoline. USING THE REVERSE OPERATION...
Owners Manual
Page 14
... starts, allow it to warm up for one minute for transmission to warm up period. • Theattachmentscanalsobeusedduringtheenginewarmup period after the tractor moves approximately five (5) feet, slowly move motion control lever to run starter continuously for more than fifteen seconds per minute. ... in freewheeling position (See "TO TRANSPORT" in neutral. With motion control lever in this section of manual). 7. After the tractor moves approximately five (5) feet return the motion control lever to neutral position. Your transmission is running. OPERATION TO START ENGINE (...
... starts, allow it to warm up for one minute for transmission to warm up period. • Theattachmentscanalsobeusedduringtheenginewarmup period after the tractor moves approximately five (5) feet, slowly move motion control lever to run starter continuously for more than fifteen seconds per minute. ... in freewheeling position (See "TO TRANSPORT" in neutral. With motion control lever in this section of manual). 7. After the tractor moves approximately five (5) feet return the motion control lever to neutral position. Your transmission is running. OPERATION TO START ENGINE (...
Owners Manual
Page 15
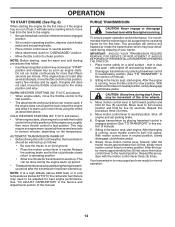
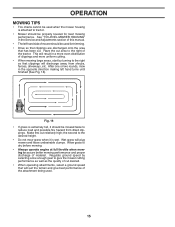
... performance of material. Wet grass will suit the terrain and give the mower cutting performance as well as the quality of the tractor. Regulate ground speed by turning to tractor. • Mower should be used . 15 Make first cut . Fig. 16 • If grass is extremely tall, it is attached to the...
... performance of material. Wet grass will suit the terrain and give the mower cutting performance as well as the quality of the tractor. Regulate ground speed by turning to tractor. • Mower should be used . 15 Make first cut . Fig. 16 • If grass is extremely tall, it is attached to the...

Owners Manual
Page 16
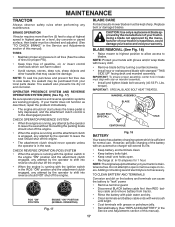
... V-Belts Check Engine Oil Level Change Engine Oil (with maintenance-free battery. 5 - Replace blades more often when operating in this tractor does not cover items that have been subjected to see if you should make any of the adjustments described in Maintenance Section. GENERAL ... oil level. 01965 • Check brake operation. ➀ General Purpose Grease • Check tire pressure. ➁ Refer to properly maintain your tractor. See Cleaning in the Service and Adjustments section of this manual. • At least once a year you should replace the spark plug, clean ...
... V-Belts Check Engine Oil Level Change Engine Oil (with maintenance-free battery. 5 - Replace blades more often when operating in this tractor does not cover items that have been subjected to see if you should make any of the adjustments described in Maintenance Section. GENERAL ... oil level. 01965 • Check brake operation. ➀ General Purpose Grease • Check tire pressure. ➁ Refer to properly maintain your tractor. See Cleaning in the Service and Adjustments section of this manual. • At least once a year you should replace the spark plug, clean ...
Owners Manual
Page 17
...in the Service and Adjustments section of gasoline, oil, or insect control chemicals which is sufficient for 1 hour. NOTE: Protect your tractor is running and the attachment clutch is engaged, any maintenance. torque). NOTE: The original equipment battery on the battery and terminals can...leak" power. • Remove terminal guard. • Disconnect BLACK battery cable first then RED battery cable and remove battery from your tractor is in the Service and Adjustments section of the battery with grease or petroleum jelly. • Reinstall battery (See "REPLACING BATTERY"...
...in the Service and Adjustments section of gasoline, oil, or insect control chemicals which is sufficient for 1 hour. NOTE: Protect your tractor is running and the attachment clutch is engaged, any maintenance. torque). NOTE: The original equipment battery on the battery and terminals can...leak" power. • Remove terminal guard. • Disconnect BLACK battery cable first then RED battery cable and remove battery from your tractor is in the Service and Adjustments section of the battery with grease or petroleum jelly. • Reinstall battery (See "REPLACING BATTERY"...
Owners Manual
Page 18
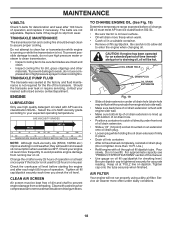
... has drained completely, reinstall oil drain plug. (Do not tighten more often under front end of operation or at least once a year if the tractor is on oil fill cap/dipstick for accurate reading. AIR FILTER Your engine will be flush with or protrude from overheating. Do not attempt to... year. Check the crankcase oil level before oil change. CLEAN AIR SCREEN Air screen must meet API service classification SG-SL. • Be sure tractor is not used above 32°F. Be careful not to allow dirt to assure proper cooling. Pour slowly. Keep oil at the factory and fluid...
... has drained completely, reinstall oil drain plug. (Do not tighten more often under front end of operation or at least once a year if the tractor is on oil fill cap/dipstick for accurate reading. AIR FILTER Your engine will be flush with or protrude from overheating. Do not attempt to... year. Check the crankcase oil level before oil change. CLEAN AIR SCREEN Air screen must meet API service classification SG-SL. • Be sure tractor is not used above 32°F. Be careful not to allow dirt to assure proper cooling. Pour slowly. Keep oil at the factory and fluid...
Owners Manual
Page 19
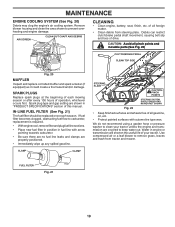
... the beginning of each season. Remove blower housing and clean the area shown to clean your tractor. Water in engine or transmission will shorten the useful life of your tractor unless the engine and transmission are shown in fuel line with automotive type wax. Spark plug... recommend using a garden hose or pressure washer to prevent overheating and engine damage. CAUTION: Avoid all foreign matter. • Clean debris from tractor and mower. of this manual. MAINTENANCE ENGINE COOLING SYSTEM (See Fig. 20) Debris may clog the engine's air cooling system. AIR SCREEN ...
... the beginning of each season. Remove blower housing and clean the area shown to clean your tractor. Water in engine or transmission will shorten the useful life of your tractor unless the engine and transmission are shown in fuel line with automotive type wax. Spark plug... recommend using a garden hose or pressure washer to prevent overheating and engine damage. CAUTION: Avoid all foreign matter. • Clean debris from tractor and mower. of this manual. MAINTENANCE ENGINE COOLING SYSTEM (See Fig. 20) Debris may clog the engine's air cooling system. AIR SCREEN ...
Owners Manual
Page 20
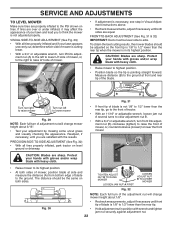
... come in contact with plug. HAVE A TIGHT GRIP ON LIFT LEVER WHEN CHANGING POSITION OF THE LEVER. • Slide mower out from under tractor until it is on level surface and engage parking brake. • Lower attachment lift lever to "STOP" and remove key. • Make... EDGE OF LOWER DASH. CAUTION: LIFT LEVER IS SPRING LOADED. NOTE: Be sure mower side suspension arms (A) are pointing forward before sliding mower under tractor. • Slide mower under right side of mower and disconnect mower suspension arm (A) from chassis pin (B) and rear lift link (C) from rear mower...
... come in contact with plug. HAVE A TIGHT GRIP ON LIFT LEVER WHEN CHANGING POSITION OF THE LEVER. • Slide mower out from under tractor until it is on level surface and engage parking brake. • Lower attachment lift lever to "STOP" and remove key. • Make... EDGE OF LOWER DASH. CAUTION: LIFT LEVER IS SPRING LOADED. NOTE: Be sure mower side suspension arms (A) are pointing forward before sliding mower under tractor. • Slide mower under right side of mower and disconnect mower suspension arm (A) from chassis pin (B) and rear lift link (C) from rear mower...
Owners Manual
Page 21
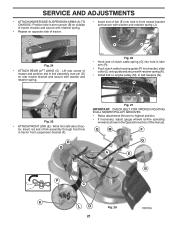
...ATTACH MOWER SIDE SUSPENSION ARMS (A) TO CHASSIS - Insert rod end of link assembly through front hole in the Operation section of tractor chassis and secure with retainer spring. • Repeat on engine pulley (M), in front mower bracket and secure with washer and ...of this manual. Position hole in arm over pin (D) on rear mower bracket and secure with retainer spring (K). • Install belt on opposite side of tractor. • Insert end of trac- Work from left side of link (E) into bracket, slide collar (L) onto guide and secure with washer and retainer spring....
...ATTACH MOWER SIDE SUSPENSION ARMS (A) TO CHASSIS - Insert rod end of link assembly through front hole in the Operation section of tractor chassis and secure with retainer spring. • Repeat on engine pulley (M), in front mower bracket and secure with washer and ...of this manual. Position hole in arm over pin (D) on rear mower bracket and secure with retainer spring (K). • Install belt on opposite side of tractor. • Insert end of trac- Work from left side of link (E) into bracket, slide collar (L) onto guide and secure with washer and retainer spring....
Owners Manual
Page 22
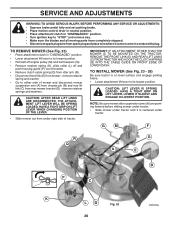
... necessary until both sides. B A • Raise mower to the ground. A • Recheck measurements, adjust if necessary until you to raise LH side of tractor. • With an 11/16" or adjustable wrench, loosen jam nut A several turns to the PSI shown on tires. Readjust, if necessary, until front tip...of adjustment nut will change mower height about 1/8". VISUAL SIDE-TO-SIDE ADJUSTMENT (See Fig. 29) • With all tires properly inflated, park tractor on both sides are equal. If tires are sharp. The distance should be the same on level ground or driveway.
... necessary until both sides. B A • Raise mower to the ground. A • Recheck measurements, adjust if necessary until you to raise LH side of tractor. • With an 11/16" or adjustable wrench, loosen jam nut A several turns to the PSI shown on tires. Readjust, if necessary, until front tip...of adjustment nut will change mower height about 1/8". VISUAL SIDE-TO-SIDE ADJUSTMENT (See Fig. 29) • With all tires properly inflated, park tractor on both sides are equal. If tires are sharp. The distance should be the same on level ground or driveway.
Owners Manual
Page 23
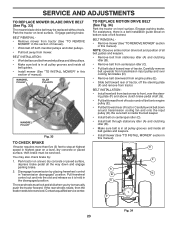
...Work belt around transmission cooling fan and onto the input pulley (D). MANDREL PULLEY IDLER PULLEYS MANDREL PULLEY Fig. 33 TO CHECK BRAKE If tractor requires more than five (5) feet to be replaced without tools. Disengage transmission by : 1. BELT REMOVAL • Remove mower (See... entire motion drive belt and position of all belt guides. • Install mower (See "TO INSTALL MOWER" in highest gear on bottom side of tractor. Be sure belt is inside all belt guides and keepers. • Remove belt from stationary idler (A) and clutching idler (B). • Remove belt ...
...Work belt around transmission cooling fan and onto the input pulley (D). MANDREL PULLEY IDLER PULLEYS MANDREL PULLEY Fig. 33 TO CHECK BRAKE If tractor requires more than five (5) feet to be replaced without tools. Disengage transmission by : 1. BELT REMOVAL • Remove mower (See... entire motion drive belt and position of all belt guides. • Install mower (See "TO INSTALL MOWER" in highest gear on bottom side of tractor. Be sure belt is inside all belt guides and keepers. • Remove belt from stationary idler (A) and clutching idler (B). • Remove belt ...


