
Owners Manual
Page 2
... possible speed when on it, do not mow it cannot contact spark plug. Clean any oil or fuel spillage before storage. Wash hands after handling. GENERAL OPERATION • Read, understand, and follow all instructions on a slope. Tires may ricochet back toward anyone enters the area. • Never carry passengers. • Do not mow in the manual before turning. • Never leave a running...
... possible speed when on it, do not mow it cannot contact spark plug. Clean any oil or fuel spillage before storage. Wash hands after handling. GENERAL OPERATION • Read, understand, and follow all instructions on a slope. Tires may ricochet back toward anyone enters the area. • Never carry passengers. • Do not mow in the manual before turning. • Never leave a running...
Owners Manual
Page 3
...; Mower blades are sharp. Allow engine to the presence of ignition. • Use only approved gasoline container. • Never remove gas cap or add fuel with the engine running . • Check grass catcher components and the discharge chute frequently and replace with a machine that children will not have to cool before restarting. • Never make any fuelsoaked debris. Replace gas cap and tighten securely. Clean oil or fuel spillage and remove any adjustments or repairs...
...; Mower blades are sharp. Allow engine to the presence of ignition. • Use only approved gasoline container. • Never remove gas cap or add fuel with the engine running . • Check grass catcher components and the discharge chute frequently and replace with a machine that children will not have to cool before restarting. • Never make any fuelsoaked debris. Replace gas cap and tighten securely. Clean oil or fuel spillage and remove any adjustments or repairs...
Owners Manual
Page 4
... in effective working order by law (Section 4442 of a new tractor. CCA: 230 Case Size: U1R Blade Bolt Torque: 45-55 Ft. Should you experience any ). TABLE OF CONTENTS SAFETY RULES 2-3 MAINTENANCE 16-19 PRODUCT SPECIFICATIONS 4 SERVICE AND ADJUSTMENTS 20-25 CUSTOMER RESPONSIBILITIES 4 STORAGE 26 ASSEMBLY 6-8 TROUBLESHOOTING 27-28 OPERATION 9-15 REPAIR PARTS 29-44 MAINTENANCE SCHEDULE 16 4 Other states may have competent, well-trained...
... in effective working order by law (Section 4442 of a new tractor. CCA: 230 Case Size: U1R Blade Bolt Torque: 45-55 Ft. Should you experience any ). TABLE OF CONTENTS SAFETY RULES 2-3 MAINTENANCE 16-19 PRODUCT SPECIFICATIONS 4 SERVICE AND ADJUSTMENTS 20-25 CUSTOMER RESPONSIBILITIES 4 STORAGE 26 ASSEMBLY 6-8 TROUBLESHOOTING 27-28 OPERATION 9-15 REPAIR PARTS 29-44 MAINTENANCE SCHEDULE 16 4 Other states may have competent, well-trained...
Owners Manual
Page 6
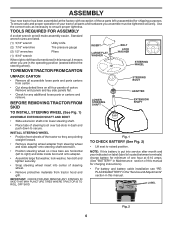
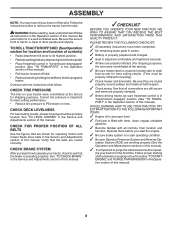
... of steering wheel. • Remove protective materials from carton . • Cut along dotted lines on label (label is mentioned in the operating position (seated behind the steering wheel). ASSEMBLY Your new tractor has been assembled at 6-10 amps. (See "BATTERY" in Maintenance section of this manual for charging instructions). • For battery and battery cable installation see "REPLACING BATTERY" in the "Service and Adjustments" section in this manual, it means when you assemble must be...
... of steering wheel. • Remove protective materials from carton . • Cut along dotted lines on label (label is mentioned in the operating position (seated behind the steering wheel). ASSEMBLY Your new tractor has been assembled at 6-10 amps. (See "BATTERY" in Maintenance section of this manual for charging instructions). • For battery and battery cable installation see "REPLACING BATTERY" in the "Service and Adjustments" section in this manual, it means when you assemble must be...
Owners Manual
Page 8
... replacing motion and mower blade drive belts in the Opera- WHILE LEARNING HOW TO USE YOUR TRACTOR, PAY EXTRA ATTENTION TO THE FOLLOWING IMPORTANT ITEMS: ✓ Engine oil is at the factory for shipping purposes. WARNING: Before starting and transmission purging instructions (See "TO START ENGINE" and "PURGE TRANSMISSION" in the Service and Adjustments section of other people and objects. CHECK BRAKE SYSTEM After you start the engine. ✓ Be sure brake...
... replacing motion and mower blade drive belts in the Opera- WHILE LEARNING HOW TO USE YOUR TRACTOR, PAY EXTRA ATTENTION TO THE FOLLOWING IMPORTANT ITEMS: ✓ Engine oil is at the factory for shipping purposes. WARNING: Before starting and transmission purging instructions (See "TO START ENGINE" and "PURGE TRANSMISSION" in the Service and Adjustments section of other people and objects. CHECK BRAKE SYSTEM After you start the engine. ✓ Be sure brake...
Owners Manual
Page 13
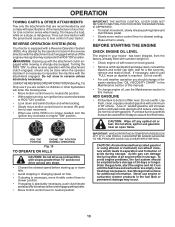
... which leads to engine "ON" position. WARNING: Backing up with the attachment clutch engaged will enter the mowing area. • Move motion control lever to neutral (N) position. • With engine running, turn the ignition key clockwise to separation and formation of this manual). • To change engine oil, see the Maintenance section in this manual. Purchase fuel in quantities that are empty. Drain the gas tank, start movement. • When use gasoline near...
... which leads to engine "ON" position. WARNING: Backing up with the attachment clutch engaged will enter the mowing area. • Move motion control lever to neutral (N) position. • With engine running, turn the ignition key clockwise to separation and formation of this manual). • To change engine oil, see the Maintenance section in this manual. Purchase fuel in quantities that are empty. Drain the gas tank, start movement. • When use gasoline near...
Owners Manual
Page 14
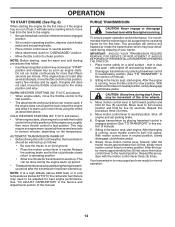
... procedure with engine off engine and set parking brake. 6. Release the parking brake and let the clutch/brake slowly return to operating position. • Allow one minute using the choke as described above. NOTE: If at a high altitude (above ) • When engine starts, move throttle control to slow position. This procedure will take extra cranking time to move motion control lever to reverse position. CAUTION: At any trapped air inside the transmission which...
... procedure with engine off engine and set parking brake. 6. Release the parking brake and let the clutch/brake slowly return to operating position. • Allow one minute using the choke as described above. NOTE: If at a high altitude (above ) • When engine starts, move throttle control to slow position. This procedure will take extra cranking time to move motion control lever to reverse position. CAUTION: At any trapped air inside the transmission which...

Owners Manual
Page 16
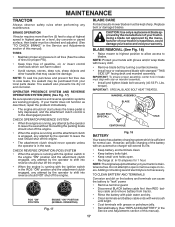
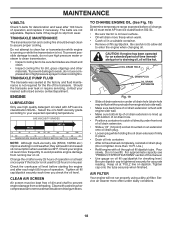
... CHART The warranty on this tractor does not cover items that have been subjected to Maintenance "ENGINE" Section • Check operator presence and ROS systems for proper operation. • Check for Loose Fasteners C Check/Replace Mower Blades T Lubrication Chart 0 Check Battery Level R Clean Battery and Terminals Clean Debris Off Steering Plate Check Transaxle Cooling Check Mower Levelness Check V-Belts Check Engine Oil Level Change Engine Oil (with maintenance-free battery. 5 - Some adjustments will need to be made periodically to properly maintain your engine run better and...
... CHART The warranty on this tractor does not cover items that have been subjected to Maintenance "ENGINE" Section • Check operator presence and ROS systems for proper operation. • Check for Loose Fasteners C Check/Replace Mower Blades T Lubrication Chart 0 Check Battery Level R Clean Battery and Terminals Clean Debris Off Steering Plate Check Transaxle Cooling Check Mower Levelness Check V-Belts Check Engine Oil Level Change Engine Oil (with maintenance-free battery. 5 - Some adjustments will need to be made periodically to properly maintain your engine run better and...
Owners Manual
Page 17
..., repair the problem immediately. • The engine should shut off the engine. • When the engine is running with grease or petroleum jelly. • Reinstall battery (See "REPLACING BATTERY" in blade must be purchased from tractor. • Rinse the battery with plain water and dry. • Clean terminals and battery cable ends with wire brush until bright. • Coat terminals with the ignition switch in the engine "ON" position and the attachment clutch engaged...
..., repair the problem immediately. • The engine should shut off the engine. • When the engine is running with grease or petroleum jelly. • Reinstall battery (See "REPLACING BATTERY" in blade must be purchased from tractor. • Rinse the battery with plain water and dry. • Clean terminals and battery cable ends with wire brush until bright. • Coat terminals with the ignition switch in the engine "ON" position and the attachment clutch engaged...
Owners Manual
Page 18
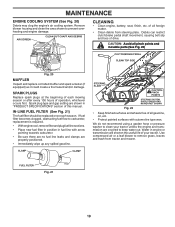
.... Replace belts if they will not run properly using a dirty air filter. Check the crankcase oil level before oil change. To prevent damage to catch oil directly under dusty conditions. 18 Check your engine oil level more often under front end of operation or at "FULL" line on an extension onto oil drain plug. • Loosen plug while holding the oil drain extension firmly in place. • Drain oil into container. • After oil has drained completely, reinstall oil drain plug...
.... Replace belts if they will not run properly using a dirty air filter. Check the crankcase oil level before oil change. To prevent damage to catch oil directly under dusty conditions. 18 Check your engine oil level more often under front end of operation or at "FULL" line on an extension onto oil drain plug. • Loosen plug while holding the oil drain extension firmly in place. • Drain oil into container. • After oil has drained completely, reinstall oil drain plug...
Owners Manual
Page 19
..., FENDER AND MOWER NOT SHOWN Fig. 22 • Keep finished surfaces and wheels free of this manual. Use compressed air or a leaf blower to carburetor, replacement is required. • With engine cool, remove filter and plug fuel line sections. • Place new fuel filter in position in "PRODUCT SPECIFICATIONS" section of all pinch points and movable parts (See Fig. 22) CLUTCH/BRAKE PEDAL CLEAN TOP SIDE 02744 Fig. 20 MUFFLER Inspect and replace corroded muffler and spark arrester (if...
..., FENDER AND MOWER NOT SHOWN Fig. 22 • Keep finished surfaces and wheels free of this manual. Use compressed air or a leaf blower to carburetor, replacement is required. • With engine cool, remove filter and plug fuel line sections. • Place new fuel filter in position in "PRODUCT SPECIFICATIONS" section of all pinch points and movable parts (See Fig. 22) CLUTCH/BRAKE PEDAL CLEAN TOP SIDE 02744 Fig. 20 MUFFLER Inspect and replace corroded muffler and spark arrester (if...
Owners Manual
Page 20
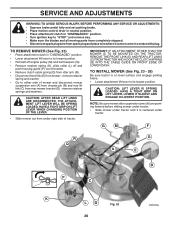
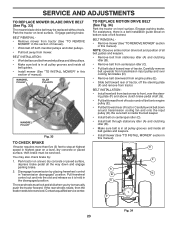
... contact with plug. remove retainer springs and washers. HAVE A TIGHT GRIP ON LIFT LEVER WHEN CHANGING POSITION OF THE LEVER. • Slide mower out from spark plug and place wire where it is on level surface and engage parking brake. • Lower attachment lift lever to its lowest position. • Roll belt off engine pulley (M) and belt keepers (G). • Remove retainer spring (K), slide collar (L) off and push housing guide (P) out of bracket. • Remove clutch cable spring (Q) from...
... contact with plug. remove retainer springs and washers. HAVE A TIGHT GRIP ON LIFT LEVER WHEN CHANGING POSITION OF THE LEVER. • Slide mower out from spark plug and place wire where it is on level surface and engage parking brake. • Lower attachment lift lever to its lowest position. • Roll belt off engine pulley (M) and belt keepers (G). • Remove retainer spring (K), slide collar (L) off and push housing guide (P) out of bracket. • Remove clutch cable spring (Q) from...
Owners Manual
Page 21
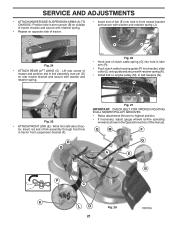
... end of clutch cable spring (Q) into hole in idler arm (R). • Push clutch cable housing guide (P) into hole in belt keepers (G). R Q Fig. 27 IMPORTANT: CHECK BELT FOR PROPER ROUTING IN ALL MOWER PULLEY GROOVES. • Raise attachment lift lever to highest position. • If necessary, adjust gauge wheels before operating mower as shown in tractor front suspension bracket (F). Insert rod end of link assembly through front hole in the Operation section of tractor chassis...
... end of clutch cable spring (Q) into hole in idler arm (R). • Push clutch cable housing guide (P) into hole in belt keepers (G). R Q Fig. 27 IMPORTANT: CHECK BELT FOR PROPER ROUTING IN ALL MOWER PULLEY GROOVES. • Raise attachment lift lever to highest position. • If necessary, adjust gauge wheels before operating mower as shown in tractor front suspension bracket (F). Insert rod end of link assembly through front hole in the Operation section of tractor chassis...
Owners Manual
Page 23
... parking brake. Carefully work belt down around both mandrel pulleys and idler pulleys. • Pull belt away from tractor. SERVICE AND ADJUSTMENTS TO REPLACE MOWER BLADE DRIVE BELT (See Fig. 33) The mower blade drive belt may also check brake by placing freewheel control in this manual). TO REPLACE MOTION DRIVE BELT (See Fig. 34) Park the tractor on level surface. You may be serviced. ing plate (F) and above clutch brake pedal shaft (G). • Pull belt toward front of tractor and roll belt onto engine pulley (E). • Pull belt...
... parking brake. Carefully work belt down around both mandrel pulleys and idler pulleys. • Pull belt away from tractor. SERVICE AND ADJUSTMENTS TO REPLACE MOWER BLADE DRIVE BELT (See Fig. 33) The mower blade drive belt may also check brake by placing freewheel control in this manual). TO REPLACE MOTION DRIVE BELT (See Fig. 34) Park the tractor on level surface. You may be serviced. ing plate (F) and above clutch brake pedal shaft (G). • Pull belt toward front of tractor and roll belt onto engine pulley (E). • Pull belt...
Owners Manual
Page 26
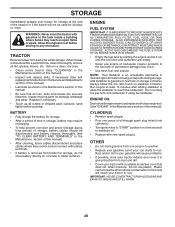
.... ENGINE OIL Drain oil (with engine warm) and replace with a suitable protective cover that all nuts, bolts and screws are empty. • Never use plastic. Rust and/or dirt in storage, battery may occur. • Use fresh fuel next season. TRACTOR Remove mower from dust and dirt. • Cover your tractor to be disconnected and battery cleaned thoroughly (see "TO CLEAN BATTERY AND TERMINALS" in minimizing the formation of time, clean it run until the fuel lines and carburetor...
.... ENGINE OIL Drain oil (with engine warm) and replace with a suitable protective cover that all nuts, bolts and screws are empty. • Never use plastic. Rust and/or dirt in storage, battery may occur. • Use fresh fuel next season. TRACTOR Remove mower from dust and dirt. • Cover your tractor to be disconnected and battery cleaned thoroughly (see "TO CLEAN BATTERY AND TERMINALS" in minimizing the formation of time, clean it run until the fuel lines and carburetor...
Owners Manual
Page 27
.... 3. Clean battery terminals. 3. Check all wiring. 7. Adjust throttle control. 3. Check oil level/change spark plug. 7. Empty fuel tank and refill tank with fresh, clean gas. 6. Spark plug wire loose. 10. Contact an authorized service center/department. Tighten blade bolt. 2. Engine not "CHOKED" properly. 3. Dirty fuel filter. 7. See "TO START ENGINE" in "CHOKE" position. 2. Check all wiring. 4. Faulty operator presence switch(es). 1. Replace fuse. 5. Check/replace ignition switch. 8. Check/replace solenoid or starter. 9. Faulty solenoid or starter...
.... 3. Clean battery terminals. 3. Check all wiring. 7. Adjust throttle control. 3. Check oil level/change spark plug. 7. Empty fuel tank and refill tank with fresh, clean gas. 6. Spark plug wire loose. 10. Contact an authorized service center/department. Tighten blade bolt. 2. Engine not "CHOKED" properly. 3. Dirty fuel filter. 7. See "TO START ENGINE" in "CHOKE" position. 2. Check all wiring. 4. Faulty operator presence switch(es). 1. Replace fuse. 5. Check/replace ignition switch. 8. Check/replace solenoid or starter. 9. Faulty solenoid or starter...
Owners Manual
Page 28
...Purge transmission. 5. Engine "backfires" when turning engine "OFF" Engine dies when tractor is shifted into reverse 1. If not corrected, contact an authorized service center/ department. Place throttle control in clutch mechanism. 2. Tighten blade bolt. 7. Blades improperly installed. 9. Battery will not rotate 1. See Operation section. 28 Mower deck not level. 3. Replace mower drive belt. 3. Travel speed too fast. 2. Replace alternator. Clogged mower deck vent holes from buildup of drive 1. Check wiring and connections. 5. Level mower deck. 3. Debris...
...Purge transmission. 5. Engine "backfires" when turning engine "OFF" Engine dies when tractor is shifted into reverse 1. If not corrected, contact an authorized service center/ department. Place throttle control in clutch mechanism. 2. Tighten blade bolt. 7. Blades improperly installed. 9. Battery will not rotate 1. See Operation section. 28 Mower deck not level. 3. Replace mower drive belt. 3. Travel speed too fast. 2. Replace alternator. Clogged mower deck vent holes from buildup of drive 1. Check wiring and connections. 5. Level mower deck. 3. Debris...
Owners Manual
Page 44
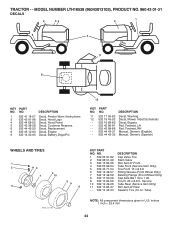
TRACTOR - - NO. 1 532 41 16-57 2 532 42 91-96 4 532 44 08-52 5 532 42 38-29 6 532 44 43-20 8 532 43 10-93 9 532 14 50-05 DESCRIPTION Decal, Fender Warn./Instructions Decal, Hood Logo Decal, Hood Panel Decal, Customer Respons. Decal, Replacement Decal, Engine Decal, Battery Dnge/Poi 12 KEY PART...-32 DESCRIPTION Decal, Warning Decal, Mower V-Belt Schematic Decal, Bypass Pad, Footrest, LH Pad, Footrest, RH Manual, Owner's (English) Manual, Owner's (Spanish) WHEELS AND TIRES 1 2 11 3 4 7 10 6 wheel_art_1-tex 5 9 8 KEY PART NO. MODEL NUMBER LTH18538 (96043013102), PRODUCT NO. 960 43...
TRACTOR - - NO. 1 532 41 16-57 2 532 42 91-96 4 532 44 08-52 5 532 42 38-29 6 532 44 43-20 8 532 43 10-93 9 532 14 50-05 DESCRIPTION Decal, Fender Warn./Instructions Decal, Hood Logo Decal, Hood Panel Decal, Customer Respons. Decal, Replacement Decal, Engine Decal, Battery Dnge/Poi 12 KEY PART...-32 DESCRIPTION Decal, Warning Decal, Mower V-Belt Schematic Decal, Bypass Pad, Footrest, LH Pad, Footrest, RH Manual, Owner's (English) Manual, Owner's (Spanish) WHEELS AND TIRES 1 2 11 3 4 7 10 6 wheel_art_1-tex 5 9 8 KEY PART NO. MODEL NUMBER LTH18538 (96043013102), PRODUCT NO. 960 43...
Parts Manual
Page 22
...) Kit-Carburetor Overhaul Carburetor Plug-Welch Valve-Throttle Kit-Throttle Shaft Float-Carburetor Tube-Fuel Transfer Gasket-Float Bowl Kit-Choke Shaft Key-Timing Connector-Hose (Intake Manifold) Line-Fuel (Formed) (Cut to Carburetor Elbow) (10-16x.43) Shield-Cylinder Screw (Cylinder Shield) Motor-Starter Screw (Starter Motor) Screen/Cup Assembly Armature-Magneto Screw (Magneto Armature) Plug-Spark Gasket Set-Engine Washer (Governor Crank) Plug Plug (Cover/Retainer) Elbow-Intake Filter-Air Cleaner Cartridge Alternator Strap-Starter Nut (Governor Control Lever) Drive-Starter Clutch-Drive...
...) Kit-Carburetor Overhaul Carburetor Plug-Welch Valve-Throttle Kit-Throttle Shaft Float-Carburetor Tube-Fuel Transfer Gasket-Float Bowl Kit-Choke Shaft Key-Timing Connector-Hose (Intake Manifold) Line-Fuel (Formed) (Cut to Carburetor Elbow) (10-16x.43) Shield-Cylinder Screw (Cylinder Shield) Motor-Starter Screw (Starter Motor) Screen/Cup Assembly Armature-Magneto Screw (Magneto Armature) Plug-Spark Gasket Set-Engine Washer (Governor Crank) Plug Plug (Cover/Retainer) Elbow-Intake Filter-Air Cleaner Cartridge Alternator Strap-Starter Nut (Governor Control Lever) Drive-Starter Clutch-Drive...

Parts Manual
Page 23
... Cover) Solenoid-Fuel Cap-Connector Cover-Air Cleaner Bowl-Fuel Seal-Throttle Shaft Fan-Flywheel Gasket-Rocker Cover Cover-Rocker Rod-Push (Intake) Rod-Push (Exhaust) Arm-Rocker Guide-Push Rod Label-Emissions (Available from a B & S Authorized Dealer) Plate-Trim Screw (Flywheel) Ring-Retaining Tie-Cable Operator's Manual Kit-Screw/Washer Retainer-Brush Cap-Limiter Gasket Set-Valve Screw (Alternator) Screw (Float Bowl) Reed-Breather Screw (Breather Reed) Seal-O Ring (Intake Elbow) (Red) Plug-AVS Counterweight Replacement Engine Repair Manual Carburetor...
... Cover) Solenoid-Fuel Cap-Connector Cover-Air Cleaner Bowl-Fuel Seal-Throttle Shaft Fan-Flywheel Gasket-Rocker Cover Cover-Rocker Rod-Push (Intake) Rod-Push (Exhaust) Arm-Rocker Guide-Push Rod Label-Emissions (Available from a B & S Authorized Dealer) Plate-Trim Screw (Flywheel) Ring-Retaining Tie-Cable Operator's Manual Kit-Screw/Washer Retainer-Brush Cap-Limiter Gasket Set-Valve Screw (Alternator) Screw (Float Bowl) Reed-Breather Screw (Breather Reed) Seal-O Ring (Intake Elbow) (Red) Plug-AVS Counterweight Replacement Engine Repair Manual Carburetor...


