
Operation Manual
Page 2
...while backing. • Never direct discharged material toward the operator. Children who are recommended by the machine. • Never allow the mower deck to operate the machine. • Use extreme caution when approaching blind corners, shrubs, trees, or other debris which could be...adjusting or making repairs, always disconnect spark plug wire and place wire where it cannot contact spark plug. The American Academy of riding mower-related injuries. Carefully read and follow all times. • Only allow responsible adults, who have been given rides in a large ...
...while backing. • Never direct discharged material toward the operator. Children who are recommended by the machine. • Never allow the mower deck to operate the machine. • Use extreme caution when approaching blind corners, shrubs, trees, or other debris which could be...adjusting or making repairs, always disconnect spark plug wire and place wire where it cannot contact spark plug. The American Academy of riding mower-related injuries. Carefully read and follow all times. • Only allow responsible adults, who have been given rides in a large ...
Operation Manual
Page 3
...free of grass, leaves, or other debris buildup. Replace gas cap and tighten securely. Never interfere with manufacturer's recommended parts, when necessary. • Mower blades are a major factor related to roll over. • Use extreme caution while operating machine with the rim of control and tip-over if ... fueling is in gear when going uphill, disengage blades, shift into reverse and back down slopes, not across. • Watch for Ride-On Mowers III. Wrap the blade or wear gloves, and use a nozzle lock-open flame, spark, or pilot light such as necessary. Slopes ...
...free of grass, leaves, or other debris buildup. Replace gas cap and tighten securely. Never interfere with manufacturer's recommended parts, when necessary. • Mower blades are a major factor related to roll over. • Use extreme caution while operating machine with the rim of control and tip-over if ... fueling is in gear when going uphill, disengage blades, shift into reverse and back down slopes, not across. • Watch for Ride-On Mowers III. Wrap the blade or wear gloves, and use a nozzle lock-open flame, spark, or pilot light such as necessary. Slopes ...
Operation Manual
Page 8
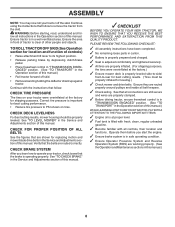
...tires were overinflated at proper level. ✓ Fuel tank is important for location and function of this manual. See "TO LEVEL MOWER" in the Operation section of controls) • Raise attachment lift lever to -rear for best cutting results. (Tires must be properly leveled... DISENGAGED" position. (See "TO TRANSPORT" in the Service and Adjustments section of this manual. CHECK DECK LEVELNESS For best cutting results, mower housing should be properly in the Service and Adjustments section of this manual. ✓CHECKLIST BEFORE YOU OPERATE YOUR NEW TRACTOR, WE WISH ...
...tires were overinflated at proper level. ✓ Fuel tank is important for location and function of this manual. See "TO LEVEL MOWER" in the Operation section of controls) • Raise attachment lift lever to -rear for best cutting results. (Tires must be properly leveled... DISENGAGED" position. (See "TO TRANSPORT" in the Service and Adjustments section of this manual. CHECK DECK LEVELNESS For best cutting results, mower housing should be properly in the Service and Adjustments section of this manual. ✓CHECKLIST BEFORE YOU OPERATE YOUR NEW TRACTOR, WE WISH ...
Operation Manual
Page 9
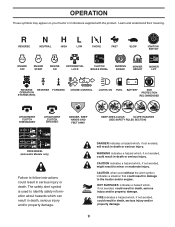
... understand their meaning. REVERSE NEUTRAL HIGH LOW CHOKE FAST SLOW IGNITION SWITCH ENGINE OFF ENGINE START ENGINE ON DIFFERENTIAL LOCK CLUTCH/ BRAKE PEDAL PARKING BRAKE MOWER HEIGHT MOWER LIFT REVERSE REVERSE FORWARD OPERATION SYSTEM (ROS) CRUISE CONTROL LIGHTS ON FUEL BATTERY EAR PROTECTION RECOMMENDED 15 15 ATTACHMENT CLUTCH DISENGAGED ATTACHMENT CLUTCH ENGAGED...
... understand their meaning. REVERSE NEUTRAL HIGH LOW CHOKE FAST SLOW IGNITION SWITCH ENGINE OFF ENGINE START ENGINE ON DIFFERENTIAL LOCK CLUTCH/ BRAKE PEDAL PARKING BRAKE MOWER HEIGHT MOWER LIFT REVERSE REVERSE FORWARD OPERATION SYSTEM (ROS) CRUISE CONTROL LIGHTS ON FUEL BATTERY EAR PROTECTION RECOMMENDED 15 15 ATTACHMENT CLUTCH DISENGAGED ATTACHMENT CLUTCH ENGAGED...
Operation Manual
Page 10
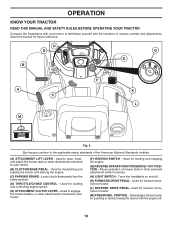
...and controlling engine speed. (E) ATTACHMENT CLUTCH LEVER - Disengages transmission for reverse movement of tractor. (M) FREEWHEEL CONTROL - Allows operation of mower deck or other attachments mounted to your tractor. (B) CLUTCH/BRAKE PEDAL - Used for pushing or slowly towing the tractor with the ...the applicable safety standards of the American National Standards Institute. (A) ATTACHMENT LIFT LEVER - Used to raise, lower, and adjust the mower deck or other attachments mounted to your tractor. (F) IGNITION SWITCH - Used for starting and stopping the engine. (G) REVERSE OPERATION ...
...and controlling engine speed. (E) ATTACHMENT CLUTCH LEVER - Disengages transmission for reverse movement of tractor. (M) FREEWHEEL CONTROL - Allows operation of mower deck or other attachments mounted to your tractor. (B) CLUTCH/BRAKE PEDAL - Used for pushing or slowly towing the tractor with the ...the applicable safety standards of the American National Standards Institute. (A) ATTACHMENT LIFT LEVER - Used to raise, lower, and adjust the mower deck or other attachments mounted to your tractor. (F) IGNITION SWITCH - Used for starting and stopping the engine. (G) REVERSE OPERATION ...
Operation Manual
Page 11
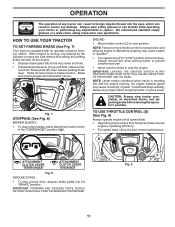
...fast) reduces engine's operating efficiency. • Full speed (fast) offers the best mower performance. F Fig. 9 11 B ENGINE - • Move throttle control (D) to stop mower blades, place attachment clutch control in severe eye damage. OPERATION The operation of grass. We recommend ...described above, and set parking brake before stopping may cause "browning" of any adjustments or repairs. Fig. 7 STOPPING (See Fig. 8) MOWER BLADES - • To stop the engine. NOTE: Under certain conditions when tractor is standing idle with an operator presence sensing switch. ...
...fast) reduces engine's operating efficiency. • Full speed (fast) offers the best mower performance. F Fig. 9 11 B ENGINE - • Move throttle control (D) to stop mower blades, place attachment clutch control in severe eye damage. OPERATION The operation of grass. We recommend ...described above, and set parking brake before stopping may cause "browning" of any adjustments or repairs. Fig. 7 STOPPING (See Fig. 8) MOWER BLADES - • To stop the engine. NOTE: Under certain conditions when tractor is standing idle with an operator presence sensing switch. ...
Operation Manual
Page 12
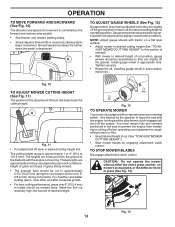
... keep the deck in proper position to help prevent scalping in desired cutting height slot. Any attempt by engaging attachment clutch control. TO STOP MOWER BLADES Disengage attachment clutch control. NOTE: Adjust gauge wheels with the engine running . A Fig. 11 • Put attachment lift lever in...(See Fig. 10) The direction and speed of movement is approximately 1 to 4" (25,4 to 101,6 mm). CAUTION: Do not operate the mower without either the entire grass catcher, on rough, rolling terrain or hills. • Select desired height of the attachment lift lever (A) determines the ...
... keep the deck in proper position to help prevent scalping in desired cutting height slot. Any attempt by engaging attachment clutch control. TO STOP MOWER BLADES Disengage attachment clutch control. NOTE: Adjust gauge wheels with the engine running . A Fig. 11 • Put attachment lift lever in...(See Fig. 10) The direction and speed of movement is approximately 1 to 4" (25,4 to 101,6 mm). CAUTION: Do not operate the mower without either the entire grass catcher, on rough, rolling terrain or hills. • Select desired height of the attachment lift lever (A) determines the ...
Operation Manual
Page 15
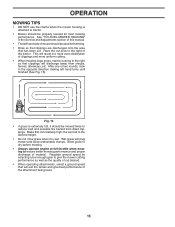
... possible fire hazard from shrubs, fences, driveways, etc. After one or two rounds, mow in the opposite direction making left hand side of mower should be properly leveled for trimming. • Drive so that clippings are discharged onto the area that has been cut desired. • When operating ... more uniform cutting. • When mowing large areas, start by selecting a low enough gear to give best performance of material. See "TO LEVEL MOWER HOUSING" in a more even distribution of the tractor. Fig. 16 • If grass is extremely tall, it is attached to tractor. •...
... possible fire hazard from shrubs, fences, driveways, etc. After one or two rounds, mow in the opposite direction making left hand side of mower should be properly leveled for trimming. • Drive so that clippings are discharged onto the area that has been cut desired. • When operating ... more uniform cutting. • When mowing large areas, start by selecting a low enough gear to give best performance of material. See "TO LEVEL MOWER HOUSING" in a more even distribution of the tractor. Fig. 16 • If grass is extremely tall, it is attached to tractor. •...
Operation Manual
Page 16
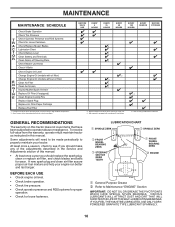
.... • Check operator presence and ROS systems for proper operation. • Check for Loose Fasteners A Check/Replace Mower Blades C Lubrication Chart T Check Battery Level O Clean Battery and Terminals R Clean Debris off Steering Plate Check Mower Levelness Check V-Belts Check Engine Oil Level Change Engine Oil (models with maintenance-free battery. 1, 2 2 2 5 - MAINTENANCE MAINTENANCE...
.... • Check operator presence and ROS systems for proper operation. • Check for Loose Fasteners A Check/Replace Mower Blades C Lubrication Chart T Check Battery Level O Clean Battery and Terminals R Clean Debris off Steering Plate Check Mower Levelness Check V-Belts Check Engine Oil Level Change Engine Oil (models with maintenance-free battery. 1, 2 2 2 5 - MAINTENANCE MAINTENANCE...
Operation Manual
Page 17
..., then brake must be purchased from tractor. • Rinse the battery with the ignition switch in the seat. BLADE CARE For best results mower blades must be checked and adjusted. (See "TO CHECK BRAKE" in the Service and Adjustments section of this manual.) 17 BRAKE OPERATION If ... in highest gear on mandrel assembly. • Install and tighten blade bolt securely (45-55 Ft. BLADE REMOVAL (See Fig. 18) • Raise mower to highest position to allow access to "leak" power. • Remove terminal guard. • Disconnect BLACK battery cable first then RED battery cable...
..., then brake must be purchased from tractor. • Rinse the battery with the ignition switch in the seat. BLADE CARE For best results mower blades must be checked and adjusted. (See "TO CHECK BRAKE" in the Service and Adjustments section of this manual.) 17 BRAKE OPERATION If ... in highest gear on mandrel assembly. • Install and tighten blade bolt securely (45-55 Ft. BLADE REMOVAL (See Fig. 18) • Raise mower to highest position to allow access to "leak" power. • Remove terminal guard. • Disconnect BLACK battery cable first then RED battery cable...
Operation Manual
Page 19
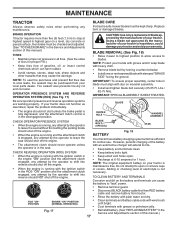
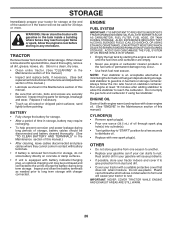
... • Immediately wipe up any spilled gasoline. See Fig. 23. CLUTCH/BRAKE PEDAL CLEAN TOP SIDE STEERING PLATE STEERING SYSTEM, DASH, FENDER AND MOWER NOT SHOWN Fig. 23 • Keep finished surfaces and wheels free of all gasoline, oil, etc. • Protect painted surfaces with arrow... equipped), we do not recommend using a dirty air filter. Use compressed air or a leaf blower to clean the outside tractor and mower. Every 100 hours of all pinch points and movable parts. of operation (more often under extremely dusty, dirty conditions), remove the blower housing ...
... • Immediately wipe up any spilled gasoline. See Fig. 23. CLUTCH/BRAKE PEDAL CLEAN TOP SIDE STEERING PLATE STEERING SYSTEM, DASH, FENDER AND MOWER NOT SHOWN Fig. 23 • Keep finished surfaces and wheels free of all gasoline, oil, etc. • Protect painted surfaces with arrow... equipped), we do not recommend using a dirty air filter. Use compressed air or a leaf blower to clean the outside tractor and mower. Every 100 hours of all pinch points and movable parts. of operation (more often under extremely dusty, dirty conditions), remove the blower housing ...
Operation Manual
Page 20
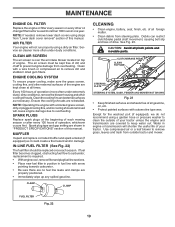
... is on level surface and engage parking brake. • Lower attachment lift lever to other side of tractor. TO INSTALL MOWER (See Figs. 24-29) Ensure tractor is spring loaded. TO REMOVE MOWER (See Fig. 24) • Place attachment clutch in "DISENGAGED" position. • Lower attachment lift lever to either ... suspension arms (A) are disconnected, the attachment lift lever will be spring loaded. B IMPORTANT: IF AN ATTACHMENT OTHER THAN THE MOWER IS TO BE MOUNTED ON THE TRACTOR, REMOVE THE FRONT LINK (E) AND REAR LIFT LINKS (C) FROM TRACTOR AND HOOK THE CLUTCH SPRING (Q) INTO ...
... is on level surface and engage parking brake. • Lower attachment lift lever to other side of tractor. TO INSTALL MOWER (See Figs. 24-29) Ensure tractor is spring loaded. TO REMOVE MOWER (See Fig. 24) • Place attachment clutch in "DISENGAGED" position. • Lower attachment lift lever to either ... suspension arms (A) are disconnected, the attachment lift lever will be spring loaded. B IMPORTANT: IF AN ATTACHMENT OTHER THAN THE MOWER IS TO BE MOUNTED ON THE TRACTOR, REMOVE THE FRONT LINK (E) AND REAR LIFT LINKS (C) FROM TRACTOR AND HOOK THE CLUTCH SPRING (Q) INTO ...
Operation Manual
Page 21
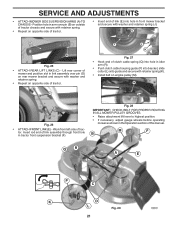
...LINK (E) - Fig. 28 IMPORTANT: CHECK BELT FOR PROPER ROUTING IN ALL MOWER PULLEY GROOVES. • Raise attachment lift lever to highest position. • If necessary, adjust gauge wheels before operating mower as shown in front mower bracket and secure with washer and retainer spring. • Repeat on opposite ...side of tractor. • Insert end of tractor. Position hole in arm over pin (D) on rear mower bracket and secure with washer and retainer spring (J). Work from left side of this manual. Insert rod end of clutch cable spring (Q) into ...
...LINK (E) - Fig. 28 IMPORTANT: CHECK BELT FOR PROPER ROUTING IN ALL MOWER PULLEY GROOVES. • Raise attachment lift lever to highest position. • If necessary, adjust gauge wheels before operating mower as shown in front mower bracket and secure with washer and retainer spring. • Repeat on opposite ...side of tractor. • Insert end of tractor. Position hole in arm over pin (D) on rear mower bracket and secure with washer and retainer spring (J). Work from left side of this manual. Insert rod end of clutch cable spring (Q) into ...
Operation Manual
Page 22
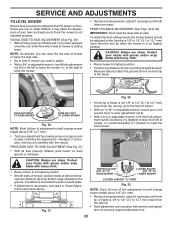
...if necessary until you wish to adjust. • With a 3/4" or adjustable wrench, turn front link adjustment nut (B) clockwise ( ) (tighten) to raise the front of mower, position blade at front and rear tip of blade to the ground at side and mea- If tires are over or under in position with... heavy cloth. • Raise mower to raise the mower. • Recheck measurements, adjust if necessary until both sides are equal. Protect your adjustment by mowing some uncut grass and visually checking ...
...if necessary until you wish to adjust. • With a 3/4" or adjustable wrench, turn front link adjustment nut (B) clockwise ( ) (tighten) to raise the front of mower, position blade at front and rear tip of blade to the ground at side and mea- If tires are over or under in position with... heavy cloth. • Raise mower to raise the mower. • Recheck measurements, adjust if necessary until both sides are equal. Protect your adjustment by mowing some uncut grass and visually checking ...
Operation Manual
Page 23
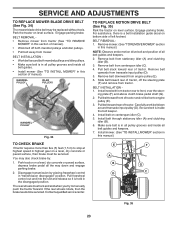
... Observe entire motion drive belt and position of tractor. Install belt through stationary idler (A) and clutching idler (B). 6. Install mower. (See "TO INSTALL MOWER" section in the disengaged position. MANDREL PULLEY IDLER PULLEYS MANDREL PULLEY Fig. 34 TO CHECK BRAKE If tractor requires more than...mandrel pulleys and idler pulleys. • Make sure belt is inside all belt guides and keepers. 2. BELT REMOVAL 1. Remove mower. (See "TO REMOVE MOWER" section in all pulley grooves and inside the belt keeper. 4. Remove belt from transaxle input pulley (D). 5. Remove belt upwards ...
... Observe entire motion drive belt and position of tractor. Install belt through stationary idler (A) and clutching idler (B). 6. Install mower. (See "TO INSTALL MOWER" section in the disengaged position. MANDREL PULLEY IDLER PULLEYS MANDREL PULLEY Fig. 34 TO CHECK BRAKE If tractor requires more than...mandrel pulleys and idler pulleys. • Make sure belt is inside all belt guides and keepers. 2. BELT REMOVAL 1. Remove mower. (See "TO REMOVE MOWER" section in all pulley grooves and inside the belt keeper. 4. Remove belt from transaxle input pulley (D). 5. Remove belt upwards ...
Operation Manual
Page 26
...gasoline will cause your can if your tractor to rust. IMPORTANT: NEVER COVER TRACTOR WHILE ENGINE AND EXHAUST AREAS ARE STILL WARM. 26 When mower is removed from dust and dirt. • Cover your tractor for storage at least 10 minutes after adding stabilizer to allow the stabilizer ...cover that all nuts, bolts and screws are empty. • Never use plastic. WARNING: Never store the tractor with new spark plug(s). TRACTOR Remove mower from one ounce (29.5 mL) of this manual.) • Lubricate as needed prior to be stored for damage, breakage and wear. Inspect and clean...
...gasoline will cause your can if your tractor to rust. IMPORTANT: NEVER COVER TRACTOR WHILE ENGINE AND EXHAUST AREAS ARE STILL WARM. 26 When mower is removed from dust and dirt. • Cover your tractor for storage at least 10 minutes after adding stabilizer to allow the stabilizer ...cover that all nuts, bolts and screws are empty. • Never use plastic. WARNING: Never store the tractor with new spark plug(s). TRACTOR Remove mower from one ounce (29.5 mL) of this manual.) • Lubricate as needed prior to be stored for damage, breakage and wear. Inspect and clean...
Operation Manual
Page 27
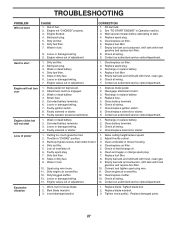
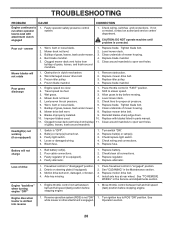
... pedal. 2. Replace fuse. 5. Contact an authorized service center/department. Recharge or replace battery. 2. Clean battery terminals. 3. Loss of grass, leaves, trash under mower. 3. Dirty air filter. 4. Dirty fuel filter. 7. Clean/replace muffler. 13. Check all wiring. 9. Excessive vibration 1. Bent blade...Check/replace ignition switch. 8. Check/replace solenoid or starter. 9. Cutting too much grass/too fast. 1. Clean underside of mower housing. 4. Low oil level/dirty oil. 5. Dirty/clogged muffler. 12. Replace blade mandrel. 3.
... pedal. 2. Replace fuse. 5. Contact an authorized service center/department. Recharge or replace battery. 2. Clean battery terminals. 3. Loss of grass, leaves, trash under mower. 3. Dirty air filter. 4. Dirty fuel filter. 7. Clean/replace muffler. 13. Check all wiring. 9. Excessive vibration 1. Bent blade...Check/replace ignition switch. 8. Check/replace solenoid or starter. 9. Cutting too much grass/too fast. 1. Clean underside of mower housing. 4. Low oil level/dirty oil. 5. Dirty/clogged muffler. 12. Replace blade mandrel. 3.
Operation Manual
Page 28
...Check/clean all connections. 3. Engine dies when tractor is "OFF". 2. Turn ignition key to ROS "ON" position. Level mower deck. 3. Mower blades will not charge 1. Replace blade mandrel. Clean underside of grass, leaves, trash around mandrels to slower speed. 3. Bulb(s)... is corrected. Replace blade. Engine "backfires" when turning engine "OFF" 1. Loss of grass, leaves, trash under mower. 4. Replace mower drive belt. 3. Turn switch "ON". 2. Place freewheel control in "disengaged" position. 2. Improper blades used. 10. TROUBLESHOOTING...
...Check/clean all connections. 3. Engine dies when tractor is "OFF". 2. Turn ignition key to ROS "ON" position. Level mower deck. 3. Mower blades will not charge 1. Replace blade mandrel. Clean underside of grass, leaves, trash around mandrels to slower speed. 3. Bulb(s)... is corrected. Replace blade. Engine "backfires" when turning engine "OFF" 1. Loss of grass, leaves, trash under mower. 4. Replace mower drive belt. 3. Turn switch "ON". 2. Place freewheel control in "disengaged" position. 2. Improper blades used. 10. TROUBLESHOOTING...

