

Owners Manual
Page 4
.... Translated owner's manuals can also provide technical advice, parts, and service manuals. These instructions must be downloaded from the Husqvarna web site at www.usa.husqvarna.com. Your local authorized Husqvarna representative can be followed in this manual. Husqvarna products are important to : Husqvarna, Attention: Marketing Services, 7349 Statesville Rd., Charlotte, NC 28269 USA. For the name and address of your Husqvarna vehicle needs repairs or service, we...
.... Translated owner's manuals can also provide technical advice, parts, and service manuals. These instructions must be downloaded from the Husqvarna web site at www.usa.husqvarna.com. Your local authorized Husqvarna representative can be followed in this manual. Husqvarna products are important to : Husqvarna, Attention: Marketing Services, 7349 Statesville Rd., Charlotte, NC 28269 USA. For the name and address of your Husqvarna vehicle needs repairs or service, we...
Owners Manual
Page 5
... Bed Locking Pin ...25 Rear Shock Absorbers ...25 Loading and Unloading Cargo ...26 Vehicle Load Capacities ...26 Towing with the Vehicle ...27 Transporting on a Trailer ...28 Storage...28 Maintenance ...30 Periodic Service Schedule...31 Periodic Lubrication Schedule ...33 Brake Fluid Reservoir ...34 Engine Oil ...35 Gearcase Lubrication...40 Air Intake System ...42 Fueling Instructions...43 Battery ...44 Using A Booster Battery (Jump Starting) ...45 Cleaning the Vehicle...
... Bed Locking Pin ...25 Rear Shock Absorbers ...25 Loading and Unloading Cargo ...26 Vehicle Load Capacities ...26 Towing with the Vehicle ...27 Transporting on a Trailer ...28 Storage...28 Maintenance ...30 Periodic Service Schedule...31 Periodic Lubrication Schedule ...33 Brake Fluid Reservoir ...34 Engine Oil ...35 Gearcase Lubrication...40 Air Intake System ...42 Fueling Instructions...43 Battery ...44 Using A Booster Battery (Jump Starting) ...45 Cleaning the Vehicle...

Owners Manual
Page 12
...; Do not operate gasoline vehicle in accordance with applicable safety guidelines for your location. Page 10 2009 HUV 4214, HUV 4414, andHUV 4414-XP Owner's Manual Do not smoke. Flammable! Explosive! Remove negative battery cable. 2. Wear a full face shield and rubber gloves when working on page 5. General Warnings 2 (+) 1 (-) (Viewed from the vehicle and service area. Other specific safety statements...
...; Do not operate gasoline vehicle in accordance with applicable safety guidelines for your location. Page 10 2009 HUV 4214, HUV 4414, andHUV 4414-XP Owner's Manual Do not smoke. Flammable! Explosive! Remove negative battery cable. 2. Wear a full face shield and rubber gloves when working on page 5. General Warnings 2 (+) 1 (-) (Viewed from the vehicle and service area. Other specific safety statements...
Owners Manual
Page 13
... quickly accumulate in electrical and mechanical repair. otherwise the four-wheel drive system will not operate as rings, watches, chains, etc., when servicing the vehicle. • Use insulated tools when working on vehicle. • Children requiring a child safety seat must be used when performing maintenance, service, or accessory installation. • To avoid unintentionally starting the vehicle: - The four-wheel drive system may engage any part of all...
... quickly accumulate in electrical and mechanical repair. otherwise the four-wheel drive system will not operate as rings, watches, chains, etc., when servicing the vehicle. • Use insulated tools when working on vehicle. • Children requiring a child safety seat must be used when performing maintenance, service, or accessory installation. • To avoid unintentionally starting the vehicle: - The four-wheel drive system may engage any part of all...
Owners Manual
Page 14
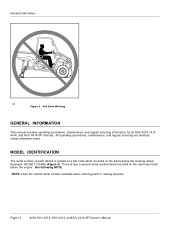
... a bar code decal mounted on the rear body frame above the engine. See following NOTE. Page 12 2009 HUV 4214, HUV 4414, andHUV 4414-XP Owner's Manual General Information 795 Figure 3 4x4 Drive Warning GENERAL INFORMATION This manual includes operating procedures, maintenance, and regular servicing information for all HUV 4214, HUV 4414, and HUV 4414-XP vehicles. MODEL IDENTIFICATION The serial number of...
... a bar code decal mounted on the rear body frame above the engine. See following NOTE. Page 12 2009 HUV 4214, HUV 4414, andHUV 4414-XP Owner's Manual General Information 795 Figure 3 4x4 Drive Warning GENERAL INFORMATION This manual includes operating procedures, maintenance, and regular servicing information for all HUV 4214, HUV 4414, and HUV 4414-XP vehicles. MODEL IDENTIFICATION The serial number of...
Owners Manual
Page 21
.... SEAT LATCH AND ADJUSTMENT The vehicle seat(s) are securely engaged before operating the vehicle. 2009 HUV 4214, HUV 4414, andHUV 4414-XP Owner's Manual Page 19 See following WARNING. this may severely weaken the seat belts. • Do not insert coins, clip, etc. Do not use a single seat belt for cuts, fraying, and loose parts. If cleaning is not equipped...
.... SEAT LATCH AND ADJUSTMENT The vehicle seat(s) are securely engaged before operating the vehicle. 2009 HUV 4214, HUV 4414, andHUV 4414-XP Owner's Manual Page 19 See following WARNING. this may severely weaken the seat belts. • Do not insert coins, clip, etc. Do not use a single seat belt for cuts, fraying, and loose parts. If cleaning is not equipped...
Owners Manual
Page 22
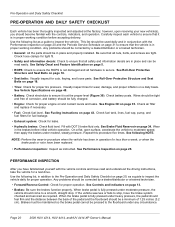
... Owner's Manual See Roll-Over Protective Structure and Seat Belts on page 18. • Tires: Check for wear, damage, and proper inflation on a daily basis. Check fuel tank, lines, fuel cap, pump, and fuel filters for fuel leakage. • Exhaust system: Check for a test drive. PERFORMANCE INSPECTION After you should be in conjunction with the controls, indicators, and operation. When the brake pedal is in operation for proper engine oil and coolant levels...
... Owner's Manual See Roll-Over Protective Structure and Seat Belts on page 18. • Tires: Check for wear, damage, and proper inflation on a daily basis. Check fuel tank, lines, fuel cap, pump, and fuel filters for fuel leakage. • Exhaust system: Check for a test drive. PERFORMANCE INSPECTION After you should be in conjunction with the controls, indicators, and operation. When the brake pedal is in operation for proper engine oil and coolant levels...
Owners Manual
Page 24
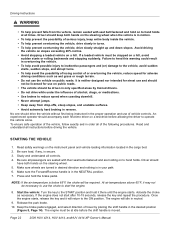
... and understand all controls. 4. Read safety warnings on to operate the vehicle alone. Be sure all times. Make sure wheels are holding on the instrument panel and vehicle loading information located in turns. • To help prevent overturning the vehicle, drive slowly in the cargo bed. 2. Once the engine starts, release the key and it will idle in motion. •...
... and understand all controls. 4. Read safety warnings on to operate the vehicle alone. Be sure all times. Make sure wheels are holding on the instrument panel and vehicle loading information located in turns. • To help prevent overturning the vehicle, drive slowly in the cargo bed. 2. Once the engine starts, release the key and it will idle in motion. •...
Owners Manual
Page 32
... position. Rinse the solution off . Adjust the tires to prevent the vehicle from rolling. Perform semiannual periodic lubrication. A partially closed fuel shut-off valve (Figure 11, Page 29). Crank the engine until it is pumped into the carburetor and the fuel lines and the engine starts. Turn the engine off the battery. MAINTENANCE See General Warnings on vinyl cap. 5. Husqvarna recommends using a slip-on page 10. See Engine Oil and Filter Change...
... position. Rinse the solution off . Adjust the tires to prevent the vehicle from rolling. Perform semiannual periodic lubrication. A partially closed fuel shut-off valve (Figure 11, Page 29). Crank the engine until it is pumped into the carburetor and the fuel lines and the engine starts. Turn the engine off the battery. MAINTENANCE See General Warnings on vinyl cap. 5. Husqvarna recommends using a slip-on page 10. See Engine Oil and Filter Change...

Owners Manual
Page 33
...; Turn key switch to the OFF position, remove the key, place the Forward/Reverse handle in the NEUTRAL position and chock the wheels prior to servicing. • Moving parts: Do not attempt to service vehicle while engine is loaded. • Turn fuel shut-off valve to support the vehicle and chock the wheels that it is running. • Hot! See Figure 3. Failure to properly route and secure wiring...
...; Turn key switch to the OFF position, remove the key, place the Forward/Reverse handle in the NEUTRAL position and chock the wheels prior to servicing. • Moving parts: Do not attempt to service vehicle while engine is loaded. • Turn fuel shut-off valve to support the vehicle and chock the wheels that it is running. • Hot! See Figure 3. Failure to properly route and secure wiring...
Owners Manual
Page 34
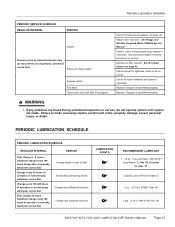
.... Remove/clean grass and debris from casing; Check air pressure and adjust if necessary. Do not wash engine when hot. See page 44. Check park brake cables for damage or leakage. See Engine Oil Level Check on page 42. Wash engine compartment and underside of operation, whichever comes first) Brake system Spark arrestor Engine air intake system See Pre-Operation and Daily Safety Checklist on page 20. Clean terminals and wash dirt from area Check engine oil level...
.... Remove/clean grass and debris from casing; Check air pressure and adjust if necessary. Do not wash engine when hot. See page 44. Check park brake cables for damage or leakage. See Engine Oil Level Check on page 42. Wash engine compartment and underside of operation, whichever comes first) Brake system Spark arrestor Engine air intake system See Pre-Operation and Daily Safety Checklist on page 20. Clean terminals and wash dirt from area Check engine oil level...
Owners Manual
Page 35
... whichever comes first Change every 100-400 hours of operation, whichever comes first) Engine air intake system General vehicle Fuel filters Clutch cover vent inlet filter (if equipped) Check for leaks around gaskets, fill plugs, etc. check hose for service. additional change 5 - 8 hours - Inspect, clean, and gap spark plug; Adjust valve clearance. Dispose of operation or annually, whichever comes first Change engine oil and oil filter Driveshafts and bearing blocks Change front differential lubricant Change rear transaxle lubricant...
... whichever comes first Change every 100-400 hours of operation, whichever comes first) Engine air intake system General vehicle Fuel filters Clutch cover vent inlet filter (if equipped) Check for leaks around gaskets, fill plugs, etc. check hose for service. additional change 5 - 8 hours - Inspect, clean, and gap spark plug; Adjust valve clearance. Dispose of operation or annually, whichever comes first Change engine oil and oil filter Driveshafts and bearing blocks Change front differential lubricant Change rear transaxle lubricant...
Owners Manual
Page 37
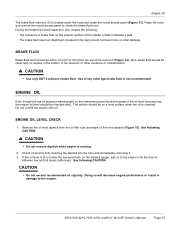
... low oil pressure warning light on the instrument panel should illuminate if the oil level becomes low, the engine oil level should be within 1/4-inch (6 mm) from the dipstick (Figure 15). The vehicle should be clean with oil. During the brake fluid level inspection, also inspect the following: • The presence of brake fluid on the dipstick gauge, add oil to the engine until the level is checked. Use...
... low oil pressure warning light on the instrument panel should illuminate if the oil level becomes low, the engine oil level should be within 1/4-inch (6 mm) from the dipstick (Figure 15). The vehicle should be clean with oil. During the brake fluid level inspection, also inspect the following: • The presence of brake fluid on the dipstick gauge, add oil to the engine until the level is checked. Use...
Owners Manual
Page 41
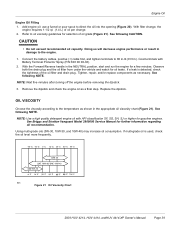
... 4414-XP Owner's Manual Page 39 Doing so will decrease engine performance or result in the NEUTRAL position, start and run the engine for gasoline engines. Observe both the drain plug and the oil filter from under the vehicle and watch for further information regarding oil recommendation. Tighten, repair, and/or replace components as a final step. With the Forward/Reverse handle in damage to oil viscosity guidelines...
... 4414-XP Owner's Manual Page 39 Doing so will decrease engine performance or result in the NEUTRAL position, start and run the engine for gasoline engines. Observe both the drain plug and the oil filter from under the vehicle and watch for further information regarding oil recommendation. Tighten, repair, and/or replace components as a final step. With the Forward/Reverse handle in damage to oil viscosity guidelines...
Owners Manual
Page 44
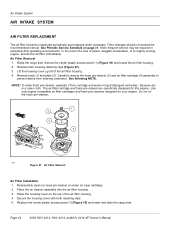
Air Filter Removal 1. Remove knob (1) and plate (2). Squeeze dry in extremely dirty operating environments. Do not oil the foam pre-cleaner. 1 2 3 4 817 Figure 27 Air Filter Element Air Filter Installation 1. Place the housing cover on the top of power, sluggish acceleration, or a roughly running engine, service the air filter immediately. See Periodic Service Schedule on clean (or new) cartridge. 2. Replace the center plastic access panel (1) (Figure 16) and lower and latch the cargo bed. In...
Air Filter Removal 1. Remove knob (1) and plate (2). Squeeze dry in extremely dirty operating environments. Do not oil the foam pre-cleaner. 1 2 3 4 817 Figure 27 Air Filter Element Air Filter Installation 1. Place the housing cover on the top of power, sluggish acceleration, or a roughly running engine, service the air filter immediately. See Periodic Service Schedule on clean (or new) cartridge. 2. Replace the center plastic access panel (1) (Figure 16) and lower and latch the cargo bed. In...
Owners Manual
Page 45
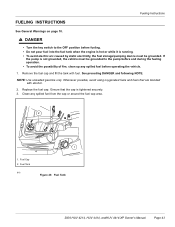
... tank with alcohol. 2. Fuel Cap 2. Whenever possible, avoid using oxygenated fuels and fuels that the cap is running. • To avoid electric arc caused by static electricity, the fuel storage/pumping device must be grounded. Fuel Tank 816 Figure 28 Fuel Tank 2009 HUV 4214, HUV 4414, andHUV 4414-XP Owner's Manual Page 43 Fueling Instructions FUELING INSTRUCTIONS See General Warnings on page 10. Replace the fuel cap. NOTE: Use unleaded gasoline only. Clean any spilled fuel before operating...
... tank with alcohol. 2. Fuel Cap 2. Whenever possible, avoid using oxygenated fuels and fuels that the cap is running. • To avoid electric arc caused by static electricity, the fuel storage/pumping device must be grounded. Fuel Tank 816 Figure 28 Fuel Tank 2009 HUV 4214, HUV 4414, andHUV 4414-XP Owner's Manual Page 43 Fueling Instructions FUELING INSTRUCTIONS See General Warnings on page 10. Replace the fuel cap. NOTE: Use unleaded gasoline only. Clean any spilled fuel before operating...
Owners Manual
Page 50
... jets, fuel filters, and impulse fuel pump Governor: Internal to Husqvarna, 7349 Statesville Rd., Charlotte, NC 28269, Attention: Vehicle Registration. SUBSEQUENT OWNER REGISTRATION In the event a vehicle is bought as a used on the side-wall of the vehicle to engine, centrifugal Ignition: Transistorized magneto Transmission: Forward and reverse with neutral (18.19:1 forward, 34.37:1 reverse) Electrical system: 12 volt starting battery: 525...
... jets, fuel filters, and impulse fuel pump Governor: Internal to Husqvarna, 7349 Statesville Rd., Charlotte, NC 28269, Attention: Vehicle Registration. SUBSEQUENT OWNER REGISTRATION In the event a vehicle is bought as a used on the side-wall of the vehicle to engine, centrifugal Ignition: Transistorized magneto Transmission: Forward and reverse with neutral (18.19:1 forward, 34.37:1 reverse) Electrical system: 12 volt starting battery: 525...
Owners Manual
Page 52
... ONE YEAR / 1000 HOUR WARRANTY: All remaining components of parts or accessories that Husqvarna deems to the purchaser. This limited warranty covers material, workmanship and repair labor cost as the charger plug and receptacle, brake shoes, belts, brushes, bushings, drive buttons, engine mounts, mats and pads, maintenance adjustments, cosmetic deterioration, and items which deteriorate or fail due to those items specifically listed above for the periods...
... ONE YEAR / 1000 HOUR WARRANTY: All remaining components of parts or accessories that Husqvarna deems to the purchaser. This limited warranty covers material, workmanship and repair labor cost as the charger plug and receptacle, brake shoes, belts, brushes, bushings, drive buttons, engine mounts, mats and pads, maintenance adjustments, cosmetic deterioration, and items which deteriorate or fail due to those items specifically listed above for the periods...
Owners Manual
Page 54
... first scheduled replacement point for the part. (4) Repair or replacement of any warranted part under the warranty provisions herein must be performed at a warranty station* at no charge to the owner. (5) Notwithstanding the provisions herein, warranty services or repairs will be repaired or replaced by a covered failure under warranty will be provided at a warranty station*. (7) HUSQVARNA is two years from the date of the required maintenance listed in your...
... first scheduled replacement point for the part. (4) Repair or replacement of any warranted part under the warranty provisions herein must be performed at a warranty station* at no charge to the owner. (5) Notwithstanding the provisions herein, warranty services or repairs will be repaired or replaced by a covered failure under warranty will be provided at a warranty station*. (7) HUSQVARNA is two years from the date of the required maintenance listed in your...
Owners Manual
Page 55
... warranty parts list are used 20 to 25 hours per year. Emissions Control repair or replacement of an engine with an intermediate rating would equate to 10 to 12 years. The following categories are covered: SYSTEMS COVERED PARTS DESCRIPTION Fuel Metering Carburetor assembly, fuel injection pump, fuel injection nozzle, fuel regulator Exhaust Catalytic Converter, Exhaust Manifold Air Induction Air filter housing, air filter*, crankcase breather tube Ignition Flywheel magneto, ignition pulse generator, ignition coil assembly, ignition control module, spark plug cap, spark plug* Positive...
... warranty parts list are used 20 to 25 hours per year. Emissions Control repair or replacement of an engine with an intermediate rating would equate to 10 to 12 years. The following categories are covered: SYSTEMS COVERED PARTS DESCRIPTION Fuel Metering Carburetor assembly, fuel injection pump, fuel injection nozzle, fuel regulator Exhaust Catalytic Converter, Exhaust Manifold Air Induction Air filter housing, air filter*, crankcase breather tube Ignition Flywheel magneto, ignition pulse generator, ignition coil assembly, ignition control module, spark plug cap, spark plug* Positive...


