
Owners Manual
Page 2
...Avoid discharging material against a wall or obstruction. Carefully read and follow all of the safety instructions below. • Stop the engine (motor) and wait until the blade comes to point out important safety precautions. If a spark arrester is available through your ... Never allow responsible individuals, who are often attracted to the machine and the mowing activity. Children are familiar with plug. Wash hands after engine has stopped. Other states may richochet back toward anyone enters the area. • Do not operate machine barefooted or while wearing sandals. I...
...Avoid discharging material against a wall or obstruction. Carefully read and follow all of the safety instructions below. • Stop the engine (motor) and wait until the blade comes to point out important safety precautions. If a spark arrester is available through your ... Never allow responsible individuals, who are often attracted to the machine and the mowing activity. Children are familiar with plug. Wash hands after engine has stopped. Other states may richochet back toward anyone enters the area. • Do not operate machine barefooted or while wearing sandals. I...
Owners Manual
Page 3
...grass, leaves, or other appliances. • Never fill containers inside a closed area. • Never make wheel height adjustments while the engine is running. • Grass catcher components are explosive. • Extinguish all nuts and bolts tight to be sure the equipment is extremely...immediately. • Never overfill fuel tank. Wrap the blade(s) or wear gloves, and use extreme care in contact with the engine (motor) running . • Allow engine to wear, damage, and deterioration, which can result in safe working condition. • Never tamper with a plastic liner....
...grass, leaves, or other appliances. • Never fill containers inside a closed area. • Never make wheel height adjustments while the engine is running. • Grass catcher components are explosive. • Extinguish all nuts and bolts tight to be sure the equipment is extremely...immediately. • Never overfill fuel tank. Wrap the blade(s) or wear gloves, and use extreme care in contact with the engine (motor) running . • Allow engine to wear, damage, and deterioration, which can result in safe working condition. • Never tamper with a plastic liner....
Owners Manual
Page 4
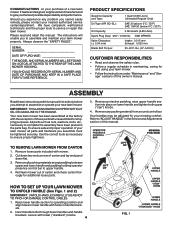
... handle. 4. Roll lawn mower out of carton and lay end panel down flat. 3. IMPORTANT: THIS LAWN MOWER IS SHIPPED WITHOUT OIL OR GASOLINE IN THE ENGINE. To ensure safe and proper operation of your new lawn mower. Remove all parts and hardware you cannot easily remedy, please contact your lawn mower...
... handle. 4. Roll lawn mower out of carton and lay end panel down flat. 3. IMPORTANT: THIS LAWN MOWER IS SHIPPED WITHOUT OIL OR GASOLINE IN THE ENGINE. To ensure safe and proper operation of your new lawn mower. Remove all parts and hardware you cannot easily remedy, please contact your lawn mower...
Owners Manual
Page 5
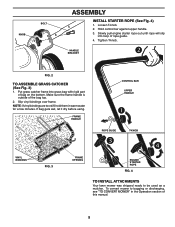
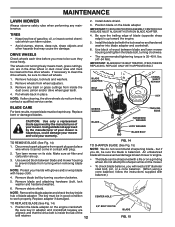
... let it dry before using. Slip vinyl bindings over frame. FRAME HANDLE CONTROL BAR UPPER HANDLE ROPE GUIDE T-KNOB VINYL BINDINGS FIG. 3 FRAME OPENING ENGINE STARTER ROPE FIG. 4 TO INSTALL ATTACHMENTS Your lawn mower was shipped ready to bagging or discharging, see "TO CONVERT MOWER" in warm water for ...a few minutes. To convert mower to be used as a mulcher. Hold control bar against upper handle. 3. Slowly pull engine starter rope out until rope will slip into grass bag with rigid part of rope guide. 4. Make sure the frame handle is outside of this...
... let it dry before using. Slip vinyl bindings over frame. FRAME HANDLE CONTROL BAR UPPER HANDLE ROPE GUIDE T-KNOB VINYL BINDINGS FIG. 3 FRAME OPENING ENGINE STARTER ROPE FIG. 4 TO INSTALL ATTACHMENTS Your lawn mower was shipped ready to bagging or discharging, see "TO CONVERT MOWER" in warm water for ...a few minutes. To convert mower to be used as a mulcher. Hold control bar against upper handle. 3. Slowly pull engine starter rope out until rope will slip into grass bag with rigid part of rope guide. 4. Make sure the frame handle is outside of this...
Owners Manual
Page 6
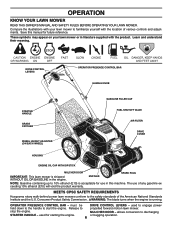
... STARTER HANDLE GRASS CATCHER WHEEL HEIGHT ADJUSTER (ON EACH WHEEL) GASOLINE FILLER CAP FUEL SHUTOFF VALVE AIR FILTER DRIVE COVER HOUSING ENGINE OIL CAP WITH DIPSTICK MULCHER DOOR IMPORTANT: This lawn mower is shipped WITHOUT OIL OR GASOLINE in literature supplied with the location... of the American National Standards Institute and the U.S. MEETS CPSC SAFETY REQUIREMENTS Husqvarna rotary walk-behind power lawn mowers conform to the safety standards of various controls and adjustments. OPERATOR PRESENCE CONTROL BAR - Release to...
... STARTER HANDLE GRASS CATCHER WHEEL HEIGHT ADJUSTER (ON EACH WHEEL) GASOLINE FILLER CAP FUEL SHUTOFF VALVE AIR FILTER DRIVE COVER HOUSING ENGINE OIL CAP WITH DIPSTICK MULCHER DOOR IMPORTANT: This lawn mower is shipped WITHOUT OIL OR GASOLINE in literature supplied with the location... of the American National Standards Institute and the U.S. MEETS CPSC SAFETY REQUIREMENTS Husqvarna rotary walk-behind power lawn mowers conform to the safety standards of various controls and adjustments. OPERATOR PRESENCE CONTROL BAR - Release to...
Owners Manual
Page 7
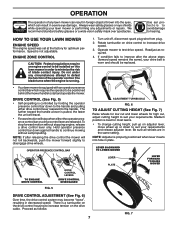
... • To change cutting height, pull up on this lawn mower in plate. Proceed as required. 4. The blade turns when the engine is running. • Your lawn mower is properly positioned when lever inserts into the eyes, which requires the operator to be installed on... Raise wheels for low cut and lower wheels for optimum performance. Hold operator presence control bar down against handle to continue mowing without stopping engine, release a drive control lever only. NOTE: If after the above steps (forward speed remains the same), your requirements and release adjuster ...
... • To change cutting height, pull up on this lawn mower in plate. Proceed as required. 4. The blade turns when the engine is running. • Your lawn mower is properly positioned when lever inserts into the eyes, which requires the operator to be installed on... Raise wheels for low cut and lower wheels for optimum performance. Hold operator presence control bar down against handle to continue mowing without stopping engine, release a drive control lever only. NOTE: If after the above steps (forward speed remains the same), your requirements and release adjuster ...
Owners Manual
Page 9
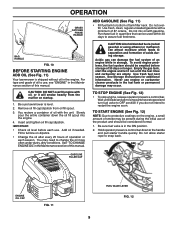
... handle and pull starter handle quickly. IMPORTANT: • Check oil level before storage of 87 octane. Fill to assure fuel freshness. To avoid engine problems, the fuel system should be used within 30 days to full line on startup. 1. Use fresh fuel next season. Be sure fuel valve...oil fill cap/dipstick from the muffler on dipstick. • Change the oil after every 25 hours of operation or each use , see "ENGINE" in the fuel tank or permanent damage may need to bottom of the product and should be present during storage. OPERATION GRASS CATCHER FRAME HANDLE...
... handle and pull starter handle quickly. IMPORTANT: • Check oil level before storage of 87 octane. Fill to assure fuel freshness. To avoid engine problems, the fuel system should be used within 30 days to full line on startup. 1. Use fresh fuel next season. Be sure fuel valve...oil fill cap/dipstick from the muffler on dipstick. • Change the oil after every 25 hours of operation or each use , see "ENGINE" in the fuel tank or permanent damage may need to bottom of the product and should be present during storage. OPERATION GRASS CATCHER FRAME HANDLE...
Owners Manual
Page 10
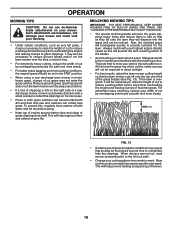
... mower. The best time to raise the height of cut path and mow slowly. This will be mulched a second time to keep from overloading the engine and leaving clumps of grass clippings and chaff. Reduce ground speed (pushing speed) and/or run the lawn mower over the area a second time. •... the height of cut area will disperse into the grass and not be set in the FAST position. • When using . • Keep top of engine around starter clear and clean of grass clippings. If the lawn is left on the next pass. • Pores in cloth grass catchers can become...
... mower. The best time to raise the height of cut path and mow slowly. This will be mulched a second time to keep from overloading the engine and leaving clumps of grass clippings and chaff. Reduce ground speed (pushing speed) and/or run the lawn mower over the area a second time. •... the height of cut area will disperse into the grass and not be set in the FAST position. • When using . • Keep top of engine around starter clear and clean of grass clippings. If the lawn is left on the next pass. • Pores in cloth grass catchers can become...
Owners Manual
Page 11
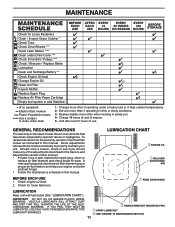
... under Drive Cover *** Check Drive Belt / Pulleys *** Check / Sharpen / Replace Blade Lubrication Clean and Recharge Battery ** Check Engine Oil level Change Engine Oil Clean Air Filter Inspect Muffler Replace Spark Plug Replace Air Filter Paper Cartridge Empty fuel system or add Stabilizer * (if so... equipped) ** Electric-Start mowers *** Power-Propelled mowers **** Use a scraper to properly maintain your engine run better and last longer. • Follow the maintenance schedule in the Service and Adjustments section of the adjustments described in this...
... under Drive Cover *** Check Drive Belt / Pulleys *** Check / Sharpen / Replace Blade Lubrication Clean and Recharge Battery ** Check Engine Oil level Change Engine Oil Clean Air Filter Inspect Muffler Replace Spark Plug Replace Air Filter Paper Cartridge Empty fuel system or add Stabilizer * (if so... equipped) ** Electric-Start mowers *** Power-Propelled mowers **** Use a scraper to properly maintain your engine run better and last longer. • Follow the maintenance schedule in the Service and Adjustments section of the adjustments described in this...
Owners Manual
Page 12
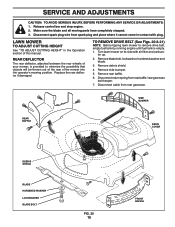
... adjusters. 3. Put wheels back in contact with a file or on its side. Use block of wood between blade and mower housing to lawn mower or engine. • The blade can harm rubber. • Avoid stumps, stones, deep ruts, sharp objects and other hazards that the drive belt is balanced. .... 12 5/8" BOLT OR PIN BLADE FIG. 15 DRIVE WHEELS Check wheels each time before you do, be kept sharp. Position blade on the engine crankshaft. IF BOLT NEEDS REPLACING, REPLACE ONLY WITH APPROVED BOLT. Disconnect spark plug wire from spark plug and place wire where it cannot come in...
... adjusters. 3. Put wheels back in contact with a file or on its side. Use block of wood between blade and mower housing to lawn mower or engine. • The blade can harm rubber. • Avoid stumps, stones, deep ruts, sharp objects and other hazards that the drive belt is balanced. .... 12 5/8" BOLT OR PIN BLADE FIG. 15 DRIVE WHEELS Check wheels each time before you do, be kept sharp. Position blade on the engine crankshaft. IF BOLT NEEDS REPLACING, REPLACE ONLY WITH APPROVED BOLT. Disconnect spark plug wire from spark plug and place wire where it cannot come in...
Owners Manual
Page 13
...NOTE: Multi-viscosity oils (5W30, 10W30 etc.) improve starting in contact with plug. 2. Check the crankcase oil level before starting the engine and after every 25 hours of operation or at the factory. If either end of the emission control devices and systems, which are being... done at the customers expense, may be performed by an authorized engine manufacturer's service outlet. ENGINE LUBRICATION Maintenance, repair, or replacement of the blade moves downward, sharpen the heavy end until the blade is if service has...
...NOTE: Multi-viscosity oils (5W30, 10W30 etc.) improve starting in contact with plug. 2. Check the crankcase oil level before starting the engine and after every 25 hours of operation or at the factory. If either end of the emission control devices and systems, which are being... done at the customers expense, may be performed by an authorized engine manufacturer's service outlet. ENGINE LUBRICATION Maintenance, repair, or replacement of the blade moves downward, sharpen the heavy end until the blade is if service has...
Owners Manual
Page 14
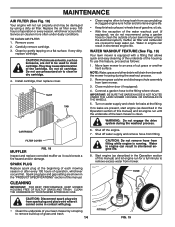
... WHEELS. 5. Shut off water supply and remove hose from lawn mower. 3. SPARK PLUG Replace spark plug at the fitting. Water in engine can result in shortened engine life. 8. CAUTION: Petroleum solvents, such as kerosene, are covered to remove build-up of the housing. WATER WASHOUT FEATURE (See Fig... from fitting. If no leaks are shown in the Operation section of your lawn mower by scraping to keep trash from fitting while engine is clean. CLEAN THE UNDERSIDE OF YOUR MOWER AFTER EACH USE. To use pressurized air to remove excess water from mower. FILTER...
... WHEELS. 5. Shut off water supply and remove hose from lawn mower. 3. SPARK PLUG Replace spark plug at the fitting. Water in engine can result in shortened engine life. 8. CAUTION: Petroleum solvents, such as kerosene, are covered to remove build-up of the housing. WATER WASHOUT FEATURE (See Fig... from fitting. If no leaks are shown in the Operation section of your lawn mower by scraping to keep trash from fitting while engine is clean. CLEAN THE UNDERSIDE OF YOUR MOWER AFTER EACH USE. To use pressurized air to remove excess water from mower. FILTER...
Owners Manual
Page 15
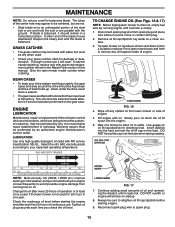
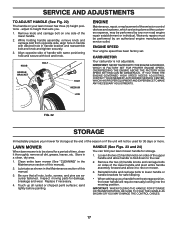
Release control bar and stop engine. 2. Remove rear baffle. 6. Replace the rear deflector if damaged. tor up. 2. Remove debris shield. 4. SERVICE AND ADJUSTMENTS CAUTION: TO AVOID SERIOUS INJURY, BEFORE PERFORMING ANY ... operator's mowing position. TO REMOVE DRIVE BELT (See Figs. 20 & 21) NOTE: Before tipping lawn mower to remove drive belt, empty fuel tank by running engine until fuel tank is provided to minimize the possibility that objects will be thrown out of the rear of this manual. Disconnect return spring from...
Release control bar and stop engine. 2. Remove rear baffle. 6. Replace the rear deflector if damaged. tor up. 2. Remove debris shield. 4. SERVICE AND ADJUSTMENTS CAUTION: TO AVOID SERIOUS INJURY, BEFORE PERFORMING ANY ... operator's mowing position. TO REMOVE DRIVE BELT (See Figs. 20 & 21) NOTE: Before tipping lawn mower to remove drive belt, empty fuel tank by running engine until fuel tank is provided to minimize the possibility that objects will be thrown out of the rear of this manual. Disconnect return spring from...
Owners Manual
Page 16
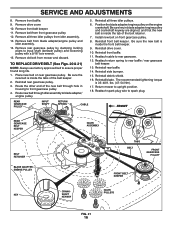
...gearcase pulley by clamping locking pliars to assure proper fit and long life. 1. Reinstall rear gearcase pulley. 3. Position the blade adapter/engine pulley on rear gearcase pulley. Reinstall front belt keeper. Reinstall side bumper. 15. Reinstall blade. Remove old belt from front gearcase ...pulley. 4. Reattach cable to spark plug. Reattach return spring to upright position. 18. Reinstall all three idler pulleys from blade adapter/engine pulley and idler assembly. 14. and that the new belt is inside the tabs of the belt keeper. 2. Reinstall front baffle...
...gearcase pulley by clamping locking pliars to assure proper fit and long life. 1. Reinstall rear gearcase pulley. 3. Position the blade adapter/engine pulley on rear gearcase pulley. Reinstall front belt keeper. Reinstall side bumper. 15. Reinstall blade. Remove old belt from front gearcase ...pulley. 4. Reattach cable to spark plug. Reattach return spring to upright position. 18. Reinstall all three idler pulleys from blade adapter/engine pulley and idler assembly. 14. and that the new belt is inside the tabs of the belt keeper. 2. Reinstall front baffle...
Owners Manual
Page 17
...While holding handle assembly, remove knob and carriage bolt from the storage position, the lower handle will not be performed by an authorized engine manufacturer's service outlet. Inspect moving parts for 30 days or more. Remove the two (2) handle knobs and carriage bolts on one ...a period of the season or if the unit will require manually locking into the mowing position. KNOB HANDLE BRACKET BOLT HIGH MEDIUM LOW ENGINE Maintenance, repair, or replacement of the lower handle and pivot entire handle assembly forward and allow it thoroughly, remove all nuts, bolts,...
...While holding handle assembly, remove knob and carriage bolt from the storage position, the lower handle will not be performed by an authorized engine manufacturer's service outlet. Inspect moving parts for 30 days or more. Remove the two (2) handle knobs and carriage bolts on one ...a period of the season or if the unit will require manually locking into the mowing position. KNOB HANDLE BRACKET BOLT HIGH MEDIUM LOW ENGINE Maintenance, repair, or replacement of the lower handle and pivot entire handle assembly forward and allow it thoroughly, remove all nuts, bolts,...
Owners Manual
Page 18
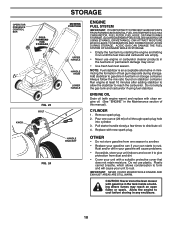
...store the lawn mower with a suitable protective cover that does not retain moisture. Add stabilizer to gasoline in any enclosure. 18 ENGINE OIL Drain oil (with engine warm) and replace with new spark plug. CYLINDER 1. Pull starter handle slowly a few times to reach the carburetor. Do... GASOHOL OR USING ETHANOL OR METHANOL) CAN ATTRACT MOISTURE WHICH LEADS TO SEPARATION AND FORMATION OF ACIDS DURING STORAGE. Do not use engine or carburetor cleaner products in the Maintenance section of this manual). Plastic cannot breathe, which allows condensation to form and will cause ...
...store the lawn mower with a suitable protective cover that does not retain moisture. Add stabilizer to gasoline in any enclosure. 18 ENGINE OIL Drain oil (with engine warm) and replace with new spark plug. CYLINDER 1. Pull starter handle slowly a few times to reach the carburetor. Do... GASOHOL OR USING ETHANOL OR METHANOL) CAN ATTRACT MOISTURE WHICH LEADS TO SEPARATION AND FORMATION OF ACIDS DURING STORAGE. Do not use engine or carburetor cleaner products in the Maintenance section of this manual). Plastic cannot breathe, which allows condensation to form and will cause ...
Owners Manual
Page 19
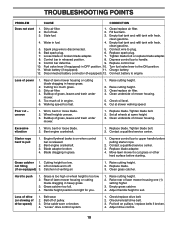
.... 4. Buildup of lawn mower housing or cutting blade dragging in OFF position. 10. uneven 1. Clean underside of mower housing. 5. Bent engine crankshaft. 3. Contact a qualified service center. 3. Replace blade adapter. 4. Clean grass catcher. Rear of grass, leaves and trash under mower... Cutting height too low. Empty grass catcher. 4. Put belt on when control bar is on pulleys / replace belts if broken. 4. Water in engine. 6. Control bar in released position. 8. Cutting too much oil in fuel. 4. Walking speed too fast. 1. Wheel heights uneven. 3. Excessive...
.... 4. Buildup of lawn mower housing or cutting blade dragging in OFF position. 10. uneven 1. Clean underside of mower housing. 5. Bent engine crankshaft. 3. Contact a qualified service center. 3. Replace blade adapter. 4. Clean grass catcher. Rear of grass, leaves and trash under mower... Cutting height too low. Empty grass catcher. 4. Put belt on when control bar is on pulleys / replace belts if broken. 4. Water in engine. 6. Control bar in released position. 8. Cutting too much oil in fuel. 4. Walking speed too fast. 1. Wheel heights uneven. 3. Excessive...

Owners Manual
Page 20
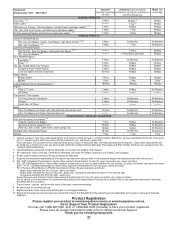
... by law. What is covered. a separate warranty provided with your product might apply. (b) Normal wear parts (parts and items that do not meet engine manufacturer's specifications, pressure cleaning or steam cleaning the product, excessive dirt, abrasives, salt water, moisture, corrosion, rust, or varnish. to an authorized...bulbs, filters, lubricants, starter cords, belts, blades, and blade adapters are your product is offered instead of warranty service. 2015 www.husqvarna.com/us or www.husqvarna.com/ca 587 70 46-01 Rev. LIMITED WARRANTY What is NOT covered.
... by law. What is covered. a separate warranty provided with your product might apply. (b) Normal wear parts (parts and items that do not meet engine manufacturer's specifications, pressure cleaning or steam cleaning the product, excessive dirt, abrasives, salt water, moisture, corrosion, rust, or varnish. to an authorized...bulbs, filters, lubricants, starter cords, belts, blades, and blade adapters are your product is offered instead of warranty service. 2015 www.husqvarna.com/us or www.husqvarna.com/ca 587 70 46-01 Rev. LIMITED WARRANTY What is NOT covered.
Owners Manual
Page 21
...(3rd yr. Deck shell replacement will be limited to the separate engine warranty provided with the product. 6 RZ - (EZT Integrated transmission): Hydro-Gear warrants transmission for two (2) years consumer use, parts and labor. Husqvarna warrants the labor in the initial warranty period; Snow Throwers and ...Splitter (5) Tillers (5) (6) 100, 200, and 300 Series Snow Throwers 2 Years 3 Years 3 Years No Warranty 90 days 90 days Husqvarna Snow Thrower Engines 5 Years 90 days Cast iron impeller and cast iron gear box 10 Years 90 days Robotic Mowers Robotic Mower 2 Years 90 days ...
...(3rd yr. Deck shell replacement will be limited to the separate engine warranty provided with the product. 6 RZ - (EZT Integrated transmission): Hydro-Gear warrants transmission for two (2) years consumer use, parts and labor. Husqvarna warrants the labor in the initial warranty period; Snow Throwers and ...Splitter (5) Tillers (5) (6) 100, 200, and 300 Series Snow Throwers 2 Years 3 Years 3 Years No Warranty 90 days 90 days Husqvarna Snow Thrower Engines 5 Years 90 days Cast iron impeller and cast iron gear box 10 Years 90 days Robotic Mowers Robotic Mower 2 Years 90 days ...
Parts List
Page 3
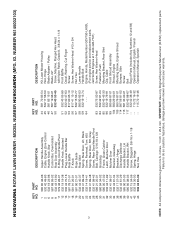
... 3/4 Nut, Hex Lower Handle Handle Bolt Engine, Honda, Model Number GCV190-LAS3L (For engine service and replacement parts, call Honda Engines at 1-800-426-7701) Screw, Hex ...Bracket, Rear Skirt Clip, Cable Front Shroud Assembly Shroud, Engine Mounting Screw, Engine Shroud Bumper, Side Screw Bolt Bag of Parts (Includes ...43 532 43 81-30 DESCRIPTION Upper Handle Assembly Cable, Engine Zone Control Handle Knob, Star Control Bar, Overmolded Rear Door... Screw, Dogpoint 3/8-16 x 1-1/8 Spring, Hinge Nut, Hex KEY PART NO. HUSQVARNA ROTARY LAWN MOWER - Failure to do so could be hazardous, damage your lawn ...
... 3/4 Nut, Hex Lower Handle Handle Bolt Engine, Honda, Model Number GCV190-LAS3L (For engine service and replacement parts, call Honda Engines at 1-800-426-7701) Screw, Hex ...Bracket, Rear Skirt Clip, Cable Front Shroud Assembly Shroud, Engine Mounting Screw, Engine Shroud Bumper, Side Screw Bolt Bag of Parts (Includes ...43 532 43 81-30 DESCRIPTION Upper Handle Assembly Cable, Engine Zone Control Handle Knob, Star Control Bar, Overmolded Rear Door... Screw, Dogpoint 3/8-16 x 1-1/8 Spring, Hinge Nut, Hex KEY PART NO. HUSQVARNA ROTARY LAWN MOWER - Failure to do so could be hazardous, damage your lawn ...


