
Owners Manual
Page 2
...8226; Do not operate machine barefooted or while wearing sandals. Always wear substantial footwear with the instructions, to the presence of accessories. Stop blade when crossing gravel surfaces. • Do not operate the mower without proper guards, plates, grass catcher or other reproductive harm. The ... accidents can occur if the operator is clear of the machine before starting when setting up and thrown by the manufacturer. • Stop the blade(s) when crossing gravel drives, walks, or roads. • Never leave a running . • Be sure the area is not alert to...
...8226; Do not operate machine barefooted or while wearing sandals. Always wear substantial footwear with the instructions, to the presence of accessories. Stop blade when crossing gravel surfaces. • Do not operate the mower without proper guards, plates, grass catcher or other reproductive harm. The ... accidents can occur if the operator is clear of the machine before starting when setting up and thrown by the manufacturer. • Stop the blade(s) when crossing gravel drives, walks, or roads. • Never leave a running . • Be sure the area is not alert to...
Owners Manual
Page 3
...someone know you are sharp and can cut. SLOPE OPERATION Slopes are subject to interfere with manufacturer's recommended parts, when necessary. • Mower blades are outside mowing. Tall grass can result in shorts or open flame, spark or pilot light such as a water heater or on other objects...• Maintain or replace safety and instruction labels, as rocks, tree limbs, etc. • Watch for the cause. Always be thrown. Wrap the blade(s) or wear gloves, and use a nozzle lock-open device. • If fuel is running . Always place containers on the ground away from your ...
...someone know you are sharp and can cut. SLOPE OPERATION Slopes are subject to interfere with manufacturer's recommended parts, when necessary. • Mower blades are outside mowing. Tall grass can result in shorts or open flame, spark or pilot light such as a water heater or on other objects...• Maintain or replace safety and instruction labels, as rocks, tree limbs, etc. • Watch for the cause. Always be thrown. Wrap the blade(s) or wear gloves, and use a nozzle lock-open device. • If fuel is running . Always place containers on the ground away from your ...
Owners Manual
Page 4
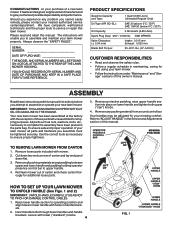
...°F) Oil Capacity: 0.58 Quarts (0.66 Liters) Spark Plug (Gap: .030" / 0.76mm): NGK BPR5ES Valve Clearance: (± 0.04 mm) Intake: 0.015 mm Exhaust: 0.020 mm Blade Bolt Torque: 35-40 ft. IMPORTANT: THIS LAWN MOWER IS SHIPPED WITHOUT OIL OR GASOLINE IN THE ENGINE. Your new lawn mower has been assembled...
...°F) Oil Capacity: 0.58 Quarts (0.66 Liters) Spark Plug (Gap: .030" / 0.76mm): NGK BPR5ES Valve Clearance: (± 0.04 mm) Intake: 0.015 mm Exhaust: 0.020 mm Blade Bolt Torque: 35-40 ft. IMPORTANT: THIS LAWN MOWER IS SHIPPED WITHOUT OIL OR GASOLINE IN THE ENGINE. Your new lawn mower has been assembled...
Owners Manual
Page 6
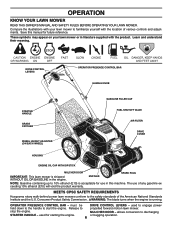
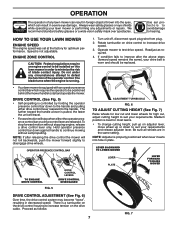
... the location of various controls and adjustments. These symbols may appear on your lawn mower to stop the engine. WARNING: The blade turns when the engine is shipped WITHOUT OIL OR GASOLINE in this manual for future reference. MULCHER DOOR - Learn and understand ... engine. Save this machine. OPERATOR PRESENCE CONTROL BAR - allows conversion to engage powerpropelled forward motion lawn mower. MEETS CPSC SAFETY REQUIREMENTS Husqvarna rotary walk-behind power lawn mowers conform to the safety standards of any gasoline exceeding 10% ethanol (E10) will void the product warranty...
... the location of various controls and adjustments. These symbols may appear on your lawn mower to stop the engine. WARNING: The blade turns when the engine is shipped WITHOUT OIL OR GASOLINE in this manual for future reference. MULCHER DOOR - Learn and understand ... engine. Save this machine. OPERATOR PRESENCE CONTROL BAR - allows conversion to engage powerpropelled forward motion lawn mower. MEETS CPSC SAFETY REQUIREMENTS Husqvarna rotary walk-behind power lawn mowers conform to the safety standards of any gasoline exceeding 10% ethanol (E10) will void the product warranty...
Owners Manual
Page 7
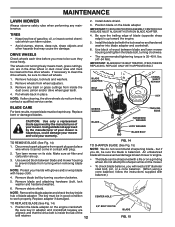
... as follows: 7 FIG. 7 Medium position is controlled by holding the operator presence control bar down against handle to minimize the risk of blade contact injury. Be sure all wheels are released. Proceed as required. 4. Speed is a turnbuckle on the drive control housing to increase tension...repairs. Operate mower to suit your drive belt is equipped with an operator presence control bar which can result in severe eye damage. The blade turns when the engine is running. • Your lawn mower is worn and should be positioned behind the mower handle to increase drive ...
... as follows: 7 FIG. 7 Medium position is controlled by holding the operator presence control bar down against handle to minimize the risk of blade contact injury. Be sure all wheels are released. Proceed as required. 4. Speed is a turnbuckle on the drive control housing to increase tension...repairs. Operate mower to suit your drive belt is equipped with an operator presence control bar which can result in severe eye damage. The blade turns when the engine is running. • Your lawn mower is worn and should be positioned behind the mower handle to increase drive ...
Owners Manual
Page 9
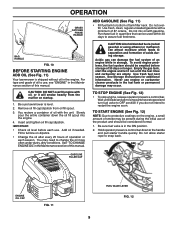
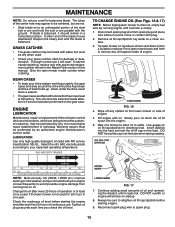
... Fig. 11) • Fill fuel tank to bottom of 30 days or longer. Use fresh, clean, regular unleaded gasoline with oil, or it run until blade and all moving parts have stopped and turn fuel valve to OFF position if you do not intend to snap back. Remove oil fill cap...
... Fig. 11) • Fill fuel tank to bottom of 30 days or longer. Use fresh, clean, regular unleaded gasoline with oil, or it run until blade and all moving parts have stopped and turn fuel valve to OFF position if you do not intend to snap back. Remove oil fill cap...
Owners Manual
Page 10
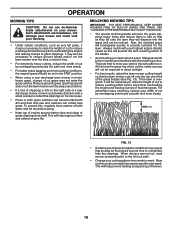
...grass. MULCHING MOWING TIPS IMPORTANT: FOR BEST PERFORMANCE, KEEP MOWER HOUSING FREE OF BUILT-UP GRASS AND TRASH. Always mulch with use de-thatcher blade attachments on your width of a rear discharge mower, mow in moist, heavy grass, clumps of grass clippings and chaff. If the lawn is...a second time. • If a trail of clippings is wet. SEE "CLEANING" IN THE MAINTENANCE SECTION OF THIS MANUAL. • The special mulching blade will biodegrade quickly to form clumps and interferes with a small overlap to west the next week. Wet grass tends to provide nutrients for the lawn...
...grass. MULCHING MOWING TIPS IMPORTANT: FOR BEST PERFORMANCE, KEEP MOWER HOUSING FREE OF BUILT-UP GRASS AND TRASH. Always mulch with use de-thatcher blade attachments on your width of a rear discharge mower, mow in moist, heavy grass, clumps of grass clippings and chaff. If the lawn is...a second time. • If a trail of clippings is wet. SEE "CLEANING" IN THE MAINTENANCE SECTION OF THIS MANUAL. • The special mulching blade will biodegrade quickly to form clumps and interferes with a small overlap to west the next week. Wet grass tends to provide nutrients for the lawn...
Owners Manual
Page 11
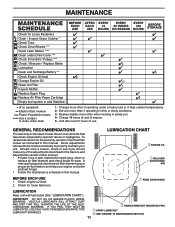
... any of this manual. • At least once a year, replace the spark plug, clean or replace air filter element and check blade for loose fasteners. Check engine oil level. 2. BEFORE EACH USE 1. LUBRICATION Keep unit well lubricated (See "LUBRICATION CHART"). VISCOUS LUBRICANTS...Check Tires Check Drive Wheels *** Clean Lawn Mower **** Clean under Drive Cover *** Check Drive Belt / Pulleys *** Check / Sharpen / Replace Blade Lubrication Clean and Recharge Battery ** Check Engine Oil level Change Engine Oil Clean Air Filter Inspect Muffler Replace Spark Plug Replace Air Filter Paper Cartridge...
... any of this manual. • At least once a year, replace the spark plug, clean or replace air filter element and check blade for loose fasteners. Check engine oil level. 2. BEFORE EACH USE 1. LUBRICATION Keep unit well lubricated (See "LUBRICATION CHART"). VISCOUS LUBRICANTS...Check Tires Check Drive Wheels *** Clean Lawn Mower **** Clean under Drive Cover *** Check Drive Belt / Pulleys *** Check / Sharpen / Replace Blade Lubrication Clean and Recharge Battery ** Check Engine Oil level Change Engine Oil Clean Air Filter Inspect Muffler Replace Spark Plug Replace Air Filter Paper Cartridge...
Owners Manual
Page 12
...if damaged. If necessary to clean the drive wheels, be sure to prevent blade from turning when removing blade bolt. Position blade on its side. BLADE ADAPTER BELT RETAINER CRANKSHAFT KEYWAY KEY BLADE CARE For best results, mower blade must be sharpened with heavy cloth. 4. DRIVE WHEELS Check wheels each time ...freely. Put wheels back in the drive wheel or dust cover area and must be cleaned to lawn mower or engine. • The blade can harm rubber. • Avoid stumps, stones, deep ruts, sharp objects and other hazards that the drive belt is inside the tab...
...if damaged. If necessary to clean the drive wheels, be sure to prevent blade from turning when removing blade bolt. Position blade on its side. BLADE ADAPTER BELT RETAINER CRANKSHAFT KEYWAY KEY BLADE CARE For best results, mower blade must be sharpened with heavy cloth. 4. DRIVE WHEELS Check wheels each time ...freely. Put wheels back in the drive wheel or dust cover area and must be cleaned to lawn mower or engine. • The blade can harm rubber. • Avoid stumps, stones, deep ruts, sharp objects and other hazards that the drive belt is inside the tab...
Owners Manual
Page 13
...oil trapped inside of the steel bolt or pin and hold the bolt or pin parallel with water, but are not. • Slide blade on oil fill cap/dipstick for damage or deterioration. Insert dipstick into a suitable container. Check the crankcase oil level before starting the ... of oil and rechecking the dipstick until it should check your engine oil level frequently to avoid possible engine damage from running engine until the blade is not used . • Check your grass catcher often for checking level. face. 3. Continue adding small amounts of engine. 5. MAINTENANCE NOTE: ...
...oil trapped inside of the steel bolt or pin and hold the bolt or pin parallel with water, but are not. • Slide blade on oil fill cap/dipstick for damage or deterioration. Insert dipstick into a suitable container. Check the crankcase oil level before starting the ... of oil and rechecking the dipstick until it should check your engine oil level frequently to avoid possible engine damage from running engine until the blade is not used . • Check your grass catcher often for checking level. face. 3. Continue adding small amounts of engine. 5. MAINTENANCE NOTE: ...
Owners Manual
Page 15
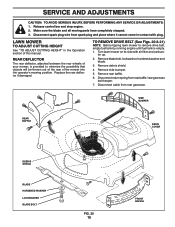
Turn lawn mower on its side with plug. Make sure the blade and all moving parts have completely stopped. 3. Replace the rear deflector if damaged. Remove debris shield. 4. Disconnect spark plug wire from spark ... rear baffle / rear gearcase belt keeper. 7. SIDE BUMPER REAR BAFFLE DRIVE COVER DEBRIS SHIELD BLADE HARDENED WASHER LOCKWASHER BLADE BOLT FIG. 20 15 FRONT BAFFLE Remove side bumper. 5. tor up. 2. Remove blade bolt, lockwasher, hardened washer and blade. 3. SERVICE AND ADJUSTMENTS CAUTION: TO AVOID SERIOUS INJURY, BEFORE PERFORMING ANY SERVICE OR ADJUSTMENTS:...
Turn lawn mower on its side with plug. Make sure the blade and all moving parts have completely stopped. 3. Replace the rear deflector if damaged. Remove debris shield. 4. Disconnect spark plug wire from spark ... rear baffle / rear gearcase belt keeper. 7. SIDE BUMPER REAR BAFFLE DRIVE COVER DEBRIS SHIELD BLADE HARDENED WASHER LOCKWASHER BLADE BOLT FIG. 20 15 FRONT BAFFLE Remove side bumper. 5. tor up. 2. Remove blade bolt, lockwasher, hardened washer and blade. 3. SERVICE AND ADJUSTMENTS CAUTION: TO AVOID SERIOUS INJURY, BEFORE PERFORMING ANY SERVICE OR ADJUSTMENTS:...
Owners Manual
Page 16
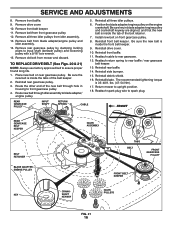
...three idler pulleys from mower and discard. Reinstall debris shield. 16. IDLER PULLEYS KEY SHAFT KEYWAY FIG. 21 16 Remove belt from blade adapter/engine pulley and idler assembly. 14. Reinstall rear gearcase pulley. 3. Return mower to input shaft (beneath pulley) and loosening ... side bumper. 15. Reinstall front baffle. 11. Reinstall rear baffle. 14. Remove old belt from idler assembly. 13. Position the blade adapter/engine pulley on rear gearcase pulley. Remove all three idler pulleys. 6. SERVICE AND ADJUSTMENTS 8. Install new belt on front gearcase...
...three idler pulleys from mower and discard. Reinstall debris shield. 16. IDLER PULLEYS KEY SHAFT KEYWAY FIG. 21 16 Remove belt from blade adapter/engine pulley and idler assembly. 14. Reinstall rear gearcase pulley. 3. Return mower to input shaft (beneath pulley) and loosening ... side bumper. 15. Reinstall front baffle. 11. Reinstall rear baffle. 14. Remove old belt from idler assembly. 13. Position the blade adapter/engine pulley on rear gearcase pulley. Remove all three idler pulleys. 6. SERVICE AND ADJUSTMENTS 8. Install new belt on front gearcase...
Owners Manual
Page 19
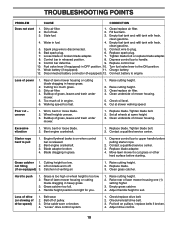
...grass, leaves and trash under mower. 1. Bent engine crankshaft. 1. Lift on pulleys / replace belts if broken. 4. Raise cutting height. 2. Replace blade. 3. Grass catcher too full. 4. Drive cable worn or broken. 4. Depress control bar to suit. Connect battery to the ON position. 11.... rear of mower housing. Check/reinstall drive belt. 3. Charge battery. 12. Check oil level. 6. Cut at same height. 3. Replace blade. Clean underside of lawn mower housing one (1) setting higher. 3. Control bar in released position. 8. Clean grass catcher. Move lawn mower to...
...grass, leaves and trash under mower. 1. Bent engine crankshaft. 1. Lift on pulleys / replace belts if broken. 4. Raise cutting height. 2. Replace blade. 3. Grass catcher too full. 4. Drive cable worn or broken. 4. Depress control bar to suit. Connect battery to the ON position. 11.... rear of mower housing. Check/reinstall drive belt. 3. Charge battery. 12. Check oil level. 6. Cut at same height. 3. Replace blade. Clean underside of lawn mower housing one (1) setting higher. 3. Control bar in released position. 8. Clean grass catcher. Move lawn mower to...

Owners Manual
Page 20
..., excessive dirt, abrasives, salt water, moisture, corrosion, rust, or varnish. What is not a condition of warranty service. 2015 www.husqvarna.com/us or www.husqvarna.com/ca 587 70 46-01 Rev. E15, E25, E30, E50, E85), use of ether or similar starting fluids, or stale ...use of oils that normally wear out with use), including without limitation spark plugs, bulbs, filters, lubricants, starter cords, belts, blades, and blade adapters are notified of important product information. Failure to perform required maintenance as described in the operator's manual will warrant the product ...
..., excessive dirt, abrasives, salt water, moisture, corrosion, rust, or varnish. What is not a condition of warranty service. 2015 www.husqvarna.com/us or www.husqvarna.com/ca 587 70 46-01 Rev. E15, E25, E30, E50, E85), use of ether or similar starting fluids, or stale ...use of oils that normally wear out with use), including without limitation spark plugs, bulbs, filters, lubricants, starter cords, belts, blades, and blade adapters are notified of important product information. Failure to perform required maintenance as described in the operator's manual will warrant the product ...
Owners Manual
Page 21
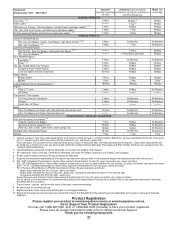
... (if purchased) (10) Collection Systems and Baggers 1 Year 90 days personnel protective equipment, etc.) 90 days 30 days Parts (e.g., belts, blades, starter covers, starter springs, etc.) 30 days 30 days Reconditioned or Refurbished Products 30 days No Warranty Sprayers 1 Year 1 Year Rental (..., High Wheel Trimmer (5)(6)(7) MZ - Zero Turn Mowers, Commercial Lawn Mowers (5) (6) PZ - Product Registration Please register your product registered. Husqvarna® Warranty Chart 2015 587 70 46-01 Consumer Commercial (any rental usage) 90 days 90 days 90 days 90 days 90 days ...
... (if purchased) (10) Collection Systems and Baggers 1 Year 90 days personnel protective equipment, etc.) 90 days 30 days Parts (e.g., belts, blades, starter covers, starter springs, etc.) 30 days 30 days Reconditioned or Refurbished Products 30 days No Warranty Sprayers 1 Year 1 Year Rental (..., High Wheel Trimmer (5)(6)(7) MZ - Zero Turn Mowers, Commercial Lawn Mowers (5) (6) PZ - Product Registration Please register your product registered. Husqvarna® Warranty Chart 2015 587 70 46-01 Consumer Commercial (any rental usage) 90 days 90 days 90 days 90 days 90 days ...

Parts List
Page 3
...117 532 42 88-67 - - 532 42 38-49 - - 115 72 19-32 - - 115 72 19-46 DESCRIPTION Kit, Lawn Mower Housing Rod, Hinge Blade Adapter / Pulley Blade, 22" Screw, Machine, Flanged Hex Head, with Nylon Patch, Grade 8, 3/8-24 x 1-1/8 Front Baffle Decal, Warning, Cut Finger Screw Screw, Hex Washer Head #... Bag of Parts (Includes Key Numbers 12 and 59) Operator's Manual, English / French Operator's Manual, Spanish 3 NOTE: All component dimensions given in U.S. HUSQVARNA ROTARY LAWN MOWER - MODEL NUMBER HU800AWDH (MFG. IMPORTANT: Use only Original Equipment Manufacturer (O.E.M.) replacement parts.
...117 532 42 88-67 - - 532 42 38-49 - - 115 72 19-32 - - 115 72 19-46 DESCRIPTION Kit, Lawn Mower Housing Rod, Hinge Blade Adapter / Pulley Blade, 22" Screw, Machine, Flanged Hex Head, with Nylon Patch, Grade 8, 3/8-24 x 1-1/8 Front Baffle Decal, Warning, Cut Finger Screw Screw, Hex Washer Head #... Bag of Parts (Includes Key Numbers 12 and 59) Operator's Manual, English / French Operator's Manual, Spanish 3 NOTE: All component dimensions given in U.S. HUSQVARNA ROTARY LAWN MOWER - MODEL NUMBER HU800AWDH (MFG. IMPORTANT: Use only Original Equipment Manufacturer (O.E.M.) replacement parts.


