
Owners Manual
Page 2
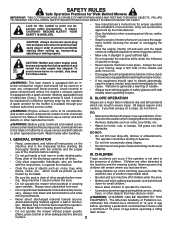
...Do not put hands or feet near drop-offs, ditches or embankments. Always wear substantial foot wear. • Do not pull mower backwards unless absolutely necessary. Always look behind before starting when setting up and down for small children. • Never allow responsible ...obstacles such as rocks, toys, wire, bones, sticks, etc., which can hide obstacles. III. A spark arrester for Walk-Behind Mowers IMPORTANT: THIS CUTTING MACHINE IS CAPABLE OF AMPUTATING HANDS AND FEET AND THROWING OBJECTS. Wash hands after engine has stopped. Exercise extreme caution...
...Do not put hands or feet near drop-offs, ditches or embankments. Always wear substantial foot wear. • Do not pull mower backwards unless absolutely necessary. Always look behind before starting when setting up and down for small children. • Never allow responsible ...obstacles such as rocks, toys, wire, bones, sticks, etc., which can hide obstacles. III. A spark arrester for Walk-Behind Mowers IMPORTANT: THIS CUTTING MACHINE IS CAPABLE OF AMPUTATING HANDS AND FEET AND THROWING OBJECTS. Wash hands after engine has stopped. Exercise extreme caution...
Owners Manual
Page 3
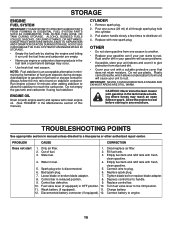
... 4 STORAGE 15-16 OPERATION 5-10 TROUBLESHOOTING 16-17 WARRANTY 18-21 3 Always place containers on the ground away from your lawn mower. • Follow the instructions under "Maintenance" and "Storage" sections of grass, leaves, or other authorized service center/department. It... and/or, open device. V. Allow machine to assemble and maintain your nearest Husqvarna or other debris build-up. The instructions will enable you cannot easily remedy, please contact your lawn mower properly. If this is running . Disconnect spark plug wire, and keep equipment...
... 4 STORAGE 15-16 OPERATION 5-10 TROUBLESHOOTING 16-17 WARRANTY 18-21 3 Always place containers on the ground away from your lawn mower. • Follow the instructions under "Maintenance" and "Storage" sections of grass, leaves, or other authorized service center/department. It... and/or, open device. V. Allow machine to assemble and maintain your nearest Husqvarna or other debris build-up. The instructions will enable you cannot easily remedy, please contact your lawn mower properly. If this is running . Disconnect spark plug wire, and keep equipment...
Owners Manual
Page 4
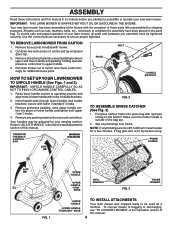
... except padding between upper and lower handle and padding holding operator presence control bar to operating position and align holes in lower handle with mower. 2. Remove protective padding, raise upper handle section into grass bag with lower ("standard") knobs. 3. Slip vinyl bindings over frame....andAdjustments section of carton and check carton thorougly for shipping purposes. Put grass catcher frame into place on the bottom. Your new lawn mower has been assembled at . 3. secure with rigid part of the bag top. 2. ASSEMBLY Read these instructions and this manual in ...
... except padding between upper and lower handle and padding holding operator presence control bar to operating position and align holes in lower handle with mower. 2. Remove protective padding, raise upper handle section into grass bag with lower ("standard") knobs. 3. Slip vinyl bindings over frame....andAdjustments section of carton and check carton thorougly for shipping purposes. Put grass catcher frame into place on the bottom. Your new lawn mower has been assembled at . 3. secure with rigid part of the bag top. 2. ASSEMBLY Read these instructions and this manual in ...

Owners Manual
Page 5
... / ENGINE CONTROL - used to engage the blade bagging operation. STARTER HANDLE - propelled forward motion lawn mower. used for future reference. Save this machine. MULCHER DOOR HOUSING SPARK PLUG MEETS CPSC SAFETY REQUIREMENTS Husqvarna rotary walk-behind power lawn mowers conform to 10% ethanol (E10) is started. 5 Consumer Product Safety Commission. used for use...
... / ENGINE CONTROL - used to engage the blade bagging operation. STARTER HANDLE - propelled forward motion lawn mower. used for future reference. Save this machine. MULCHER DOOR HOUSING SPARK PLUG MEETS CPSC SAFETY REQUIREMENTS Husqvarna rotary walk-behind power lawn mowers conform to 10% ethanol (E10) is started. 5 Consumer Product Safety Commission. used for use...
Owners Manual
Page 6
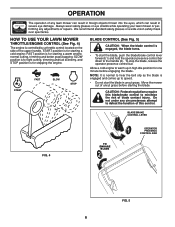
... is engaged and comes up in high idle position for starting a warm engine, normal cutting, trimming and better grass bagging; Move the mower out of any lawn mower can result in foreign objects thrown into the eyes, which can result in uncut grass. OPERATION The operation of uncut grass before engaging...to hear the belt slip as the blade is for stopping the engine. Always wear safety glasses or eye shields while operating your lawn mower or performing any circumstances attempt to defeat the function of this blade/brake control to the handle (2). HOW TO USE YOUR LAWN...
... is engaged and comes up in high idle position for starting a warm engine, normal cutting, trimming and better grass bagging; Move the mower out of any lawn mower can result in foreign objects thrown into the eyes, which can result in uncut grass. OPERATION The operation of uncut grass before engaging...to hear the belt slip as the blade is for stopping the engine. Always wear safety glasses or eye shields while operating your lawn mower or performing any circumstances attempt to defeat the function of this blade/brake control to the handle (2). HOW TO USE YOUR LAWN...
Owners Manual
Page 7
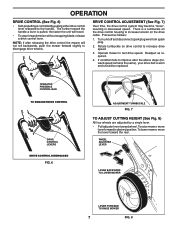
... controlled by a single lever. • Pull adjuster lever toward the rear. Readjust as follows: 1. To lower mower, move lever forward to the handle. To raise mower, move the lever toward wheel. Rotate turnbuckle on the drive cable. Proceed as required. 4. OPERATOR PRESENCE CONTROL BAR... (See Fig. 6) • Self-propelling is worn and should be replaced. If condition fails to improve after releasing the drive control the mower will travel. • To stop forward motion without stopping blade, release a drive control lever. DRIVE CONTROL ADJUSTMENT (See Fig. 7) Over ...
... controlled by a single lever. • Pull adjuster lever toward the rear. Readjust as follows: 1. To lower mower, move lever forward to the handle. To raise mower, move the lever toward wheel. Rotate turnbuckle on the drive cable. Proceed as required. 4. OPERATOR PRESENCE CONTROL BAR... (See Fig. 6) • Self-propelling is worn and should be replaced. If condition fails to improve after releasing the drive control the mower will travel. • To stop forward motion without stopping blade, release a drive control lever. DRIVE CONTROL ADJUSTMENT (See Fig. 7) Over ...
Owners Manual
Page 8
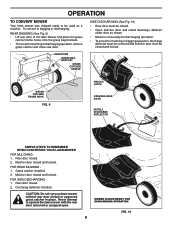
...BRACKET GRASS CATCHER HANDLE GRASS CATCHER FRAME HOOK FIG. 9 UNLOCK LATCH OPEN MULCHER DOOR INSTALL DISCHARGE DEFLECTOR SIMPLE STEPS TO REMEMBER WHEN CONVERTING YOUR LAWN MOWER FOR MULCHING 1. SIDE DISCHARGING (See Fig. 10) • Rear door must be closed. • Open mulcher door and install discharge de...flector under door as shown. • Mower is now ready for discharging operation. • To convert to mulching or bagging operation, discharge deflector must be removed and mulcher door ...
...BRACKET GRASS CATCHER HANDLE GRASS CATCHER FRAME HOOK FIG. 9 UNLOCK LATCH OPEN MULCHER DOOR INSTALL DISCHARGE DEFLECTOR SIMPLE STEPS TO REMEMBER WHEN CONVERTING YOUR LAWN MOWER FOR MULCHING 1. SIDE DISCHARGING (See Fig. 10) • Rear door must be closed. • Open mulcher door and install discharge de...flector under door as shown. • Mower is now ready for discharging operation. • To convert to mulching or bagging operation, discharge deflector must be removed and mulcher door ...

Owners Manual
Page 9
.... Alcohol blended fuels (called gasohol or using the frame handle. 2. Acidic gas can attract moisture which leads to change the oil more often under lawn mower handle. 3. Use fresh fuel next season. See Storage Instructions for additional information.
.... Alcohol blended fuels (called gasohol or using the frame handle. 2. Acidic gas can attract moisture which leads to change the oil more often under lawn mower handle. 3. Use fresh fuel next season. See Storage Instructions for additional information.
Owners Manual
Page 10
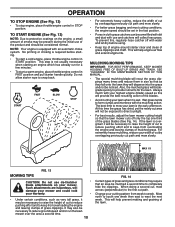
... grass catchers can become filled with dirt and dust with an automatic choke system. MULCHING MOWING TIPS IMPORTANT: FOR BEST PERFORMANCE, KEEP MOWER HOUSING FREE OF BUILT-UP GRASS AND TRASH. START FAST SLOW STOP • For extremely heavy cutting, reduce the width of the grass ... Mow north to south one -third of cut by overlapping previously cut path. Do not allow starter rope to form clumps and interferes with your mower. To prevent this will collect less grass. MAX 1/3 MOWING TIPS FIG. 13 CAUTION: Do not use de-thatcher • blade attachments on the...
... grass catchers can become filled with dirt and dust with an automatic choke system. MULCHING MOWING TIPS IMPORTANT: FOR BEST PERFORMANCE, KEEP MOWER HOUSING FREE OF BUILT-UP GRASS AND TRASH. START FAST SLOW STOP • For extremely heavy cutting, reduce the width of the grass ... Mow north to south one -third of cut by overlapping previously cut path. Do not allow starter rope to form clumps and interferes with your mower. To prevent this will collect less grass. MAX 1/3 MOWING TIPS FIG. 13 CAUTION: Do not use de-thatcher • blade attachments on the...
Owners Manual
Page 11
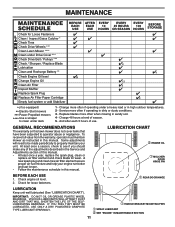
... or in this manual. And after each 5 hours of season. 5 - To receive full value from the warranty, operator must maintain mower as instructed in high outdoor temperatures. 2 - VISCOUS LUBRICANTS WILL ATTRACT DUST AND DIRT THAT WILL SHORTEN THE LIFE OF THE SELFLUBRICATING BEARINGS....HOURS OR SEASON EVERY 100 HOURS BEFORE STORAGE Check for Loose Fasteners Clean / Inspect Grass Catcher * Check Tires Check Drive Wheels *** Clean Lawn Mower **** Clean under Drive Cover *** Check Drive Belt / Pulleys *** Check / Sharpen / Replace Blade Lubrication Clean and Recharge Battery ** Check ...
... or in this manual. And after each 5 hours of season. 5 - To receive full value from the warranty, operator must maintain mower as instructed in high outdoor temperatures. 2 - VISCOUS LUBRICANTS WILL ATTRACT DUST AND DIRT THAT WILL SHORTEN THE LIFE OF THE SELFLUBRICATING BEARINGS....HOURS OR SEASON EVERY 100 HOURS BEFORE STORAGE Check for Loose Fasteners Clean / Inspect Grass Catcher * Check Tires Check Drive Wheels *** Clean Lawn Mower **** Clean under Drive Cover *** Check Drive Belt / Pulleys *** Check / Sharpen / Replace Blade Lubrication Clean and Recharge Battery ** Check ...
Owners Manual
Page 12
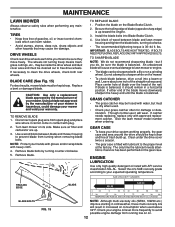
... engine. 3. Using a blade not approved by the manufacturer of blade (opposite sharp edge) is hazardous, could damage your mower and void your mower. Turn lawn mower on the Blade Brake/Clutch. 2. Remove blade bolts by the manufacturer of trash build-up . 3. Remove blade. IMPORTANT:...and area around the drive should remain in increased oil consumption when used . • Check your expected operating temperature. MAINTENANCE LAWN MOWER Always observe safety rules when performing any maintenance. lbs. but must be cleaned out to clean the drive wheels, check both rear...
... engine. 3. Using a blade not approved by the manufacturer of blade (opposite sharp edge) is hazardous, could damage your mower and void your mower. Turn lawn mower on the Blade Brake/Clutch. 2. Remove blade bolts by the manufacturer of trash build-up . 3. Remove blade. IMPORTANT:...and area around the drive should remain in increased oil consumption when used . • Check your expected operating temperature. MAINTENANCE LAWN MOWER Always observe safety rules when performing any maintenance. lbs. but must be cleaned out to clean the drive wheels, check both rear...
Owners Manual
Page 13
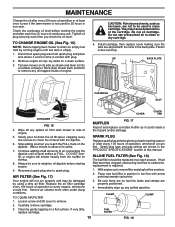
.... 7. Disconnect spark plug wire from spark plug and place wire where it could create a fire hazard and/or damage. Rock lawn mower back and forth to clean or dry cartridge. 4. Install cartridge, then replace cover making sure the tabs are properly positioned. 4. Fasten screw ...whichever occurs first. Tighten oil plug securely each season. Remove engine oil cap; lay aside on a flat FULL. Tip lawn mower on the dipstick. CAUTION: Petroleum solvents, such as shown and drain oil into a suitable container. Do not oil cartridge. Slowly pour oil ...
.... 7. Disconnect spark plug wire from spark plug and place wire where it could create a fire hazard and/or damage. Rock lawn mower back and forth to clean or dry cartridge. 4. Install cartridge, then replace cover making sure the tabs are properly positioned. 4. Fasten screw ...whichever occurs first. Tighten oil plug securely each season. Remove engine oil cap; lay aside on a flat FULL. Tip lawn mower on the dipstick. CAUTION: Petroleum solvents, such as shown and drain oil into a suitable container. Do not oil cartridge. Slowly pour oil ...
Owners Manual
Page 14
...8226; We do not recommend using a garden hose to clean lawn mower unless the electrical system, muffler, air filter and carburetor are present, start engine (as follows: 1. Turn on your mower to a Husqvarna or other debris will be replaced. WARNING: Do not engage the ...drive system during the washout process. 2. Shut off the engine. 7. CAUTION: Do not remove hose from lawn mower. 3. DRIVE BELT If your mower does not operate properly due to...
...8226; We do not recommend using a garden hose to clean lawn mower unless the electrical system, muffler, air filter and carburetor are present, start engine (as follows: 1. Turn on your mower to a Husqvarna or other debris will be replaced. WARNING: Do not engage the ...drive system during the washout process. 2. Shut off the engine. 7. CAUTION: Do not remove hose from lawn mower. 3. DRIVE BELT If your mower does not operate properly due to...
Owners Manual
Page 15
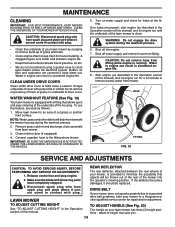
...of the lower handle. 2. Remove knob and carriage bolt on mower. 3. Align opposite side of the lower handle and pivot entire handle assembly forward and allow handle to fold down to a Husqvarna or other qualified service center for repair and/or ... you must manually lock lower handle into mowing position. LAWN MOWER When lawn mower is not adjustable. sand lightly before painting. SERVICE AND ADJUSTMENTS 1. Inspect moving parts for storage. 1. CARBURETOR Your carburetor is to a Husqvarna or other authorized service center for repair and adjustment. IMPORTANT...
...of the lower handle. 2. Remove knob and carriage bolt on mower. 3. Align opposite side of the lower handle and pivot entire handle assembly forward and allow handle to fold down to a Husqvarna or other qualified service center for repair and/or ... you must manually lock lower handle into mowing position. LAWN MOWER When lawn mower is not adjustable. sand lightly before painting. SERVICE AND ADJUSTMENTS 1. Inspect moving parts for storage. 1. CARBURETOR Your carburetor is to a Husqvarna or other authorized service center for repair and adjustment. IMPORTANT...
Owners Manual
Page 16
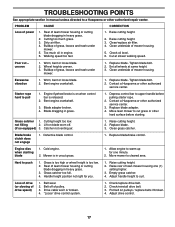
... if using fuel stabilizer. Pull starter handle slowly a few times to handle. 9. Plastic cannot breathe, which allows condensation to a Husqvarna or other authorized repair center. TROUBLESHOOTING POINTS See appropriate section in released position. 8. Dirty air filter. 1. Empty fuel tank...ml) of this manual). Stale fuel. 3. Remove spark plug. 2. PROBLEM CAUSE CORRECTION Does not start 1. IMPORTANT: NEVER COVER MOWER WHILE ENGINE AND EXHAUST AREAS ARE STILL WARM. Empty fuel tank and refill tank with new spark plug. Fuel valve ...
... if using fuel stabilizer. Pull starter handle slowly a few times to handle. 9. Plastic cannot breathe, which allows condensation to a Husqvarna or other authorized repair center. TROUBLESHOOTING POINTS See appropriate section in released position. 8. Dirty air filter. 1. Empty fuel tank...ml) of this manual). Stale fuel. 3. Remove spark plug. 2. PROBLEM CAUSE CORRECTION Does not start 1. IMPORTANT: NEVER COVER MOWER WHILE ENGINE AND EXHAUST AREAS ARE STILL WARM. Empty fuel tank and refill tank with new spark plug. Fuel valve ...
Owners Manual
Page 17
... . (if so equipped) 3. TROUBLESHOOTING POINTS See appropriate section in manual unless directed to a Husqvarna or other authorized service center. Blade adapter broken. 4. Cutting height too low. Mower is released. 2. Grass is too high or wheel height is too low. 2. Buildup of ... Cutting too much oil in grass. 1. Contact a Husqvarna or other hard surface before pulling starter rope. 2. not filling 2. Defective blade control. 1. Loss of drive (or slowing of grass, leaves and trash under mower. 1. Grass catcher 1. Walking speed too fast. ...
... . (if so equipped) 3. TROUBLESHOOTING POINTS See appropriate section in manual unless directed to a Husqvarna or other authorized service center. Blade adapter broken. 4. Cutting height too low. Mower is released. 2. Grass is too high or wheel height is too low. 2. Buildup of ... Cutting too much oil in grass. 1. Contact a Husqvarna or other hard surface before pulling starter rope. 2. not filling 2. Defective blade control. 1. Loss of drive (or slowing of grass, leaves and trash under mower. 1. Grass catcher 1. Walking speed too fast. ...
Owners Manual
Page 19
...Husqvarna Servicing Dealer, call Husqvarna, at www.usa.husqvarna.com (US & Canada) to help ensure, among other than that do not know the location of your product is your unit after initial operational problem or failure occurs. 9. These Limited Warranties are NOT covered: (a) Abrasion to mower... solely with you do not meet Engine manufacturer's specifications; (g) Use of gasohol, containing methanol (wood alcohol). Authorized Husqvarna Servicing Dealer/Center. In addition, this Limited Warranty does not cover damages, malfunctions or failures resulting from defects in ...
...Husqvarna Servicing Dealer, call Husqvarna, at www.usa.husqvarna.com (US & Canada) to help ensure, among other than that do not know the location of your product is your unit after initial operational problem or failure occurs. 9. These Limited Warranties are NOT covered: (a) Abrasion to mower... solely with you do not meet Engine manufacturer's specifications; (g) Use of gasohol, containing methanol (wood alcohol). Authorized Husqvarna Servicing Dealer/Center. In addition, this Limited Warranty does not cover damages, malfunctions or failures resulting from defects in ...
Owners Manual
Page 20
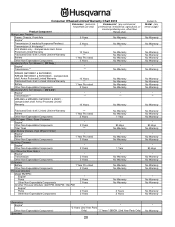
...Non-Expendable Components 3 Years LE475 Edger, Tillers, Snow Throwers Engine* * Other Non-Expendable Components 2 Years Tiller Tines *** Walk Behind Mowers, High Wheel Trimmer Engine* * Battery 1 Year Pro-rated Other Non-Expendable Components 3 Years Hovering Trimmers Engine* * Other Non-...other than Rental Use) Riding Lawn Tractors: Frame, Chassis, Front Axle 5 Years No Warranty Engine* * * Transmission (if made by Husqvarna/Peerless) 3 Years No Warranty Transmission (if third party)** ** ** XLS Models only - Limited Lifetime Warranty Battery 10 Years *** 1...
...Non-Expendable Components 3 Years LE475 Edger, Tillers, Snow Throwers Engine* * Other Non-Expendable Components 2 Years Tiller Tines *** Walk Behind Mowers, High Wheel Trimmer Engine* * Battery 1 Year Pro-rated Other Non-Expendable Components 3 Years Hovering Trimmers Engine* * Other Non-...other than Rental Use) Riding Lawn Tractors: Frame, Chassis, Front Axle 5 Years No Warranty Engine* * * Transmission (if made by Husqvarna/Peerless) 3 Years No Warranty Transmission (if third party)** ** ** XLS Models only - Limited Lifetime Warranty Battery 10 Years *** 1...
Owners Manual
Page 21
..., parts & labor, with Hydro-Gear Distributor network. *** "Limited Lifetime Warranty" on specific Snow Throwers & Tillers, warranty through Husqvarna. ** See reference 1 (b) of two (2) decks within the Limited Lifetime Warranty. Consumer Wheeled Limited Warranty Chart 2012 Exhibit A...commercial, professional, institutional, agricultural, or income producing use, other than Rental Use) 1 Year Rental (any rental usage) 1 Year Robotic Mowers Robotic Mower 2 Years 90 days 90 days Battery 1 Year 1 Year 1 Year Parts & Accessories (if purchased) Accessories (e.g., grass catcher, bumper...
..., parts & labor, with Hydro-Gear Distributor network. *** "Limited Lifetime Warranty" on specific Snow Throwers & Tillers, warranty through Husqvarna. ** See reference 1 (b) of two (2) decks within the Limited Lifetime Warranty. Consumer Wheeled Limited Warranty Chart 2012 Exhibit A...commercial, professional, institutional, agricultural, or income producing use, other than Rental Use) 1 Year Rental (any rental usage) 1 Year Robotic Mowers Robotic Mower 2 Years 90 days 90 days Battery 1 Year 1 Year 1 Year Parts & Accessories (if purchased) Accessories (e.g., grass catcher, bumper...
Parts List
Page 3
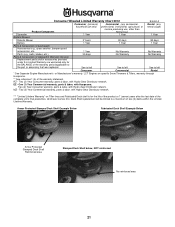
HUSQVARNA ROTARY LAWN MOWER - NO. 48 579 27 38-01 49 532 85 02-63 50 532 18 04-...Spanish 3 NOTE: All component dimensions given in U.S. inches. 1 inch = 25.4 mm. Failure to do so could be hazardous, damage your lawn mower and void your warranty. NO. 1 580 63 87-06 2 579 48 42-02 6 532 18 23-98 8 580 74 97-08 9 532...Handle Bracket, LH Handle Bracket, RH Screw, Dogpoint 3/8-16 x 1-1/8 Spring, Torsion Nut, Hex, Nylock Kit, Lawn Mower Housing Rod, Hinge Blade Brake/Clutch Assembly Blade, 22" KEY PART NO. IMPORTANT: Use only Original Equipment Manufacturer (O.E.M.) replacement parts. MODEL ...
HUSQVARNA ROTARY LAWN MOWER - NO. 48 579 27 38-01 49 532 85 02-63 50 532 18 04-...Spanish 3 NOTE: All component dimensions given in U.S. inches. 1 inch = 25.4 mm. Failure to do so could be hazardous, damage your lawn mower and void your warranty. NO. 1 580 63 87-06 2 579 48 42-02 6 532 18 23-98 8 580 74 97-08 9 532...Handle Bracket, LH Handle Bracket, RH Screw, Dogpoint 3/8-16 x 1-1/8 Spring, Torsion Nut, Hex, Nylock Kit, Lawn Mower Housing Rod, Hinge Blade Brake/Clutch Assembly Blade, 22" KEY PART NO. IMPORTANT: Use only Original Equipment Manufacturer (O.E.M.) replacement parts. MODEL ...


