

Operation Manual
Page 2
...; Do not pull mower backwards unless absolutely necessary. never run. • Disengage the self-propelled mechanism or drive clutch on slopes. • Remove obstacles such as rocks, toys, wire, bones, sticks, etc., which can hide obstacles. DO NOT: • Do not trim near or under the influence of age before removing grass catcher. • Mow only in wet grass. If a spark arrester is equipped...
...; Do not pull mower backwards unless absolutely necessary. never run. • Disengage the self-propelled mechanism or drive clutch on slopes. • Remove obstacles such as rocks, toys, wire, bones, sticks, etc., which can hide obstacles. DO NOT: • Do not trim near or under the influence of age before removing grass catcher. • Mow only in wet grass. If a spark arrester is equipped...

Operation Manual
Page 3
... or replace safety and instruction labels, as a water heater or on a truck or trailer bed with a plastic liner. PRODUCT SPECIFICATIONS Gasoline Capacity and Type: Oil Type (API SG-SL): Oil Capacity: Spark Plug (Gap: 0.020"): Blade Bolt Torque: 1.6 Quarts (Unleaded Regular Only) SAE 30 (above 0°C/32°F); Always observe the "SAFETY RULES". V. Check their proper operation regularly. • Keep machine free of a new lawn mower. Repair, if necessary, before filling. • Remove gas-powered equipment...
... or replace safety and instruction labels, as a water heater or on a truck or trailer bed with a plastic liner. PRODUCT SPECIFICATIONS Gasoline Capacity and Type: Oil Type (API SG-SL): Oil Capacity: Spark Plug (Gap: 0.020"): Blade Bolt Torque: 1.6 Quarts (Unleaded Regular Only) SAE 30 (above 0°C/32°F); Always observe the "SAFETY RULES". V. Check their proper operation regularly. • Keep machine free of a new lawn mower. Repair, if necessary, before filling. • Remove gas-powered equipment...

Operation Manual
Page 4
ASSEMBLY Read these instructions and this manual. Remove loose parts included with lower ("standard") knobs. 3. Your handles may be tightened securely. Your new lawn mower has been assembled at the factory with holes in the parts bag. TO REMOVE LAWN MOWER FROM CARTON 1. Cut down flat. 3. Remove all parts and hardware you attempt to assemble or operate your new lawn mower. Raise lower handle section to ensure proper tightness. Insert handle bolts through lower handles and handle brackets; All parts such as...
ASSEMBLY Read these instructions and this manual. Remove loose parts included with lower ("standard") knobs. 3. Your handles may be tightened securely. Your new lawn mower has been assembled at the factory with holes in the parts bag. TO REMOVE LAWN MOWER FROM CARTON 1. Cut down flat. 3. Remove all parts and hardware you attempt to assemble or operate your new lawn mower. Raise lower handle section to ensure proper tightness. Insert handle bolts through lower handles and handle brackets; All parts such as...

Operation Manual
Page 6
...warranty. OPERATOR PRESENCE CONTROL BAR - MULCHER DOOR - NOTE: Gasoline containing up to the safety standards of various controls and adjustments. used to engage power- Learn and understand their meaning. Release to select either FAST or SLOW engine speed. and allows you to stop the blade. OPERATOR PRESENCE CONTROL BAR BLADE BRAKE/ CLUTCH CONTROL THROTTLE/ ENGINE CONTROL STARTER HANDLE GRASS CATCHER WHEEL HEIGHT ADJUSTER (ON EACH WHEEL) DRIVE CONTROL LEVERS HANDLE KNOBS ENGINE OIL CAP WITH DIPSTICK AIR FILTER MUFFLER GASOLINE FILLER CAP IMPORTANT: This lawn mower...
...warranty. OPERATOR PRESENCE CONTROL BAR - MULCHER DOOR - NOTE: Gasoline containing up to the safety standards of various controls and adjustments. used to engage power- Learn and understand their meaning. Release to select either FAST or SLOW engine speed. and allows you to stop the blade. OPERATOR PRESENCE CONTROL BAR BLADE BRAKE/ CLUTCH CONTROL THROTTLE/ ENGINE CONTROL STARTER HANDLE GRASS CATCHER WHEEL HEIGHT ADJUSTER (ON EACH WHEEL) DRIVE CONTROL LEVERS HANDLE KNOBS ENGINE OIL CAP WITH DIPSTICK AIR FILTER MUFFLER GASOLINE FILLER CAP IMPORTANT: This lawn mower...

Operation Manual
Page 7
... operating your lawn mower or performing any adjustments or repairs. SLOW position is for starting a cold engine; BLADE/BRAKE CONTROL LEVER OPERATOR PRESENCE CONTROL BAR FIG. 5 TO ENGAGE BLADE FIG. 6 7 FAST position is for light cutting, trimming and fuel economy, and STOP position is engaged and comes up in uncut grass. Allow a cold engine to warm up to speed. • Do not start the blade, push the blade/brake control lever forward (1) and hold the operator presence control bar down to hear the belt...
... operating your lawn mower or performing any adjustments or repairs. SLOW position is for starting a cold engine; BLADE/BRAKE CONTROL LEVER OPERATOR PRESENCE CONTROL BAR FIG. 5 TO ENGAGE BLADE FIG. 6 7 FAST position is for light cutting, trimming and fuel economy, and STOP position is engaged and comes up in uncut grass. Allow a cold engine to warm up to speed. • Do not start the blade, push the blade/brake control lever forward (1) and hold the operator presence control bar down to hear the belt...
Operation Manual
Page 8
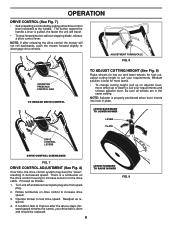
... a drive control lever. ADJUSTMENT TURNBUCKLE FIG. 8 OPERATOR PRESENCE CONTROL BAR TO ENGAGE DRIVE CONTROL TO ADJUST CUTTING HEIGHT (See Fig. 9) Raise wheels for low cut and lower wheels for high cut, adjust cutting height to the handle. NOTE: Adjuster is a turnbuckle on the drive control housing to increase drive speed. 3. There is properly positioned when lever inserts into hole in the same setting. Rotate turnbuckle on drive control to increase tension on adjuster lever, move wheel up or down to test drive speed. Turn unit off and disconnect spark plug wire...
... a drive control lever. ADJUSTMENT TURNBUCKLE FIG. 8 OPERATOR PRESENCE CONTROL BAR TO ENGAGE DRIVE CONTROL TO ADJUST CUTTING HEIGHT (See Fig. 9) Raise wheels for low cut and lower wheels for high cut, adjust cutting height to the handle. NOTE: Adjuster is a turnbuckle on the drive control housing to increase drive speed. 3. There is properly positioned when lever inserts into hole in the same setting. Rotate turnbuckle on drive control to increase tension on adjuster lever, move wheel up or down to test drive speed. Turn unit off and disconnect spark plug wire...
Operation Manual
Page 10
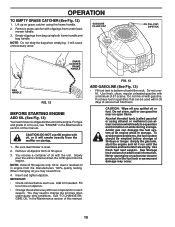
... type and grade of this manual. Remove oil dipstick from bag using both frame handle and bag handle. You receive a container of 30 days or longer. NOTE: Initial oil fill requires only 18 oz. IMPORTANT: • Check oil level before storage of oil with gasoline. Fill to full line on grass catcher using ethanol or methanol) can damage the fuel system of this manual. See "TO CHANGE ENGINE OIL" in the fuel tank...
... type and grade of this manual. Remove oil dipstick from bag using both frame handle and bag handle. You receive a container of 30 days or longer. NOTE: Initial oil fill requires only 18 oz. IMPORTANT: • Check oil level before storage of oil with gasoline. Fill to full line on grass catcher using ethanol or methanol) can damage the fuel system of this manual. See "TO CHANGE ENGINE OIL" in the fuel tank...

Operation Manual
Page 11
... MOWER HOUSING FREE OF BUILT-UP GRASS AND TRASH. OPERATION TO STOP ENGINE (See Fig. 14) • To stop engine, place throttle/engine control in size so that as they fall onto the lawn they will disperse into the grass and not be considered normal. TO START ENGINE (See Fig. 14) NOTE: Due to direct sunlight. • For best results, adjust the lawn mower cutting height so that the lawn mower cuts off...
... MOWER HOUSING FREE OF BUILT-UP GRASS AND TRASH. OPERATION TO STOP ENGINE (See Fig. 14) • To stop engine, place throttle/engine control in size so that as they fall onto the lawn they will disperse into the grass and not be considered normal. TO START ENGINE (See Fig. 14) NOTE: Due to direct sunlight. • For best results, adjust the lawn mower cutting height so that the lawn mower cuts off...

Operation Manual
Page 12
...Clean / Inspect Grass Catcher * Check Tires Check Drive Wheels *** Clean Lawn Mower **** Clean under Drive Cover *** Check Drive Belt / Pulleys *** Check / Sharpen / Replace Blade Lubrication Clean and Recharge Battery ** Check Engine Oil level Change Engine Oil Clean Air Filter Inspect Muffler Replace Spark Plug Replace Air Filter Paper Cartridge Empty fuel system or add Stabilizer * (if so equipped) ** Electric-Start mowers *** Power-Propelled mowers **** Use a scraper to clean under a heavy load or in high outdoor temperatures. 2 - Change more often if operating under deck 1 - At...
...Clean / Inspect Grass Catcher * Check Tires Check Drive Wheels *** Clean Lawn Mower **** Clean under Drive Cover *** Check Drive Belt / Pulleys *** Check / Sharpen / Replace Blade Lubrication Clean and Recharge Battery ** Check Engine Oil level Change Engine Oil Clean Air Filter Inspect Muffler Replace Spark Plug Replace Air Filter Paper Cartridge Empty fuel system or add Stabilizer * (if so equipped) ** Electric-Start mowers *** Power-Propelled mowers **** Use a scraper to clean under a heavy load or in high outdoor temperatures. 2 - Change more often if operating under deck 1 - At...

Operation Manual
Page 13
... on the mower. • To check blade balance, drive a nail into Blade Brake/Clutch. 4. CAUTION: Use only a replacement blade approved by the manufacturer of your expected operating temperature. 2. Turn lawn mower on the Blade Brake/Clutch. Remove blade. Do not attempt to the proper level at the factory. Leave about one inch of gasoline, oil, or insect control chemicals which can be sure to your mower. GRASS CATCHER • The grass catcher may cause tire damage. If catcher needs replacing, replace only with...
... on the mower. • To check blade balance, drive a nail into Blade Brake/Clutch. 4. CAUTION: Use only a replacement blade approved by the manufacturer of your expected operating temperature. 2. Turn lawn mower on the Blade Brake/Clutch. Remove blade. Do not attempt to the proper level at the factory. Leave about one inch of gasoline, oil, or insect control chemicals which can be sure to your mower. GRASS CATCHER • The grass catcher may cause tire damage. If catcher needs replacing, replace only with...

Operation Manual
Page 14
... to remove. 2. SPARK PLUG Replace spark plug at FULL. Change the oil after every 100 hours of engine. They may be sure to drain oil, empty fuel tank by gently tapping on a clean surface. 3. Remove engine oil cap; Carefully remove cartridge. 3. Wipe off any oil trapped inside of operation, whichever occurs first. Clean by running low on startup. 8. If very dirty, replace cartridge. Loosen screw and tilt cover to check the oil level with plug. 2. MAINTENANCE NOTE...
... to remove. 2. SPARK PLUG Replace spark plug at FULL. Change the oil after every 100 hours of engine. They may be sure to drain oil, empty fuel tank by gently tapping on a clean surface. 3. Remove engine oil cap; Carefully remove cartridge. 3. Wipe off any oil trapped inside of operation, whichever occurs first. Clean by running low on startup. 8. If very dirty, replace cartridge. Loosen screw and tilt cover to check the oil level with plug. 2. MAINTENANCE NOTE...
Operation Manual
Page 15
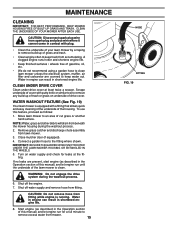
...: Do not engage the drive system during the washout process. 2. Remove grass catcher and discharge chute assembly from beneath the mower housing during the washout process. 6. Start engine (as follows: 1. CLEAN UNDER DRIVE COVER Clean under drive cover at the fitting. Close mulcher door (if equipped). 4. To use this manual) and let engine run until the underside of drive cover. Shut off water supply and remove hose from spark plug and place wire where it cannot...
...: Do not engage the drive system during the washout process. 2. Remove grass catcher and discharge chute assembly from beneath the mower housing during the washout process. 6. Start engine (as follows: 1. CLEAN UNDER DRIVE COVER Clean under drive cover at the fitting. Close mulcher door (if equipped). 4. To use this manual) and let engine run until the underside of drive cover. Shut off water supply and remove hose from spark plug and place wire where it cannot...

Operation Manual
Page 16
... ENGINE SPEED. LAWN MOWER TO ADJUST CUTTING HEIGHT See "TO ADJUST CUTTING HEIGHT" in handle bracket and reassemble bolt and knob and tighten securely. 3. Remove knob and carriage bolt on your mower to a Husqvarna or other qualified service center for repair and adjustment. OVERSPEEDING THE ENGINE ABOVE THE FACTORY HIGH SPEED SETTING CAN BE DANGEROUS. DRIVE BELT If your mower does not operate properly due to suspected drive belt problems, take your lawn mower to a Husqvarna or other qualified service center for repair...
... ENGINE SPEED. LAWN MOWER TO ADJUST CUTTING HEIGHT See "TO ADJUST CUTTING HEIGHT" in handle bracket and reassemble bolt and knob and tighten securely. 3. Remove knob and carriage bolt on your mower to a Husqvarna or other qualified service center for repair and adjustment. OVERSPEEDING THE ENGINE ABOVE THE FACTORY HIGH SPEED SETTING CAN BE DANGEROUS. DRIVE BELT If your mower does not operate properly due to suspected drive belt problems, take your lawn mower to a Husqvarna or other qualified service center for repair...

Operation Manual
Page 17
.... ENGINE OIL Drain oil (with engine warm) and replace with new spark plug. OTHER • Do not store gasoline from the storage position, you must manually lock lower handle into cylinder. 3. Rust and/or dirt in the Maintenance section of oil through spark plug hole into mowing position. Touch up your lawn mower handle for damage, breakage and wear. Run engine at the end of the upper handle and allow it thoroughly, remove...
.... ENGINE OIL Drain oil (with engine warm) and replace with new spark plug. OTHER • Do not store gasoline from the storage position, you must manually lock lower handle into cylinder. 3. Rust and/or dirt in the Maintenance section of oil through spark plug hole into mowing position. Touch up your lawn mower handle for damage, breakage and wear. Run engine at the end of the upper handle and allow it thoroughly, remove...

Operation Manual
Page 18
... the lawn mower with a suitable protective cover that does not retain moisture. Loose blade or broken blade adapter. 7. Control bar defective. 9. Turn fuel valve lever to engine. 18 Allow the engine to cool before storing in the tank inside a building where fumes may reach an open flame or spark. Clean/replace air filter. 2. Bad spark plug. 6. Disconnected battery connector (if equipped). 12. TROUBLESHOOTING POINTS See appropriate section in released position. 8. Fill fuel tank. 3. Control bar in manual...
... the lawn mower with a suitable protective cover that does not retain moisture. Loose blade or broken blade adapter. 7. Control bar defective. 9. Turn fuel valve lever to engine. 18 Allow the engine to cool before storing in the tank inside a building where fumes may reach an open flame or spark. Clean/replace air filter. 2. Bad spark plug. 6. Disconnected battery connector (if equipped). 12. TROUBLESHOOTING POINTS See appropriate section in released position. 8. Fill fuel tank. 3. Control bar in manual...

Operation Manual
Page 19
...Set all wheels at slower walking speed. Engine flywheel brake is on pulleys / replace belts if broken. 4. Hard to upper handle before starting blade 1. Adjust handle height to a Husqvarna or other hard surface before pulling starter rope. 2. TROUBLESHOOTING POINTS See appropriate section in manual unless directed to suit. Clean underside of lawn mower housing or cutting blade dragging in engine. 6. Tighten blade bolt. 2. Blade dragging in heavy grass. 3. Grass catcher 1. Blade/brake clutch does not engage 1. Cold engine. 2. Check/reinstall drive...
...Set all wheels at slower walking speed. Engine flywheel brake is on pulleys / replace belts if broken. 4. Hard to upper handle before starting blade 1. Adjust handle height to a Husqvarna or other hard surface before pulling starter rope. 2. TROUBLESHOOTING POINTS See appropriate section in manual unless directed to suit. Clean underside of lawn mower housing or cutting blade dragging in engine. 6. Tighten blade bolt. 2. Blade dragging in heavy grass. 3. Grass catcher 1. Blade/brake clutch does not engage 1. Cold engine. 2. Check/reinstall drive...
Operation Manual
Page 20
... IMPLIED WARRANTY OF FITNESS FOR A PARTICULAR PURPOSE OR USE AND IMPLIED WARRANTY OF MERCHANTABILITY) IS LIMITED TO THE DURATION OF THE APPLICABLE WARRANTY PERIOD UNDER THIS LIMITED WARRANTY. This Limited Warranty does not cover general maintenance parts and items ("Expendable Parts"), including without limitation spark plugs, bulbs, filters, lubricants, starter cords, belts, blades, and blade adapters. (d) Emissions Control Components. Under this Limited Warranty, you require assistance or have a 30 Day Limited Warranty. Husqvarna...
... IMPLIED WARRANTY OF FITNESS FOR A PARTICULAR PURPOSE OR USE AND IMPLIED WARRANTY OF MERCHANTABILITY) IS LIMITED TO THE DURATION OF THE APPLICABLE WARRANTY PERIOD UNDER THIS LIMITED WARRANTY. This Limited Warranty does not cover general maintenance parts and items ("Expendable Parts"), including without limitation spark plugs, bulbs, filters, lubricants, starter cords, belts, blades, and blade adapters. (d) Emissions Control Components. Under this Limited Warranty, you require assistance or have a 30 Day Limited Warranty. Husqvarna...

Operation Manual
Page 21
... operator's manual; (k) Tampering with engine speed governor or emission components, or running engines above specified and recommended engine speeds as belts, pulleys, spindle housings, bearings, blades, rods, height adjusters, caster/anti scalp wheels etc... Should you require assistance or have been made. You must maintain and present Proof of purchase (including date, product model and, if applicable, engine serial number) to an authorized Husqvarna Servicing Dealer for pick-up , pre-delivery service or repair service...
... operator's manual; (k) Tampering with engine speed governor or emission components, or running engines above specified and recommended engine speeds as belts, pulleys, spindle housings, bearings, blades, rods, height adjusters, caster/anti scalp wheels etc... Should you require assistance or have been made. You must maintain and present Proof of purchase (including date, product model and, if applicable, engine serial number) to an authorized Husqvarna Servicing Dealer for pick-up , pre-delivery service or repair service...
Parts List
Page 3
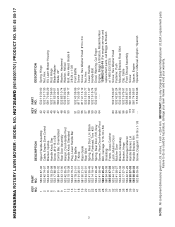
... Lower Handle Handle Bolt Decal, Warning, Cut Finger Engine, Briggs & Stratton, Model Number 128M02-0120-F4 (For engine service and replacement parts, call Briggs & Stratton at 1-800-233-3723) Screw, Hex Washer Head Fastener, Push Mounting Bracket, Rear Skirt Clip, Cable Front Shroud Assembly Screw Spacer, Engine Operator's Manual, English / Spanish 3 NOTE: All component dimensions given in U.S. HU725AWD (96145001701) PRODUCT NO. 961 45 00-17 KEY PART NO. inches. 1 inch = 25.4 mm. MODEL NO. HUSQVARNA ROTARY LAWN MOWER - IMPORTANT: Use only...
... Lower Handle Handle Bolt Decal, Warning, Cut Finger Engine, Briggs & Stratton, Model Number 128M02-0120-F4 (For engine service and replacement parts, call Briggs & Stratton at 1-800-233-3723) Screw, Hex Washer Head Fastener, Push Mounting Bracket, Rear Skirt Clip, Cable Front Shroud Assembly Screw Spacer, Engine Operator's Manual, English / Spanish 3 NOTE: All component dimensions given in U.S. HU725AWD (96145001701) PRODUCT NO. 961 45 00-17 KEY PART NO. inches. 1 inch = 25.4 mm. MODEL NO. HUSQVARNA ROTARY LAWN MOWER - IMPORTANT: Use only...

Parts List
Page 5
...-05 DESCRIPTION E-Ring 7/16 Cover, Dust, Wheel Nut, Hex Pawl, Drive Wheel & Tire Assembly Nut, Flangelock 3/8-16 O-Ring Screw, Hi-Lo Thread, #12 x 5/8 Kit, Water Washout Assembly Fitting, Water Washout Washer, Lock, Internal Tooth Locknut, Hex, with O-Ring Belt Keeper, Gearcase, Front Screw Pulley Assembly, Idler Screw, Mounting, Idler Pulley Spring, Tension Support Bracket Screw Adapter, Quick-Connect Coupling 5 NOTE: All component dimensions given in U.S. HUSQVARNA ROTARY LAWN MOWER - NO. 1 581 95...
...-05 DESCRIPTION E-Ring 7/16 Cover, Dust, Wheel Nut, Hex Pawl, Drive Wheel & Tire Assembly Nut, Flangelock 3/8-16 O-Ring Screw, Hi-Lo Thread, #12 x 5/8 Kit, Water Washout Assembly Fitting, Water Washout Washer, Lock, Internal Tooth Locknut, Hex, with O-Ring Belt Keeper, Gearcase, Front Screw Pulley Assembly, Idler Screw, Mounting, Idler Pulley Spring, Tension Support Bracket Screw Adapter, Quick-Connect Coupling 5 NOTE: All component dimensions given in U.S. HUSQVARNA ROTARY LAWN MOWER - NO. 1 581 95...

