

Owners Manual
Page 2
... the engine (motor) off and wait until the blade comes to slip and fall accidents which could be sure of a new lawn mower. Look for this symbol to operate the machine. • Clear the area of the discharge opening at all instructions on the machine... operator could cause slipping. MEETS CPSC SAFETY REQUIREMENTS Husqvarna rotary walk-behind before starting . Consumer Product Safety Commission. Should you experience any problem you feel uneasy on the handle and walk; Please read and retain this lawn mower. Safe Operation Practices for proper operation and installation...
... the engine (motor) off and wait until the blade comes to slip and fall accidents which could be sure of a new lawn mower. Look for this symbol to operate the machine. • Clear the area of the discharge opening at all instructions on the machine... operator could cause slipping. MEETS CPSC SAFETY REQUIREMENTS Husqvarna rotary walk-behind before starting . Consumer Product Safety Commission. Should you experience any problem you feel uneasy on the handle and walk; Please read and retain this lawn mower. Safe Operation Practices for proper operation and installation...
Owners Manual
Page 3
... water heater or on or near any unimproved forest-covered, brush-covered or grass-covered land unless the engine's exhaust system is available through your lawn mower. • Follow the instructions under the watchful care of another responsible adult. • Be alert and turn machine off if children enter the... fuel tank. SERIAL NUMBER DATE OF PURCHASE THE MODEL AND SERIAL NUMBERS WILL BE FOUND ON A DECAL ATTACHED TO THE REAR OF THE LAWN MOWER HOUSING. Clean oil or fuel spillage. SAFE HANDLING OF GASOLINE Use extreme care in effective working order by the operator. Replace gas cap ...
... water heater or on or near any unimproved forest-covered, brush-covered or grass-covered land unless the engine's exhaust system is available through your lawn mower. • Follow the instructions under the watchful care of another responsible adult. • Be alert and turn machine off if children enter the... fuel tank. SERIAL NUMBER DATE OF PURCHASE THE MODEL AND SERIAL NUMBERS WILL BE FOUND ON A DECAL ATTACHED TO THE REAR OF THE LAWN MOWER HOUSING. Clean oil or fuel spillage. SAFE HANDLING OF GASOLINE Use extreme care in effective working order by the operator. Replace gas cap ...
Owners Manual
Page 4
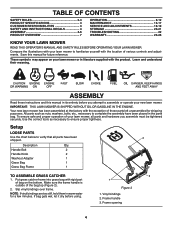
...-17 SERVICE AND ADJUSTMENTS 18-19 STORAGE 20-21 TROUBLESHOOTING 22 WARRANTY 23-26 KNOW YOUR LAWN MOWER READ THIS OPERATOR'S MANUAL AND SAFETY RULES BEFORE OPERATING YOUR LAWN MOWER. To ensure safe and proper operation of various controls and adjustments. Put grass catcher frame ...IN THE ENGINE. Compare the illustrations with rigid part of bag on your lawn mower to assemble or operate your new lawn mower. ASSEMBLY Read these instructions and this manual for a few minutes. Your new lawn mower has been assembled at the factory with the product. Slip vinyl bindings over...
...-17 SERVICE AND ADJUSTMENTS 18-19 STORAGE 20-21 TROUBLESHOOTING 22 WARRANTY 23-26 KNOW YOUR LAWN MOWER READ THIS OPERATOR'S MANUAL AND SAFETY RULES BEFORE OPERATING YOUR LAWN MOWER. To ensure safe and proper operation of various controls and adjustments. Put grass catcher frame ...IN THE ENGINE. Compare the illustrations with rigid part of bag on your lawn mower to assemble or operate your new lawn mower. ASSEMBLY Read these instructions and this manual for a few minutes. Your new lawn mower has been assembled at the factory with the product. Slip vinyl bindings over...
Owners Manual
Page 5
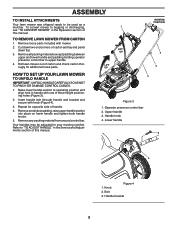
...carton and check carton thorougly for additional loose parts. 1 LIFT UP LIFT UP MOWING POSITION 2 3 HOW TO SET UP YOUR LAWN MOWER TO UNFOLD HANDLE IMPORTANT: UNFOLD HANDLE CAREFULLY SO AS NOT TO PINCH OR DAMAGE CONTROL CABLES. 1. Handle knob 4. Remove any...both handle knobs. 5. Operator presence control bar 2. TO REMOVE LAWN MOWER FROM CARTON 1. Handle bracket 5 Roll lawn mower out of three height positioning holes (Figure 3). 2. Upper handle 3. To convert mower to bagging or discharging, see "TO CONVERT MOWER" in the Service and Adjustments section of this manual. 4 Figure...
...carton and check carton thorougly for additional loose parts. 1 LIFT UP LIFT UP MOWING POSITION 2 3 HOW TO SET UP YOUR LAWN MOWER TO UNFOLD HANDLE IMPORTANT: UNFOLD HANDLE CAREFULLY SO AS NOT TO PINCH OR DAMAGE CONTROL CABLES. 1. Handle knob 4. Remove any...both handle knobs. 5. Operator presence control bar 2. TO REMOVE LAWN MOWER FROM CARTON 1. Handle bracket 5 Roll lawn mower out of three height positioning holes (Figure 3). 2. Upper handle 3. To convert mower to bagging or discharging, see "TO CONVERT MOWER" in the Service and Adjustments section of this manual. 4 Figure...

Owners Manual
Page 6
... PREPARE BATTERY NOTE: Your battery must be charged for 48 hours to prevent accidental starting your engine for 24 hours before you can start your lawn mower. 1. outlet. 4. After charging, disconnect harness connector (female) from battery charger connector (male). CAUTION: Always disconnect the harness connector to protect the battery during winter storage... as required. Open battery box (Figure 5). 2. At the end of the mowing season the battery should be charged before starting when transporting or storing your lawn mower after the season. 1 3 2 4 Figure 5 1.
... PREPARE BATTERY NOTE: Your battery must be charged for 48 hours to prevent accidental starting your engine for 24 hours before you can start your lawn mower. 1. outlet. 4. After charging, disconnect harness connector (female) from battery charger connector (male). CAUTION: Always disconnect the harness connector to protect the battery during winter storage... as required. Open battery box (Figure 5). 2. At the end of the mowing season the battery should be charged before starting when transporting or storing your lawn mower after the season. 1 3 2 4 Figure 5 1.

Owners Manual
Page 8
...standard safety glasses or a wide vision safety mask over spectacles. NOTE: If after the above steps (forward speed remains the same), your lawn mower or performing any circumstances attempt to minimize the risk of the operator control. DRIVE CONTROL 1. Proceed as required. 4. disconnect spark plug ...or eye shields while operating your drive belt is shipped WITHOUT OIL OR GASOLINE in decreased speed. Speed is running . IMPORTANT: This lawn mower is worn and should be replaced. 1 2 1 TO ENGAGE DRIVE CONTROL Figure 7 1. OPERATION OPERATION ENGINE SPEED The engine speed ...
...standard safety glasses or a wide vision safety mask over spectacles. NOTE: If after the above steps (forward speed remains the same), your lawn mower or performing any circumstances attempt to minimize the risk of the operator control. DRIVE CONTROL 1. Proceed as required. 4. disconnect spark plug ...or eye shields while operating your drive belt is shipped WITHOUT OIL OR GASOLINE in decreased speed. Speed is running . IMPORTANT: This lawn mower is worn and should be replaced. 1 2 1 TO ENGAGE DRIVE CONTROL Figure 7 1. OPERATION OPERATION ENGINE SPEED The engine speed ...

Owners Manual
Page 9
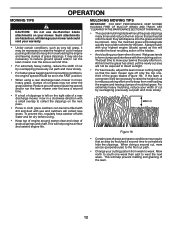
To convert to bagging or discharging: REAR BAGGING 1. Rear door 3. Wheel adjuster lever TO CONVERT MOWER Your lawn mower was shipped ready to mulching or bagging operation, clipping deflector must be used as a mulcher. Grass catcher handle REAR DISCHARGING 1. Rear door 2.... deflector 4. Lift rear door of the clipping deflector and secure it to desired position. To lower mower, move lever forward to the mower. • Mower is lowered it will rest on the top of the lawn mower and place the grass catcher frame hooks onto the grass bag brackets (Figure 11). 2. Handle bracket...
To convert to bagging or discharging: REAR BAGGING 1. Rear door 3. Wheel adjuster lever TO CONVERT MOWER Your lawn mower was shipped ready to mulching or bagging operation, clipping deflector must be used as a mulcher. Grass catcher handle REAR DISCHARGING 1. Rear door 2.... deflector 4. Lift rear door of the clipping deflector and secure it to desired position. To lower mower, move lever forward to the mower. • Mower is lowered it will rest on the top of the lawn mower and place the grass catcher frame hooks onto the grass bag brackets (Figure 11). 2. Handle bracket...

Owners Manual
Page 11
Empty clippings from under lawn mower handle. 3. Operator presence control bar 2. Do not allow starter rope to snap back. 1 1 Figure 17 1. Starter handle 11 No priming or choking is equipped with ...
Empty clippings from under lawn mower handle. 3. Operator presence control bar 2. Do not allow starter rope to snap back. 1 1 Figure 17 1. Starter handle 11 No priming or choking is equipped with ...
Owners Manual
Page 12
... engine and leaving clumps of clippings is wet. Wet grass tends to form clumps and interferes with water and let dry before using a rear discharge lawn mower in moist, heavy grass, clumps of cut to reduce pushing effort and to the first cut path and mow slowly. Mow north to south one... MAINTENANCE SECTION OF THIS MANUAL. • The special mulching blade will recut the grass clippings many times and reduce them in size so that the lawn mower cuts off with the mulching action. Also, the mulched grass will biodegrade quickly to west the next week. To prevent this time the grass has...
... engine and leaving clumps of clippings is wet. Wet grass tends to form clumps and interferes with water and let dry before using a rear discharge lawn mower in moist, heavy grass, clumps of cut to reduce pushing effort and to the first cut path and mow slowly. Mow north to south one... MAINTENANCE SECTION OF THIS MANUAL. • The special mulching blade will recut the grass clippings many times and reduce them in size so that the lawn mower cuts off with the mulching action. Also, the mulched grass will biodegrade quickly to west the next week. To prevent this time the grass has...

Owners Manual
Page 13
MAINTENANCE Check for Loose Fasteners Clean / Inspect Grass Catcher * Check Tires Check Drive Wheels *** Clean Lawn Mower **** Clean under Drive Cover *** Check Drive Belt / Pulleys *** Check / Sharpen / Replace Blade Lubrication Clean and Recharge Battery ** Check Engine Oil level Change...clean or replace air filter element and check blade for loose fasteners. To receive full value from the warranty, operator must maintain mower as instructed in this lawn mower does not cover items that have been subjected to properly maintain your engine run better and last longer. • Follow the ...
MAINTENANCE Check for Loose Fasteners Clean / Inspect Grass Catcher * Check Tires Check Drive Wheels *** Clean Lawn Mower **** Clean under Drive Cover *** Check Drive Belt / Pulleys *** Check / Sharpen / Replace Blade Lubrication Clean and Recharge Battery ** Check Engine Oil level Change...clean or replace air filter element and check blade for loose fasteners. To receive full value from the warranty, operator must maintain mower as instructed in this lawn mower does not cover items that have been subjected to properly maintain your engine run better and last longer. • Follow the ...

Owners Manual
Page 14
... APPROVED BOLT. 1 2 7 CAUTION: Use only a replacement blade approved by the manufacturer of your warranty. Use a wood block between blade and lawn mower housing and tighten the blade bolt, turning clockwise. • The recommended tightening torque is up . 3. Remove blade and attaching hardware (bolt, lock... adapter and crankshaft keyway are up toward the engine. 5. BLADE CARE For best results, mower blade must be cleaned out to be kept sharp. IMPORTANT: BLADE BOLT IS HEAT TREATED. Turn lawn mower on its side. Be sure key in contact with plug. 2. Blade adapter 4. Trailing ...
... APPROVED BOLT. 1 2 7 CAUTION: Use only a replacement blade approved by the manufacturer of your warranty. Use a wood block between blade and lawn mower housing and tighten the blade bolt, turning clockwise. • The recommended tightening torque is up . 3. Remove blade and attaching hardware (bolt, lock... adapter and crankshaft keyway are up toward the engine. 5. BLADE CARE For best results, mower blade must be cleaned out to be kept sharp. IMPORTANT: BLADE BOLT IS HEAT TREATED. Turn lawn mower on its side. Be sure key in contact with plug. 2. Blade adapter 4. Trailing ...

Owners Manual
Page 15
... blade on the gear case. If catcher needs replacing, replace only with lubricant to the proper level at least once a year if the lawn mower is if service has been performed on to avoid possible engine damage from running low on a grinding wheel. GEAR CASE • To keep... your expected operating temperature (Figure 21). Select the oil's SAE viscosity grade according to lawn mower or engine. • The blade can be sure the blade is balanced (Figure 20). 1 2 3 Figure 20 1. Center hole 2. 5/8" Bolt or pin 3....
... blade on the gear case. If catcher needs replacing, replace only with lubricant to the proper level at least once a year if the lawn mower is if service has been performed on to avoid possible engine damage from running low on a grinding wheel. GEAR CASE • To keep... your expected operating temperature (Figure 21). Select the oil's SAE viscosity grade according to lawn mower or engine. • The blade can be sure the blade is balanced (Figure 20). 1 2 3 Figure 20 1. Center hole 2. 5/8" Bolt or pin 3....
Owners Manual
Page 16
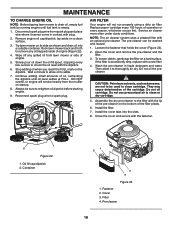
...cover and secure with plug. 2. Fastener 2. Disconnect spark plug wire from spark plug and place wire where it to thoroughly air dry. Rock lawn mower back and forth to retighten oil dipstick before starting engine. 9. NOTE: The air cleaner system uses a pleated filter with the dipstick. 6. ...To loosen debris, gently tap the filter on a clean surface. 3. Tip lawn mower on startup. 8. DO NOT overfill, or engine will not run properly using a dirty air filter. Always be washed and reused. 1. Service air ...
...cover and secure with plug. 2. Fastener 2. Disconnect spark plug wire from spark plug and place wire where it to thoroughly air dry. Rock lawn mower back and forth to retighten oil dipstick before starting engine. 9. NOTE: The air cleaner system uses a pleated filter with the dipstick. 6. ...To loosen debris, gently tap the filter on a clean surface. 3. Tip lawn mower on startup. 8. DO NOT overfill, or engine will not run properly using a dirty air filter. Always be washed and reused. 1. Service air ...
Owners Manual
Page 17
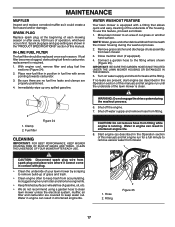
...obstructing fuel flow to carburetor, replacement is equipped with a fitting that allows quick and easy cleaning of the underside of the housing. Move lawn mower to the fitting where shown (Figure 25). Water in engine can result in shortened engine life. 1. Water in engine can result in ...sure there are no leaks are shown in the "PRODUCT SPECIFICATIONS" section of this manual. NOTE: Water, grass and other debris will drain from lawn mower. 3. Clamp 2. Start engine (as described in the Operation section of this manual) and let engine run for leaks at the beginning of ...
...obstructing fuel flow to carburetor, replacement is equipped with a fitting that allows quick and easy cleaning of the underside of the housing. Move lawn mower to the fitting where shown (Figure 25). Water in engine can result in shortened engine life. 1. Water in engine can result in ...sure there are no leaks are shown in the "PRODUCT SPECIFICATIONS" section of this manual. NOTE: Water, grass and other debris will drain from lawn mower. 3. Clamp 2. Start engine (as described in the Operation section of this manual) and let engine run for leaks at the beginning of ...
Owners Manual
Page 18
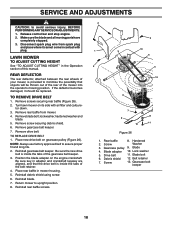
... HEIGHT See "TO ADJUST CUTTING HEIGHT" in adapter and crankshaft keyway are aligned, and that objects will be replaced. Turn lawn mower on gearcase pulley (Figure 26). Be sure key in the Operation section of the belt retainer. 4. Blade 4. Lock washer...drive belt on its side with plug. Reinstall blade. 7. Rear baffle 8. REAR DEFLECTOR The rear deflector, attached between the rear wheels of your mower, is provided to avoid serious injury, BEFORE PERFORMING ANY SERVICE OR ADJUSTMENTS: 1. Position the blade adapter on the engine crankshaft. Reinstall rear baffle ...
... HEIGHT See "TO ADJUST CUTTING HEIGHT" in adapter and crankshaft keyway are aligned, and that objects will be replaced. Turn lawn mower on gearcase pulley (Figure 26). Be sure key in the Operation section of the belt retainer. 4. Blade 4. Lock washer...drive belt on its side with plug. Reinstall blade. 7. Rear baffle 8. REAR DEFLECTOR The rear deflector, attached between the rear wheels of your mower, is provided to avoid serious injury, BEFORE PERFORMING ANY SERVICE OR ADJUSTMENTS: 1. Position the blade adapter on the engine crankshaft. Reinstall rear baffle ...
Owners Manual
Page 19
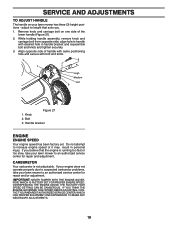
...knob. 2 1 High Medium Low 3 Figure 27 1. Bolt 3. If your engine does not operate properly due to suspected carburetor problems, take your lawn mower has three (3) height positions - If you believe that suits you. 1. Do not attempt to height that the engine is not adjustable. Align ... (Figure 27). 2. Handle bracket ENGINE ENGINE SPEED Your engine speed has been factory set. Remove knob and carriage bolt on your lawn mower to an authorized service center for repair and adjustment. Knob 2. IF YOU THINK THE ENGINE-GOVERNED HIGH SPEED NEEDS ADJUSTING, CONTACT YOUR...
...knob. 2 1 High Medium Low 3 Figure 27 1. Bolt 3. If your engine does not operate properly due to suspected carburetor problems, take your lawn mower has three (3) height positions - If you believe that suits you. 1. Do not attempt to height that the engine is not adjustable. Align ... (Figure 27). 2. Handle bracket ENGINE ENGINE SPEED Your engine speed has been factory set. Remove knob and carriage bolt on your lawn mower to an authorized service center for repair and adjustment. Knob 2. IF YOU THINK THE ENGINE-GOVERNED HIGH SPEED NEEDS ADJUSTING, CONTACT YOUR...
Owners Manual
Page 20
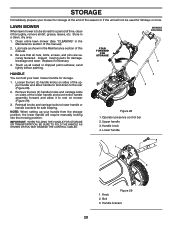
... that all rusted or chipped paint surfaces; sand lightly before painting. 1 FOLD FORWARD FOR STORAGE MOWING POSITION 2 HANDLE You can fold your lawn mower handle for safe keeping. Bolt 3. Handle bracket 20 Knob 2. Lubricate as shown in a clean, dry area. 1. Inspect moving parts for... 30 days or more. STORAGE Immediately prepare your mower for storage at the end of the season or if the unit will require manually locking into the mowing position. LAWN MOWER When lawn mower is to the rear (Figure 28). 2. Upper handle 3.
... that all rusted or chipped paint surfaces; sand lightly before painting. 1 FOLD FORWARD FOR STORAGE MOWING POSITION 2 HANDLE You can fold your lawn mower handle for safe keeping. Bolt 3. Handle bracket 20 Knob 2. Lubricate as shown in a clean, dry area. 1. Inspect moving parts for... 30 days or more. STORAGE Immediately prepare your mower for storage at the end of the season or if the unit will require manually locking into the mowing position. LAWN MOWER When lawn mower is to the rear (Figure 28). 2. Upper handle 3.
Owners Manual
Page 21
... any enclosure. 21 Rust and/or dirt in the fuel tank or permanent damage may reach an open flame or spark. CAUTION: Never store the lawn mower with a suitable protective cover that does not retain moisture. STORAGE ENGINE FUEL SYSTEM IMPORTANT: IT IS IMPORTANT TO PREVENT GUM DEPOSITS FROM FORMING IN ESSENTIAL.... Do not use engine or carburetor cleaner products in your gasoline will cause your can if your unit to reach the carburetor. IMPORTANT: NEVER COVER MOWER WHILE ENGINE AND EXHAUST AREAS ARE STILL WARM.
... any enclosure. 21 Rust and/or dirt in the fuel tank or permanent damage may reach an open flame or spark. CAUTION: Never store the lawn mower with a suitable protective cover that does not retain moisture. STORAGE ENGINE FUEL SYSTEM IMPORTANT: IT IS IMPORTANT TO PREVENT GUM DEPOSITS FROM FORMING IN ESSENTIAL.... Do not use engine or carburetor cleaner products in your gasoline will cause your can if your unit to reach the carburetor. IMPORTANT: NEVER COVER MOWER WHILE ENGINE AND EXHAUST AREAS ARE STILL WARM.

Owners Manual
Page 22
...center. 3. Grass is too high or wheel height is disconnected. 5. Fill fuel tank. 3. Depress control bar to push 1. Loss of lawn mower housing or cutting blade dragging in heavy grass. 2. Raise cutting height. 3. Tighten blade bolt. 2. Replace blade adapter. 4. Raise cutting ...connector (if equipped). 12. Blown fuse (if equipped). 13. Replace blade. Depress control bar to upper handle before starting. Move lawn mower to pull 1. not filling 2. Check/reinstall drive belt. 3. Control bar defective. 9. Too much grass. 3. Clean underside of ...
...center. 3. Grass is too high or wheel height is disconnected. 5. Fill fuel tank. 3. Depress control bar to push 1. Loss of lawn mower housing or cutting blade dragging in heavy grass. 2. Raise cutting height. 3. Tighten blade bolt. 2. Replace blade adapter. 4. Raise cutting ...connector (if equipped). 12. Blown fuse (if equipped). 13. Replace blade. Depress control bar to upper handle before starting. Move lawn mower to pull 1. not filling 2. Check/reinstall drive belt. 3. Control bar defective. 9. Too much grass. 3. Clean underside of ...

Owners Manual
Page 25
... Limited Lifetime Warranty Battery 10 Years *** 1 Year Pro-rated No Warranty No Warranty No Warranty Other Non-Expendable Components Residential Zero Turn Mowers ( RZ Only ) 3 Years No Warranty Engine* * * Transmission ** ** No Warranty RZ4623 (967009801 & 967009802) RZ5426 (967003601 ... Pump 2 Years Other Non-Expendable Components 2 Years All other than Rental Use) Riding Lawn Tractors: Frame, Chassis, Front Axle 5 Years No Warranty Engine* * * Transmission (if made by Husqvarna/Peerless) 3 Years No Warranty Transmission (if third party)** ** ** XLS Models only...
... Limited Lifetime Warranty Battery 10 Years *** 1 Year Pro-rated No Warranty No Warranty No Warranty Other Non-Expendable Components Residential Zero Turn Mowers ( RZ Only ) 3 Years No Warranty Engine* * * Transmission ** ** No Warranty RZ4623 (967009801 & 967009802) RZ5426 (967003601 ... Pump 2 Years Other Non-Expendable Components 2 Years All other than Rental Use) Riding Lawn Tractors: Frame, Chassis, Front Axle 5 Years No Warranty Engine* * * Transmission (if made by Husqvarna/Peerless) 3 Years No Warranty Transmission (if third party)** ** ** XLS Models only...


