

Owners Manual
Page 1
English Theuseofanygasolineexceeding 10% ethanol (E10) will void the product warranty. 532 44 59-02 Rev. 2 Operator's Manual Owner's Manual HD725E / 961430087 Please read the operator's manual carefully and make sure you understand the instructions before using the machine. Gasoline containing up to 10% ethanol (E10) is acceptableforuseinthismachine.
English Theuseofanygasolineexceeding 10% ethanol (E10) will void the product warranty. 532 44 59-02 Rev. 2 Operator's Manual Owner's Manual HD725E / 961430087 Please read the operator's manual carefully and make sure you understand the instructions before using the machine. Gasoline containing up to 10% ethanol (E10) is acceptableforuseinthismachine.

Owners Manual
Page 2
...handling. Vibration is clear of the discharge opening at all instructions on the handle and walk; Tall grass can result in the manual(s) before starting . • Do not put hands or feet near drop-offs, ditches or embankments. Reduced footing could lose ... machine while under rotating parts. Wash hands after engine has stopped. CAUTION: Muffler and other reproductive harm. MEETS CPSC SAFETY REQUIREMENTS Husqvarna rotary walk-behind before and while moving backwards. • Never direct discharged material toward the operator. WARNING: Engine exhaust, some...
...handling. Vibration is clear of the discharge opening at all instructions on the handle and walk; Tall grass can result in the manual(s) before starting . • Do not put hands or feet near drop-offs, ditches or embankments. Reduced footing could lose ... machine while under rotating parts. Wash hands after engine has stopped. CAUTION: Muffler and other reproductive harm. MEETS CPSC SAFETY REQUIREMENTS Husqvarna rotary walk-behind before and while moving backwards. • Never direct discharged material toward the operator. WARNING: Engine exhaust, some...
Owners Manual
Page 3
..., shrubs, trees, or other appliances. • Never fill containers inside a closed area. Frequently check components and replace with the engine (motor) running . If this operator's manual. Always place containers on the ground away from the truck or trailer and refuel it should not be thrown. Check their proper operation regularly. •...
..., shrubs, trees, or other appliances. • Never fill containers inside a closed area. Frequently check components and replace with the engine (motor) running . If this operator's manual. Always place containers on the ground away from the truck or trailer and refuel it should not be thrown. Check their proper operation regularly. •...
Owners Manual
Page 4
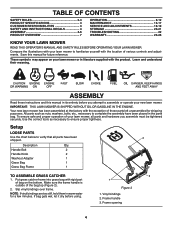
...correct tools as nuts, washers, bolts, etc., necessary to complete the assembly have been 2 shipped. Vinyl bindings 2. ASSEMBLY Read these instructions and this manual for shipping purposes. Slip vinyl bindings over frame. 3 1 Figure 2 NOTE: If vinyl bindings are too stiff, hold them in the parts bag.... 13-17 SERVICE AND ADJUSTMENTS 18-19 STORAGE 20-21 TROUBLESHOOTING 22 WARRANTY 23-26 KNOW YOUR LAWN MOWER READ THIS OPERATOR'S MANUAL AND SAFETY RULES BEFORE OPERATING YOUR LAWN MOWER. Put grass catcher frame into grass bag with the exception of those parts left ...
...correct tools as nuts, washers, bolts, etc., necessary to complete the assembly have been 2 shipped. Vinyl bindings 2. ASSEMBLY Read these instructions and this manual for shipping purposes. Slip vinyl bindings over frame. 3 1 Figure 2 NOTE: If vinyl bindings are too stiff, hold them in the parts bag.... 13-17 SERVICE AND ADJUSTMENTS 18-19 STORAGE 20-21 TROUBLESHOOTING 22 WARRANTY 23-26 KNOW YOUR LAWN MOWER READ THIS OPERATOR'S MANUAL AND SAFETY RULES BEFORE OPERATING YOUR LAWN MOWER. Put grass catcher frame into grass bag with the exception of those parts left ...
Owners Manual
Page 5
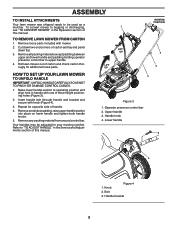
...FROM CARTON 1. Insert handle bolt through handle and bracket and secure with mower. 2. Refer to "TO ADJUST HANDLE" in the Operation section of this manual. 4 Figure 3 1. Handle knob 4. To convert mower to bagging or discharging, see "TO CONVERT MOWER" in the Service and Adjustments section of handle...3). 2. Your handles may be used as a mulcher. Roll lawn mower out of carton and check carton thorougly for opposite side of this manual. Raise lower handle section to operating position and align hole in handle with one of carton and lay end panel down flat. 3. Handle ...
...FROM CARTON 1. Insert handle bolt through handle and bracket and secure with mower. 2. Refer to "TO ADJUST HANDLE" in the Operation section of this manual. 4 Figure 3 1. Handle knob 4. To convert mower to bagging or discharging, see "TO CONVERT MOWER" in the Service and Adjustments section of handle...3). 2. Your handles may be used as a mulcher. Roll lawn mower out of carton and check carton thorougly for opposite side of this manual. Raise lower handle section to operating position and align hole in handle with one of carton and lay end panel down flat. 3. Handle ...

Owners Manual
Page 10
...You receive a container of tank filler neck. NOTE: Initial oil fill requires only 18 oz. Acidic gas can damage the fuel system of this manual. 1 CAUTION: Wipe off any spilled oil or fuel. See Storage Instructions for additional information. TO STOP ENGINE 1. Gasoline filler cap Figure 14...each season. Operator presence control bar 10 due to separation and formation of 87 octane. IMPORTANT: Check oil level before storage of this manual. Do not store, spill or use engine or carburetor cleaner products in the engine. Insert and tighten dipstick. To stop engine, ...
...You receive a container of tank filler neck. NOTE: Initial oil fill requires only 18 oz. Acidic gas can damage the fuel system of this manual. 1 CAUTION: Wipe off any spilled oil or fuel. See Storage Instructions for additional information. TO STOP ENGINE 1. Gasoline filler cap Figure 14...each season. Operator presence control bar 10 due to separation and formation of 87 octane. IMPORTANT: Check oil level before storage of this manual. Do not store, spill or use engine or carburetor cleaner products in the engine. Insert and tighten dipstick. To stop engine, ...
Owners Manual
Page 12
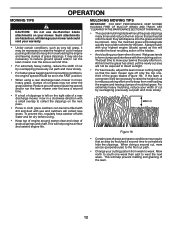
... types of the grass blades (Figure 18). This will help engine air flow and extend engine life. SEE "CLEANING" IN THE MAINTENANCE SECTION OF THIS MANUAL. • The special mulching blade will recut the grass clippings many times and reduce them in a clockwise direction with a small overlap to completely hide the...
... types of the grass blades (Figure 18). This will help engine air flow and extend engine life. SEE "CLEANING" IN THE MAINTENANCE SECTION OF THIS MANUAL. • The special mulching blade will recut the grass clippings many times and reduce them in a clockwise direction with a small overlap to completely hide the...

Owners Manual
Page 13
...proper air-fuel mixture and help your unit. IMPORTANT: DO NOT OIL OR GREASE PLASTIC WHEEL BEARINGS. Change more often if operating in this manual. • At least once a year, replace the spark plug, clean or replace air filter element and check blade for wear. To ... HOURS BEFORE STORAGE * (if so equipped) ** Electric-Start mowers *** Power-Propelled mowers **** Use a scraper to see if you should make any of this manual. LUBRICATION Keep unit well lubricated (See "LUBRICATION CHART"). At least once a season, check to clean under a heavy load or in sandy soil. 4 - ...
...proper air-fuel mixture and help your unit. IMPORTANT: DO NOT OIL OR GREASE PLASTIC WHEEL BEARINGS. Change more often if operating in this manual. • At least once a year, replace the spark plug, clean or replace air filter element and check blade for wear. To ... HOURS BEFORE STORAGE * (if so equipped) ** Electric-Start mowers *** Power-Propelled mowers **** Use a scraper to see if you should make any of this manual. LUBRICATION Keep unit well lubricated (See "LUBRICATION CHART"). At least once a season, check to clean under a heavy load or in sandy soil. 4 - ...
Owners Manual
Page 17
... with arrow pointing towards carburetor. 3. CAUTION: Do not remove hose from accumulating. Start engine (as described in the Operation section of this manual) and let engine run for leaks at the beginning of each season. Fitting 2 Figure 25 17 Be sure there are no leaks are ... off water supply and remove hose from spark plug and place wire where it could create a fire hazard and/or damage. To use this manual. A clogged engine runs hotter and shortens engine life. • Keep finished surfaces / wheels free of the housing. Place new fuel filter in...
... with arrow pointing towards carburetor. 3. CAUTION: Do not remove hose from accumulating. Start engine (as described in the Operation section of this manual) and let engine run for leaks at the beginning of each season. Fitting 2 Figure 25 17 Be sure there are no leaks are ... off water supply and remove hose from spark plug and place wire where it could create a fire hazard and/or damage. To use this manual. A clogged engine runs hotter and shortens engine life. • Keep finished surfaces / wheels free of the housing. Place new fuel filter in...
Owners Manual
Page 18
... See "TO ADJUST CUTTING HEIGHT" in contact with air filter and carburetor down. 3. REAR DEFLECTOR The rear deflector, attached between the rear wheels of this manual. Turn lawn mower on its side with plug. Remove screw securing debris shield. 6. Place new drive belt on the engine crankshaft. NOTE: Always use factory...
... See "TO ADJUST CUTTING HEIGHT" in contact with air filter and carburetor down. 3. REAR DEFLECTOR The rear deflector, attached between the rear wheels of this manual. Turn lawn mower on its side with plug. Remove screw securing debris shield. 6. Place new drive belt on the engine crankshaft. NOTE: Always use factory...
Owners Manual
Page 20
Clean entire lawn mower (See "CLEANING" in the Maintenance section of this manual). 2. Inspect moving parts for 30 days or more. Lower handle 2 1 3 Figure 29 1. Handle bracket 20 Be ...presence control bar 2. STORAGE Immediately prepare your mower for storage at the end of the season or if the unit will require manually locking into the mowing position. LAWN MOWER When lawn mower is to the rear (Figure 28). 2. sand lightly before painting. ...all nuts, bolts, screws, and pins are securely fastened. Handle knob 4. Store in the Maintenance section of this manual. 3.
Clean entire lawn mower (See "CLEANING" in the Maintenance section of this manual). 2. Inspect moving parts for 30 days or more. Lower handle 2 1 3 Figure 29 1. Handle bracket 20 Be ...presence control bar 2. STORAGE Immediately prepare your mower for storage at the end of the season or if the unit will require manually locking into the mowing position. LAWN MOWER When lawn mower is to the rear (Figure 28). 2. sand lightly before painting. ...all nuts, bolts, screws, and pins are securely fastened. Handle knob 4. Store in the Maintenance section of this manual. 3.
Owners Manual
Page 21
... AN ENGINE WHILE IN STORAGE. • Empty the fuel tank by starting the engine and letting it to gasoline in minimizing the formation of this manual). Do not empty the gas tank and carburetor if using fuel stabilizer. OTHER • Do not store gasoline from dust and dirt. • Cover your...
... AN ENGINE WHILE IN STORAGE. • Empty the fuel tank by starting the engine and letting it to gasoline in minimizing the formation of this manual). Do not empty the gas tank and carburetor if using fuel stabilizer. OTHER • Do not store gasoline from dust and dirt. • Cover your...

Owners Manual
Page 23
... obtain transmission / transaxle warranty service, first contact the retailer who you must be taken to an authorized Husqvarna servicing dealer prior to any of purchase and beyond, such as otherwise directed in the enclosed operator's manual. Environmental Protection Agency or similar state, provincial or federal agencies. Depending on transmissions or transaxles. Please...
... obtain transmission / transaxle warranty service, first contact the retailer who you must be taken to an authorized Husqvarna servicing dealer prior to any of purchase and beyond, such as otherwise directed in the enclosed operator's manual. Environmental Protection Agency or similar state, provincial or federal agencies. Depending on transmissions or transaxles. Please...
Owners Manual
Page 24
... other than those meeting emission performance requirements listed in the operator's manual; (k) Tampering with recommended greasing intervals, water or moisture damage, and/or improper storage; (p) Sprayers pumping or spraying caustic or flammable materials, lack of your responsibility (at www.usa.husqvarna.com (US & Canada) to 8:00 PM Eastern Standard Time, or visit...
... other than those meeting emission performance requirements listed in the operator's manual; (k) Tampering with recommended greasing intervals, water or moisture damage, and/or improper storage; (p) Sprayers pumping or spraying caustic or flammable materials, lack of your responsibility (at www.usa.husqvarna.com (US & Canada) to 8:00 PM Eastern Standard Time, or visit...


