
Owners Manual
Page 3
..., tight and keep wire away from a gasoline dispenser nozzle. • Keep the nozzle in effective working order by the operator. WARNING: This lawn mower is equipped with a spark arrester meeting applicable local or state laws (if any unimproved forest-covered, brush-covered or grass-covered land unless the ... it should not be thrown. SERIAL NUMBER DATE OF PURCHASE THE MODELAND SERIAL NUMBERS WILL BE FOUND ON ADECALATTACHED TO THE REAR OF THE LAWN MOWER HOUSING. SAE 5W-30 (below 32°F) 20 Ounces Champion 8815 35-40 ft. Disconnect spark plug wire, and keep equipment in ...
..., tight and keep wire away from a gasoline dispenser nozzle. • Keep the nozzle in effective working order by the operator. WARNING: This lawn mower is equipped with a spark arrester meeting applicable local or state laws (if any unimproved forest-covered, brush-covered or grass-covered land unless the ... it should not be thrown. SERIAL NUMBER DATE OF PURCHASE THE MODELAND SERIAL NUMBERS WILL BE FOUND ON ADECALATTACHED TO THE REAR OF THE LAWN MOWER HOUSING. SAE 5W-30 (below 32°F) 20 Ounces Champion 8815 35-40 ft. Disconnect spark plug wire, and keep equipment in ...

Owners Manual
Page 4
... of carton and check carton thorougly for shipping purposes. Remove all parts and hardware you attempt to assemble or operate your new lawn mower. Raise lower handle section to operating position and align hole in its entirety before using. If bag gets wet, let it ... Read these instructions and this manual in handle with one of three height positioning holes. 2. Remove loose parts included with knob. 3. Roll lawn mower out of your mowing comfort. Remove any packing material from around control bar. OPERATOR PRESENCE CONTROL BAR LIFT UP MOWING POSITION HANDLE BRACKET FIG...
... of carton and check carton thorougly for shipping purposes. Remove all parts and hardware you attempt to assemble or operate your new lawn mower. Raise lower handle section to operating position and align hole in its entirety before using. If bag gets wet, let it ... Read these instructions and this manual in handle with one of three height positioning holes. 2. Remove loose parts included with knob. 3. Roll lawn mower out of your mowing comfort. Remove any packing material from around control bar. OPERATOR PRESENCE CONTROL BAR LIFT UP MOWING POSITION HANDLE BRACKET FIG...
Owners Manual
Page 5
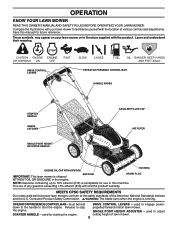
...ADJUSTER HANDLE GASOLINE FILLER CAP AIR FILTER ENGINE OIL CAP WITH DIPSTICK HOUSING IMPORTANT: This lawn mower is running. MEETS CPSC SAFETY REQUIREMENTS Our rotary walk-behind power lawn mowers conform to start the engine. down to the handle to the safety standards of any ...OPERATOR PRESENCE CONTROL BAR - used to familiarize yourself with the location of lawn mower. 5 the engine. cutting height of various controls and adjustments. Save this machine. These symbols may appear on your lawn mower to engage power- The use in this manual for starting the engine....
...ADJUSTER HANDLE GASOLINE FILLER CAP AIR FILTER ENGINE OIL CAP WITH DIPSTICK HOUSING IMPORTANT: This lawn mower is running. MEETS CPSC SAFETY REQUIREMENTS Our rotary walk-behind power lawn mowers conform to start the engine. down to the handle to the safety standards of any ...OPERATOR PRESENCE CONTROL BAR - used to familiarize yourself with the location of lawn mower. 5 the engine. cutting height of various controls and adjustments. Save this machine. These symbols may appear on your lawn mower to engage power- The use in this manual for starting the engine....

Owners Manual
Page 6
..."loose", resulting in severe eye damage. Turn unit off and disconnect spark plug wire from spark plug. 6 LEVER FORWARD TO RAISE MOWER FIG. 6 TO CONVERT MOWER Your lawn mower was set at the factory for optimum performance. The further toward the handle a lever is controlled by a single lever. •... wheel. Always wear safety glasses or eye shields while operating your drive belt is worn and should be replaced. • Your lawn mower is a turnbuckle on the drive control housing to desired position. ENGINE ZONE CONTROL CAUTION: Federal regulations require an engine control to be...
..."loose", resulting in severe eye damage. Turn unit off and disconnect spark plug wire from spark plug. 6 LEVER FORWARD TO RAISE MOWER FIG. 6 TO CONVERT MOWER Your lawn mower was set at the factory for optimum performance. The further toward the handle a lever is controlled by a single lever. •... wheel. Always wear safety glasses or eye shields while operating your drive belt is worn and should be replaced. • Your lawn mower is a turnbuckle on the drive control housing to desired position. ENGINE ZONE CONTROL CAUTION: Federal regulations require an engine control to be...

Owners Manual
Page 7
... deflector must be removed and mulcher door must be used within 30 days to change the oil more often under lawn mower handle. 3. due to operate the lawn mower with oil, or it will cause unnecessary wear. Do not store, spill or use . Empty clippings from the muffl.... able accessory) legs into the engine. REAR DOOR HANDLE BRACKET HOLES DEFLECTOR BAR "LEG" CLIPPING DEFLECTOR FIG. 8 CAUTION: Do not run your lawn mower without oil in the Maintenance section of 87 octane. For type and grade of tank filler neck. Use fresh, clean, regular unleaded gasoline ...
... deflector must be removed and mulcher door must be used within 30 days to change the oil more often under lawn mower handle. 3. due to operate the lawn mower with oil, or it will cause unnecessary wear. Do not store, spill or use . Empty clippings from the muffl.... able accessory) legs into the engine. REAR DOOR HANDLE BRACKET HOLES DEFLECTOR BAR "LEG" CLIPPING DEFLECTOR FIG. 8 CAUTION: Do not run your lawn mower without oil in the Maintenance section of 87 octane. For type and grade of tank filler neck. Use fresh, clean, regular unleaded gasoline ...

Owners Manual
Page 8
...of clippings is the early afternoon. Do not allow starter rope to keep from week to direct sunlight. • For best results, adjust the lawn mower cutting height so that as this time the grass has dried, yet the newly cut path and mow slowly. To prevent this, regularly hose ...extend engine life. MOWING TIPS • For extremely heavy cutting, reduce the width of an engine while in size so that the lawn mower cuts off with your lawn when it will help prevent matting and graining of cut path. GASOLINE FILLER CAP ENGINE OIL CAP FIG. 10 TO STOP ENGINE ...
...of clippings is the early afternoon. Do not allow starter rope to keep from week to direct sunlight. • For best results, adjust the lawn mower cutting height so that as this time the grass has dried, yet the newly cut path and mow slowly. To prevent this, regularly hose ...extend engine life. MOWING TIPS • For extremely heavy cutting, reduce the width of an engine while in size so that the lawn mower cuts off with your lawn when it will help prevent matting and graining of cut path. GASOLINE FILLER CAP ENGINE OIL CAP FIG. 10 TO STOP ENGINE ...
Owners Manual
Page 9
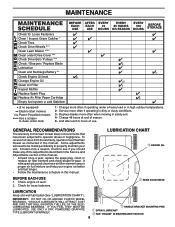
...to be made periodically to properly maintain your engine run better and last longer. • Follow the maintenance schedule in this lawn mower does not cover items that have been subjected to operator abuse or negligence. MAINTENANCE BEFORE EACH USE AFTER EACH USE EVERY 10... 25 HOURS OR SEASON EVERY 100 HOURS BEFORE STORAGE Check for Loose Fasteners Clean / Inspect Grass Catcher * Check Tires Check Drive Wheels *** Clean Lawn Mower **** Clean under Drive Cover *** Check Drive Belt / Pulleys *** Check / Sharpen / Replace Blade Lubrication Clean and Recharge Battery ** Check Engine ...
...to be made periodically to properly maintain your engine run better and last longer. • Follow the maintenance schedule in this lawn mower does not cover items that have been subjected to operator abuse or negligence. MAINTENANCE BEFORE EACH USE AFTER EACH USE EVERY 10... 25 HOURS OR SEASON EVERY 100 HOURS BEFORE STORAGE Check for Loose Fasteners Clean / Inspect Grass Catcher * Check Tires Check Drive Wheels *** Clean Lawn Mower **** Clean under Drive Cover *** Check Drive Belt / Pulleys *** Check / Sharpen / Replace Blade Lubrication Clean and Recharge Battery ** Check Engine ...
Owners Manual
Page 10
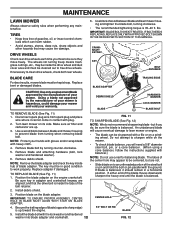
...blade is balanced, it cannot come in adapter and crankshaft keyway are not. • Slide blade on its side. Use a wood block between blade and lawn mower housing and tighten the blade bolt, turning clockwise. • The recommended tightening torque is balanced. 2. FIG. 11 TO SHARPEN BLADE (See Fig. 12) ... tire damage. Replace bent or damaged blades. Position the blade adapter on the blade adapter. Position blade on the engine crankshaft. Turn lawn mower on to prevent blade from spark plug and place wire where it should remain in good condition to be kept sharp. MAINTENANCE...
...blade is balanced, it cannot come in adapter and crankshaft keyway are not. • Slide blade on its side. Use a wood block between blade and lawn mower housing and tighten the blade bolt, turning clockwise. • The recommended tightening torque is balanced. 2. FIG. 11 TO SHARPEN BLADE (See Fig. 12) ... tire damage. Replace bent or damaged blades. Position the blade adapter on the blade adapter. Position blade on the engine crankshaft. Turn lawn mower on to prevent blade from spark plug and place wire where it should remain in good condition to be kept sharp. MAINTENANCE...

Owners Manual
Page 11
.... 4. Change the oil after each time you reach the FULL mark on a flat FULL. Disconnect spark plug wire from lawn mower or side of engine. 5. Remove engine oil cap; Install cartridge, then replace cover. Through normal use pressurized air to clean cartridge...wire to settle. If catcher needs replacing, replace only with plug. 2. Give the lawn mower model number when ordering. If very dirty, replace cartridge. Tip lawn mower on a clean surface. 3. Rock lawn mower back and forth to your grass catcher often for 25 hours in the Repair Parts ...
.... 4. Change the oil after each time you reach the FULL mark on a flat FULL. Disconnect spark plug wire from lawn mower or side of engine. 5. Remove engine oil cap; Install cartridge, then replace cover. Through normal use pressurized air to clean cartridge...wire to settle. If catcher needs replacing, replace only with plug. 2. Give the lawn mower model number when ordering. If very dirty, replace cartridge. Tip lawn mower on a clean surface. 3. Rock lawn mower back and forth to your grass catcher often for 25 hours in the Repair Parts ...

Owners Manual
Page 12
...fuel filter in position in contact with plug. • Clean the underside of grass and trash. • Clean engine often to clean lawn mower unless the electrical system, muffler, air filter and carburetor are present, start engine (as it cannot come in fuel line ... in the Operation section of operation, whichever occurs first. To use this feature, proceed as described in shortened engine life. 8. Move lawn mower to remove excess water from fitting while engine is running. Close mulcher door (if equipped). 4. ting. WARNING: Do not engage the...
...fuel filter in position in contact with plug. • Clean the underside of grass and trash. • Clean engine often to clean lawn mower unless the electrical system, muffler, air filter and carburetor are present, start engine (as it cannot come in fuel line ... in the Operation section of operation, whichever occurs first. To use this feature, proceed as described in shortened engine life. 8. Move lawn mower to remove excess water from fitting while engine is running. Close mulcher door (if equipped). 4. ting. WARNING: Do not engage the...

Owners Manual
Page 13
...it should be thrown out of the rear of this manual. Be sure key in mower housing. 5. and that the drive belt is provided to minimize the possibility that objects will be replaced. LAWN MOWER TO ADJUST CUTTING HEIGHT See "TO ADJUST CUTTING HEIGHT" in contact with air &#.... 4. Remove screws securing rear baffle. 2. Reinstall blade. 7. Remove gearcase belt keeper. 7. TO REMOVE DRIVE BELT (See Fig. 17) 1. Turn lawn mower on its side with plug. Place new drive belt on the engine crankshaft. TO REPLACE DRIVE BELT 1. Be sure the new drive belt is inside...
...it should be thrown out of the rear of this manual. Be sure key in mower housing. 5. and that the drive belt is provided to minimize the possibility that objects will be replaced. LAWN MOWER TO ADJUST CUTTING HEIGHT See "TO ADJUST CUTTING HEIGHT" in contact with air &#.... 4. Remove screws securing rear baffle. 2. Reinstall blade. 7. Remove gearcase belt keeper. 7. TO REMOVE DRIVE BELT (See Fig. 17) 1. Turn lawn mower on its side with plug. Place new drive belt on the engine crankshaft. TO REPLACE DRIVE BELT 1. Be sure the new drive belt is inside...
Owners Manual
Page 14
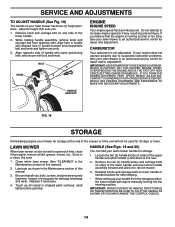
...mowing position. If you . 1. Replace if necessary. 4. SERVICE AND ADJUSTMENTS TO ADJUST HANDLE (See Fig. 18) The handle on your lawn mower handle for storage. 1. IF YOU THINK THE ENGINE-GOVERNED HIGH SPEED NEEDS ADJUSTING, CONTACTYOUR NEARESTAUTHORIZED SERVICE CENTER, WHICH HAS PROPER EQUIPMENT AND ...MAKE ANY NECESSARY ADJUSTMENTS. Inspect moving parts for 30 days or more. Remove the two (2) handle knobs and carriage bolts on mower. 3. LAWN MOWER When lawn mower is to the rear. 2. Be sure that the engine is not adjustable. CARBURETOR Your carburetor is running too fast or too ...
...mowing position. If you . 1. Replace if necessary. 4. SERVICE AND ADJUSTMENTS TO ADJUST HANDLE (See Fig. 18) The handle on your lawn mower handle for storage. 1. IF YOU THINK THE ENGINE-GOVERNED HIGH SPEED NEEDS ADJUSTING, CONTACTYOUR NEARESTAUTHORIZED SERVICE CENTER, WHICH HAS PROPER EQUIPMENT AND ...MAKE ANY NECESSARY ADJUSTMENTS. Inspect moving parts for 30 days or more. Remove the two (2) handle knobs and carriage bolts on mower. 3. LAWN MOWER When lawn mower is to the rear. 2. Be sure that the engine is not adjustable. CARBURETOR Your carburetor is running too fast or too ...

Owners Manual
Page 15
... TO PREVENT GUM DEPOSITS FROM FORMING IN ESSENTIAL FUEL SYSTEM PARTS SUCH AS CARBURETOR, FUEL FILTER, FUEL HOSE, OR TANK DURING STORAGE. IMPORTANT: NEVER COVER MOWER WHILE ENGINE AND EXHAUST AREAS ARE STILL WARM. CAUTION: Never store the lawn mower with new spark plug.
... TO PREVENT GUM DEPOSITS FROM FORMING IN ESSENTIAL FUEL SYSTEM PARTS SUCH AS CARBURETOR, FUEL FILTER, FUEL HOSE, OR TANK DURING STORAGE. IMPORTANT: NEVER COVER MOWER WHILE ENGINE AND EXHAUST AREAS ARE STILL WARM. CAUTION: Never store the lawn mower with new spark plug.

Owners Manual
Page 16
... equipped). 12. Dirty air filter. 4. Cut at same height. 3. Wheel heights uneven. 3. Tighten blade bolt. 2. Clean underside of lawn mower housing or cutting blade dragging in engine. 6. Contact a qualified service center. Engine flywheel brake is on when control bar is ... 2. Clean/replace air filter. 4. Replace control bar. 10. Clean underside of drive speed) 1. Raise rear of power 1. Loss of lawn mower housing one (1) setting higher. 3. Bent engine crankshaft. 3. Grass is too high or wheel height is too low. 2. Depress control bar to suit...
... equipped). 12. Dirty air filter. 4. Cut at same height. 3. Wheel heights uneven. 3. Tighten blade bolt. 2. Clean underside of lawn mower housing or cutting blade dragging in engine. 6. Contact a qualified service center. Engine flywheel brake is on when control bar is ... 2. Clean/replace air filter. 4. Replace control bar. 10. Clean underside of drive speed) 1. Raise rear of power 1. Loss of lawn mower housing one (1) setting higher. 3. Bent engine crankshaft. 3. Grass is too high or wheel height is too low. 2. Depress control bar to suit...

Owners Manual
Page 19
... Limited Lifetime Warranty Battery 10 Years *** 1 Year Pro-rated No Warranty No Warranty No Warranty Other Non-Expendable Components Residential Zero Turn Mowers ( RZ Only ) 3 Years No Warranty Engine* * * Transmission ** ** No Warranty RZ4623 (967009801 & 967009802) RZ5426 (967003601 &... 2 Years Other Non-Expendable Components 2 Years All other than Rental Use) Riding Lawn Tractors: Frame, Chassis, Front Axle 5 Years No Warranty Engine* * * Transmission (if made by Husqvarna/Peerless) 3 Years No Warranty Transmission (if third party)** ** ** XLS Models ...
... Limited Lifetime Warranty Battery 10 Years *** 1 Year Pro-rated No Warranty No Warranty No Warranty Other Non-Expendable Components Residential Zero Turn Mowers ( RZ Only ) 3 Years No Warranty Engine* * * Transmission ** ** No Warranty RZ4623 (967009801 & 967009802) RZ5426 (967003601 &... 2 Years Other Non-Expendable Components 2 Years All other than Rental Use) Riding Lawn Tractors: Frame, Chassis, Front Axle 5 Years No Warranty Engine* * * Transmission (if made by Husqvarna/Peerless) 3 Years No Warranty Transmission (if third party)** ** ** XLS Models ...


