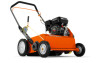
Owners Manual
Page 3
... Application Chart 18 Seed Application Recommendations.........18 Bagger Attachment and Removal 18 Before Starting 19 Starting 19 Finishing 19 Maintenance 20 Maintenance Schedule 20 Drive Belt 21 Flail blades 22 Delta Blades 24 Spring tines 24 Two Minute Rule 25 Cleaning and Washing 25 Lubrication Schedule 26 Blades 27 Handle 27...
... Application Chart 18 Seed Application Recommendations.........18 Bagger Attachment and Removal 18 Before Starting 19 Starting 19 Finishing 19 Maintenance 20 Maintenance Schedule 20 Drive Belt 21 Flail blades 22 Delta Blades 24 Spring tines 24 Two Minute Rule 25 Cleaning and Washing 25 Lubrication Schedule 26 Blades 27 Handle 27...
Owners Manual
Page 11
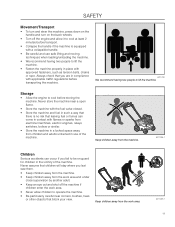
... use of the machine. Keep children away from the machine. 8011-038-1 Children Serious accidents can come in contact with approved fasteners, such as tension belts, chains or rope. Storage • Allow the engine to lift the machine. SAFETY Movement/Transport • To turn and steer the machine, press down on...
... use of the machine. Keep children away from the machine. 8011-038-1 Children Serious accidents can come in contact with approved fasteners, such as tension belts, chains or rope. Storage • Allow the engine to lift the machine. SAFETY Movement/Transport • To turn and steer the machine, press down on...
Owners Manual
Page 14
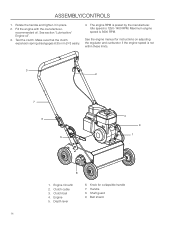
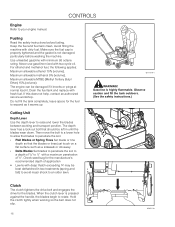
... is 1250-1400 RPM. Engine Oil refill 2. Knob for instructions on adjusting the regulator and carburetor if the engine speed is preset by the manufacturer. Belt shield 14 Make sure that the clutch expansion spring disengages 6.35 mm (¼") easily. 4. Depth lever 6. Test the clutch. The engine RPM is not within...
... is 1250-1400 RPM. Engine Oil refill 2. Knob for instructions on adjusting the regulator and carburetor if the engine speed is preset by the manufacturer. Belt shield 14 Make sure that the clutch expansion spring disengages 6.35 mm (¼") easily. 4. Depth lever 6. Test the clutch. The engine RPM is not within...
Owners Manual
Page 16
... just touch on a flat surface such as it . Observe caution and fill the tank outdoors. (See the safety instructions.) Clutch The clutch tightens the drive belt and engages the drive for the manufacture's recommended depth of application • Lawns with a maximum penetration of 1/8" to ¼" with deep thatch exceeding ¾" may.... The engine can be left in two treatments (spring and fall) to avoid major shock to raise and lower the blades between working so the belt does not slip. 16 8060-016 CONTROLS Engine Refer to rotate.
... just touch on a flat surface such as it . Observe caution and fill the tank outdoors. (See the safety instructions.) Clutch The clutch tightens the drive belt and engages the drive for the manufacture's recommended depth of application • Lawns with a maximum penetration of 1/8" to ¼" with deep thatch exceeding ¾" may.... The engine can be left in two treatments (spring and fall) to avoid major shock to raise and lower the blades between working so the belt does not slip. 16 8060-016 CONTROLS Engine Refer to rotate.
Owners Manual
Page 20
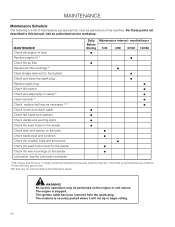
... clutch cable Check flail blade lock washers Check decals and warning signs Check the seed holes for the seeder Check wear and tension on the belts Check blade wear and condition Check the chassis, bolts and set screws Check the seed control lever for the seeder Check the wire mountings on...
... clutch cable Check flail blade lock washers Check decals and warning signs Check the seed holes for the seeder Check wear and tension on the belts Check blade wear and condition Check the chassis, bolts and set screws Check the seed control lever for the seeder Check the wire mountings on...
Owners Manual
Page 21
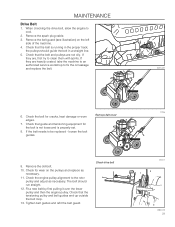
... on the pulleys and replace as necessary. Check that guide and tensioning equipment for the belt is not loose and is running in a straight line. 5. Remove the old belt. 10. Fit a new belt by first pulling it over the lower pulley and then the engine pulley. the pulleys ...11. If the belt needs to cool. 2. Remove belt cover 9. Tighten belt guides and refit the belt guard. Check the belt for wear on the left side of the machine. 4. Check that the belt and pulleys are not oily. The belt should guide the belt in the proper track; Check drive belt DT06 DT07-1 8060...
... on the pulleys and replace as necessary. Check that guide and tensioning equipment for the belt is not loose and is running in a straight line. 5. Remove the old belt. 10. Fit a new belt by first pulling it over the lower pulley and then the engine pulley. the pulleys ...11. If the belt needs to cool. 2. Remove belt cover 9. Tighten belt guides and refit the belt guard. Check the belt for wear on the left side of the machine. 4. Check that the belt and pulleys are not oily. The belt should guide the belt in the proper track; Check drive belt DT06 DT07-1 8060...
Owners Manual
Page 22
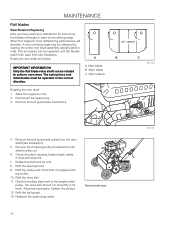
... to achieve even wear. Check the shaft, bearing, blade length, blade e-rings and spacers. 7. Refit the drive belt. 11. Refit the belt guard. 13. Remove the belt guard (see illustration. Rotate the shaft end for some time, the blades will diminish. Rotate the rotor shaft as ...). 3.5" / 89mm B C 8011-006 4. MAINTENANCE Flail blades Wear/Rotation/Replacing After you have used your dethatcher for end. 8. Remove the belt guard and pulley from the rotor shaft (see illustration). 5. A new combing edge may be operated in its track. Worn blade C. New blade...
... to achieve even wear. Check the shaft, bearing, blade length, blade e-rings and spacers. 7. Refit the drive belt. 11. Refit the belt guard. 13. Remove the belt guard (see illustration. Rotate the shaft end for some time, the blades will diminish. Rotate the rotor shaft as ...). 3.5" / 89mm B C 8011-006 4. MAINTENANCE Flail blades Wear/Rotation/Replacing After you have used your dethatcher for end. 8. Remove the belt guard and pulley from the rotor shaft (see illustration). 5. A new combing edge may be operated in its track. Worn blade C. New blade...
Owners Manual
Page 26
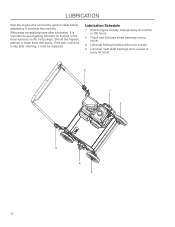
.... Lubricate main shaft bearings once a week or every 40 hours. 3 1 2 3 4 2 26 Lubricate folding handle points once a week. 4. If the belt continues to clean them with spirits. Wipe away excessive grease after cleaning, it must be replaced. It is important to lubricate the machine. Lubrication Schedule 1. ...
.... Lubricate main shaft bearings once a week or every 40 hours. 3 1 2 3 4 2 26 Lubricate folding handle points once a week. 4. If the belt continues to clean them with spirits. Wipe away excessive grease after cleaning, it must be replaced. It is important to lubricate the machine. Lubrication Schedule 1. ...
Owners Manual
Page 30
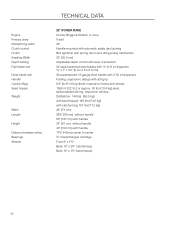
... Seed hopper Weight Width Length Height Distance between axles Bearings Wheels TECHNICAL DATA 22" POWER RAKE Honda, Briggs & Stratton or none V-belt 22" Handle-mounted with automatic safety declutching Belt tightener with spring return and idling pulley mechanism 22" (55.8 cm) Adjustable depth control with lever mechanism 32 case-hardened steel blades...
... Seed hopper Weight Width Length Height Distance between axles Bearings Wheels TECHNICAL DATA 22" POWER RAKE Honda, Briggs & Stratton or none V-belt 22" Handle-mounted with automatic safety declutching Belt tightener with spring return and idling pulley mechanism 22" (55.8 cm) Adjustable depth control with lever mechanism 32 case-hardened steel blades...
Owners Manual
Page 31
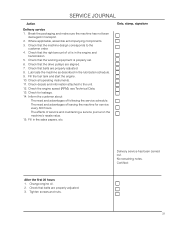
... components. 3. Fill the fuel tank and start the engine. 10. Check for service every 300 hours. The effects of following the service schedule. Check that belts are properly adjusted. 8. Change engine oil. 2. Certified: 31 Check the engine speed (RPM), see Technical Data. 13. Date, stamp, signature After the first 20 hours... order. 4. Lubricate the machine as described in transport. 2. Fill in the engine and transmission. 5. Tighten screws and nuts. Check all operating instruments. 11. Check that belts are properly adjusted. 3.
... components. 3. Fill the fuel tank and start the engine. 10. Check for service every 300 hours. The effects of following the service schedule. Check that belts are properly adjusted. 8. Change engine oil. 2. Certified: 31 Check the engine speed (RPM), see Technical Data. 13. Date, stamp, signature After the first 20 hours... order. 4. Lubricate the machine as described in transport. 2. Fill in the engine and transmission. 5. Tighten screws and nuts. Check all operating instruments. 11. Check that belts are properly adjusted. 3.

Parts Guide
Page 5
... AXLE 19 .. 539100511 ...... 1 ...... HCS 3/8C X 1 1/2 23 .. 539106672 ..... 1 ...... FLAP ROD 24 .. 539990037 ..... 4 ...... BELT GUARD (CE) 30 .. 539106816 ..... 1 ...... WHEEL, 10 X 1 3/4 W/BUSHINGS 46 .. 539106663 ..... 1 ...... HCS 1/4C X 5/8 53........ 4 ...... WASHER, 1/2, FLAT 10 .. 539101332 ..... 2 ...... HCS 5/16C X 1 1/4 12 .. 539100488 ..... 2 ...... FLANGE BEARING 13 .. 539100439 ..... 1 ...... BELT 14 .. 539106805 ..... 1 ...... LINKAGE 15 .. 540075051 ..... 2 ...... WHEEL, 8 X 1 3/4 16 .. 539000342 ..... 1 ...... REAR FLAP 18 .. 539106759 ..... 1 .........
... AXLE 19 .. 539100511 ...... 1 ...... HCS 3/8C X 1 1/2 23 .. 539106672 ..... 1 ...... FLAP ROD 24 .. 539990037 ..... 4 ...... BELT GUARD (CE) 30 .. 539106816 ..... 1 ...... WHEEL, 10 X 1 3/4 W/BUSHINGS 46 .. 539106663 ..... 1 ...... HCS 1/4C X 5/8 53........ 4 ...... WASHER, 1/2, FLAT 10 .. 539101332 ..... 2 ...... HCS 5/16C X 1 1/4 12 .. 539100488 ..... 2 ...... FLANGE BEARING 13 .. 539100439 ..... 1 ...... BELT 14 .. 539106805 ..... 1 ...... LINKAGE 15 .. 540075051 ..... 2 ...... WHEEL, 8 X 1 3/4 16 .. 539000342 ..... 1 ...... REAR FLAP 18 .. 539106759 ..... 1 .........


